
Chocolate Mille-Feuille
Chocolate Mille-Feuille
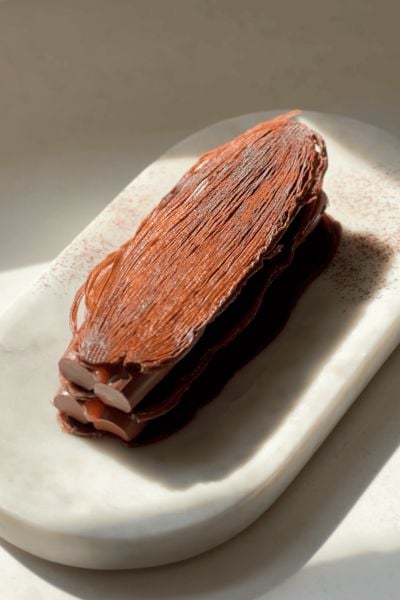
A mille-feuille is a classic French pastry, but here we are elevating it, using a cross-lamination technique which gives an even flakier final texture to the puff pastry!
The puff pastry is made with a little bit of cocoa powder, then laminated with butter, until 4 single folds have been completed. The pastry is then cut into thin strips, which, when baked, gives an organic shape with a flaky structure.
It is filled with a smooth chocolate orange cremeux and an orange gel. The final presentation is something worthy of a fancy restaurant!
A note on the quantities – the puff pastry will be more than you need, as we are cutting it so thin. The remaining puff pastry can be frozen. The cremeux and gel quantities are enough to make around 2 large Mille-Feuille (each about 6″ long – enough to feed 3-4 per Mille-Feuille), but can easily be scaled up if you need more!

Ingredients
Method
Into a small saucepan, add the butter and melt it over a low heat. Remove it from the heat once melted to cool slightly.
Meanwhile, add the vinegar (which helps to relax the gluten) and tepid water to a jug.
Into the bowl of a stand mixer, add the flour, cocoa powder and salt. Mix on a low speed with the paddle attachment
Pour the melted butter in and mix on low speed.

Pour the remaining liquid into the stand mixer and mix on a low speed just until it pulls together into a rough dough with no more dry bits.

Lift the dough out onto a work surface and briefly knead it with your hands - about 30 seconds.
On to a large piece of acetate or parchment paper, draw a 20x25cm rectangle (7.8x9.8").

Lift the dough into the centre and fold the edges up to form a neat rectangle (it can help to tape it together). Use a rolling pin to roll the dough to the edges of the rectangle and then chill the dough in the fridge for 3 hours or overnight.

Take a large sheet of acetate or parchment paper and draw a rectangular outline, 20x25cm (7.8x9.8"). Place the butter into the centre. Wrap the excess parchment/acetate around the butter, folding the edges in to match the guides (tape it together if needed).
Use a rolling pin to roll the butter, pushing it to the edges and creating an even layer of butter across the rectangle of parchment. Place this in the fridge to chill for at least an hour, or overnight.
Prepare the dark chocolate cremeux as per the recipe - if you are interested into adding a little bit of orange zest, add that into the cream when you are heating it. Pour the cremeux onto a tray, then chill this in the fridge for 3-4 hours.
Temperature is key when laminating - if your butter is too cold when you go to roll it, it will crack. If it is too warm, it will simply leak out. Remove your butter from the fridge - it is ready to use when it reaches a temperature of 12C/54F. At this temperature, you will see that the butter is slightly firm but flexible. You can test the temperature by placing a digital thermometer into the butter.
Just before it is at temperature, remove your puff pastry dough from the fridge. We need this to be at around 4C/40F. Very lightly flour the dough, and roll it so that it is double the length of the butter block. This should leave you with a dough measuring 40x25cm (15.7x9.8").

Place your butter into the centre of the dough so that the height of the dough and the butter match.

Fold the exposed sides of the dough into the centre so they meet in the middle.

Use your fingers to pinch the dough together to form a seam down the centre.
Using a sharp knife, carefully score the edges of the dough, where it is folded over the butter - this will release tension and make it easier to roll.
With this seam facing towards you, turn the dough 90 degrees so the seam is now horizontal to your body and give the dough a quick roll, to give it a little bit of width.
Turn the dough 90 degrees again so the seam is vertical in line with your body and begin to roll the dough. Working relatively quickly. Apply even pressure and roll the dough into a long, even rectangle, flouring very lightly if needed.

Don’t focus too much on the length of the rectangle, but more on getting it into an even rectangle that ends up roughly around 5mm thick (0.2”).
Once you are happy with the thickness and shape, dust off any excess flour with a brush, and if the ends of the dough have gone a bit wonky, cut them off so you have straight edges on either side.
Perform a single fold of the dough, where you take one-third of the dough and fold it up, then take the other third of dough and fold this over the top. This is called a ‘single fold or ‘single turn’.

Wrap the dough and chill it in the fridge for 15 minutes. Chill for longer if you're kitchen is particularly warm. If the dough feels cool enough, you can actually do two folds in one go, but you need to work quickly!
Repeat this rolling and folding technique, chilling it in between each fold, performing a total of four single folds. Once you have finished the final fold, chill the dough for 1 hour in the fridge.

This is great made with fresh blood orange juice - squeeze the fresh juice from an orange through a sieve, weigh the juice, then multiply that by 1% to get the weight of agar agar you need. For me, it was 140g of juice, so I needed 1.4g of agar agar.
Add the fresh juice and agar agar to a small saucepan and bring it to a boil. Remove it from the heat and pour it onto a tray, and refrigerate for an hour.
Pre-heat the oven to 175C/345F Non-Fan Assisted (lower the temp by 15C if using fan assisted oven).
Remove the chilled pastry and cut thin strips of dough, along the open seam side of the dough. The strips only need to be about 5-7mm (0.2-0.3") in width.

By cutting the dough this way, it was spread horizontally as it bakes, creating the flaky, thin texture we are looking for.

Lift the strips onto a lined baking tray, giving them enough space to spread. You will need a total of 3 strips per mille-feuille, so cut as many as you need, then the rest of the dough can be wrapped tightly and frozen.

Chill the strips of pastry on the tray in the fridge for 15 minutes, then place them into the oven and bake for 40-45 minutes. As it is a cocoa-based dough, it is a little tough to see when they are done, but they should be crispy to the touch. Keep an eye on them after about 30-35 minutes. Once baked, allow them to cool for 30 minutes.
Remove the chilled orange gel from the fridge and add it into a small blender or into a tall jug, and use a hand blender to blend until it is a smooth gel. Add the gel into a piping bag and set it to one side.
Remove the cremeux from the fridge - depending on the chocolate you used or how long you chilled it, it could still be slightly soft. If this is the case, just add it into a stand mixer and whisk on a medium speed until it thickens to a more pipeable consistency, but be careful not to overwhip it. If you do whip it, you will just lighten the texture slightly and end up with slightly more cremeux as it has been aerated.
If it is thick straight out of the fridge, simply scoop it straight into a piping bag fitted with a large round tip nozzle - no need to whisk it.

Take your serving plate, and place one strip of puff pastry down (you can glue it down with a little cremeux so it sticks!)
Pipe two long lines of cremeux on the pastry. Use a hot knife to trim the end of the cremeux once you get to the end of piping each line, to create a clean 'finish'.

Fill the centre with a line of orange gel.

Place a second layer of puff pastry on top and repeat the process.
Add a final layer of puff pastry, then dust lightly with cocoa powder and serve. This is best served as fresh as possible so that the puff pastry is crispy!

Can I use vege gel instead of agar agar
I’m afraid I’ve not tried this so couldn’t say
Amazing presanteion very valuable
I have a few questions about the chocolate mille-feuille:
1. How long can each element (puff pastry, chocolate crémeux, and orange gel) be stored in the fridge separately before assembling?
2. Can I prepare the puff pastry in advance, keep it uncooked in the fridge overnight, and then bake it fresh on the day of the party?
3. Once assembled, how long will the mille-feuille stay fresh and at its best in terms of texture and flavor?
I’m asking because I’d like to prepare the components the day before my party, then bake the pastry and assemble everything on the day itself.
Looking forward to your advice!
I would bake the puff pastry fresh, but the cremeux and gel can be stored for a few days no problem! Yes you can keep the puff pastry in the fridge unbaked well wrapped for a few days! It is really best to serve it within a few hours so the pastry doesn’t start to soften!
Amezing wow.