
Pistachio Burnt Basque Cheesecake
Pistachio Burnt Basque Cheesecake
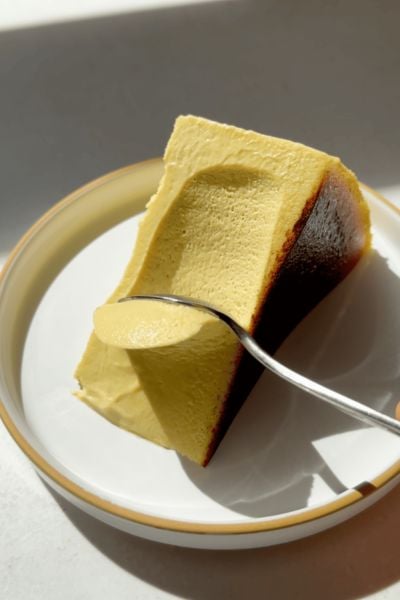
Pistachio Burnt Basque Cheesecake is a simple dessert to make that uses just a handful of ingredients, delivering an incredible pistachio flavor and an ultra-smooth texture.
We’re elevating this recipe by carefully lining the cake tin instead of simply scrunching in parchment paper. Soaking the tea towels helps create a more controlled, even bake, resulting in a neater, more professional cheesecake.
For this recipe, pure pistachio paste is best as it is over 98% pistachio compared to cheaper pistachio creams, which often only have around 20% pistachio! The pisatchio is the star of the show, so it is important to use the best quality paste you can buy.
This needs a long time to chill once baked, so make sure you make it the day before you need to serve.

Ingredients
Method
Start by prepping your cake tin. Take a 9" springform cake pan and lightly grease the bottom and sides with butter. Place a circle of parchment paper on the base, and line the sides with a strip of parchment paper. A springform pan is ideal here as it will make it really simple to remove the sides of the tin when you need to serve.
Place two large sheets of foil on a baking tray, then place the tin on top.
Take two tea towels and soak them in water, so they are wet but not totally dripping! Fold them neatly, and wrap them around the cake tin, then fold the foil over the tea towels to cover them. Set the tin to one side.

Pre-heat the oven to 210C/420F Fan Assisted.
Into the bowl of a stand mixer, add the cream cheese, and sift over the sugar, flour & salt.

Mix on a low speed with the paddle attachment until the mixture is completely smooth, about 2 minutes. Scrape down the bowl with a spatula and mix again for 1 minute.
Slowly drizzle in the whisked eggs and again mix on a low speed until they are incorporated. Scrape down the bowl and mix again on low for a minute.

Finally, pour in the cream and pure pistachio paste and mix until the mixture is smooth. Scrape down the bowl and mix again for a minute. Note - we are using pure pistachio paste here - this is 98% pistachio nuts with no added sugars, oils etc. I've only tested it with this so I can't say whether the pistachio creams you buy from the supermarket will work as a replacement. Just bear in mind they often contain quite a small percentage of actual pistachios.

Remove the bowl from the mixer and tap it firmly on the work surface to help get rid of some air bubbles.
Pour the mixture through a sieve, into the lined cake tin.

Place the cheesecake straight into the oven, on the upper third rack.
Bake for around 38 minutes - the cheesecake should be a deep golden colour on top with quite a significant wobble (about 4/5 of the cheesecake will wobble when you gently shake it - see the video for reference). The timing really does depend on your oven; if you underbake it, it will be very soft/liquid when you cut it, but overbaking it will result in a slightly firmer texture. So it takes some trial to see what works best in your oven, 38 minutes is ideal for me!
Remove it from the oven and allow it to cool at room temperature for 30 minutes, then place it in the fridge uncovered for 18-24 hours (I go for 24!). The chilling time is really important to set the texture, so don't cut it short.
Once chilled, remove it from the tin and use a hot knife to cut slices and serve. Just be aware, you can't really remove it from the bottom of the cake tin so I would be very careful if you're considering sliding it off, onto a cake plate, as you will probably crack the cheesecake! I just use the bottom of the cake tin as a little serving plate, and cut it directly from that.

how to prepare it without pistachios past
I’ve not tried this I’m afraid so I couldn’t say
Hi Matt,
Can’t wait to try this. Can I just ask which full fat cream cheese do you use?
Thank you!
Just the cheapest!
Thanks alot for sharing this recipe.. it’s always helpful 🙏🏽🩵
Amazing work 😍
Hi Matt
Thank you so much for you wonderfull recipies!
How can I make this cake gluten free for my celiac daugter in law, who loves chees cakes??
Thank you so much
You’re welcome 🙂 I’m afraid I wouldn’t be able to say as I’ve not tried this.
Generally you can substitute 1/2 cornstarch for the all-purpose flour to make it GF. I haven’t tried it with this recipe but have with others.
I have made this with Bob’s Red Mill GF 1-to-1 as a substitute and it came out great!
This recipe is absolutely divine, made it with less percent pistachio creme but delicious anyway. And the the wet towel tip is a game changer!!
Hello shef
I like your recipe.
Thank you!
Hey!
In the Nordic countries it’s hard to find (if possible) to find double cream. How about using regular cream? The Norwegian one contains 37%.
that should be fine! The texture will just be slightly lighter 🙂
Hi Matt! Thank you for sharing this recipe! I made it with a 6 inch springform pan and 18% pistachio cream (couldn’t find anything better). I followed your recipe to the t. It was delicious! It is not too sweet or tart (like how some cheesecakes can be) with a hint of pistachio. The texture is super creamy!
That’s great to hear!
I followed the recipe exactly and it turned out so well. I also added a crust containing biscuits and pistachios which added a lot of deliciousness 🙂
Pleased to hear!
Hi! If I wanted to make it without the pistachio do I just omit it?
Yep you do, it’ll just be less filling so you might need to adjust the bake time
What if I have to make the same recipe in a 8 inch spring form without pistachio paste?
It’ll work you might just need to adjust the bake time
If I wanted to make a larger basque cheesecake.. 12 portion what size tin do I use and do I just scale up the ingredients accordingly?
Yes but will be a longer cook time!
My partner is allergic to nuts what can I use instead of pistachio please
You can leave out the pistachio paste, it’ll just be less filling so you might need to adjust the bake time
I can’t find the oven temperature
Hi Daniel, it’s step 4 – Pre-heat the oven to 210C/420F Fan Assisted.
Can I make half of the recipe
Yes but you’ll need to adjust the bake time
If we don’t use a pistachio cream, is the recipe the same?
It it yes, it’ll just be less filling so you might need to adjust the bake time
Hi Matt, can I make it without the pistachio paste to make the regular version? Do I have to adjust any other ingredient?
You can yes, it’ll just be less filling so you might need to adjust the bake time
Hello Matt, can you tell me a sauce for topping? Probably with white chocolate and pistachio paste?
I would do a berry compote rather than white chocolate 🙂
Hey Matt, how long will I have to bake if I were to use a loaf pan? Will the baking time take the same amount? 38 minutes?
I’m afraid I haven’t tried that so not quite sure!
Thanks for sharing! If you’re using a non-fan assisted oven, what temperature would you recommend?
non fan is 15c higher