
Chocolate Fondant Cake
TIER 1
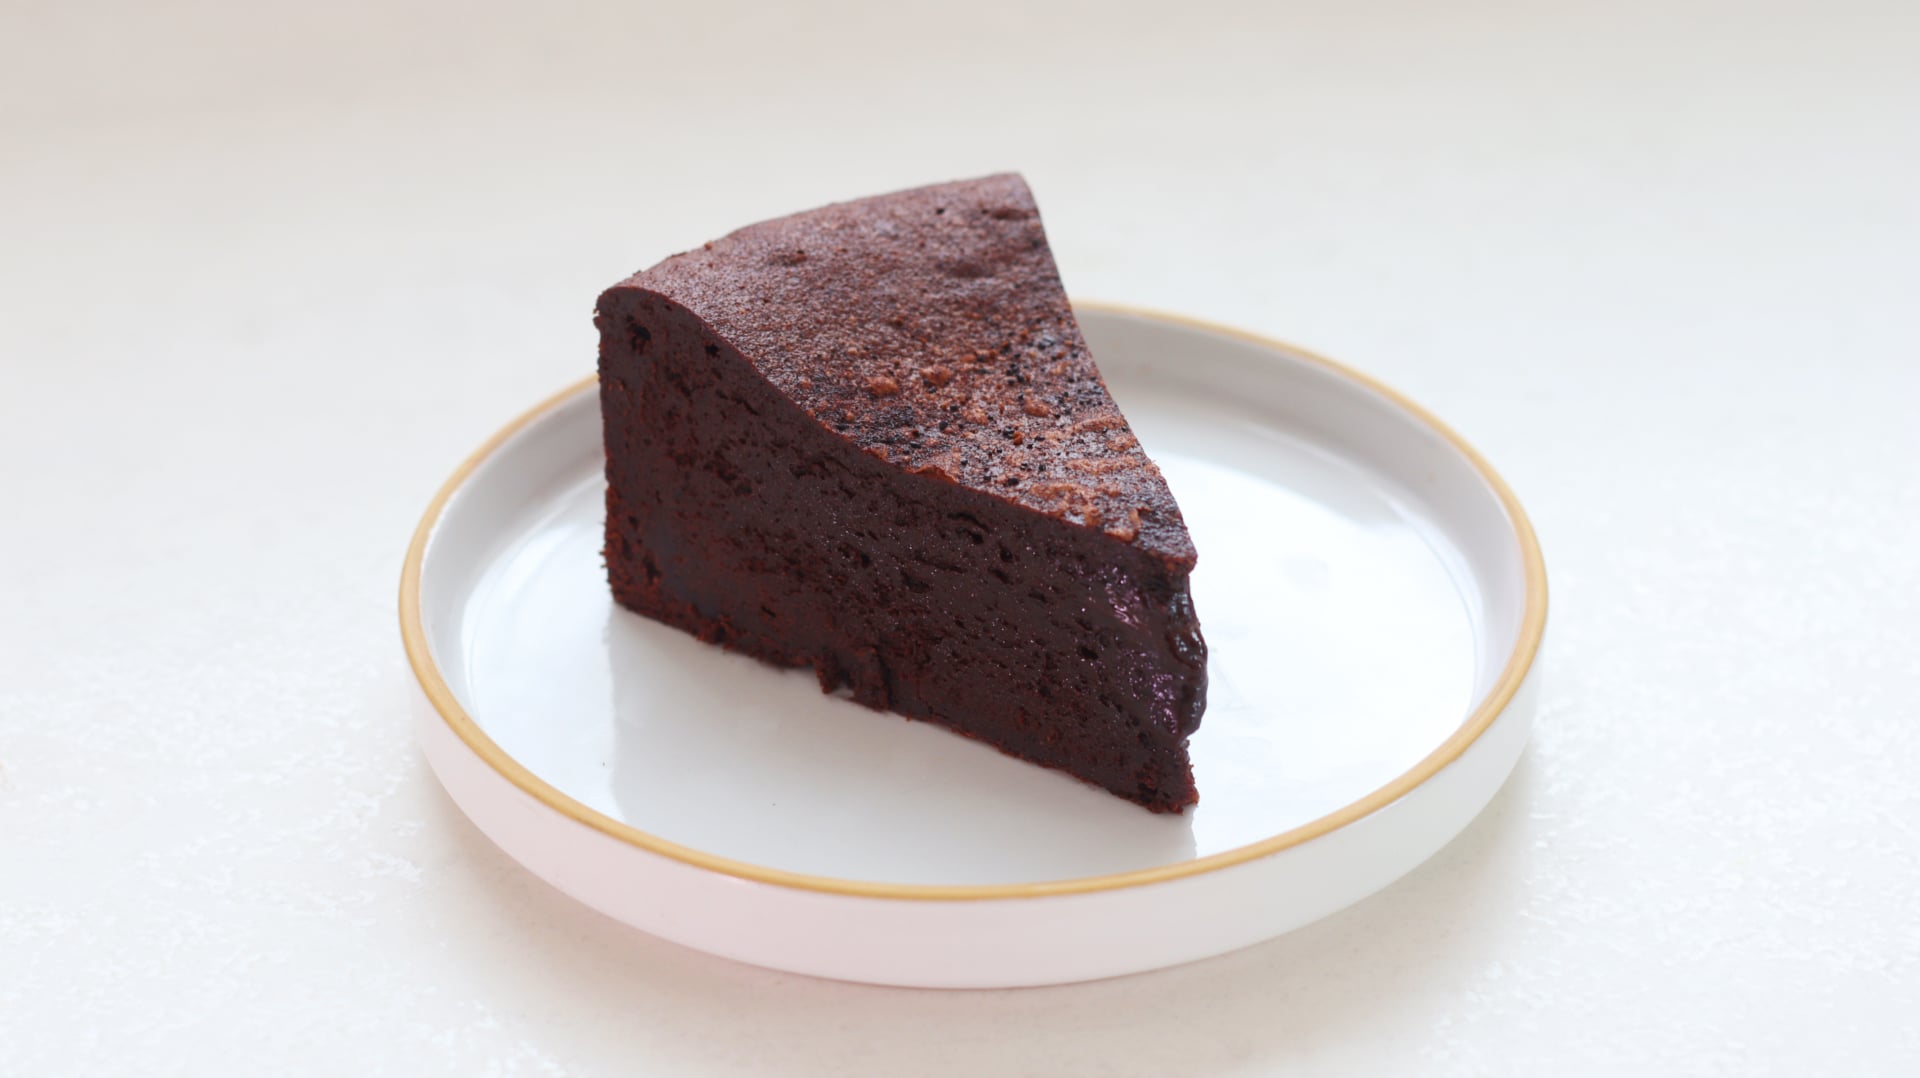
Chocolate Fondant Cake
I love this dessert for how simple yet decadent it is, but my favourite part is how well it works as a make ahead option. During testing, I baked it, left it in the fridge overnight, then reheated it the next day and it still had an incredible gooey centre. Serve it simply with softly whipped vanilla cream.

8-10
SERVINGS
Ingredients
Makes 8-10 servings
300g Dark Chocolate (70% Cocoa Solids), Chopped
100g Milk Chocolate, Chopped
200g Unsalted Butter, Room Temperature
190g Caster/White Sugar
60g Light Brown Sugar
335g Whole Eggs
20g Egg Yolks
3g Flakey Sea Salt
90g Plain/All-Purpose Flour
15g Cocoa Powder
Special equipment
20cm/8” cake ring mold
Stand mixer or electric hand whisk
Method
1. Preheat the oven to 145C/295F non-fan assisted (130C/365 Fan). Take a 20cm/8” cake ring mold and lightly grease it with butter then dust the inside with cocoa powder. Tap out any excess.
2. Place this onto a piece of parchment paper, slightly scrunched around the edge of it so it hugs the cake ring slightly. Lift this onto a baking tray lined with a silicon baking mat.
3. Add the chopped chocolate to a medium bowl and place this over a pan of gently simmering water. Stir this occasionally until it is completely melted, then set this to one side to cool slightly.
- 300g Dark Chocolate (70% Cocoa Solids), Chopped
- 100g Milk Chocolate, Chopped
4. Into the bowl of a stand mixer, (or a large bowl if using an electric hand mixer), add the room temperature butter and sugars. Beat this on a medium speed with the paddle attachment for 3-4 minutes, or until thicker and paler in consistency. Scrape down the sides.
- 200g Unsalted Butter, Room Temperature
- 190g Caster/White Sugar
- 60g Light Brown Sugar
5. Slowly drizzle in the eggs (previously whisked together in a bowl) and scrape down the bowl a few times as you add the eggs to ensure the butter is fully incorporated. Don’t worry if once you add the eggs the mixture looks slightly split.
- 335g Whole Eggs
- 20g Egg Yolks
6. Pour in the slightly cooled chocolate mixture and mix just until it forms a smooth, chocolate batter.
7. Finally, sift in the flour and cocoa powder, and sprinkle over the salt. Stir this together with a spatula until there are no more dry ingredients.
- 3g Flakey Sea Salt
- 90g Plain/All-Purpose Flour
- 15g Cocoa Powder
8. Pour the batter into the prepared cake ring and spread it flat with a spatula.
9. Place it into the centre of the oven and bake for 45 minutes.
10. Once baked, remove it from the oven and allow it to cool for at least 30 minutes (this will give a very gooey consistency) or even longer. You can even refrigerate it, then place it back into a hot oven (200C/390F for 5 minutes) and then serve it. This will make the centre soft again (although not quite as soft as when you serve it the same day). This is best served with some freshly whipped cream.
Shop the Equipment


Lemon Meringue Tart
TIER 1
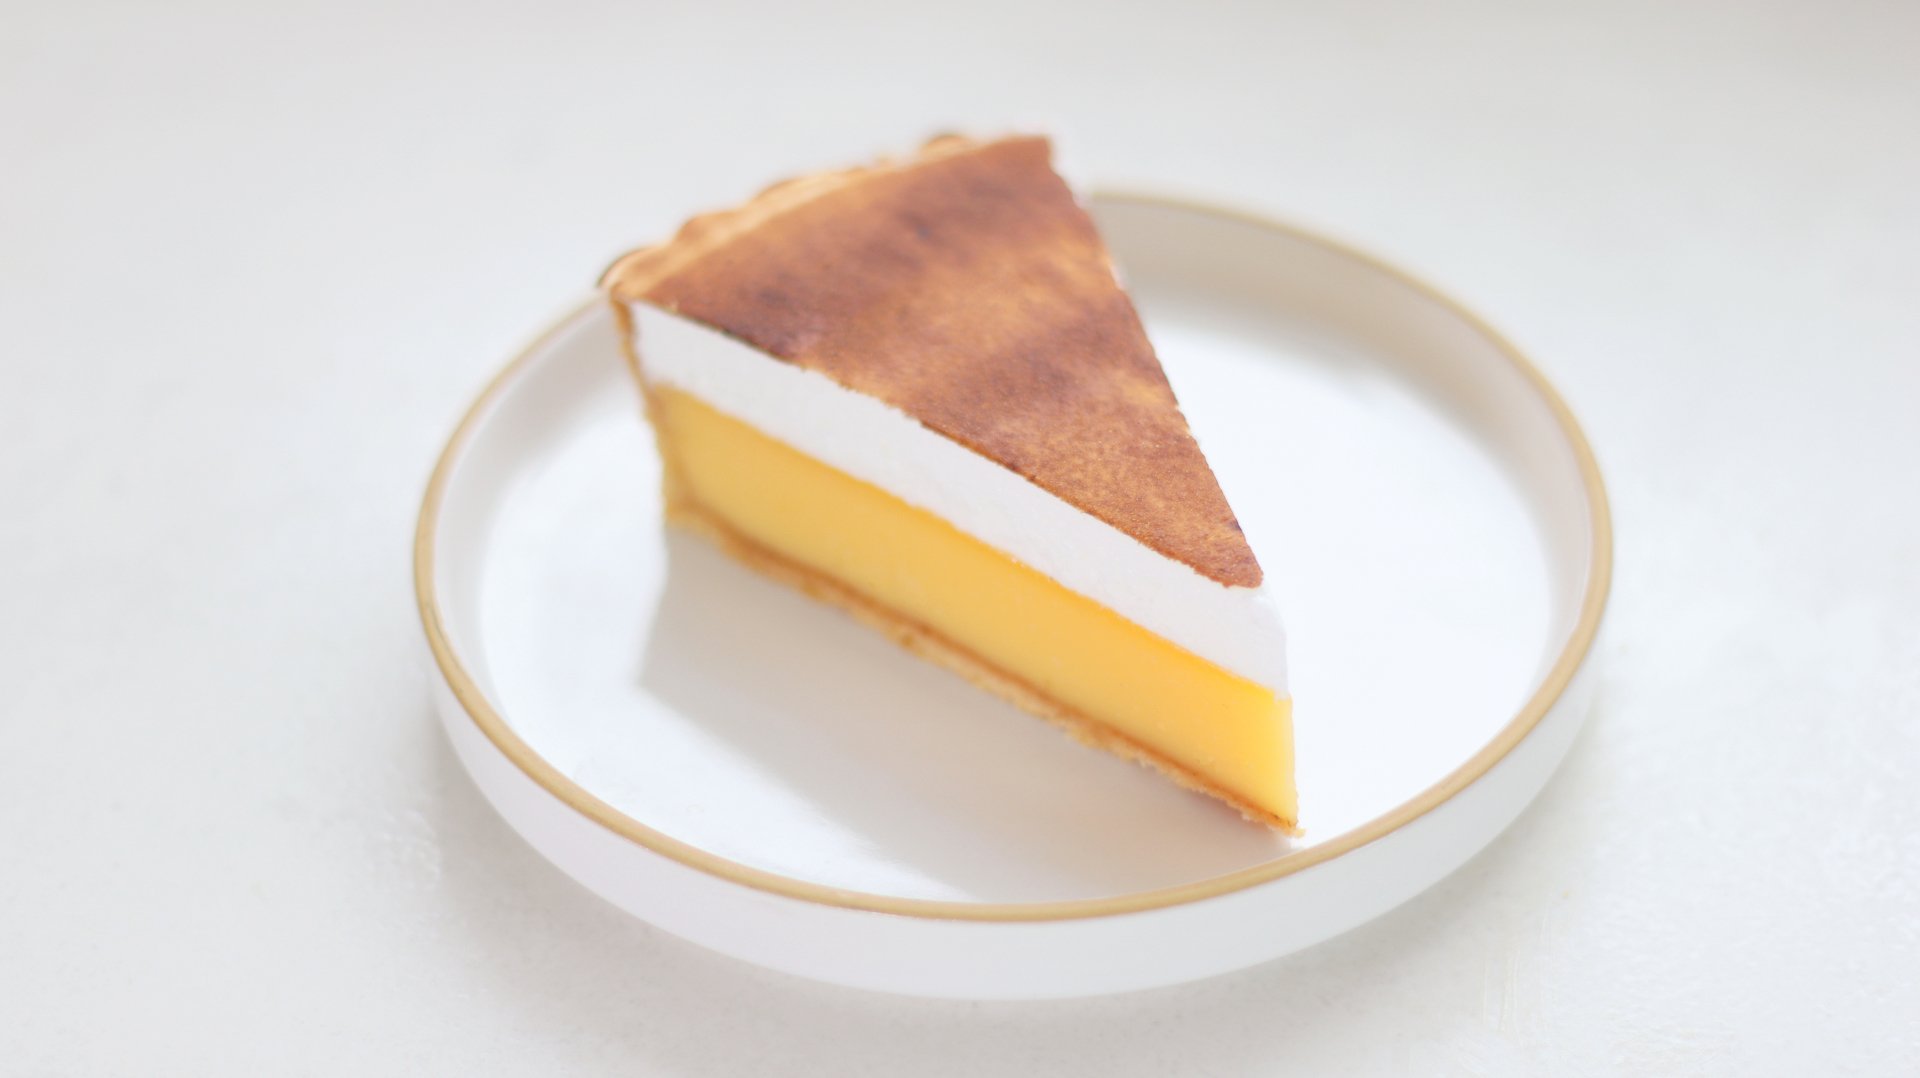
Lemon Meringue Tart
Lemon meringue tart is something I’ve been a bit hesitant to make before – I always thought there was way too much meringue, and it was overly sweet, so it was my mission to be proved wrong! The lemon filling is slightly richer than my Dad’s recipe, with more egg yolks which means it sets slightly firmer. We make a Swiss meringue for the topping, but with less sugar, which we press flat against the filling to create a more modern design.
1
9-INCH TART
Ingredients
Makes 1 9-inch tart
Lemon Sweet Pastry
100g Unsalted Butter, Cold & Cubed
70g Icing/Powdered Sugar, Sifted
Pinch of Fine Sea Salt
Zest ½ Lemon
50g Egg Yolk
200g Plain, All Purpose Flour
Egg Wash
40g Egg Yolk
10g Double/Heavy Cream
Lemon Filling
160g Whole Eggs
120g Egg Yolks
230g Caster/ White Sugar
200g Double/Heavy Cream
6g Lemon Zest
150g Lemon Juice
Swiss Meringue
100g Egg Whites
100g Caster/White Sugar
Special equipment
Stand mixer
9-inch fluted tart ring
Hand blender
Baking beans
Blow torch
Digital thermometer
Method
Lemon Sweet Pastry
1. Into the bowl of a stand mixer, add the butter, icing sugar, salt and lemon zest. With the paddle attachment, beat the mixture for 2-3 minutes, scraping it down a few times in between, until you have a smooth paste.
2. Add in the egg yolks, and beat again, until the mixture is evenly combined, you will need to scrape down the bowl a few times again.
3. Tip in the flour, and use a rubber spatula to scrape the bottom of the bowl to make sure the butter doesn’t get stuck. Scrape the sides, and then mix on a low speed until it pulls together to form a dough.
4. Scoop the dough out onto your work surface, and give it a quick knead just to bring it together. Shape it into a disc and warp it in clingfilm, before refrigerating for an hour or longer.
5. Once it’s chilled, remove it from the fridge and let it soften slightly at room temperature. The dough needs to be cold but flexible. If it is too cold when you roll it, it will crack.
6. Flour the dough and your rolling pin and applying even pressure, roll the dough out into a large, rough circle shape, around 3-5mm thick.
7. Working quickly, carefully lift this into a 23cm fluted tart ring on a baking tray. Use your fingers to press the dough into the side of the tin, then with the excess dough, fold it to create a thick rim around the outside of the tin. We will remove this excess later, but it will help to prevent the dough from shrinking as it bakes.
8. Dock the bottom of the pastry with a fork, and then freeze it for 30 minutes.
9. Preheat the oven to 175C Non-fan assisted (345F or 160C fan-assisted).
Lemon Filling
1. Into a large measuring jug, add the cream, sugar, eggs and egg yolks and blend until smooth.
2. Add in the lemon juice and zest, and blend again to combine, avoiding adding too many air bubbles.
3. Place a sheet of clingfilm on the surface, and refrigerate until needed.
Pastry Continued
1. Once the pastry has chilled, scrunch a large circle of parchment/baking paper up, then press it firmly into the tart. Fill it to the top with baking beans or rice.
2. Place it into the centre of the oven and bake for 25 minutes. Remove the parchment paper and beans, then bake for a further 5-10 minutes until it is a pale golden brown.
3. Whisk together the egg wash ingredients, then brush these all over the tart. Bake for a further 8-15 minutes, or until it is a deep golden colour.
4. As soon as it is out of the oven, use a serrated knife, holding it against the edge of the tin, and carefully trim off the excess pastry. Brush out any crumbs. Lower the oven temperature to 110C Non-fan assisted (230F or 95C fan-assisted).
5. Remove the lemon filling from the fridge and peel off the clingfilm. Scoop off any remaining bubbles with a spoon, then pour the mixture into a medium saucepan.
6. Place the pan onto a medium low heat and stir constantly until it reaches 40C/104F on a digital thermometer.
7. Immediately remove it from the heat and gently pour it through a sieve, back into a tall measuring jug.
8. Place the tart shell, on a tray, into the centre of the oven and pour the lemon filling in. Use a blow torch to pop any remaining bubbles.
9. Bake for around 55 minutes, or until the filling has just set when you gently wobble the tray.
10. Remove it from the oven and allow it to cool for 30 minutes at room temperature, before refrigerating for 1-2 hours.
Swiss Meringue
1. Into the bowl of a stand mixer (or a medium bowl if using an electric hand whisk), add the egg whites and sugar.
2. Place this over a pan of gently simmering water, whisking constantly until it reaches 65C/149F on a digital thermometer.
3. Immediately remove it from the heat, and place it onto a stand mixer fitted with the whisk attachment. Whisk for 5-7 minutes, until you have a medium stiff peak.
4. Remove the lemon tart from the fridge and with it still in the tin, spread the meringue over the top. Then using a large offset spatula, starting at one edge, press it firmly against the rim of the tin and drag it firmly across the tin, to smooth the top. You can do this a few times if needs be.
5. Use a blow torch to caramelise the meringue to an even golden brown colour. Alternatively place it under a hot grill, keeping a very very close eye on it.
6. Remove the tart from the tin and slice it with a hot knife to serve.
Shop the Equipment


Strawberry Custard Buns
TIER 2
Strawberry Custard Buns
A true showstopper, we take the same bun as tier 1 but this time just use vanilla as the flavouring. It’s filled with a strawberry cremeux, vanilla pastry cream and finished with a strawberry gel. The decoration is elegant and refined, definitely worthy of a fancy pastry shop! To finish it, I added some simple white chocolate sticks – if you want to learn about tempering just head to the archives and there is a whole class about it!
12-14
BUNS
Ingredients
Makes 12-14 Buns
Soft Buns
Tangzhong
80g Whole Milk
20g White Bread Flour
Dough
500g White Bread Flour
9g Fine Sea Salt
12g Fresh Yeast/6g Instant Dry Yeast
255g Whole Milk
50g Double/Heavy Cream
55g Sweetened Condensed Milk
50g Whole Egg
75g Unsalted Butter
½ Fresh Vanilla Pod
Strawberry Cremeux
200g Egg Yolks
130g Whole Eggs
100g Sugar
300g Strawberry Puree
200g Unsalted Butter, Soft
5g Powdered Gelatin (250 Bloom) + 30g Water (or 2 sheets of leaf gelatin)
A touch of red food colour (optional)
Pinch of Flakey Salt
Crème Pâtissière
350g Whole Milk
1 Fresh vanilla bean pod
50g Caster/White Sugar
85g Egg Yolks
28g Cornstarch/Cornflour
Pinch of Flakey Sea Salt
30g Unsalted Butter, Cold & Cubed
Strawberry Coulis
5g Powdered Gelatin (250 Bloom) + 30g Cold Water
100g Strawberry Puree
100g Fresh Strawberries
5g Pectin NH
30g Caster/White Sugar
Juice of 1/4 Lemon
Special equipment
Digital thermometer
Hand blender
Stand mixer
Oil spray (optional)
Piping bags
Round tip nozzle
Method
Strawberry Cremeux
1. Into a small dish, add the powdered gelatin and cold water and set it aside to bloom for 10 minutes. If using gelatin leaves, use two sheets (any strength) and soften this in a bowl of cold water.
2. Add the puree, eggs, yolks and sugar into a medium saucepan. Add a touch of red food colour if you wish. Place it over a medium heat and whisk constantly until the mixture has thickened to a custard-like texture. It will be just above 75C on a digital thermometer, but be careful not to scramble it. It has gelatin in it to stabilise it, which will help.
3. Immediately remove it from the heat and pass the mixture through a sieve into a tall measuring jug.
4. Add in the bloomed gelatin (squeeze out the excess water if using a gelatin sheet) and blend this with a hand blender until smooth.
5. Allow the mixture to cool to 35-45C and then add in the soft butter and blend again until smooth. Finally, stir through a pinch of salt.
Soft Buns
Tangzhong
1. Into a small saucepan, add the whole milk and bread flour and cook it over a medium heat, whisking until it reaches a thick paste like consistency.
2. Scoop the mixture into a pan and set it aside to cool for 15 minutes.
Dough
1. Into the bowl of a stand mixer, add the bread flour, salt and yeast. Split half a vanilla pod lengthwise and scrape the beans into the dry mixture.
2. Add the cooled tangzhong paste and crumble this through with your fingertips. Set the bowl to one side.
3. Add the milk, cream, egg and sweetened condensed milk to a small saucepan. Over a low heat, stir it until it reaches 46-48C/114F-188F and then immediately take it off the heat and pour it over the dry ingredients.
4. Stir the mixture together with a spatula and a plastic dough scraper, until there are no more dry ingredients at the bottom. Cover the bowl with a tea towel and let it rest for 30 minutes.
5. Add in the cold cubed butter and with the dough hook, knead for 5-7 minutes, scraping down the sides if needed, until the dough is smooth and elastic.
6. Remove it from the bowl and shape it into a tight ball on the work surface, before lifting it into a lightly oiled bowl. Cover the bowl with cling film and proof for 1 hour.
7. Remove the proofed dough from the bowl and lift it onto your work surface – no need to flour it.
8. Cut the dough into 75g portions, you should get 12-14.
9. Cup your hand around the dough in a ‘C’ shape and rotate it underneath your fingers and palm, to create a smooth, round ball.
10. Lift each ball onto a baking tray lined with parchment paper or a silicon baking mat. You will fit 6 balls per tray. If you have it, spray the balls with an oil spray and cover them with cling film. If not, cover them loosely with a clingfilm. Proof them for 45 minutes – 1 hour or until doubled in size.
11. Meanwhile, preheat the oven to 175C/345F non-fan assisted (160C fan assisted).
12. Whisk together the egg wash ingredients and use a pastry brush, to cover the whole bun. Place them into the centre oven (you will likely need to swap the trays halfway through baking). Bake them for around 25 minutes or until golden brown all over.
13. Remove them from the oven and lift them off the tray, straight onto a wire cooling rack. Cool for at least 30 minutes.
Crème Pâtissière
1. Heat milk and vanilla in a saucepan over a medium heat. Whilst this is heating up, in a separate bowl whisk together the egg yolk, sugar, cornstarch and salt.
2. Once the milk has come to a gentle simmer, slowly pour it over the top of the egg mixture, whisking constantly.
3. Pour the combined mixture back into the saucepan and continue whisking until the mixture starts to thicken. It will take about two minutes to come to a boil. Once it reaches this point, heat and whisk for a further minute to cook out all the cornstarch. You should be left with a thick, pudding-like consistency.
4. Pass the mixture through a sieve into a tall measuring jug. Add in the cold butter and blend with a hand blender until smooth. Pour it into a bowl and set it in the fridge to chill for 2 hours.
Strawberry Gel
1. Into a small bowl, add cold water and the powdered gelatin. Let it soak for 5-10 minutes.
2. Stir together the pectin and sugar in a small bowl and set this to one side.
3. Add the fresh strawberries and strawberry puree to a small saucepan and stir them together over a medium heat until they warm slightly (about 40C/105F). Whisk in the pectin sugar mixture and continue to whisk until it reaches a boil.
4. Remove it from the heat and scoop in the bloomed gelatin before whisking it through, along with the fresh lemon juice.
5. Pour the mixture into a tall jug, cover the surface with clingfilm, and let it set in the fridge for 1-2 hours or overnight.
Assembly
1. Add the chilled strawberry cremeux to a stand mixer fitted with a whisk attachment. Whisk on a medium speed until it holds a medium stiff peak.
2. Split the mixture between two piping bags, one with a large round tip nozzle.
3. Add the cooled strawberry gel into a small blend (or a tall just if using a hand blender) and blend it into a smooth gel. Add this into a piping bag.
4. Remove the crème pâtissière and with a hand whisk, whisk for 1-2 minutes, until it is smooth and there are no lumps. Add this to a piping bag.
5. Take the cooled buns and use an apple corer or a knife to take a portion of dough out of the underside, keeping the base intact so you can put this back on! You need a decent-sized hole in order to fit the filling in so you may need to pull some of the dough out.
6. Take the buns and fill them with the strawberry cremeux, and then the crème pâtissière. Place the base of the bun back on, to seal it.
7. Take the strawberry cremeux with the piping nozzle, and pipe a small dollop on top of each bun. Then, using the back of a warm ¼ tsp measure, scoop a small hole out of the centre, and pipe the strawberry gel inside.
8. Finish with a dusting of icing sugar and some white chocolate decorations if you fancy making them.
9. These are best served and eaten within a few hours.
Shop the Equipment


Chocolate Orange Marmalade Trifle
TIER 1
Chocolate Orange Marmalade Trifle
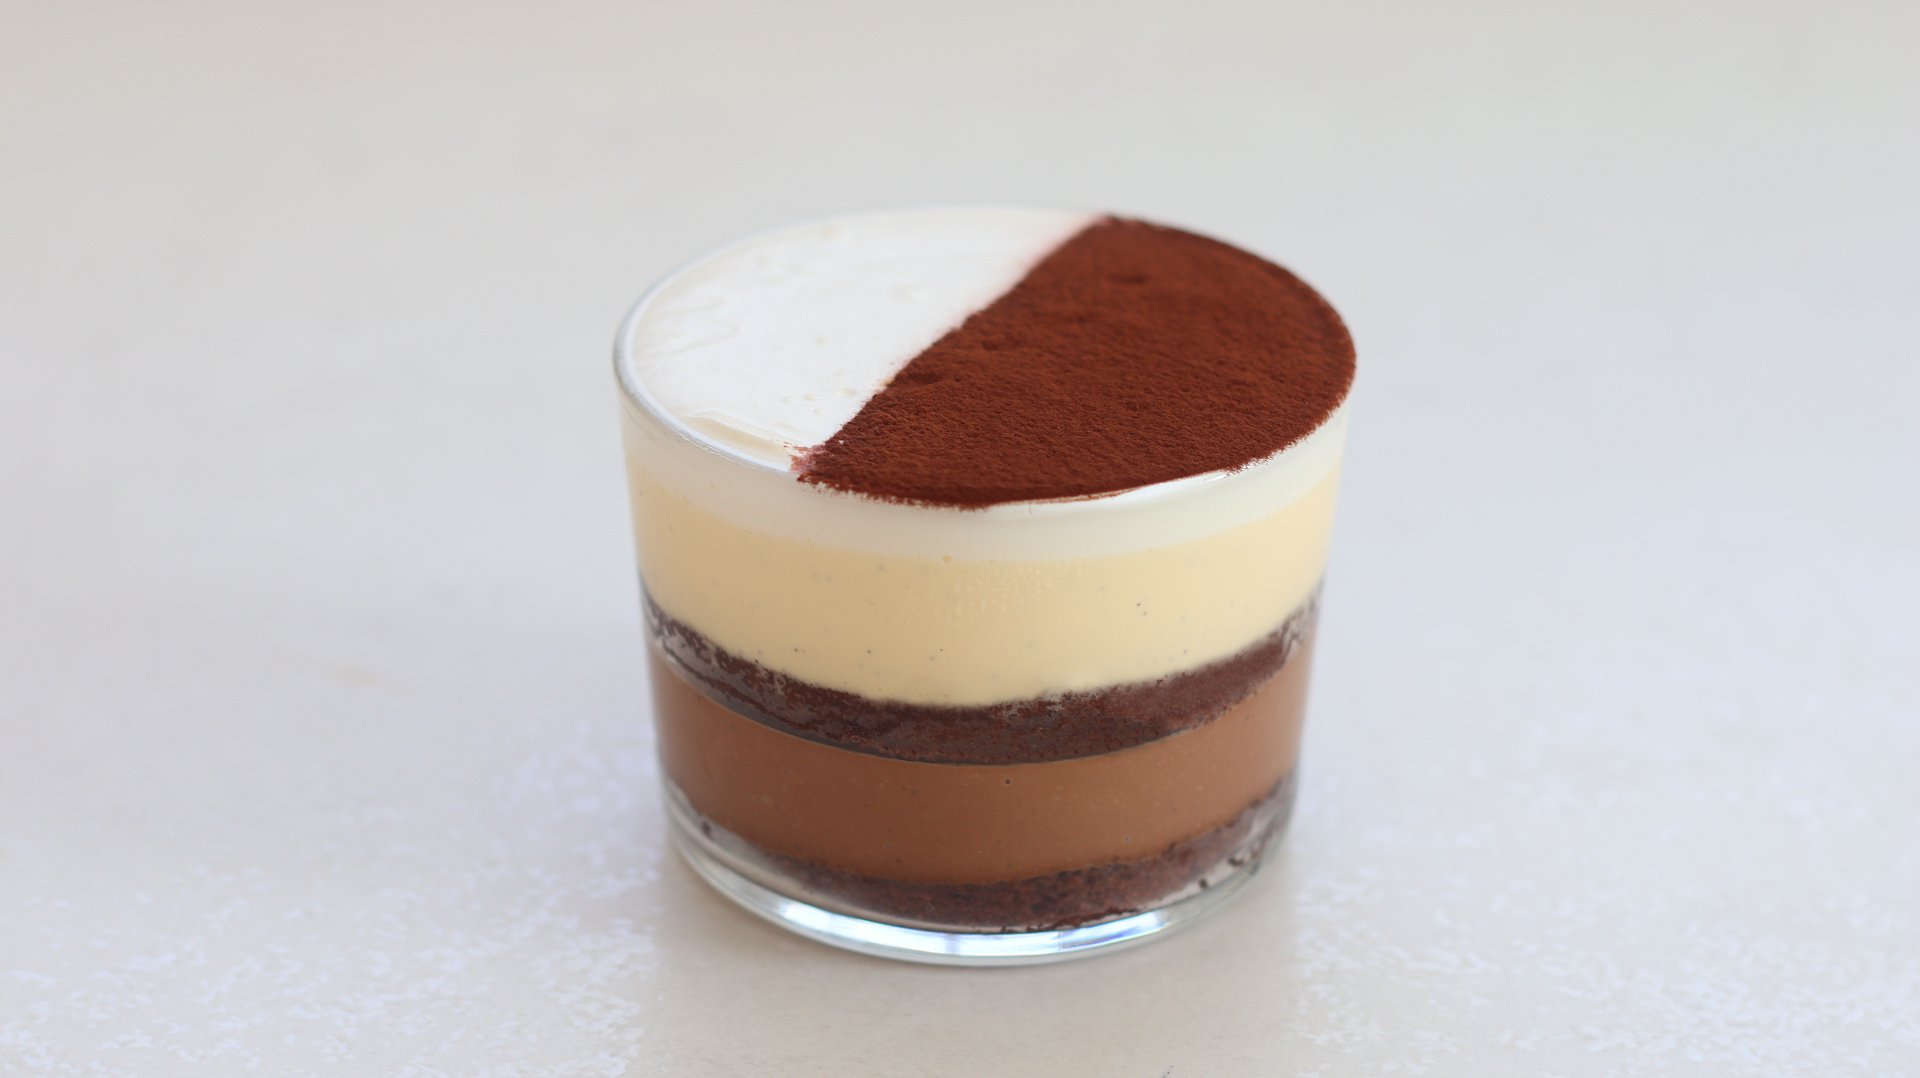
Now this isn’t any ordinary trifle. This has layers of soft chocolate sponge, orange marmalade, vanilla and chocolate custard, then finished with whipped cream. It’s not really traditional, but the texture when you get a spoonful of all the layers is amazing. This can be scaled up to a large trifle, you will just need to increase the quantities.
4
MINI TRIFLES
Ingredients
Makes 4 Mini Trifles
Chocolate Sponge
80g Egg Yolks
75g Caster/White Sugar, Divided
150g Egg Whites
45g Plain/All-Purpose Flour
25g Cocoa Powder
50g Vegetable Oil
35g Whole Milk
Custard Base
350g Double/Heavy Cream
175g Milk
1 Vanilla Pod
160g Egg Yolks
55g Caster/White Sugar
Pinch Flakey Sea Salt
Chocolate Custard
260-285g Custard Base
65g Chocolate, 70% Cocoa Solids
Vanilla Custard
260-285g Custard Base
40g Unsalted Butter, Cold & Cubed
Unsweetened Whipped Cream
200g Double/Heavy Cream
Orange Marmalade To Fill
Cocoa Powder To Decorate
Special equipment
39x27cm baking tray
Electric hand whisk or stand mixer
Digital thermometer
Hand blender
Cookie cutter
Piping bag (optional)
Method
Chocolate Sponge
1. Preheat the oven to 180°C/355°F Non-Fan Assisted.
2. Lightly grease a 39x27cm baking tray. Cut a rectangle of parchment paper so that it fits neatly inside the tray, and press it in.
3. Into a medium bowl, add the egg yolks, and 20g of caster sugar. Whisk the mixture with an electric hand mixer (or in a stand mixer) until it is thicker in volume and pale in colour. About 1-2 minutes. Set this to one side.
4. Into a medium bowl, add the egg whites and using an electric hand whisk (or stand mixer) whisk on a medium-low speed. Once the mixture is frothy, increase the speed to medium and slowly add the remaining 55g of caster sugar, about 1 tablespoon at a time. Whisk until you have a medium-stiff peak to the meringue.
5. Gently fold the first third of meringue into the egg yolk mixture. Once incorporated, add the second third, fold it through and then the final third.
6. Next, sift in the plain flour & cocoa powder, and fold the mixture carefully until there are no more streaks of dry ingredients.
7. Finally, pour in the vegetable oil and whole milk. Use a spatula to fold this in, making sure to scrape the bottom of the bowl.
8. Pour the batter onto the lined tray, and then using a spatula, spread the batter out evenly.
9. Bake the sponge for 12 minutes then allow it to cool for 30 minutes at room temperature.
Custard Base
1. Into a medium saucepan add the cream, milk, egg yolks, sugar and beans scraped from a fresh vanilla pod.
2. Place this over a medium-low heat and whisk constantly until it reaches a temperature of 82C/180F on a digital thermometer.
3. Immediately remove it from the heat and pour it through a sieve into a tall measuring jug.
4. Split the mixture into half in between two measuring jugs, you should get around 260-285g per jug.
5. Add the chopped chocolate into one, butter into another, and then blend each until smooth with a hand blender. Add a pinch of flakey sea salt to each and stir it through with a spoon. Alternatively, if you want the vanilla version to be thicker, try using white chocolate instead of butter.
6. Pour the vanilla custard onto a shallow baking tray and cover the surface directly with cling film. Cover the surface of the chocolate jug with cling film and refrigerate – this will thicken faster than the vanilla version.
Assembly
1. Take the cooled chocolate sponge and flip it out of the tray onto a large silicon mat or piece of parchment paper.
2. Take a few tablespoons of orange marmalade and spread this evenly across the sponge with an offset spatula.
3. Take a cookie cutter that is just slightly bigger than the width of your individual trifle dishes.
4. Place a disc of sponge into the base of each trifle dish.
5. Remove the chilled chocolate custard from the fridge (it needs 15-30 minutes to thicken and cool slightly).
6. Add it into a piping bag if you want, otherwise, pour an even layer across each dish.
7. Place it into the freezer or fridge just until a skin has formed on top and when you poke it with your finger, you feel there is enough of a ‘barrier’ to support the weight of the next layer.
8. Add a second disc of sponge, then remove the chilled vanilla custard from the fridge – this will be a looser consistency.
9. Pour this on top of the sponge, leaving enough room at the top for cream.
10. Place the trifles into the fridge or freezer just until the vanilla mixture has set to create a slight barrier and support the weight of the cream. This can take slightly longer as the mixture is softer.
11. For the whipped cream, simply add the cream to a bowl and whisk with an electric hand whisk until you have a medium stiff peak.
12. Spoon the cream on top of the set vanilla custard, and then level it completely with a slightly warm palette knife.
13. The trifles can now be refrigerated until needed or served immediately. Dust with a light coating of cocoa powder when ready to serve.
Shop the Equipment


Sesame Bloomer
TIER 1
Sesame Bloomer
The Tier 1 dough is relatively low hydration so simple to work with – by hand or in your mixer. The great technique here is lightly soaking the dough and then coating it in sesame seeds. It is a technique I use to get perfect coverage of seeds over the loaf, rather than spilling seeds everywhere! This is a slightly softer loaf than Tier 2 so great for sandwiches. Feel free to swap out sesame seeds for poppy seeds too.
1
LOAF
Ingredients
Makes 1 Loaf
12g Fresh Yeast/6g Instant Dry Yeast
12g Fine Salt
400g Strong White Bread Flour
100g Wholemeal Bread flour
325g Tepid Water
15g Sesame Seeds + Extra To Coat
20g Unsalted Butter, Soft
5g White Sugar
Special equipment
Stand mixer
Bread scorer
Digital thermometer (optional)
Method
1. Add all of the ingredients for the dough into the bowl of a stand mixer.
2. Attach the dough hook and knead on a medium speed for around 6-7 minutes until the dough pulls away from the sides of the bowl and appears smooth. It should pass the windowpane test, which is when you stretch a small piece of dough out and it forms a windowpane without tearing.
3. Lift the dough onto your work surface, and perform a few slap and folds with the dough, then use your hands to shape it into a smooth ball shape.
4. Lift the dough into a lightly oiled bowl and cover it with clingfilm – the dough needs to proof for about an hour at room temperature or until doubled in size. This may take longer if your room is cold.
5. Just before it is ready, soak a tea towel and ring out any excess water. Set this next to a baking tray lined with parchment paper.
6. Lightly toast a tray of sesame seeds for about 10 minutes at 180C/355F. They just need to be a light golden brown – not too dark!
7. Lightly flour your work surface, and scoop the dough, smooth side down, onto the flour.
8. Gently flatten the dough with lightly floured hands into a large circle. Stretch the left side out slightly and fold it toward the center. Then stretch the right side and fold it in to overlap the first fold.
9. Reshape the dough into a tidy rectangle. Starting from the top edge, roll the dough tightly towards you, using your thumbs to press the dough firmly inward with each turn to create a taut log.
10. Once fully rolled, pinch the seam closed by using your fingers to stitch it together.
11. Working quickly, tilt the dough side to side on the wet tea towel, then transfer it to the toasted sesame seeds, tilting it to cover the entire loaf.
12. Flip the dough over and place it seam side down onto your baking tray.
13. Cover the dough with a tea towel to proof for about an hour at room temperature. The dough should almost double in size.
14. Meanwhile, preheat the oven to 230C/445F non-fan assisted and place a small tray on the bottom shelf.
15. Once the dough is proofed, take a razor blade and slash the dough. I used multiple diagonal slashes across the top of the dough, but you can slash it any way you prefer.
16. Splash a cup of boiling water onto the preheated tray and immediately place the bread on the middle shelf of the oven.
17. Immediately drop the oven temperature to 190C/375F non-fan assisted and bake for around 50 minutes – the dough should be a golden colour, and a digital thermometer inserted into the centre should reach 90C/195F or just above it.
18. Lift the baked loaf onto a wire rack and cool for at least an hour before slicing.
Shop the Equipment


Boston Cream Pie
TIER 1
Boston Cream Pie
A childhood favourite of mine, a Boston cream pie often comes as a donut, but it’s also fantastic in cake form. It starts with two layers of vanilla sponge, which are filled with a thick layer of smooth vanilla crème pâtissière. The cake is then finished with a thin chocolate glaze.The beauty in the cake lies in how it is layered in the tin, and using acetate really helps to get a smooth, clean finish.
7"
CAKE
Ingredients
Makes 1 7-inch Cake
Vanilla Sponge
245g Caster Sugar
245g All Purpose/Plain or Cake Flour
15g Baking Powder
2g Fine Sea Salt
245g Whole Eggs
100g Vegetable Oil
85g Whole Milk
145g Unsalted Butter
1 Tsp Vanilla Bean Paste
Crème Pâtissiére
500g Whole Milk
1 Fresh Vanilla Pod
75g Caster/White Sugar
120g Egg Yolks
40g Cornstarch
1g Fine Sea Salt
45g Unsalted Butter, Cold & Cubed
Chocolate Glaze
100g Chocolate (55% Cocoa Solids)
50g Unsalted Butter
80g Double/Heavy Cream, Slightly Warm
Special equipment
2 x 7″ springform/removable base cake tins
Acetate
Hand blender (optional)
Stand mixer (optional)
Method
Vanilla Sponge
1. Pre-heat your oven to 180C/355F non-fan assisted.
2. Lightly grease the bottom of two 7” cake tins, and place a circle of parchment on the base. Lightly grease the sides and coat them with flour, tipping out any excess.
3. Place the butter & vanilla into a saucepan and melt it over a low heat. Once it has just melted, set it to one side to cool slightly.
4. In a large bowl, sieve together the dry ingredients – sugar, flour, salt & baking powder. Whisk until they are evenly combined.
5. In a separate jug, whisk together the eggs, oil & milk.
6. Slowly pour the wet ingredients into the dry bowl, whisking to combine until you have a smooth batter with no more streaks of flour.
7. Finally, pour in the melted butter and mix the batter slowly until everything is evenly combined and you have a smooth batter.
8. Pour 500g of batter into each cake tin.
9. Place the cakes in the oven and bake for around 30-35 minutes, at which time the cake should be golden and a skewer should come out clean.
10. Once baked, remove them from the oven and run a knife around the outer edge of the cake tin to ensure it releases. Then carefully flip it onto a wire rack.
11. Let the sponges cool for a few minutes, then flip them onto a sheet of cling film and wrap them, before refrigerating. 3-4 hours will be enough but overnight works great too!
Crème Pâtissiére
1. In a medium saucepan on the stovetop over medium heat, add the milk and the scraped vanilla pod just until it is steaming.
2. In a separate medium bowl, whisk together the sugar, egg yolks, cornstarch, and salt until smooth and thickened.
3. Slowly pour the hot milk mixture over the sugar and eggs mixture, whisking constantly.
4. Pour the mixture back into the saucepan. Whisk constantly over medium heat until it begins to bubble, then cook for 1 minute.
5. Remove the saucepan from the heat and pass the mixture through a sieve placed over a large bowl.
6. Blend (or whisk) in the butter until the mixture is smooth. Cover the surface with cling film and refrigerate for 2-3 hours.
Assembly
1. Once the cakes have chilled, use a serrated knife (or cake leveller) just to trim the top of the cakes off – don’t cut off too much!
2. Take a 7” cake tin with a removable bottom/springform tin/cake ring and line the inside with acetate. Place this onto a tray.
3. Take one of the sponges, and lift it into the tin/ring mold. Ensure the acetate is tight around the cake – if you need to, adjust the acetate and re-tape it so that there are no gaps between the acetate and the cake.
4. Remove the créme pâtissiére from the fridge and add it into a stand mixer (or whisk by hand) and whisk for around 2 minutes until the mixture becomes much smoother in texture. It might initially look slightly lumpy/gelatinous but as you whisk it will smooth itself out.
5. Scoop the créme pâtissiére on top of the sponge and use a spoon to spread it to the edges, creating an even layer.
6. Next, take the second layer of cake and flip it upside down so that the side you cut is now facing down. Lift this on top of the créme pâtissiére and carefully press it in with your hands.
7. To make the chocolate ganache, add the chocolate and butter to a bowl and place this over a pan of gently simmering water. Stir it until it has completely melted.
8. Take some slightly warm cream and pour this in, and then stir with a spatula until smooth.
9. Working quickly, immediately pour the ganache on top of the sponge, and then tilt the tin/ring mold so that it spreads evenly to the edges.
10. Place the entire cake in the fridge for 2-3 hours to set (or overnight) then remove it from the fridge.
11. Lift it out of the tin/ring mold and peel off the acetate. If any of the créme pâtissiére has stuck, simply smooth the edge of the cake with an offset spatula so that it is neat.
12. It is best served, left at room temperature for 30m-1 hours so that the chocolate can soften slightly.
13. To give it a nice finish as you serve it, gently blow torch the chocolate to give it a quick shine!
Shop the Equipment


Raspberry Jam Frangipane Tart
TIER 2
Raspberry Jam Frangipane Tart
In this recipe we take our homemade raspberry jam from tier 1 and spread it on a Páte Brisée pastry case. Then we fill it with an almond frangipane and delicately decorate it with a pattern of flaked almonds. I usually fill my desserts with almond cream instead of frangipane, but the addition of pastry cream really improves the texture and adds even more flavour to the dessert.
1
9-INCH TART
Ingredients
Makes 1 9-inch Tart
Pâte Brisée
200g Plain/All-Purpose Flour
100g Unsalted Butter, Cold & Cubed
50g Cold Water
3g Sea Salt
Pastry Cream
250g Whole Milk
½ Fresh Vanilla Bean Pod
35g Caster/White sugar
60g Egg Yolks
20g Cornstarch/Cornflour
2g Fine Sea Salt
20g Cold Unsalted Butter
Frangipane
165g Unsalted Butter, Room Temperature
165g Caster/White Sugar
Zest ½ Lemon
130g Whole Egg, Lightly Whisked Together
165g Ground Almonds/Almond Flour
2g Sea Salt
85g Pastry Cream, Cooled
To Fill & Finish
Raspberry Jam (Tier 1)
Flaked Almonds
Fresh Raspberries
Icing/Powdered Sugar
Special equipment
Stand mixer
Silicon mats
9-inch fluted tart ring
Baking beans
Piping bag
Method
Pâte Brisée
1. Into the bowl of a stand mixer, add the butter, flour and salt. Mix on a low speed until the butter has completely broken down into fine crumbs and there are no large chunks of butter.
2. Slowly drizzle in the cold water and mix for a few seconds until it pulls together into a dough.
3. Gently knead the dough into a disc on your work surface and wrap it in clingfilm, then refrigerate for 30 minutes.
4. After 30 minutes, place it in between two silicon mats (or two sheets of parchment paper), and roll the dough into a rough disc that is around 3-5mm thick.
5. Refrigerate the pastry again for 1 hour and preheat the oven to 180C/355F Non-fan Assisted. This is a good point to prepare your pastry cream.
6. Peel the silicon mats/parchment paper off the pastry and ensure the dough is cold but flexible. If it is too cold it will break so just leave it for a few minutes to soften slightly if needed.
7. Lift the pastry into a 22.5cm fluted tart ring and use your hands to gently press it into the edges. Work quickly, being careful not to tear the pastry.
8. Use a knife to trim the excess pastry off and place the tart shell back into the fridge to chill for 15 minutes.
9. Scrunch up a piece of baking paper and press this into the chilled tart shell. Fill the tart shell with baking beans or rice and then place it on a tray and straight into the oven to bake.
10. Bake the tart for 30 minutes, then remove the baking beans, and continue to bake for a further 10-15 minutes, or until the pastry is an even golden brown colour.
11. Remove it from the oven and allow it to cool for 30 minutes.
Pastry Cream
1. In a medium saucepan on the stovetop over medium heat, add the milk and the scraped vanilla pod just until it is steaming.
2. In a separate medium bowl, whisk together the sugar, egg yolks, cornstarch, and salt until smooth and thickened.
3. Slowly pour the hot milk mixture over the sugar and eggs mixture, whisking constantly.
4. Pour the mixture back into the saucepan. Whisk constantly over medium heat until it begins to bubble, then cook for 1 minute.
5. Remove the saucepan from the heat and pass the mixture through a sieve placed over a large bowl.
6. Whisk in the butter until the mixture is smooth. Cover the bowl with cling film and refrigerate it for an hour.
Frangipane
1. Into a stand mixer, add the soft butter, salt, lemon zest and sugar. Beat for 2-3 minutes on a medium-low speed until slightly thicker and paler in texture.
2. Slowly drizzle in the eggs and beat for a further minute.
3. Finally, add in the ground almonds/almond flour and scoop in the required amount of cooled pastry cream. Beat until smooth.
4. Add the mixture into a piping bag.
Assembly & Baking
1. Lower the oven temperature to 175C/345F Non-Fan Assisted.
2. Take the raspberry jam and spread a few tablespoons across the bottom of the cooled pastry. Make sure it is nice and even.
3. Next, pipe the frangipane evenly into the tart shell. Use a palette knife if needed to smooth it out.
4. Slice your fresh raspberries in half and press them gently into the frangipane.
5. Next, take your time, and evenly place the flaked almonds around the entire tart in a nice circular pattern. This is optional, you can simply sprinkle them on!
6. Place it into the oven and bake for 25-30 minutes or until it is an even golden colour all over.
7. Remove it from the oven, and at this point this filling will still be slightly soft, so let it cool for an hour at room temperature before serving.
Shop the Equipment


Vanilla Glazed Donuts
TIER 1
Vanilla Glazed Donuts
In Tier 1 we start with a classic glazed donut. I walk you through my (new) favourite donut dough, how to create the iconic donut shape, and how to fry your donuts to perfection. Then we smother them in an insane vanilla glaze for that classic Krispy Kreme finish. The end result is the lightest, fluffiest donuts – it’s a struggle just to eat one!
6-7
DONUTS
Ingredients
Makes 6-7 Donuts
Donut Dough
550g Strong White Bread Flour
125g Whole Milk
7g Instant Dry Yeast
200g Whole Eggs
12g Fine Sea Salt
125g Unsalted Butter, Cold + Small Cubes
75g Caster/Granulated Sugar
20g Powdered Milk (Full Fat)
10g Vanilla Extract
Vanilla Glaze
500g Icing/Powdered Sugar
20g Glucose (or Golden Syrup)
80g Whole Milk
25g Water
15g Double/Heavy Cream
1 Tsp Vanilla Bean Paste or 1 Fresh Vanilla Pods
Zest ¼ Lemon
Pinch of Fine Sea Salt
3 Litres of Vegetable Oil For Frying
Special equipment
Stand mixer
Oil spray (optional)
80mm cookie cutter
30mm cookie cutter
Piping bag
Deep fat fryer (optional but recommended)
Method
Donut Dough
1. Into the bowl of a stand mixer, add the wet ingredients, followed by the dry. Attach the dough hook and mix it on a medium speed for 10 minutes, scraping down the bowl every 3-4 minutes.
2. After 10 minutes, turn the mixer off and let the dough rest for 5 minutes. This will relax the gluten and make the next part of the mixing easier!
3. Turn the mixer back on, and knead for a further 10-12 minutes. The dough should start to come away from the sides of the bowl, but there will still be a little bit stuck to the edges.
4. Remove it from the mixer and lift the dough onto your work surface. Give it a quick knead and shape it into a nice tight ball. The dough should feel smooth and pass the windowpane test when you stretch a small piece of the dough.
5. Lift it into a lightly oiled bowl, then lightly spray the top of the dough with an oil spray and cover the surface directly with cling film. Cover the bowl with a sheet of cling film too and refrigerate the dough overnight (12-18 hours). This will make it much easier to work with.
6. Before you are ready to work with the dough, prep a baking tray by cutting 6-7 squares of parchment paper and lightly oiling them before placing them on the tray. This will make it easier to transfer the donuts to the fryer.
7. The next day remove the chilled dough from the fridge. Very lightly flour your work surface and lift the dough on. Lightly flour the top of the dough and a rolling pin, and roll the dough out, the shape doesn’t matter, but you want it to be around 12-15mm thick (0.5”).
8. Take an 80mm cookie cutter and dip it in a bowl of flour to make sure it doesn’t stick to the dough. Press the cookie cutter into the dough. Then take your 30mm cookie cutter, dip it into the bowl of flour and press this into the centre of your donut to create a hole. Lift your donut onto a sheet of parchment paper, then repeat with the remaining dough.
9. Very lightly oil the top of the donuts with an oil spray, and then cover the entire tray with a sheet of cling film and allow the donuts to rise for 2-3 hours at room temperature. In warmer weather, 2 hours should be fine, but when it is colder it will be closer to 3 hours. The donuts should look puffier and will have increased in volume when they are done.
Vanilla Glaze
1. Into the bowl of a stand mixer, sift in the icing sugar then add the remaining ingredients, starting with 80g of milk.
2. Beat the ingredients together with the paddle attachment. You want the consistency to resemble a runny glue, so add more milk if needed. Once you have the desired consistency, beat for a further 30 seconds on a medium-low speed, ensuring all the ingredients are combined.
3. Pour this into a piping bag, tie the end (so that the glaze doesn’t dry out) and set this to one side while you fry the donuts.
Frying
1. When the donuts are close to being proofed, add the oil to your deep fat fryer (or a large pan) and heat it to 170C/340F. A deep-fat fryer is ideal here as it is able to regulate the temperature at a much more consistent level vs frying in a pan.
2. When the donuts are ready, drop 1 at a time into the oil, and slowly peel off the sheet of parchment paper.
3. Fry for 90 seconds, flip, fry for 60 seconds, flip, fry for 15 seconds, flip, fry for 15 seconds.
4. Remove your donut and place it on a wire rack, allowing any excess oil to drip off. After a minute, coat the donut in your vanilla glaze. Repeat with the remaining donuts.
5. Best served the same day (I can’t not eat mine immediately!)
Shop the Equipment


Chocolate Mousse Cake
TIER 1
Chocolate Mousse Cake
There are only two elements to this cake – the sponge and the mousse. I show you how to master each one, then it’s just a case of building your cake! I recommend using a ring mould for the most professional finish, and running a warm palette knife over the top of your mousse to create a smooth top. This is such a simple recipe but it looks amazing, the texture is divine, and it’s so full of flavour.
1
6-INCH CAKE
Ingredients
Makes 1 6-inch Cake
Chocolate Sponge
80g Egg Yolks
20g Caster Sugar (A)
60g Caster Sugar (B)
150g Egg Whites
40g Plain Flour
28g Cocoa Powder
50g Vegetable Oil
30g Whole Milk
Chocolate Mousse
170g Whole Milk
120g Chocolate (70% Cocoa Solids), Finely Chopped
120g Chocolate (30% Cocoa Solids), Finely Chopped
300g Double/Heavy Cream
Pinch Sea Salt Flakes
Special equipment
39cm x 27cm baking tray
Electric hand whisk (or stand mixer)
Hand blender
16cm ring mould (4.5cm high)
Method
Chocolate Sponge
1. Preheat the oven to 180C/356F Non-Fan Assisted (160C Fan Assisted) and then lightly grease a medium-sized baking tray (this recipe uses a 39cm x 27cm tray). Cut a rectangle of parchment paper so that it fits neatly inside the tray, and press it in firmly with your hands.
2. Into a medium bowl, add the egg yolks and sugar (A). Whisk the mixture with an electric hand mixer (or in a stand mixer) until it is thicker in volume and pale in colour. About 1-2 minutes. Set this to one side.
3. Into a medium bowl, add the egg whites and using an electric hand whisk (or a stand mixer) whisk on a medium-low speed. Once the mixture is frothy, increase the speed to medium and slowly add the sugar (B), about 1 tablespoon at a time. Whisk until you have a medium-stiff peak to the meringue.
4. Pour the egg yolk mixture on top of the meringue and gently fold it through using a spatula until well combined.
5. Next, sift in the plain flour & cocoa powder, and fold it in carefully until it is fully incorporated.
6. Finally, pour in the vegetable oil and whole milk. Use a spatula to fold this in, making sure to scrape the bottom of the bowl.
7. Pour the batter onto the lined tray, and then using a spatula, spread the batter out evenly. Try to ensure the batter is relatively even.
8. Bake the sponge for 12 minutes then allow it to cool for 30 minutes at room temperature.
Chocolate Mousse
1. Add the milk to a small saucepan and place it onto a medium low heat, stirring occasionally.
2. Meanwhile, add the chopped chocolate into a medium bowl.
3. Once the milk is simmering, pour it over the chocolate and let it sit for 2 minutes with a plate on top.
4. Then, remove the plate and use a hand blender to blend the milk and chocolate until smooth and set it to one side.
5. Into a medium bowl, add the cream and use an electric hand whisk to whisk it to a soft-medium peak.
6. Then, whisk the cream through the chocolate mixture in three parts until smooth. It’s important to whisk it through, as if you try to fold it, the cream will not incorporate properly and remain lumpy.
7. Lastly, fold in the salt.
Assembly
1. Take your cooled sponge and tip it out onto a silicon mat/piece of parchment paper.
2. Use your cake ring to cut 2 circles out of the chocolate sponge.
You will have enough remaining sponge to make the Tier 2 recipe, so make sure to save this if you’re moving straight onto Tier 2!
3. Take one of the sponges and place it on a tray lined with a silicon mat/piece of parchment paper. Place your cake ring over the top and gently push the sponge to the sides of the cake ring to make sure it’s even and there are no gaps.
4. Pour your chocolate mousse over the sponge until it reaches halfway up the cake ring. Then add your second layer of chocolate sponge and pour the remaining chocolate mousse over the top until it reaches the top of the cake ring.
You may have a little mousse left over but you can pour this into ramekins to have little pots of delicious chocolate mousse!
5. If you have a slightly uneven top to your mousse cake, heat the edge of a palette knife or scraper and run it evenly over the top of the cake to smooth out the top.
6. Place the cake in the fridge for at least 4 hours until set and ready to serve.
7. To remove the ring, simply gently heat the sides with a blowtorch and it should lift off smoothly. Finish with a pinch of flaky sea salt just before serving.
Shop the Equipment


Maritozzi
TIER 1
Maritozzi
Here we learn the fundamentals of Maritozzi dough, and how to shape it into the traditional Maritozzi style. I show you how to make the dough by hand, but you can stick it in a stand mixer if you have one. After a lot of messages on Instagram I found out a traditional Maritozzi has a little bit of crème pâtissière hidden inside – this adds an extra bit of sweetness which is divine! Filled with whipped cream, they’re a mouthful to eat but absolutely delicious.
7
MARITOZZI
Ingredients
Makes 7 Maritozzi
For the dough
315g White Bread Flour
25g Caster/Granulated Sugar
6g Instant Dry Yeast
5.5g Sea Salt
55g Whole Eggs
160g Whole Milk
Zest ½ Lemon
2g Vanilla Bean Paste (1 Tsp)
55g Unsalted Butter, Cold + Cubed
For the egg wash
50g Whole Egg
5g Whole Milk
For the crème pâtissière
250ml Whole Milk
38g Caster/Granulated Sugar
20g Cornflour/Cornstarch
Pinch of Salt
60g Egg Yolk
2g Vanilla Bean Paste (1 Tsp)
20g Unsalted Butter, Cold + Cubed
For the whipped cream
450g Double/Heavy Cream
10g Icing/Powdered Sugar
Special equipment
Stand mixer with whisk attachment
Dough scraper
Piping bag
Palette knife
Method
For the Dough
1. In a bowl, mix together the milk, eggs and yeast.
2. On top of that, pour the flour, sugar & finally the salt. Add in the lemon zest & vanilla.
3. Using a dough scraper, combine all the ingredients until there is no liquid left over. You’ll be left with a rough dough.
4. On a clean surface, knead the dough together. To do this, hold the edge of the dough with your non-dominant hand, then with the heel of your dominant hand push the dough away from you, and then pull it over back towards you. Rotate the dough 90 degrees and repeat for 10 minutes. (Alternatively knead in a stand mixer for 10 minutes on a medium low speed, scraping down the sides halfway through to make sure everything is incorporated). You should be left with a smoother dough, but not very elastic.
5. Add the cubed cold butter into the centre of your dough and continue to knead. If kneading by hand, you’ll want to move a little faster and can push with the heel of your hand a few times before rotating. If using a stand mixer, increase the speed to medium. Once all the butter has been incorporated, knead for a further 3 minutes by which point the dough should be nice and smooth.
6. Lift the dough out of the bowl and onto your work surface. Gently shape it into a smooth round ball and lift it into a lightly oiled bowl. Cover the bowl with cling film and proof the dough for 1 hour, or until it has doubled in size. *You can make the Crème Pâtissière during this time.
7. Once proofed, remove the dough from the bowl and cut it into 85g pieces. You should get 7 pieces of dough in total.
8. Take a piece of dough rough side up and pinch around the edges, bringing the dough into the centre (this creates tension to help create a more smooth ball). Then turn the dough smooth side up and, with your hand in a C shape, circle your hand repeatedly around the dough to make a nice even ball.
9. Carefully lift the dough ball onto a baking tray lined with parchment paper, and repeat with the remaining dough.
10. Cover the dough loosely with a tea towel and allow it to proof again for another 1-1.5 hours until the dough has increased in size about 1.5x.
11. Just before the dough is ready, preheat the oven to 180C/355F (non-fan assisted).
12. Prepare the egg wash by whisking together the egg and milk.
13. Use a pastry brush to paint an even coating over the dough and then place the dough into the oven and bake for around 22-25 minutes, or until golden brown.
14. Remove from the oven and lift them onto a wire cooling rack, to cool completely.
For the Crème Pâtissière
1. In a bowl, whisk the egg yolk, sugar, salt and cornflour for 30 seconds until thick.
2. To a saucepan over a medium heat, add the whole milk and vanilla bean paste. Gently whisk until the milk is steaming (but not boiling).
3. Once steaming, slowly pour the hot milk over the yolk mixture, whisking constantly. Pour the combined mixture back into the pan and cook on a medium heat. Keep whisking and then once it starts to bubble, cook for a further minute.
4. Next, pass the mixture through a sieve over a bowl with the cold butter in. Whisk to combine.
5. Cover the surface of the mixture directly with cling film, then chill until you’re ready to assemble your buns.
For the cream
1. In a stand mixer (or by hand if you wish!), whisk together the double cream and icing sugar until you have a medium peak.
Assembly
1. Whisk the crème pâtissière for about 30 seconds by hand, to loosen it, then add it to a piping bag.
2. Once your buns are cooled, starting slightly off-centre, cut through the bun with a knife at 45 degree angle. Don’t cut all the way through the bun (watch the video!).
3. Pipe some crème pâtissière into the corner of the bun, filling it about ⅕ full.
4. Fill the rest of the bun with the whipped cream. Then, using a warm palette knife, scrape across the edge of the bun to smooth the cream and create a nice clean finish. You’ll be left with a little cream across the edges, so I tend to use my (clean!) finger to remove this.
5. Repeat with all the buns, then dust with icing sugar to finish.
Shop the Equipment

