
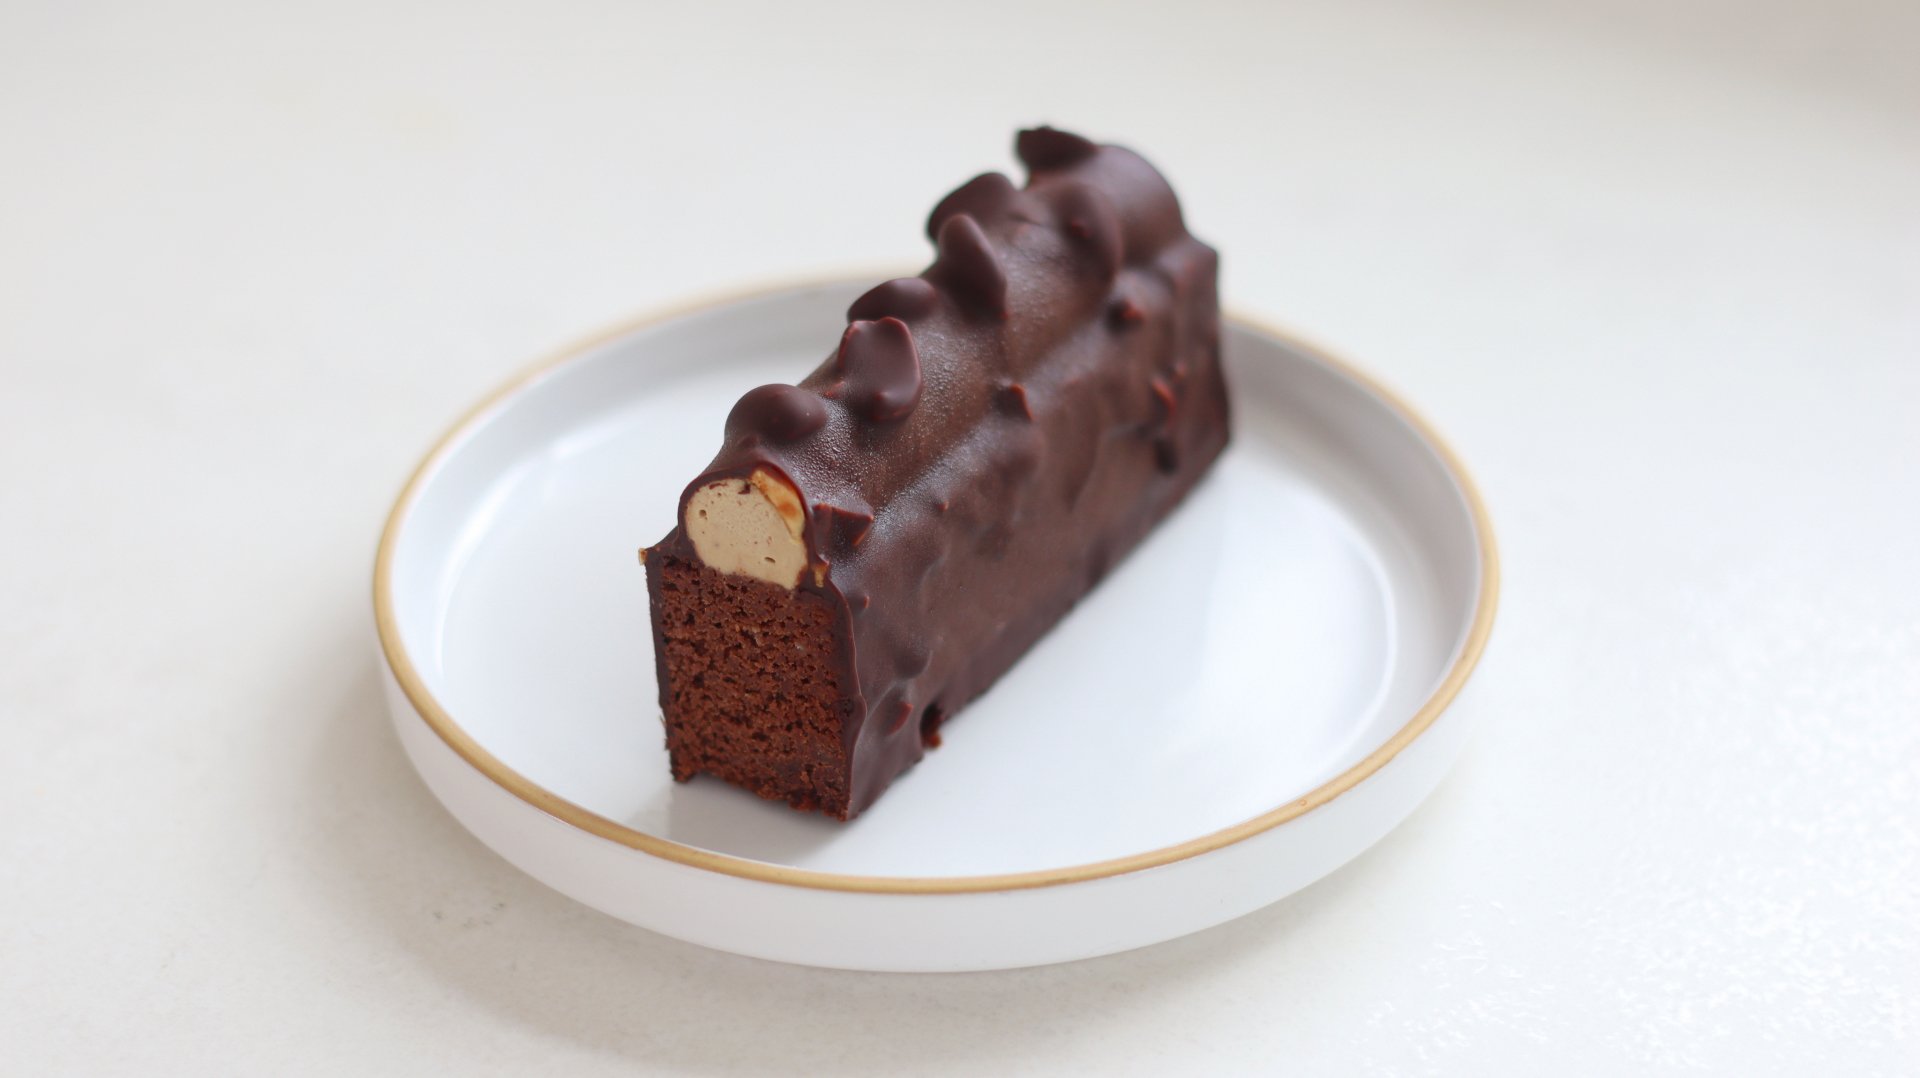
Coffee & Peanut Financier
TIER 1
Coffee & Peanut Financier
I’m a huge fan of “finger” style desserts and the great thing about this recipe is that it builds all the fundamental elements you’ll need to take on tier 2. The financier is almost like a brownie texture with a smooth coffee cremeux and a simple chocolate glaze. Peanut and coffee is a delicious combination but feel free to swap the peanuts with any other nut. The financier also stores really well so you can bake it, wrap it tightly and store it in the fridge for a few days until you need it.

12-14
FINANCIERS
Ingredients
Makes 12-14 Financiers
Coffee Cremeux
5g Powdered Gelatin + 30g Water
400g Double Cream
115g Egg Yolks
60g Sugar
1 Vanilla Pod
75g Espresso
1g Freshly Ground Coffee
Small Pinch of Flaky Salt
Chocolate Peanut Financier
200g Unsalted Butter
560g Dark Chocolate (70%)
160g Plain Flour
200g Icing Sugar
16g Baking Powder
2g Fine Sea Salt
520g Double Cream
400g Egg Whites
160g Ground Peanuts or Almonds
Chopped Peanuts To Garnish
Chocolate Peanut Glaze
300g Dark Chocolate, 70% cocoa solids
30g Neutral Oil
30g Chopped Peanuts
Special equipment
Digital thermometer
Hand blender
13×9” cake tin
Stand mixer
Piping bag
Large round tip nozzle
Method
1. Into a small bowl, add the gelatin and water to a small saucepan and let it bloom for 10 minutes.
2. Into a medium saucepan, add the cream, espresso, coffee grounds and beans from the fresh vanilla pod. Place it over a medium heat until steaming.
3. Meanwhile, whisk together the egg yolks and sugar until combined.
4. Pour the hot cream over the egg mixture, whisking to combine, then add it back into the saucepan. Place it over a medium heat.
5. Cook to 80-82C on a digital thermometer, then immediately pass it through a sieve, on top of a tall measuring jug.
6. Scoop in the bloomed gelatin and blend till smooth with a hand blender. Sprinkle in a pinch of flaky sea salt and stir it through with a spatula. Pour the mixture into a bowl and refrigerate for a minimum of 6 hours.
7. For the financier, preheat the oven to 160C/320F non-fan assisted (145C for fan assisted). Lightly grease a 13×9” cake tin with soft butter. Cut a strip of parchment paper long enough to cover the base of the tin and extend up and over two opposite sides, creating “handles.” Press it into the tin so it sticks to the base and sides. Then cover the other sides with two strips of parchment.
8. Add the chocolate and butter to a medium bowl and melt this over a pan of gently simmering water. Once melted, set it to one side to cool slightly.
9. Meanwhile, sift together the flour, icing sugar, baking powder and salt. Add the ground peanuts on top and whisk to combine.
10. Pour the cream and egg whites on top and whisk by hand just until combined and there are no streaks of dry ingredients.
11. Pour in the melted chocolate mixture and whisk again to combine.
12. Pour the smooth batter into the lined tray and bake in the oven for 70-75 minutes.
13. Remove it from the oven and allow it to cool for 30 minutes before refrigerating for 1 hour.
14. When the financiers have cooled, use the parchment handles to lift it out of the tin and onto a chopping board. Cut it into 12-14 rectangles, or as small/large as you would like to make them.
15. Remove the coffee cremeux from the fridge and add the mixture into a stand mixer fitted with a whisk attachment. Whisk on a medium speed until it has thickened to a medium stiff peak. Add the mixture into a piping bag fitted with a large round tip nozzle.
16. Pipe long lines of the cremeux along the top of the financier, and then use a slightly warm knife to trim off the ends so they are flush with the edge of the financier.
17. Place some chopped peanuts into the top of the cremeux, then place the financiers into the freezer for 3-6 hours or until they are solid.
18. When they are frozen, prepare the glaze. Add the chocolate and oil into a bowl and place it over a pan of simmering water, stirring until it is melted.
19. Remove it from the heat and stir through the chopped peanuts. The glaze needs to be around 45C/113F when you use it. Pour the mixture into a tall but thin rectangular container. Take the temperature and heat it up if needed or allow it to cool further.
20. Remove the financiers from the freezer and place a knife into the bottom. Dip the financier into the glaze until it is completely covered, then lift it up, allowing the excess to drip off before quickly flipping it over and placing it onto a tray.
21. Repeat this with the remaining financiers.
22. The financiers can be left at room temperature for 30 minutes then served, or stored in the fridge until needed.
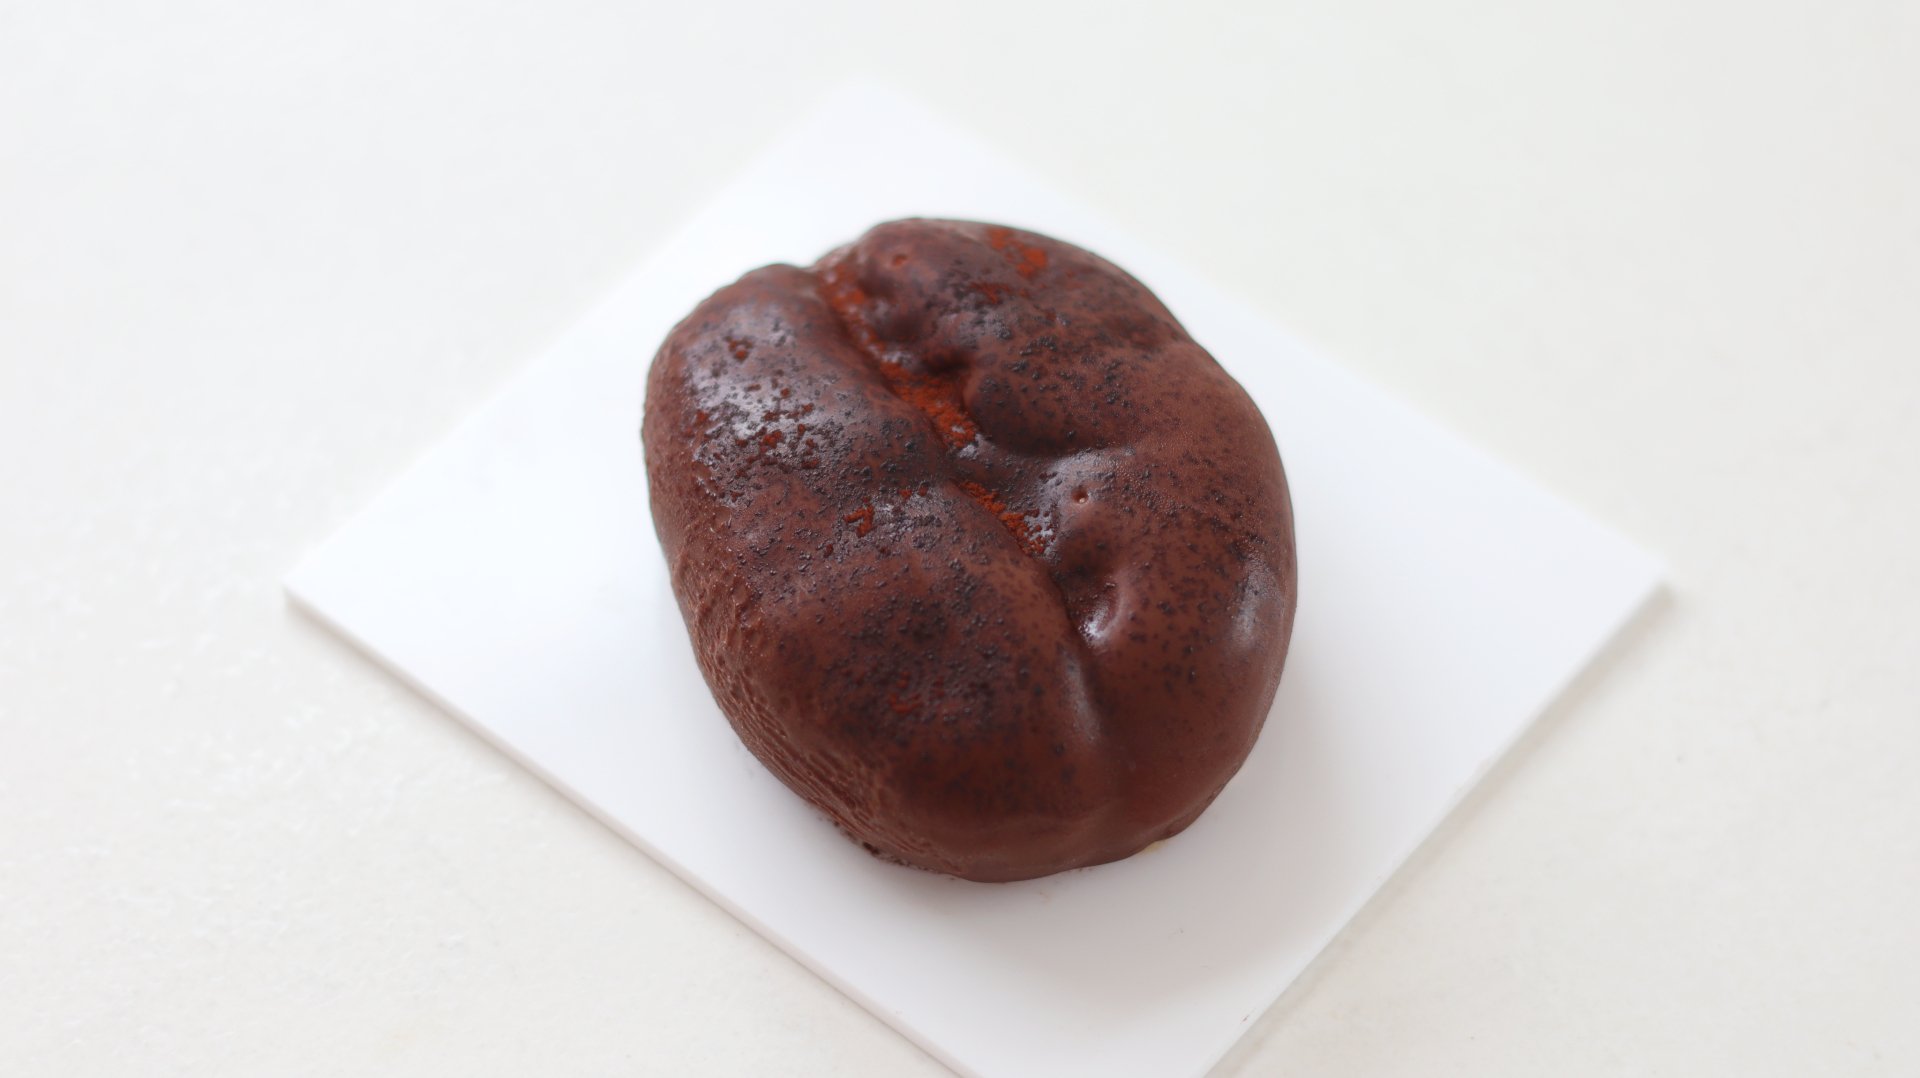
Coffee Bean Petit Gateaux
TIER 2
Coffee Bean Petit Gateaux
The showstopper! This style of dessert was made famous by pastry chef Cedric Grolet but no one ever seems to show you how to actually make them! The recipe has quite a few elements to prepare with a coffee cremeux, chocolate financier, recomposed streusel and a chocolate glaze. I’m a coffee snob, so I would always recommend using the freshest coffee you can get for the best flavour. If you don’t have the fancy coffee bean silicon mold, then feel free to freeze it in any small silicon mold you’ve got.
8-10
COFFEE BEANS
Ingredients
Makes 8-10 Coffee Beans
Coffee Cremeux
5g Powdered Gelatin + 30g Water
400g Double Cream
115g Egg Yolks
60g Sugar
1 Vanilla Pod
75g Espresso
1g Freshly Ground Coffee
Small Pinch of Flaky Salt
Chocolate Financier
130g Double Cream
100g Egg Whites
50g Icing Sugar
40g Ground Almonds
40g Plain Flour
4g Baking Powder
Pinch of Salt
50g Unsalted Butter
140g Dark Chocolate (70% Cocoa Solids)
Coffee Hazelnut Praline
220g Roasted Hazelnuts, Skinned
80g Pecans
12g Whole Coffee Beans
200g Sugar
50g Water
1 Vanilla Pod
Flakey Salt
Streusel
110g Light Brown Sugar
110g Ground Hazelnuts or Almonds
95g Plain/All-Purpose Flour
2g Bicarbonate of Soda
1g Fine Sea Salt
110g Cold Unsalted Butter, Cubed
Recomposed Streusel
215g Streusel
50g Dark Chocolate (70%)
25g Unsalted Butter
70g Coffee Hazelnut Praline
Chocolate Glaze
350g 55% Chocolate
300g Cocoa Butter
30g Neutral Oil
Cocoa Powder to Finish
Special equipment
Digital thermometer
35x25cm baking tray
Food processor
Stand mixer
Piping bag
Coffee bean silicon mold
Method
1. Into a small bowl, add the gelatin and water to a small saucepan and let it bloom for 10 minutes.
2. Into a medium saucepan, add the cream, espresso, coffee grounds and beans from the fresh vanilla pod. Place it over a medium heat until steaming.
3. Meanwhile, whisk together the egg yolks and sugar until combined.
4. Pour the hot cream over the egg mixture, whisking to combine, then add it back into the saucepan. Place it over a medium heat.
5. Cook to 80-82C on a digital thermometer, then immediately pass it through a sieve, on top of a tall measuring jug.
6. Scoop in the bloomed gelatin and blend till smooth with a hand blender. Sprinkle in a pinch of flaky sea salt and stir it through with a spatula. Pour the mixture into a bowl and refrigerate for a minimum of 6 hours.
7. For the financier, preheat the oven to 160C/320F non-fan assisted (145C for fan assisted). Lightly grease a 35x25cm baking tray with soft butter and line it with parchment paper – alternatively use a silicon sponge roll mat. Add the chocolate and butter to a medium bowl and melt this over a pan of gently simmering water. Once melted, set it to one side to cool slightly.
8. Meanwhile, sift together the flour, icing sugar, baking powder and salt. Add the ground almonds on top and whisk to combine.
9. Pour the cream and egg whites on top and whisk by hand just until combined and there are no streaks of dry ingredients.
10. Pour in the melted chocolate mixture and whisk again to combine.
11. Pour the smooth batter into the lined tray and bake in the oven for 15-17 minutes.
12. Remove it from the oven and allow it to cool for 30 minutes before refrigerating for at least 1 hour. You can also freeze this.
13. For the coffee hazelnut praline, into a medium saucepan, add the sugar and water. Place it on a medium heat, and cook the mixture until it reaches 116C/240F on a digital thermometer.
14. Once at temperature, pour in the hazelnuts, pecans, coffee beans and the beans from a fresh vanilla pod. Stir constantly with a spatula. The mixture will initially look quite clumpy, then the sugar will crystallise, but eventually, as you keep stirring, the sugars will caramelise and you should have a deep golden caramel surrounding the nuts. It will take around 3-5 minutes.
15. Immediately remove the pan from the heat, and tip the caramelised nuts onto a baking tray lined with a silicon mat. Sprinkle some sea salt flakes on top and let it set completely at room temperature for 30 minutes.
16. The praline should then be completely cool and solid to the touch. Break it into pieces and add it into a high-powered food processor. Blend for 3-4 minutes, scraping it down every so often, until you have a smooth, nutty paste. Store in an airtight container.
17. Into the bowl of a stand mixer, fitted with the paddle attachment, add all of the ingredients for the streusel.
18. Mix on a low speed until the butter has broken down and the mixture is sandy in texture.
19. Transfer this to a baking tray, lined with a silicon mat and spread it out. Place it into the freezer for 30 minutes. Meanwhile preheat the oven to 175C/345F non-fan assisted.
20. Place the chilled mixture into the oven and bake for 30 minutes. After around 15 minutes it should be slightly golden around the edges. Remove it from the oven and stir it all together with a spatula then place it back in the oven to bake until it is an even golden colour.
21. Once baked, allow it to cool at room temperature for at least 30 minutes.
22. For the recomposed streusel, add the chocolate, butter and praline into a bowl and place this over a pan of simmering water. Stir it together until the chocolate and butter have completely melted. Remove it from the heat.
23. Tip in the cooled streusel and stir to combine. Ensure if there are any large pieces of streusel, that you crush them slightly so they are smaller, before adding them in.
24. Pour the mixture onto a sheet of parchment paper and place a second sheet on top. Use a rolling pin to roll it relatively thin, then place it into the freezer for 30 minutes.
25. To assemble the dessert, remove the coffee cremeux from the fridge and whisk it to a medium peak in a stand mixer – avoid whipping it too stiff. Add the mixture into a piping bag.
26. If your coffee bean silicon mold has a cutter, use this to cut the out inserts from the recomposed streusel and financier. Sandwich them together with a little bit of cremeux. If you don’t have a cutter, then you can use a sharp knife to cut the required shapes that will fit your coffee bean mold. You can also freeze this dessert in any silicon mold you have!
27. Take the coffee bean silicon mold (or any silicon mold) and pipe the cremeux into the mold, filling it up about ¾ of the way. Use a spatula to press the cremeux to the edges, then place the financier/streusel insert into the cremeux. Top up the mold if needed with cremeux and then smooth the top with a palette knife. Repeat this for all of the molds you have. Place the molds onto a tray and freeze them for at least 12 hours.
28. Once frozen, remove them from the molds then place the desserts back in the freezer on a tray lined with a silicon mat for a further hour.
29. For the glaze, add the chocolate, cocoa butter and oil into a medium bowl. Place this over a pan of gently simmering water and stir it until it is completely melted.
30. The glaze needs to be at 45C/113F when you dip the desserts. Pour the mixture into a small, deep container that is just slightly larger than your dessert.
31. Remove one dessert at a time, and place a knife into the base. Dip the dessert into the so that it is covered right to the edge, then lift it up and hold it at a 45 degree angle until the dripping slows. Then lift it upright until it has set.
32. Dip a pastry brush back into the glaze and quickly brush this all around the bean to ‘rough’ it up slightly.
33. Finally, dust a thin layer of cocoa powder on top of the coffee bean then very quickly and carefully blow torch it to darken the cocoa powder slightly. Lift it onto a small serving dish.
34. Repeat this for all the remaining desserts, and then leave them in the fridge for at least an hour or overnight before serving.