
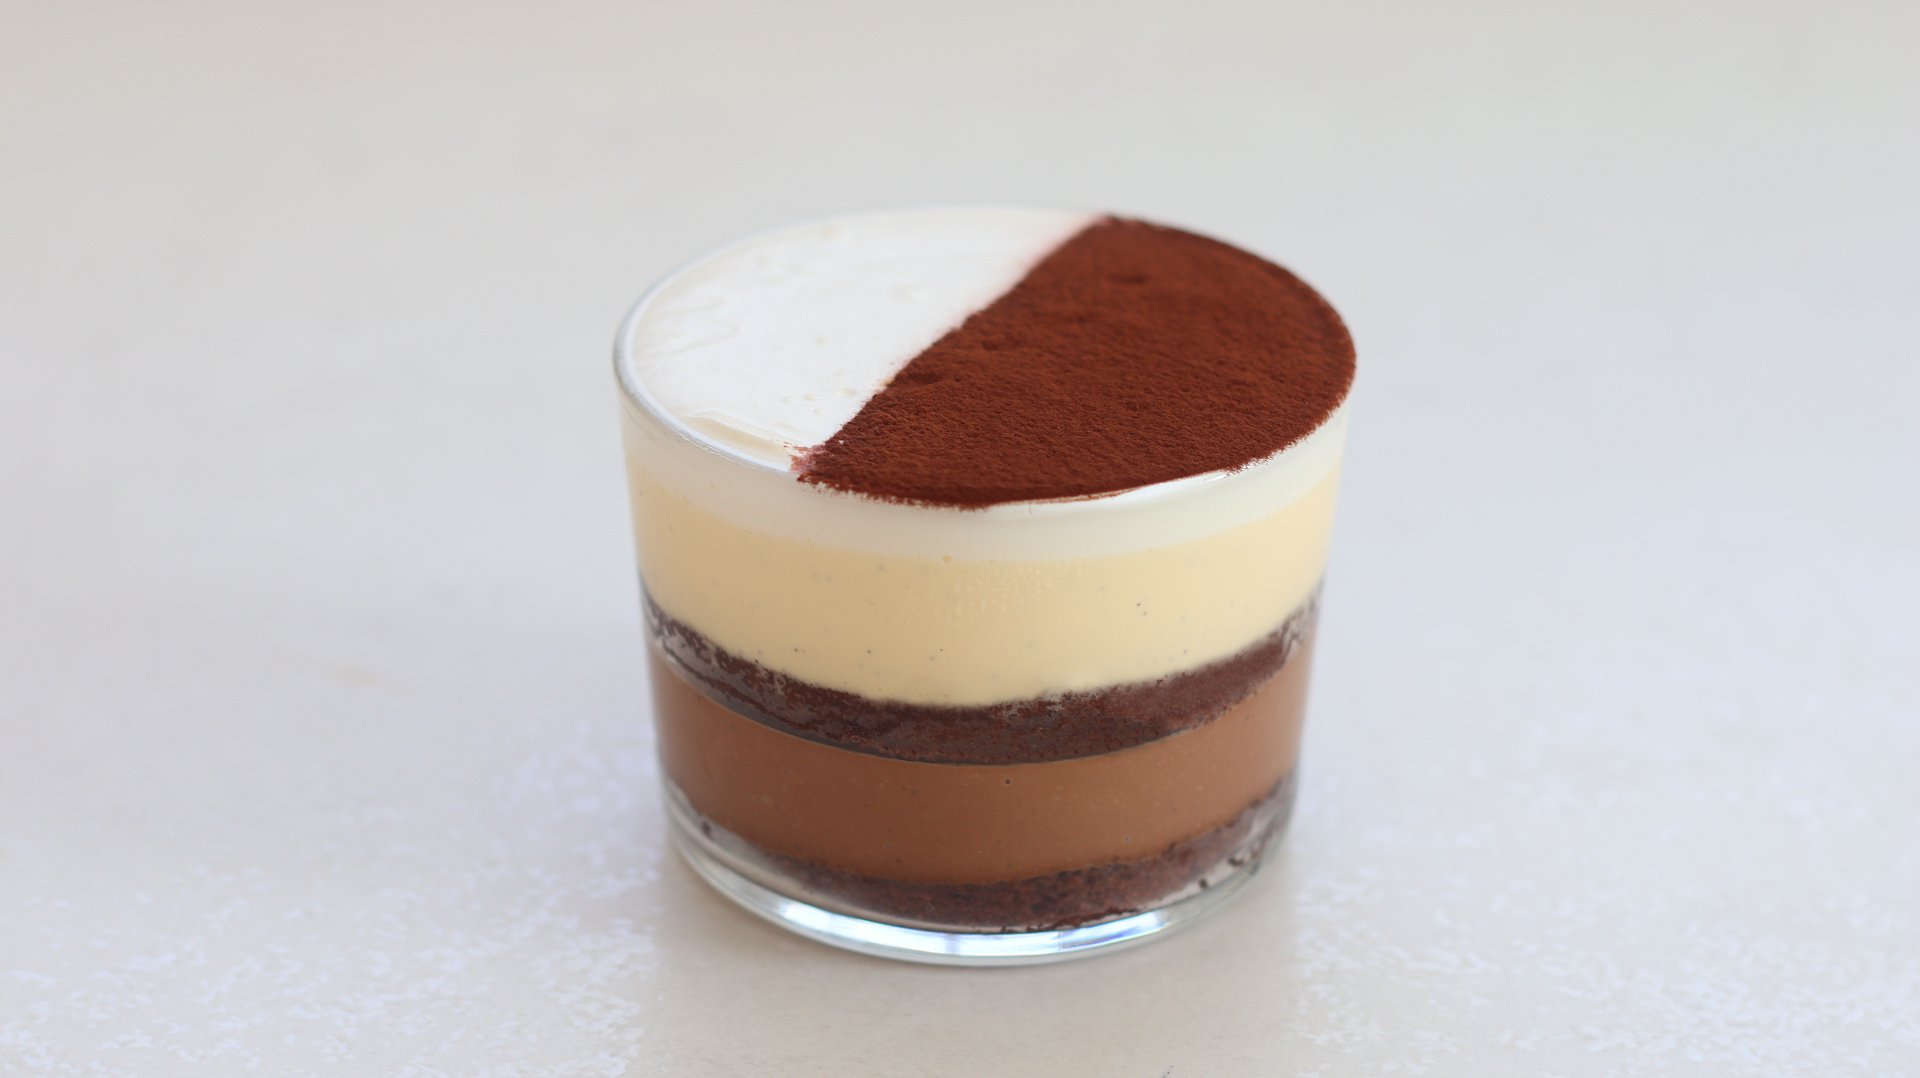
Chocolate Orange Marmalade Trifle
TIER 1
Chocolate Orange Marmalade Trifle
Now this isn’t any ordinary trifle. This has layers of soft chocolate sponge, orange marmalade, vanilla and chocolate custard, then finished with whipped cream. It’s not really traditional, but the texture when you get a spoonful of all the layers is amazing. This can be scaled up to a large trifle, you will just need to increase the quantities.

4
MINI TRIFLES
Ingredients
Makes 4 Mini Trifles
Chocolate Sponge
80g Egg Yolks
75g Caster/White Sugar, Divided
150g Egg Whites
45g Plain/All-Purpose Flour
25g Cocoa Powder
50g Vegetable Oil
35g Whole Milk
Custard Base
350g Double/Heavy Cream
175g Milk
1 Vanilla Pod
160g Egg Yolks
55g Caster/White Sugar
Pinch Flakey Sea Salt
Chocolate Custard
260-285g Custard Base
65g Chocolate, 70% Cocoa Solids
Vanilla Custard
260-285g Custard Base
40g Unsalted Butter, Cold & Cubed
Unsweetened Whipped Cream
200g Double/Heavy Cream
Orange Marmalade To Fill
Cocoa Powder To Decorate
Special equipment
39x27cm baking tray
Electric hand whisk or stand mixer
Digital thermometer
Hand blender
Cookie cutter
Piping bag (optional)
Method
Chocolate Sponge
1. Preheat the oven to 180°C/355°F Non-Fan Assisted.
2. Lightly grease a 39x27cm baking tray. Cut a rectangle of parchment paper so that it fits neatly inside the tray, and press it in.
3. Into a medium bowl, add the egg yolks, and 20g of caster sugar. Whisk the mixture with an electric hand mixer (or in a stand mixer) until it is thicker in volume and pale in colour. About 1-2 minutes. Set this to one side.
4. Into a medium bowl, add the egg whites and using an electric hand whisk (or stand mixer) whisk on a medium-low speed. Once the mixture is frothy, increase the speed to medium and slowly add the remaining 55g of caster sugar, about 1 tablespoon at a time. Whisk until you have a medium-stiff peak to the meringue.
5. Gently fold the first third of meringue into the egg yolk mixture. Once incorporated, add the second third, fold it through and then the final third.
6. Next, sift in the plain flour & cocoa powder, and fold the mixture carefully until there are no more streaks of dry ingredients.
7. Finally, pour in the vegetable oil and whole milk. Use a spatula to fold this in, making sure to scrape the bottom of the bowl.
8. Pour the batter onto the lined tray, and then using a spatula, spread the batter out evenly.
9. Bake the sponge for 12 minutes then allow it to cool for 30 minutes at room temperature.
Custard Base
1. Into a medium saucepan add the cream, milk, egg yolks, sugar and beans scraped from a fresh vanilla pod.
2. Place this over a medium-low heat and whisk constantly until it reaches a temperature of 82C/180F on a digital thermometer.
3. Immediately remove it from the heat and pour it through a sieve into a tall measuring jug.
4. Split the mixture into half in between two measuring jugs, you should get around 260-285g per jug.
5. Add the chopped chocolate into one, butter into another, and then blend each until smooth with a hand blender. Add a pinch of flakey sea salt to each and stir it through with a spoon. Alternatively, if you want the vanilla version to be thicker, try using white chocolate instead of butter.
6. Pour the vanilla custard onto a shallow baking tray and cover the surface directly with cling film. Cover the surface of the chocolate jug with cling film and refrigerate – this will thicken faster than the vanilla version.
Assembly
1. Take the cooled chocolate sponge and flip it out of the tray onto a large silicon mat or piece of parchment paper.
2. Take a few tablespoons of orange marmalade and spread this evenly across the sponge with an offset spatula.
3. Take a cookie cutter that is just slightly bigger than the width of your individual trifle dishes.
4. Place a disc of sponge into the base of each trifle dish.
5. Remove the chilled chocolate custard from the fridge (it needs 15-30 minutes to thicken and cool slightly).
6. Add it into a piping bag if you want, otherwise, pour an even layer across each dish.
7. Place it into the freezer or fridge just until a skin has formed on top and when you poke it with your finger, you feel there is enough of a ‘barrier’ to support the weight of the next layer.
8. Add a second disc of sponge, then remove the chilled vanilla custard from the fridge – this will be a looser consistency.
9. Pour this on top of the sponge, leaving enough room at the top for cream.
10. Place the trifles into the fridge or freezer just until the vanilla mixture has set to create a slight barrier and support the weight of the cream. This can take slightly longer as the mixture is softer.
11. For the whipped cream, simply add the cream to a bowl and whisk with an electric hand whisk until you have a medium stiff peak.
12. Spoon the cream on top of the set vanilla custard, and then level it completely with a slightly warm palette knife.
13. The trifles can now be refrigerated until needed or served immediately. Dust with a light coating of cocoa powder when ready to serve.
Shop the Equipment


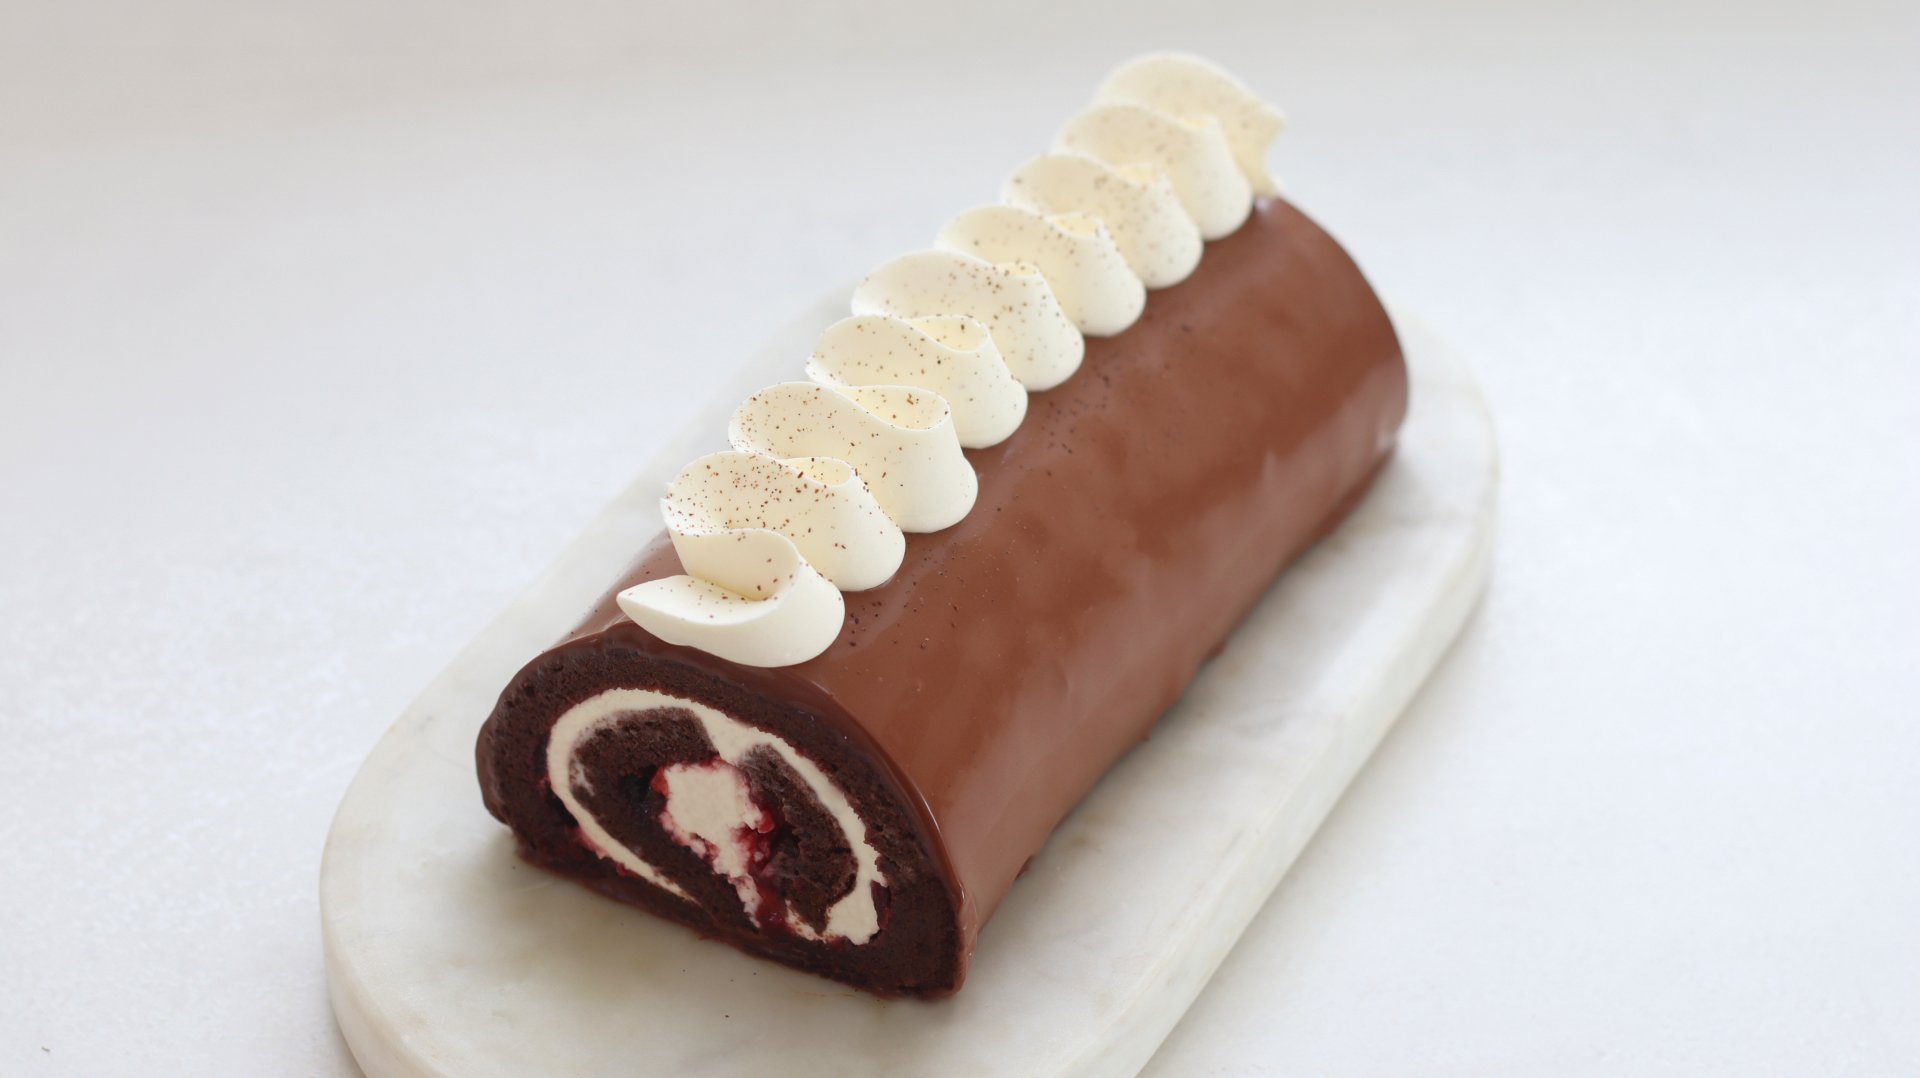
Black Forest Swiss Roll
TIER 2
Black Forest Swiss Roll
Black Forest gâteau is one of my all-time favourites, and the mix of cream, fruit, and chocolate is exactly what a good Swiss roll should be about too! This version layers the chocolate sponge from Tier 1 with cherry jam, mascarpone cream, and finishes with a stunning chocolate glaze. Watch the video to help you master the perfect roll, and you’ll catch the little accident I had along the way 😅.
1
SWISS ROLL CAKE
Ingredients
Makes 1 Swiss Roll Cake
Mascarpone Vanilla Cream
4g Powdered Gelatin, 250 bloom
24g Cold water
400g Double/Heavy Cream, Divided
1 Fresh Vanilla Pod
130g Mascarpone
20g Icing/Powdered Sugar
Chocolate Sponge
80g Egg Yolks
75g Caster/White Sugar, Divided
150g Egg Whites
45g Plain/All-Purpose Flour
25g Cocoa Powder
50g Vegetable Oil
35g Whole Milk
Chocolate Glaze
160g Dark Chocolate, 70% Cocoa Solids, Chopped
370g Double/Heavy Cream
10g Unsalted Butter
10g Glucose or Honey
Cherry Jam To Fill
Special equipment
Hand blender
39x27cm baking tray.
Electric hand whisk
Stand mixer
Piping bag
St Honore nozzle
Method
Mascarpone Vanilla Cream
1. Into a small bowl, add the powdered gelatin and cold water. Stir them together and set to one side for 5 minutes to bloom.
2. Into a tall jug, add the mascarpone and set this to one side.
3. Pour 330g of cream into a small saucepan, along with the sugar and the beans scraped from a fresh vanilla pod.
4. Place this over a medium heat, stirring until the mixture is steaming.
5. Remove it from the heat and pour it over the mascarpone. Scoop in the bloomed gelatin, and blend with a hand blender until smooth.
6. Finally, pour in the remaining 70g of cold cream and blend again. Pour the mixture onto a deep baking tray and cover the surface directly with clingfilm.
7. Refrigerate for a minimum of 3 hours.
Chocolate Sponge
1. Preheat the oven to 180°C/355°F Non-Fan Assisted.
2. Lightly grease a 39x27cm baking tray. Cut a rectangle of parchment paper so that it fits neatly inside the tray, and press it in.
3. Into a medium bowl, add the egg yolks, and 20g of caster sugar. Whisk the mixture with an electric hand mixer (or in a stand mixer) until it is thicker in volume and pale in colour. About 1-2 minutes. Set this to one side.
4. Into a medium bowl, add the egg whites and using an electric hand whisk (or stand mixer) whisk on a medium-low speed. Once the mixture is frothy, increase the speed to medium and slowly add the remaining 55g of caster sugar, about 1 tablespoon at a time. Whisk until you have a medium-stiff peak to the meringue.
5. Gently fold the first third of meringue into the egg yolk mixture. Once incorporated, add the second third, fold it through and then the final third.
6. Next, sift in the plain flour & cocoa powder, and fold the mixture carefully until there are no more streaks of dry ingredients.
7. Finally, pour in the vegetable oil and whole milk. Use a spatula to fold this in, making sure to scrape the bottom of the bowl.
8. Pour the batter onto the lined tray, and then using a spatula, spread the batter out evenly.
9. Bake the sponge for 12 minutes then allow it to cool for 30 minutes at room temperature.
Assembly
1. Once the sponge has cooled, flip it out of the tray and gently peel off the parchment paper. Then carefully flip the sponge over onto a large, clean sheet of parchment paper, so that the smooth top side (the side that wasn’t touching the tray during baking) is facing down.
2. Position the sponge with the long edge facing you. Choose one of the short ends—either the left or right edge—and slice off a thin piece at a 45-degree angle using a serrated knife. This angled cut makes it easier to start the roll neatly and helps it tuck in smoothly. Then, at the opposite end, score three lines, about 1cm/0.4” apart, being very careful not to cut through the sponge.
3. Take a few tablespoons of cherry jam and spread this evenly across the sponge using a palette knife.
4. Then, remove the mascarpone cream from the fridge, and scoop half of it into the bowl of a stand mixer fitted with a whisk attachment. Place the remaining half back in the fridge to use later.
5. Whisk the cream on a medium speed for 2-3 minutes, until you have a medium stiff peak.
6. Use an offset spatula to spread the cream in a very even layer across the sponge, right to the edges.
7. Starting from the short edge that you didn’t cut, begin to roll the sponge tightly using the parchment paper underneath to guide and lift the sponge as you go. Use firm but gentle pressure to keep the roll even and tight. Once fully rolled, wrap the parchment paper around the log. Then, place a flat tool like a bench scraper against the roll, and with your other hand, gently pull the loose end of the parchment paper. This will tighten the log and help create a more defined cylinder shape. Place the Swiss roll onto a tray and refrigerate for 1 hour, then into the freezer for 15 minutes.
Chocolate Glaze
1. Just before you remove the Swiss roll from the freezer, prepare the glaze, as we will use this immediately.
2. Into a tall jug, add the chopped chocolate and set this to one side.
3. Add the cream and glucose (or honey) to a small saucepan. Note – if you are using a cream with a lower fat percentage (35% for example), you will need less cream, around 260g.
4. Place this over a medium-low heat and stir until the mixture is steaming.
5. Immediately remove it from the heat, and pour it over the chocolate, and add the butter on top.
6. Let it sit for 2 minutes, then use a hand blender to blend until smooth. Avoid adding any air bubbles as you blend it.
7. Remove the Swiss roll from the freezer and place a wire rack over a tray to catch any excess glaze. To elevate the Swiss roll and allow the glaze to drip cleanly down the sides, set a few small ring molds under the roll so it sits slightly above the wire rack. This will keep the bottom from sticking and ensure an even coating all around.
8. Take the glaze and slowly pour it evenly all over the Swiss roll.
9. Let the excess drip off and the glaze set for a few minutes before taking a small knife and wiping away any drips that have set on the underside of the cake.
10. Use a large offset spatula to carefully lift the Swiss roll onto your serving plate, then with a sharp knife that has been heated, cut both ends of the Swiss roll to reveal the swirl. Clean up the plate to ensure a nice presentation. Leave this at room temperature for 30 minutes.
11. Take the remaining mascarpone cream and whisk it to a medium stiff peak. Add this into a piping bag fitted with a St Honore nozzle.
12. Pipe a zigzag of cream down the centre and serve.
Shop the Equipment
