
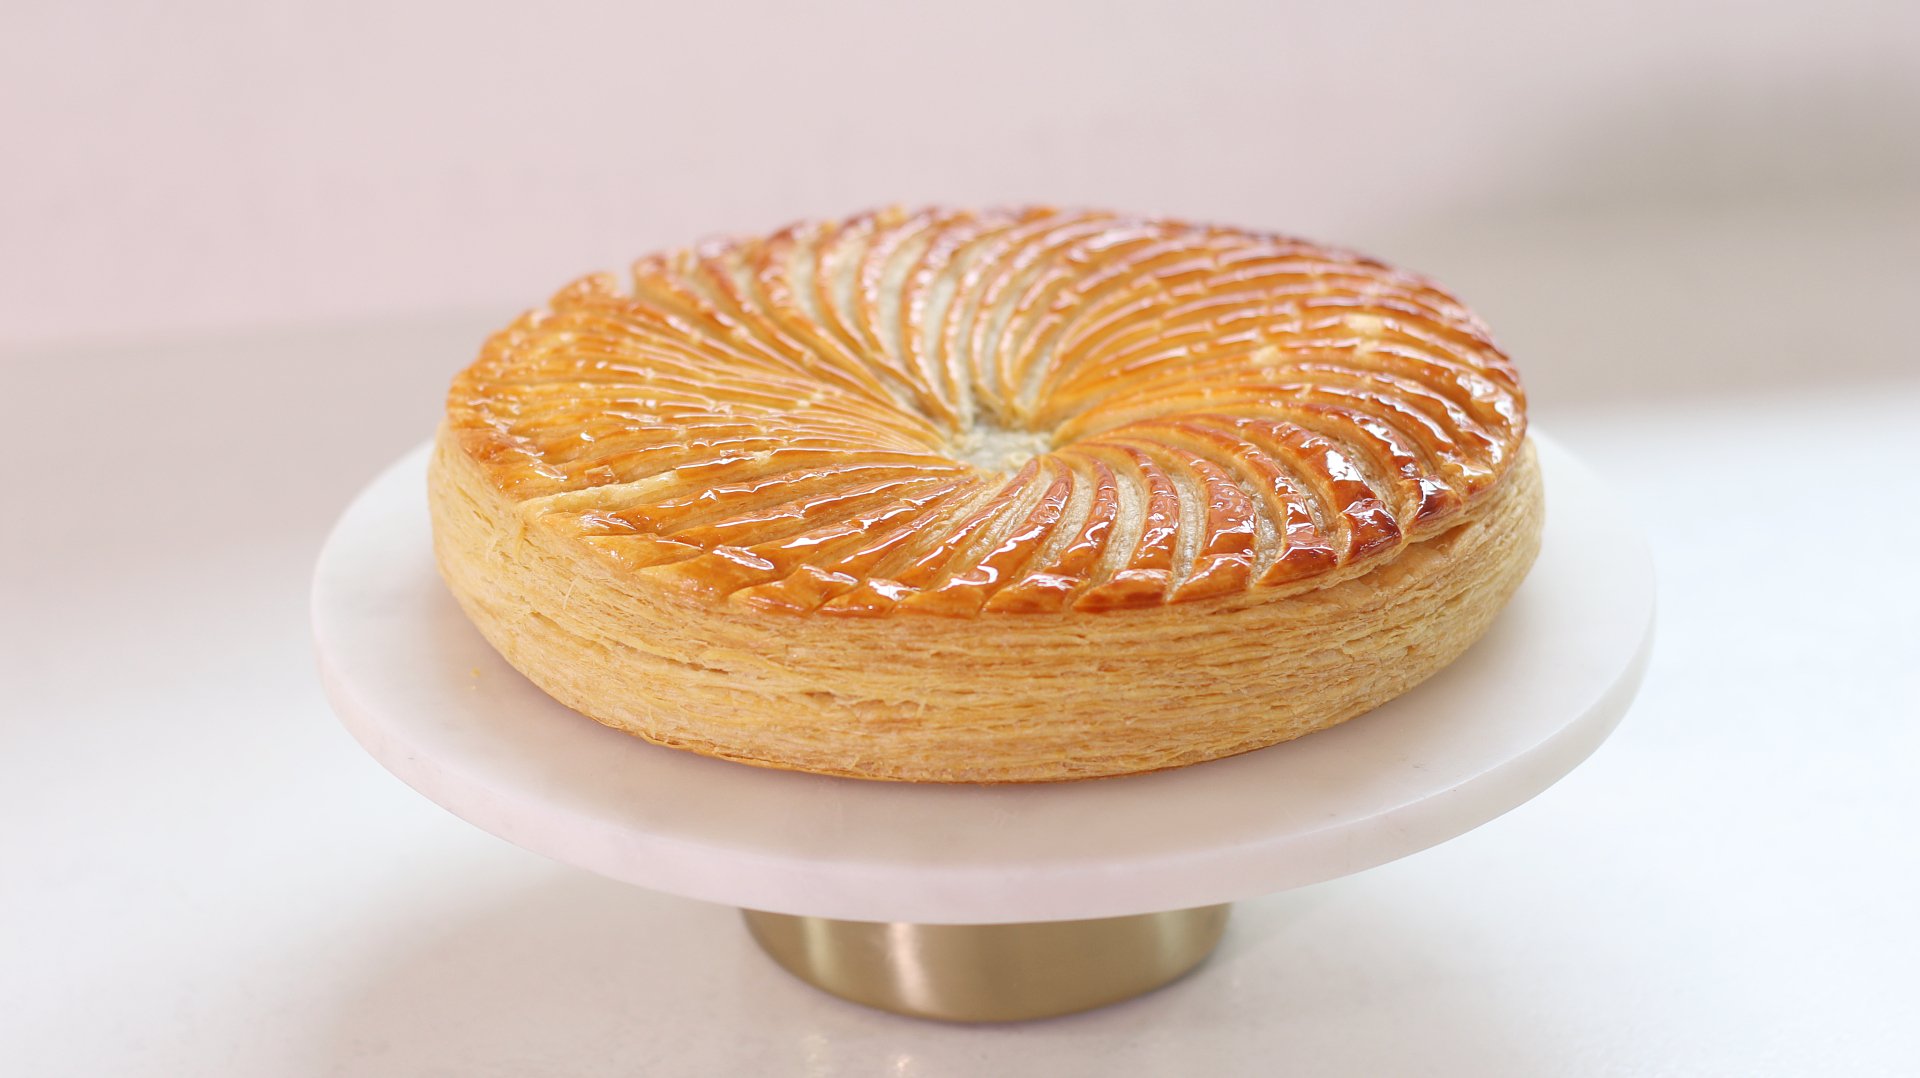
Pistachio Galette Des Rois
TIER 2
Pistachio Galette Des Rois
For Tier 2 I was determined to use our inverse puff pastry to make a Galette Des Rois. After all my fails, I realised I wasn’t resting the dough enough and that I needed to adjust my filling slightly to add more nuts. The resulting galette has the most amazing puff, that stays even, holds its shape and has a soft, pistachio filling. Although we’re at the end of galette season, I think it’s something you should make all year round it’s that good! Take your time with this recipe, especially paying attention to the scoring pattern. There’s lots of helpful tips in the PDF recipe so much sure to download that.

8-10
SERVINGS
Ingredients
Makes 8-10 Servings
Inverse Puff Pastry (x2)
Butter Block
100g Plain/All-Purpose Flour
300g Unsalted Butter, Room Temperature
Dough
200g Plain/All-Purpose Flour
4g Fine Sea Salt
120g Double/Heavy Cream
20g Cold Water
5g White Vinegar
Pistachio Cream
85g Unsalted Butter, Soft
85g Icing Sugar
130g Ground Pistachios
70g Ground Almonds
15g Cornstarch/Cornflour
70g Whole Eggs, Room Temperature
Egg Wash
35g Egg Yolk
30g Double/Heavy Cream
Hot Syrup
50g Caster Sugar
35g Water
Special equipment
Stand mixer
Digital thermometer
Silicon mat
18cm ring mold (optional)
Piping bag
23cm disc (for measuring)
Method
Inverse Puff Pastry
Note that you will need two batches of pastry (one for the top of the galette, and one for the bottom). As we are laminating by hand, I prefer to do this in two separate batches to ensure not too much gluten is developed. So you will need to create this recipe twice.
Butter Block
1. Add the soft butter and flour into a stand mixer fitted with a paddle attachment. Beat for 1-2 minutes on a medium speed until smooth, scraping down the bowl as needed.
- 100g Plain/All-Purpose Flour
- 300g Unsalted Butter, Room Temperature
2. Trace a rectangle 35 x 20 cm/14 x 8 inches in the centre of a large sheet of parchment paper or acetate, then flip it over. Place the butter mixture into the centre, folding over the edges of the paper and taping them in place if needed.
3. Use a rolling pin to roll it into a rectangle with even thickness. Chill for 3 hours in the fridge or overnight.
Dough
1. For the dough, add all the ingredients to a large bowl and stir together until there are no more dry ingredients. It can help to squeeze it together with your hands.
- 200g Plain/All-Purpose Flour
- 4g Fine Sea Salt
- 120g Double Cream
- 20g Cold Water
- 5g White Vinegar
2. Tip the mixture onto a lightly floured work surface and knead it for 1–2 minutes. Initially, it will be quite dry, but as you continue to work it, it will become smooth and gain some very slight elasticity.
3. Trace a rectangle 17.5 x 20cm into the centre of a large sheet of baking parchment or acetate and flip it over. Place the dough in the centre and fold over the edges of the parchment, taping it in place if needed. Roll the dough to the edges until you have an even block. Refrigerate for 3 hours, or ideally overnight. A longer chill is preferable to relax the gluten.
4. Once both have chilled, remove the butter block from the fridge, it needs to be 9–10°C (48–50°F) before using. Once it is close to temperature, remove the dough from the fridge; this needs to be at 6–7°C (43–45°F).
5. Place the dough block in the centre of the butter and fold the butter over, sealing the seam with your fingers. Be quite generous with flouring the work surface and the dough here, or the butter will stick.
6. Rotate the dough 90 degrees so the seam is facing you horizontally, and use a sharp knife to score the edges of the dough where it is folded over the butter. This will release tension and make it easier to roll.
7. Lightly roll the dough to give it some slight width, then rotate the dough 90 degrees again so the seam is now vertically in line with your body.
8. Roll the dough lengthways into a long rectangle, being liberal with the flour so that it doesn’t stick, until it reaches a thickness of about 5–7mm. Use a sharp knife to trim off any wonky ends and dust off any excess flour.
9. Perform a double fold, folding one side of the dough up about 1/5th of the way, bringing the opposite side over to meet it, and then folding the whole piece in half. Wrap the dough tightly in cling film, and place it in the freezer for 15 minutes, then into the fridge for 10 minutes.
10. Remove the dough from the fridge, and with the open seam facing you (i.e if you were looking at the dough straight on, you would be able to see where it has been folded over itself), use a sharp knife again, to score the edges of the dough where it is folded.
11. Turn the dough 90 degrees so the open seam is now horizontal to you and give the dough a quick roll, to give it a little bit of width.
12. Turn the dough 90 degrees again so the open seam is facing you again and begin to roll the dough. Roll the dough into a long even rectangle, very very lightly flouring it, just as we did in step 8.
13. Perform another double fold, and place it in the freezer for 15 minutes, then into the fridge for 10 minutes.
14. Repeat this process one more time, but finishing with a single fold rather than a double fold. To do this, take one-third of the dough and fold it up, then take the other third of dough and fold this over the top.
15. Wrap the dough tightly in cling film and refrigerate, ideally overnight. Again, a longer chill helps to relax the gluten.
Pistachio Cream
1. Into a stand mixer fitted with a paddle attachment, beat the butter and icing sugar on a medium-low speed until smooth, 1-2 minutes.
- 85g Unsalted Butter, Soft
- 85g Icing Sugar
2. Scrape down the sides and add in the ground pistachios, ground almonds and cornstarch, then mix again just until combined.
- 130g Ground Pistachios
- 70g Ground Almonds
- 15g Cornstarch/Cornflour
3. Finally pour in the eggs and beat until it is evenly combined.
- 70g Whole Eggs, Room Temperature
4. You will need 320g of mixture so pour the batter into a bowl and weigh the required amount.
5. To make the mixture neat, place an 18cm ring mold onto a baking tray lined with a silicon mat. Scoop the mixture in, and level it so it is smooth with a palette knife. Place this into the freezer for 1-2 hours. You can also place a fève into the mixture (or a whole pistachio) which is very traditional.
6. If you do not have a ring mold, the mixture can just be piped fresh onto the puff pastry. In this case, add it into a piping bag fitted with a large round tip nozzle and refrigerate until your pastry has been rolled out. (Once you have rolled out one portion of the pastry, pipe and even disc, 18 cm wide)
Assembly
1. Remove one batch of inverse puff pastry from the fridge and lightly flouring it, roll it into a rough square shape, around 3-4mm thick. Carefully lift this onto a lined baking tray and place it into the fridge.
2. Roll out the second piece of pastry to the same thickness.
3. Remove the first batch of pastry from the fridge and with it still on the tray, lift the frozen pistachio cream and place the disc into the centre of the pastry.
4. Lightly brush around the disc of pistachio cream with water – do not go to heavy on the water, just enough to moisten is to the pastry sticks together,
5. Lift the second piece of pastry on top, and using your hands, lightly cup around the outside of the cream layer, tucking it so it hugs the filling. This pushes out any trapped air. Ensure the two layers of pastry are firmly sealed together,
6. Finally, take a disc (like the bottom of a tart ring) that is 23cm in diameter, and place this on top. Use a sharp knife/box cutter, cut around this, to create a neat 23cm galette. Use a skewer to prick a few small holes all over it.
7. At this point we want to rest it again, to relax the gluten in the dough and prevent it from shrinking. Ideally this should be refrigerated overnight (covered with cling film) or 1-2 hours.
8. Once it has chilled, prepare the egg wash, whisking together the ingredients.
9. Meanwhile, preheat the oven to 180C/355F Non-Fan assisted (165C/330 Fan).
10. Remove the galette from the fridge and flip it over, onto a baking tray with a silicon baking mat (or ideally a perforated tray with a perforated mat if you have one) so the smooth side is on top. Brush the egg wash evenly over the surface of the dough. Note – for a deeper, darker finish to your galette, you can apply one layer of egg wash, then refrigerate it for 45m, then add another layer, before proceeding with the scoring.
- 35g Egg Yolk
- 30g Double/Heavy Cream
11. Use a sharp knife to gently score the dough, ensuring you don’t cut through the dough, in a decorative pattern. I use the design below. Once you have completed the scoring, use a skewer, to create 5-8 holes, piercing through the top layer of puff pastry (indicated by the green dots). This will allow the steam to escape.
12. Place the galette into the centre of the oven and bake for 45 minutes, then lower the temperature to 170C/340F non-fan assisted (155/310F fan assisted) and bake for a further 20-30 minutes, or until the galette is a deep golden brown colour.
13. Just before it has finished baking, prepare the hot syrup, by adding the ingredients to a small saucepan, and bringing them to the boil until the sugar has dissolved. Set this to one side.
- 50g Caster Sugar
- 35g Water
14. Once the galette is a deep golden brown colour, remove it from the oven and lift it onto a wire cooling rack. Brush a thin layer of sugar syrup over the top and then allow it to cool for 30 minutes before serving.
Shop the Equipment


Chausson Aux Pommes
TIER 1
Chausson Aux Pommes
Ok these are essentially apple turnovers, but I felt the name didn’t do them justice and it sounds much more fancy in French! In this recipe I take you through how to make rough puff pastry in detail, so make sure you watch the video to master those folds! Then we cut it into a classic turnover shape and fill it with a sweet apple compote. It’s the perfect buttery, fruity, flakey dessert!
4-6
TURNOVERS
Ingredients
Makes 4-6 Turnovers
Rough Puff Pastry
500g Plain/All-Purpose Flour
10g Fine Sea Salt
240g Ice Cold Water
10g White Vinegar
400g Unsalted Butter, Very Cold & Cubed
Apple Compote
500g Apples (Braeburn/Pink Lady/Golden Delicious – about 5-6 large apples)
60g Dark Brown Sugar
25g Unsalted Butter
1 Vanilla Bean/1 Tsp Vanilla Bean Paste
Pinch of Sea Salt Flakes
Bowl of ice water with the juice of 1 lemon
Egg Wash
25g Egg Whites
60g Egg Yolks
15g Double/Heavy Cream
Glaze
60g Water
60g Caster/White Sugar
Or
65g Water
125g Sugar
30g Liquid Glucose
Special equipment
Stand mixer
Rolling pin
Hand blender
Digital calipers (optional)
Oval template (see PDF)
Fluted pastry wheel
Method
Rough Puff Pastry
1. Pour the flour into the bowl of a stand mixer along with the salt.
2. Pour in the cold water and vinegar.
3. Tip the cubed butter into the centre, then with the paddle attachment, mix on a low speed, just until the dry bits of flour have been absorbed. This should only take 15-20 seconds. The lumps of butter will still be there!
4. Scoop the mixture out of the bowl onto a lightly floured work surface. Using a rolling pin, roll the dough into a long rectangle. You need to work quickly here especially if it is a warm day as the butter will start to soften too much.
5. Once you’ve rolled it out, you might need to use a lightly floured bench scraper to loosen it from the work surface.
6. Perform a single turn, by folding one-third of the dough up on itself, and then folding the remaining third of dough over the top as seen in the PDF.
7. Wrap the dough in cling film and chill it. If it is a warm day, I prefer to do 10 minutes in the freezer then 15 minutes in the fridge. But on a ‘normal day’, 20 minutes in the fridge will be enough.
8. Unwrap the dough and with the open seam facing you, turn the dough 90 degrees so it is now adjacent to you. Roll the dough slightly to give it a little bit of width, then rotate it 90 degrees again so the open seam is facing you again. Roll the dough into a long rectangle again, flouring as needed to ensure it doesn’t stick.
9. Use a bench scraper to get underneath the dough if it feels like it is sticking, then perform a double turn, by folding ¼ of the dough up on itself, then the remaining ¾ of the dough to meet. Fold the dough in half, then wrap in cling film to chill again.
10. Repeat steps 9&10, 2 more times (performing two more double turns) and chill the dough.
11. Unwrap the dough again, and roll it out, performing one final single turn (as seen in step 7). In total you will have done 1x single turn, 3x double turn, 1 x single turn. Refrigerate the dough for 2 hours (or overnight).
Apple Compote
1. Peel and core the apples, then dice them into small cubes (‘brunoise’ as they would say in French!). As you are chopping them, add them to the bowl of cold water with the lemon juice to prevent them from oxidising.
2. Once chopped, drain them and add them into a medium saucepan. Cook them over a medium heat until the juices start to come out of the apples – about 3 minutes. Strain them to remove the excess liquid, then add in the light brown sugar, butter and vanilla.
3. Continue to cook them, stirring frequently, until you have a golden caramelised mixture, this should take about 6-10 minutes. Once cooked, stir through the sea salt flakes.
4. Add the mixture into a jug and blend until you have a thick compote texture.
5. Add this mixture into a bowl and set it to one side in the fridge to cool completely.
Assembly
1. To create the classic chausson aux pommes shape, we need a fluted oval shape which is then folded in half. You can buy special cutters for this but they are expensive, so I created a little hack so that we can do it at home!
2. At the bottom of the PDF there is an oval template you can print off (ideally on some thick card). This will give you an oval that is 6.7”x4.8”.
3. Print this off and then to get the fluted edge, we use a fluted pastry wheel and cut around the template while it is on top of the puff pastry. If you do not have a fluted cutter don’t worry you can just cut around it with a knife. But this template will give you the perfect size!
4. Remove the chilled puff pastry from the fridge and place it onto a floured work surface. Note – it can be easier to work with the pastry in two batches so that it doesn’t get too warm, in this case, just cut the chilled dough in half, and reserve one in the fridge while you roll the other. For the following steps I will assume you are working with a half batch and you just need to repeat the steps to make the remaining pastries.
5. With the open seam facing you, turn the dough 90 degrees so it is now adjacent to you. Roll the dough slightly to give it a bit of width – it needs to be around around 7.5” tall so that it is taller than the oval template.
6. Rotate it 90 degrees again so the open seam is facing you again. Roll the dough into a long rectangle, flouring as needed to ensure it doesn’t stick.
7. Don’t worry about the length of the rectangle, we are more concerned about the thickness – it needs to be around 0.2”/5mm thick. If it is too thick, when it bakes, it will puff up too much! If the dough feels too soft at this point, get it straight into the freezer for 10 minutes to firm up a little. It is much easier to work with when it is cold.
8. Assuming you are working with a half batch of the dough, use the oval template to cut out 2-3 ovals (the number you get will depend on how efficiently you were rolling it and how thick it is!)
9. Lift the fluted ovals onto a tray lined with a silicon mat, and place them in the fridge for 15 minutes.
10. At any point during the process, if you find the dough is getting too warm, place it back into the freezer for 5/10 minutes to chill it down then carry on.
11. Prepare the egg wash by whisking together all the ingredients until you have a homogenous mixture.
12. To ensure you get the same amount of filling, I like to decant my chilled compote into little dishes, each weighing 50g. Then I can just scoop it straight into the pastry knowing I’ve got the correct amount.
13. Remove the chilled pastry from the fridge and, working quickly, scoop 50g of compote into the centre. Refer to the drawing below, we want to make sure we keep the compote away from the edges so it doesn’t leak out later so use your fingers to keep it nice and centred.
14. Brush an egg wash around the edge of the pastry surrounding the compote and fold the bottom half of the pastry over. Use your fingers to seal the dough together, being careful not to warm the dough too much with your hands and ‘smoosh’ it.
15. Use a knife to poke 4 holes in the back of the pastry and then flip it over so this side is now touching the baking tray lined with a silicon mat. Brush the top of the pastry with an egg wash then refrigerate it for 20 minutes. At this point, preheat your oven to 175C/345F non-fan assisted.
16. Remove the pastry from the fridge and apply a second egg wash, then using a sharp knife, lightly score a decorative pattern into the pastry, I just do a series of vertical lines!
17. Place the pastries straight into the oven on the middle shelf and bake for around 45-50 minutes. The apple compote is already cooked so all we are looking for is a nice golden puff pastry.
18. About 10 minutes before you can prepare the glaze so that it is still slightly warm. Add the sugar and water into a saucepan, and simply bring it to a boil. Continue to cook it until it has thickened slightly but is still runny. Slightly looser than the consistency of honey.
19. I’ve given you two options for the glaze, the second one is just slightly shinier from the addition of glucose but is prepared with the exact same method! Just boil the ingredients together.
20. Once the pastries are baked, lift them onto a wire rack and brush them lightly with the glaze. They can be eaten warm or served once cooled, but they are best eaten the same day so that the pastry is as fresh as possible.
Shop the Equipment


Latticed Pistachio Mille-Feuille
TIER 2
Latticed Pistachio Mille-Feuille
You guys know I love a Mille Feuille, and this filling combination has to be my favourite yet. It’s the same rough puff pastry recipe as Tier 1 (I don’t cover this again in the video for Tier 2), but we walk through how to bake it into the perfect Mille Feuille shape. Then we make a raspberry cremeux and a pistachio cremeux to fill it with, alongside a tangy raspberry coulis. The lattice top is optional, but creates a real show stopping design!
1
LARGE MILLE FEUILLE
Ingredients
Makes 1 Large Mille-Feuille
Rough Puff Pastry
250g Plain/All-Purpose Flour
5g Fine Sea Salt
120g Ice Cold Water
5g White Vinegar
200g Unsalted Butter, Very Cold & Cubed
Basic Cremeux
400g Double Cream
115g Egg Yolks
60g Caster Sugar
5g Powdered Gelatin (200-250 Bloom) + 30g Cold Water
Pistachio Cremeux
240g Basic Cremeux
40g Pistachio Paste
Raspberry Cremeux
240g Basic Cremeux
100g Raspberry Puree
Raspberry Coulis
2g Powdered Gelatin (200-250 Bloom)
12g Cold Water
105g Raspberry Puree
105g Frozen Raspberries
5g Pectin NH
20g Caster Sugar
Icing Sugar To Decorate
Special equipment
Stand mixer
Rolling pin
Digital thermometer
Hand blender
Digital calipers (optional)
Lattice pie cutter
Silicon mats
Baking trays
Piping bags
Method
Rough Puff Pastry
1. Pour the flour into the bowl of a stand mixer along with the salt.
2. Pour in the cold water and vinegar.
3. Tip the cubed butter into the centre, then with the paddle attachment, mix on a low speed, just until the dry bits of flour have been absorbed. This should only take 15-20 seconds. The lumps of butter will still be there!
4. Scoop the mixture out of the bowl onto a lightly floured work surface. Using a rolling pin, roll the dough into a long rectangle. You need to work quickly here especially if it is a warm day as the butter will start to soften too much.
5. Once you’ve rolled it out, you might need to use a lightly floured bench scraper to loosen it from the work surface.
6. Perform a single turn, by folding one-third of the dough up on itself, and then folding the remaining third of dough over the top as seen in the PDF.
7. Wrap the dough in cling film and chill it. If it is a warm day, I prefer to do 10 minutes in the freezer then 15 minutes in the fridge. But on a ‘normal day’, 20 minutes in the fridge will be enough.
8. Unwrap the dough and with the open seam facing you, turn the dough 90 degrees so it is now adjacent to you. Roll the dough slightly to give it a little bit of width, then rotate it 90 degrees again so the open seam is facing you again. Roll the dough into a long rectangle again, flouring as needed to ensure it doesn’t stick.
9. Use a bench scraper to get underneath the dough if it feels like it is sticking, then perform a double turn, by folding ¼ of the dough up on itself, then the remaining ¾ of the dough to meet. Fold the dough in half, then wrap in cling film to chill again.
10. Repeat steps 9&10, 2 more times (performing two more double turns) and chill the dough.
11. Unwrap the dough again, and roll it out, performing one final single turn (as seen in step 7). In total you will have done 1x single turn, 3x double turn, 1 x single turn. Refrigerate the dough for 2 hours (or overnight).
Basic Cremeux/Pistachio Cremeux/Raspberry Cremeux
1. Add the pistachio paste and raspberry puree into two separate bowls and set these to one side.
*Note – Pistachio Paste is quite expensive so you can make it yourself. Just toast shelled pistachios in the oven for about 15 minutes at 170C/340F and then process them in а food processor. You will need to do this with about 300g of Pistachios or it won’t be enough for the blades of your food processor to pick up. It will take some time to blend them and you need a high powered food processor!
2. Add the powdered gelatin into a small dish and pour over the cold water. Allow this to bloom for 10 minutes. Once bloomed, scoop this into a large bowl with a sieve placed over the top.
3. Into a medium bowl, add the egg yolks and sugar. Whisk briefly to combine.
4. Add a splash of the cream just to prevent any lumps and whisk to combine.
5. Pour the entire mixture into a medium saucepan along with the cream. Place the pan on a medium heat and whisk constantly, The mixture needs to reach 80-82C. As you continue to cook it, you will see it thicken in the pan, just be really careful not to scramble the eggs.
6. Once at temperature, immediately remove it from the heat and pour it through the sieve over the gelatin. Some of the egg might have caught on the bottom of the pan but don’t panic!
7. Use a hand blender to blend the mixture to ensure the gelatin has completely incorporated.
8. The mixture should weigh around 480-500g so we’re going to split this equally between the two bowls.
9. Pour around 240g of the mixture over the pistachio paste and blend it with a hand blender to completely emulsify it. Cover the surface with cling film and refrigerate overnight (minimum of 6 hours)
10. For the raspberry, let the basic cremeux cool to around 40C/104F before pouring it over the puree. Blend with a hand blender to completely emulsify it. Cover the surface with cling film and refrigerate overnight (minimum of 6 hours)
Raspberry Coulis
1. Add the powdered gelatin into a small dish and pour over the cold water. Allow this to bloom for 10 minutes.
2. Meanwhile, whisk together the sugar and pectin and set this to one side.
3. Add the frozen raspberries (they can be fresh too) and raspberry puree to a small saucepan.
4. Cook them down until they reach around 40C/104F on a digital thermometer, then add in the sugar/pectin mixture. Continue to cook the mixture until it reaches a boil.
5. Remove the pan from the heat, scoop in the bloomed gelatin and stir it to dissolve it into the raspberry mixture.
6. Pour this into a bowl and cover the surface with clingfilm. Refrigerate for a minimum of 1-2 hours.
Assembly
1. Remove the chilled puff pastry from the fridge and place it onto a floured work surface.
2. With the open seam facing you, turn the dough 90 degrees so it is now adjacent to you. Roll the dough slightly to give it a little bit of width, then rotate it 90 degrees again so the open seam is facing you again. Roll the dough into a rectangle, flouring as needed to ensure it doesn’t stick.
3. We are going to bake this on a baking tray, so we just need to ensure the rectangle we roll isn’t bigger than the tray. We are more concerned about the thickness. It needs to be around 7.5” tall and 0.2”/5mm thick.
4. Once you are at that thickness, you can use a pastry wheel or a knife, to trim the rectangle of pastry down so it fits perfectly on your tray.
5. Lift the dough onto a silicon mat and refrigerate it for 20 minutes.
6. Once chilled, cutting vertically, cut off ⅓ of the rectangle, leaving the remaining ⅔ intact.
7. Work quickly here so the dough stays cold (if not, chill it again. This part will be a disaster if the dough is too warm!), use a lattice pastry wheel cutter or a lattice cutter and cut the ⅓ of dough to create the lattice design.
8. Get both the latticed strip of dough, and the other strip of dough into the fridge for another 20 minutes while you pre-heat the oven to 175C/345F non-fan assisted.
9. Once it has chilled. Remove it from the fridge and place a second silicon mat on top, along with another tray and some extra weight! We need to weigh the top tray down as much as possible to stop the pastry from puffing up. I like to use more baking trays!
10. Place the tray of pastry into the oven on the middle shelf and bake it for 60 minutes.
11. After 60 minutes remove all the trays on top, and the pastry should be a light golden colour (if not place the trays back on and bake it for a little longer)
12. Place it back into the oven, uncovered, and bake until it is golden brown.
13. Remove it from the oven and increase the oven temperature to 220C/430F.
14. Dust the puff pastry liberally with icing/powdered sugar and then place it back in the oven, closer to the top shelf this time.
15. Keep a very close eye on it and bake it until the sugar has caramelised and the pastry is a deep, shiny golden colour. Be really careful not to burn it. It can take anywhere from 2-5 minutes.
16. You will find the lattice probably caramelises quicker than the other piece of pastry so you can remove this early.
17. Get both onto a wire cooling rack to cool for 15 minutes.
18. Using a serrated knife trim down the latticed piece of pastry into a neat rectangle. Then cut the other piece of pastry into two, and then trim each of those pieces down so they match the exact size of the lattice pastry.
Final Assembly
1. Add the chilled raspberry coulis into a tall jug, and with a hand blender, blend it to a smooth mixture. Add this into a piping bag and set it to one side.
2. Whisk both the raspberry and pistachio cremeux using a stand mixer until they are thick and hold a stiff peak. The pistachio cremeux will whisk up thicker than the raspberry cremeux, so don’t worry if the raspberry is slightly softer.
3. Add these into separate piping bags fitted with large round tip piping nozzles.
4. Pipe three lines of the pistachio cremeux onto the base of the plain, non latticed pieces of puff pastry. There should be one line on each outer edge and one in the centre. It’s important the pistachio is on the outside to provide support, as the raspberry cremeux would be too soft to support the weight of the layers.
5. Pipe the raspberry cremeux into the gaps and then pipe 2 lines of raspberry coulis on top.
6. Dust icing sugar diagonally across the top of the latticed pastry, using a flat object to cover one side of the pastry.
7. Carefully stack and assemble the mille-feuille, finishing the latticed piece on top. It is now ready to serve. If you need to serve it later, ensure you keep it refrigerated so the cremeux doesn’t soften too much at room temperature.
Shop the Equipment


Vanilla & Blueberry Danish
We would love to see your Bake It Better creations!
Show off your skills by sharing your desserts
#BakeItBetter

Puff Pastry
We would love to see your Bake It Better creations!
Show off your skills by sharing your desserts
#BakeItBetter