
Chocolate Orange Marmalade Trifle
TIER 1
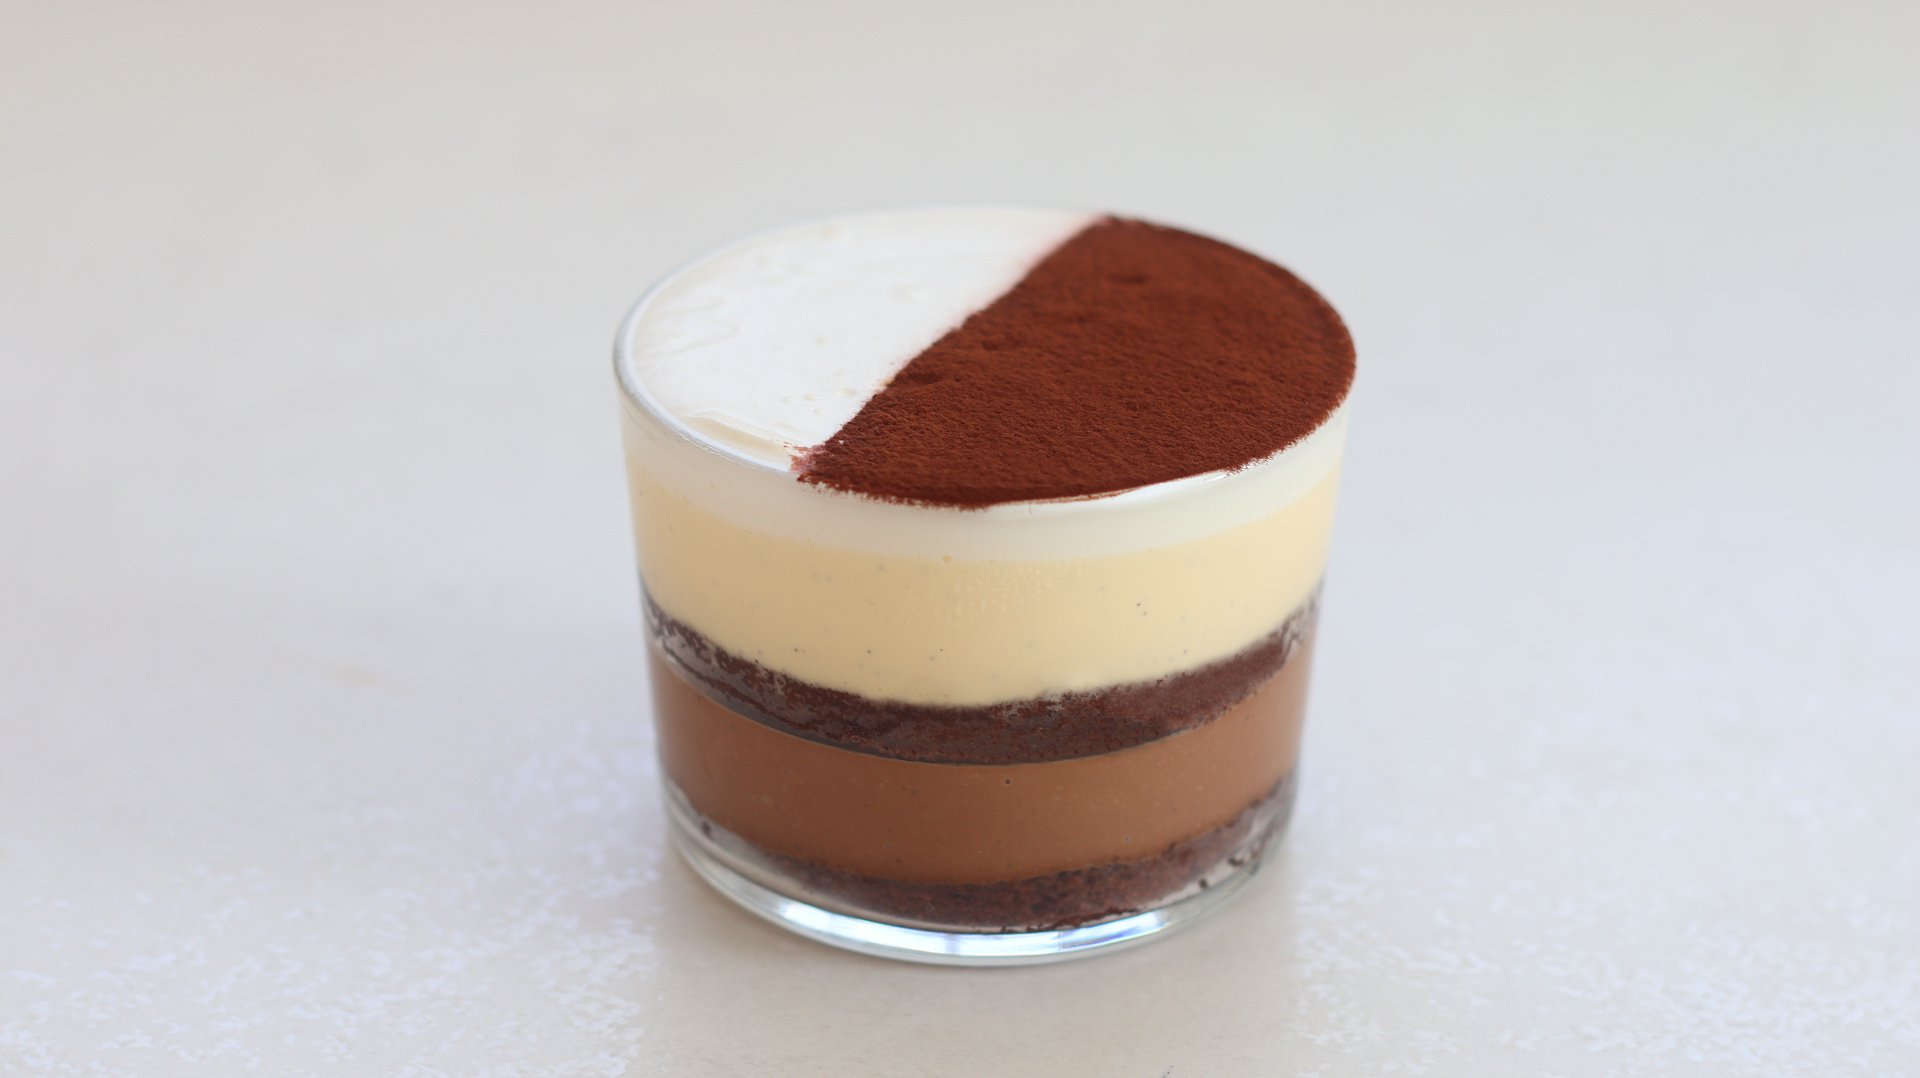
Chocolate Orange Marmalade Trifle
Now this isn’t any ordinary trifle. This has layers of soft chocolate sponge, orange marmalade, vanilla and chocolate custard, then finished with whipped cream. It’s not really traditional, but the texture when you get a spoonful of all the layers is amazing. This can be scaled up to a large trifle, you will just need to increase the quantities.

4
MINI TRIFLES
Ingredients
Makes 4 Mini Trifles
Chocolate Sponge
80g Egg Yolks
75g Caster/White Sugar, Divided
150g Egg Whites
45g Plain/All-Purpose Flour
25g Cocoa Powder
50g Vegetable Oil
35g Whole Milk
Custard Base
350g Double/Heavy Cream
175g Milk
1 Vanilla Pod
160g Egg Yolks
55g Caster/White Sugar
Pinch Flakey Sea Salt
Chocolate Custard
260-285g Custard Base
65g Chocolate, 70% Cocoa Solids
Vanilla Custard
260-285g Custard Base
40g Unsalted Butter, Cold & Cubed
Unsweetened Whipped Cream
200g Double/Heavy Cream
Orange Marmalade To Fill
Cocoa Powder To Decorate
Special equipment
39x27cm baking tray
Electric hand whisk or stand mixer
Digital thermometer
Hand blender
Cookie cutter
Piping bag (optional)
Method
Chocolate Sponge
1. Preheat the oven to 180°C/355°F Non-Fan Assisted.
2. Lightly grease a 39x27cm baking tray. Cut a rectangle of parchment paper so that it fits neatly inside the tray, and press it in.
3. Into a medium bowl, add the egg yolks, and 20g of caster sugar. Whisk the mixture with an electric hand mixer (or in a stand mixer) until it is thicker in volume and pale in colour. About 1-2 minutes. Set this to one side.
4. Into a medium bowl, add the egg whites and using an electric hand whisk (or stand mixer) whisk on a medium-low speed. Once the mixture is frothy, increase the speed to medium and slowly add the remaining 55g of caster sugar, about 1 tablespoon at a time. Whisk until you have a medium-stiff peak to the meringue.
5. Gently fold the first third of meringue into the egg yolk mixture. Once incorporated, add the second third, fold it through and then the final third.
6. Next, sift in the plain flour & cocoa powder, and fold the mixture carefully until there are no more streaks of dry ingredients.
7. Finally, pour in the vegetable oil and whole milk. Use a spatula to fold this in, making sure to scrape the bottom of the bowl.
8. Pour the batter onto the lined tray, and then using a spatula, spread the batter out evenly.
9. Bake the sponge for 12 minutes then allow it to cool for 30 minutes at room temperature.
Custard Base
1. Into a medium saucepan add the cream, milk, egg yolks, sugar and beans scraped from a fresh vanilla pod.
2. Place this over a medium-low heat and whisk constantly until it reaches a temperature of 82C/180F on a digital thermometer.
3. Immediately remove it from the heat and pour it through a sieve into a tall measuring jug.
4. Split the mixture into half in between two measuring jugs, you should get around 260-285g per jug.
5. Add the chopped chocolate into one, butter into another, and then blend each until smooth with a hand blender. Add a pinch of flakey sea salt to each and stir it through with a spoon. Alternatively, if you want the vanilla version to be thicker, try using white chocolate instead of butter.
6. Pour the vanilla custard onto a shallow baking tray and cover the surface directly with cling film. Cover the surface of the chocolate jug with cling film and refrigerate – this will thicken faster than the vanilla version.
Assembly
1. Take the cooled chocolate sponge and flip it out of the tray onto a large silicon mat or piece of parchment paper.
2. Take a few tablespoons of orange marmalade and spread this evenly across the sponge with an offset spatula.
3. Take a cookie cutter that is just slightly bigger than the width of your individual trifle dishes.
4. Place a disc of sponge into the base of each trifle dish.
5. Remove the chilled chocolate custard from the fridge (it needs 15-30 minutes to thicken and cool slightly).
6. Add it into a piping bag if you want, otherwise, pour an even layer across each dish.
7. Place it into the freezer or fridge just until a skin has formed on top and when you poke it with your finger, you feel there is enough of a ‘barrier’ to support the weight of the next layer.
8. Add a second disc of sponge, then remove the chilled vanilla custard from the fridge – this will be a looser consistency.
9. Pour this on top of the sponge, leaving enough room at the top for cream.
10. Place the trifles into the fridge or freezer just until the vanilla mixture has set to create a slight barrier and support the weight of the cream. This can take slightly longer as the mixture is softer.
11. For the whipped cream, simply add the cream to a bowl and whisk with an electric hand whisk until you have a medium stiff peak.
12. Spoon the cream on top of the set vanilla custard, and then level it completely with a slightly warm palette knife.
13. The trifles can now be refrigerated until needed or served immediately. Dust with a light coating of cocoa powder when ready to serve.
Shop the Equipment


Black Forest Swiss Roll
TIER 2
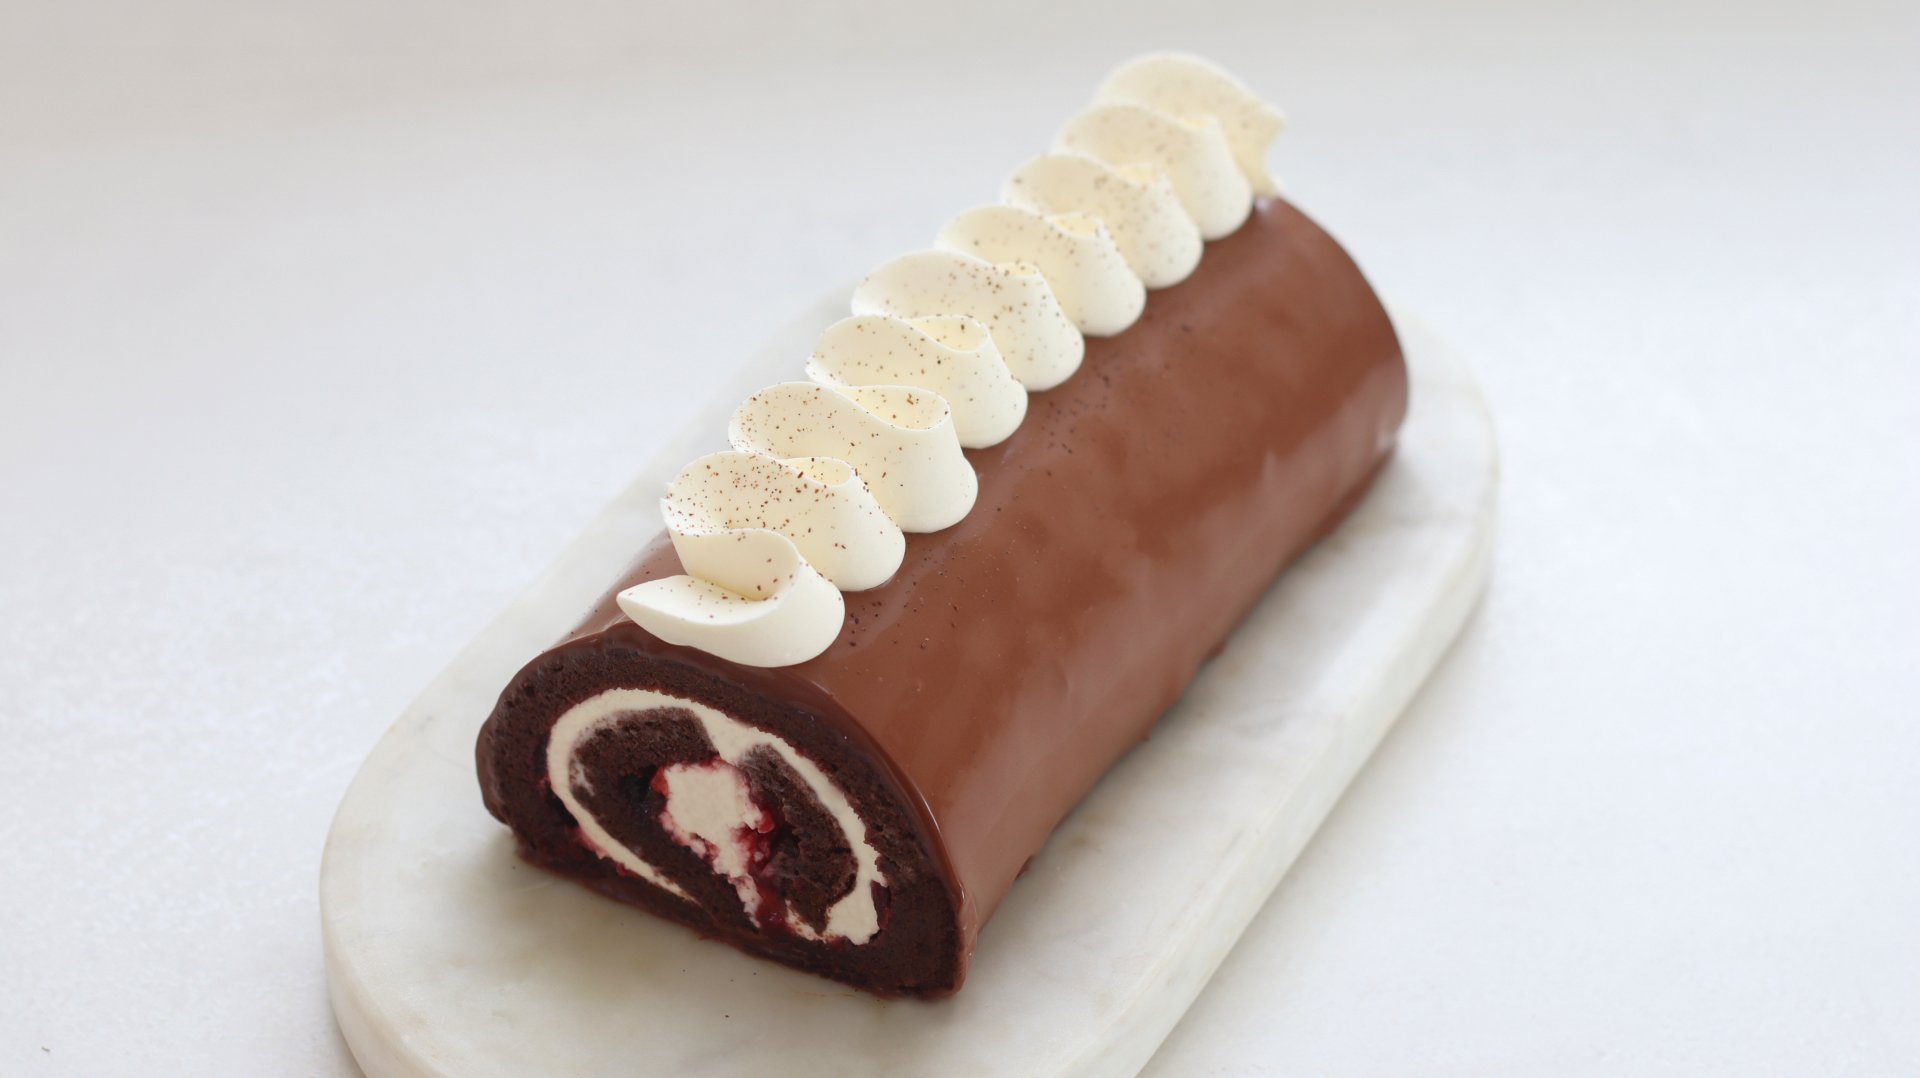
Black Forest Swiss Roll
Black Forest gâteau is one of my all-time favourites, and the mix of cream, fruit, and chocolate is exactly what a good Swiss roll should be about too! This version layers the chocolate sponge from Tier 1 with cherry jam, mascarpone cream, and finishes with a stunning chocolate glaze. Watch the video to help you master the perfect roll, and you’ll catch the little accident I had along the way 😅.
1
SWISS ROLL CAKE
Ingredients
Makes 1 Swiss Roll Cake
Mascarpone Vanilla Cream
4g Powdered Gelatin, 250 bloom
24g Cold water
400g Double/Heavy Cream, Divided
1 Fresh Vanilla Pod
130g Mascarpone
20g Icing/Powdered Sugar
Chocolate Sponge
80g Egg Yolks
75g Caster/White Sugar, Divided
150g Egg Whites
45g Plain/All-Purpose Flour
25g Cocoa Powder
50g Vegetable Oil
35g Whole Milk
Chocolate Glaze
160g Dark Chocolate, 70% Cocoa Solids, Chopped
370g Double/Heavy Cream
10g Unsalted Butter
10g Glucose or Honey
Cherry Jam To Fill
Special equipment
Hand blender
39x27cm baking tray.
Electric hand whisk
Stand mixer
Piping bag
St Honore nozzle
Method
Mascarpone Vanilla Cream
1. Into a small bowl, add the powdered gelatin and cold water. Stir them together and set to one side for 5 minutes to bloom.
2. Into a tall jug, add the mascarpone and set this to one side.
3. Pour 330g of cream into a small saucepan, along with the sugar and the beans scraped from a fresh vanilla pod.
4. Place this over a medium heat, stirring until the mixture is steaming.
5. Remove it from the heat and pour it over the mascarpone. Scoop in the bloomed gelatin, and blend with a hand blender until smooth.
6. Finally, pour in the remaining 70g of cold cream and blend again. Pour the mixture onto a deep baking tray and cover the surface directly with clingfilm.
7. Refrigerate for a minimum of 3 hours.
Chocolate Sponge
1. Preheat the oven to 180°C/355°F Non-Fan Assisted.
2. Lightly grease a 39x27cm baking tray. Cut a rectangle of parchment paper so that it fits neatly inside the tray, and press it in.
3. Into a medium bowl, add the egg yolks, and 20g of caster sugar. Whisk the mixture with an electric hand mixer (or in a stand mixer) until it is thicker in volume and pale in colour. About 1-2 minutes. Set this to one side.
4. Into a medium bowl, add the egg whites and using an electric hand whisk (or stand mixer) whisk on a medium-low speed. Once the mixture is frothy, increase the speed to medium and slowly add the remaining 55g of caster sugar, about 1 tablespoon at a time. Whisk until you have a medium-stiff peak to the meringue.
5. Gently fold the first third of meringue into the egg yolk mixture. Once incorporated, add the second third, fold it through and then the final third.
6. Next, sift in the plain flour & cocoa powder, and fold the mixture carefully until there are no more streaks of dry ingredients.
7. Finally, pour in the vegetable oil and whole milk. Use a spatula to fold this in, making sure to scrape the bottom of the bowl.
8. Pour the batter onto the lined tray, and then using a spatula, spread the batter out evenly.
9. Bake the sponge for 12 minutes then allow it to cool for 30 minutes at room temperature.
Assembly
1. Once the sponge has cooled, flip it out of the tray and gently peel off the parchment paper. Then carefully flip the sponge over onto a large, clean sheet of parchment paper, so that the smooth top side (the side that wasn’t touching the tray during baking) is facing down.
2. Position the sponge with the long edge facing you. Choose one of the short ends—either the left or right edge—and slice off a thin piece at a 45-degree angle using a serrated knife. This angled cut makes it easier to start the roll neatly and helps it tuck in smoothly. Then, at the opposite end, score three lines, about 1cm/0.4” apart, being very careful not to cut through the sponge.
3. Take a few tablespoons of cherry jam and spread this evenly across the sponge using a palette knife.
4. Then, remove the mascarpone cream from the fridge, and scoop half of it into the bowl of a stand mixer fitted with a whisk attachment. Place the remaining half back in the fridge to use later.
5. Whisk the cream on a medium speed for 2-3 minutes, until you have a medium stiff peak.
6. Use an offset spatula to spread the cream in a very even layer across the sponge, right to the edges.
7. Starting from the short edge that you didn’t cut, begin to roll the sponge tightly using the parchment paper underneath to guide and lift the sponge as you go. Use firm but gentle pressure to keep the roll even and tight. Once fully rolled, wrap the parchment paper around the log. Then, place a flat tool like a bench scraper against the roll, and with your other hand, gently pull the loose end of the parchment paper. This will tighten the log and help create a more defined cylinder shape. Place the Swiss roll onto a tray and refrigerate for 1 hour, then into the freezer for 15 minutes.
Chocolate Glaze
1. Just before you remove the Swiss roll from the freezer, prepare the glaze, as we will use this immediately.
2. Into a tall jug, add the chopped chocolate and set this to one side.
3. Add the cream and glucose (or honey) to a small saucepan. Note – if you are using a cream with a lower fat percentage (35% for example), you will need less cream, around 260g.
4. Place this over a medium-low heat and stir until the mixture is steaming.
5. Immediately remove it from the heat, and pour it over the chocolate, and add the butter on top.
6. Let it sit for 2 minutes, then use a hand blender to blend until smooth. Avoid adding any air bubbles as you blend it.
7. Remove the Swiss roll from the freezer and place a wire rack over a tray to catch any excess glaze. To elevate the Swiss roll and allow the glaze to drip cleanly down the sides, set a few small ring molds under the roll so it sits slightly above the wire rack. This will keep the bottom from sticking and ensure an even coating all around.
8. Take the glaze and slowly pour it evenly all over the Swiss roll.
9. Let the excess drip off and the glaze set for a few minutes before taking a small knife and wiping away any drips that have set on the underside of the cake.
10. Use a large offset spatula to carefully lift the Swiss roll onto your serving plate, then with a sharp knife that has been heated, cut both ends of the Swiss roll to reveal the swirl. Clean up the plate to ensure a nice presentation. Leave this at room temperature for 30 minutes.
11. Take the remaining mascarpone cream and whisk it to a medium stiff peak. Add this into a piping bag fitted with a St Honore nozzle.
12. Pipe a zigzag of cream down the centre and serve.
Shop the Equipment


Pandoro
TIER 2
Pandoro
In Tier 2 we are really stepping things up with a Pandoro – the iconic 8 pointed star Italian bread. This is a challenging dough that requires a high protein flour to handle the high levels of fat and sugar in the dough. Similarly to the Kugelhopf , this dough is flavoured with lemon and orange zest, with a beautiful enriched yellow crumb once baked. There is a lot of fermentation and proofing in this recipe, so really set aside some time to tackle this!
2
750G LOAVES
Ingredients
Makes 2 750g Loaves
1st Dough
615g Manitoba Flour (or Pannetone Flour)
0.8g Fresh Yeast/0.4g Instant Dry Yeast
340g Whole Eggs
125g Unsalted Butter, Cubed & Slightly Soft
Butter Mixture
150g Unsalted Butter, Soft
105g Caster Sugar
10g Honey
Zest ½ Lemon
Zest 1 Orange
Beans from 1 Vanilla Pod
2nd Dough
170g Manitoba Flour (or Pannetone Flour)
125g Caster/White Sugar
45g Whole Milk
8.5g Fine Sea Salt
85g Egg Yolks
19g Fresh Yeast/9.5g Instant Dry Yeast
Butter Mixture (Above)
Special equipment
Stand mixer
Dough scraper
Pandoro tins
Digital thermometer
Method
1st Dough
Note – this dough needs a long proof so it is best to do it at night so that it can proof overnight, then you’ll be ready to make the 2nd dough the next day.
1. Into a stand mixer, add the eggs and yeast, and whisk to combine.
2. Add in the flour and attach the dough hook. Mix on a medium low speed, until the flour has completely absorbed the wet ingredients. Once it has absorbed them, continue to knead for a minute on a low speed.
3. While mixing on a medium low speed, add the cubed butter a few pieces at a time. Allow the butter to incorporate before adding the next few pieces.
4. As soon as the butter has all been incorporated, continue to knead for 1 minute. We are not looking to develop the dough too much so remove it from the mixer and gently work it on your work surface, shaping it into a rough ball.
5. Lift the dough into a large container or bowl, ideally with measurements on the side so that you can see how much the dough has risen.
6. Cover the bowl tightly and proof at room temperature for 12 hours or until the dough has tripled in volume.
Butter Mixture
1. The next day, add all the ingredients for the butter mixture into a stand mixer, and attach the paddle attachment. Beat on a medium speed until it is smooth and homogenous. Set this to one side at room temperature.
2nd Dough
1. Now that the 1st dough has tripled in size, it is ready to use.
2. Into a small bowl, whisk together the sugar and flour. Add the milk into a small jug too.
3. Into the bowl of a stand mixer, add half of the 1st dough, along with the yeast.
4. Add ¼ of the sugar/flour mixture and mix on a low speed. Drizzle in ¼ of the milk. Knead on a low speed until all the dry ingredients are completely absorbed.
5. Repeat this process, adding the sugar/flour mixture in increments along with the milk. Ensure that all the dry ingredients are incorporated each time.
6. Once you have a homogenous dough, add the remaining half of the first dough and knead on a low speed for a minute.
7. Add in the salt and knead for a minute.
8. With the mixer still on low, alternate adding the egg yolks and butter mixture (above) in about 4 additions per ingredient. You need to ensure that the egg yolks are completely incorporated before adding the butter, and the butter is incorporated before adding the next part of egg yolks. Be patient here, waiting about 45 seconds in between each addition.
9. Once these have been incorporated and there are no streaks of egg yolks or butter, increase the speed to medium, and knead for around 10 minutes or until the dough is completely smooth and passes the windowpane test (where you stretch a small piece of dough between your fingers and it creates a windowpane without tearing).
10. Lift the dough out of the mixer, shape it into a tight ball, and lift it into a lightly oiled bowl. Allow it to proof at room temperature for 30 minutes.
11. After 30 minutes, using a dough scraper, split the dough into two equal 750g portions (you might have a little extra dough).
12. Use a dough scrape to shape each piece of dough into a tight ball.
13. Ensure your 750g Pandoro tins are lightly buttered and floured, and carefully lift the dough balls into the tins, smooth side down (so the smooth, top side of the dough should be against the bottom of the tin).
14. Loosely cover the top of the tins with clingfilm, and proof them for 4-6 hours at room temperature or until the dough has risen to just below the lip of the tin.
15. Before they are ready, pre-heat the oven to 170C/340F Non-Fan Assisted.
16. When the dough has proofed, place the tins into the oven, and bake for 50-60 minutes. The dough needs to register a temperature of at least 95C/203F on a digital thermometer. After about 25 minutes of baking, cover the top with a sheet of foil to stop it from darkening too much.
17. Once at temperature, remove the tins from the oven and allow the Pandoro to cool for 30 minutes in the tin, before flipping them onto a wire rack to cool completely.
18. Dust with icing sugar to serve.
Shop the Equipment


Kugelhopf
TIER 1
Kugelhopf
This bread has ties to Germany, Austria and France and is a popular bread served around the holidays. Think of it like giant hot cross bun in a bundt tin! The dough is a soft, buttery brioche flavoured with soaked raisins that have been steeped in orange, lemon and vanilla. When the cake is finished it is soaked in melted butter and then coated in sugar. I have to say, this is one of the most delicious recipes I’ve made ALL year! I’ve used a Kugelhopf tin, but the dough can also be made in a classic bundt tin.
2
400G LOAVES
Ingredients
Makes 2 400g Loaves
Soaked Raisins
100g Sultanas
20g Sugar
150g Water
Peels of 1/2 Lemon
Peels of 1 Medium Orange
Brioche Dough
425g Strong White Bread Flour (13-14% Protein)
10g Salt
50g Sugar
17g Fresh Yeast or 8.5g Instant Dry Yeast
190g Eggs
65g Whole Milk
Zest of 1 Lemon
Zest of 1 Orange
210g Unsalted Butter, Slightly Cold & Cubed
To Finish
Melted Butter
Caster/White Sugar
Special equipment
Stand mixer
Dough scraper
Kugelhopf tin/Bundt tin
Digital thermometer
Method
Soaked Raisins
1. Into a small saucepan, add all the ingredients for the soaked raisins. Bring it to a boil and then pour the mixture into a tupperware. Cover and refrigerate for a minimum of 6 hours, ideally overnight.
Brioche Dough
1. For the brioche dough, add all the ingredients, except the butter, to the bowl of a stand mixer fitted with the dough hook.
2. Mix for 10 minutes on a medium speed, scraping down the sides of the bowl occasionally.
3. After 10 minutes, add the butter slowly, a few cubes at a time. It helps to squeeze the cold butter in between your fingers gently just before you add it into the mixer.
4. Once all the butter has been added, continue to mix the dough until it is pulling away from the sides of the mixer and the dough passes the windowpane test.
5. Right at the end, drain the soaked raisins and briefly mix these in. We don’t want to knead them for too long or it will discolour the dough.
6. Scoop the dough out of the bowl, and shape it into a round ball using a dough scraper before lifting it into a lightly oiled bowl.
7. Allow the dough to proof for 2 hours at room temperature. It should double in size.
8. While it is proofing, lightly butter your Kugelhopf tin and coat the inside with flour, before tipping out the excess.
9. Once the dough has proofed, remove it from the bowl, knocking out the air.
10. Cut it into two equal 400g pieces of dough.
11. Carefully shape each piece into a ball, then with one of the dough balls, use your fingers to press a hole in the middle, creating a donut shape.
12. Confidently lift it into the greased tin and cover the tin with cling film.
13. With the other piece of dough, simply shape it into a ball and place it back into the bowl. Cover the surface of the dough and the bowl with cling film. Place both the tin and the bowl in the fridge overnight.
14. The next day, leave the tin at room temperature and proof for 2-3 hours, while leaving the other dough in the fridge.
15. Before baking, preheat the oven to 170C/355F Non-Fan Assisted.
16. Once proofed, the dough should have doubled, to just below the top edge of the tin. Bake the dough for around 35 minutes, it should be a golden colour and register 95C/203F when a digital thermometer is inserted in the middle.
17. Allow it to cool in the tin for 5 minutes, then flip it out and use a pastry brush to cover the entire dough in melted butter, before rolling in sugar.
18. Allow to cool before serving.
19. You can now remove the second dough from the fridge, and re-use the tin. Shape it into a donut again by piercing a hole in the centre and lift it into a the lightly greased tin.
20. Cover the tin with a tea towel and allow it to rise again until doubled – about 2-3 hours at room temperature. Bake as per step 16/17.
Shop the Equipment


Tarte Tropézienne
TIER 2
Tarte Tropézienne
This recipe uses the same style of enriched dough as Tier 1, but we add a few more elements to level it up. We make a crème diplomate for the centre of the cake, and top it with a streusel. Traditional Tarte Tropézienne also has pearl sugar on top which gives it a lovely crunch! If you want to level this up even more, try adding some of the raspberry gel from the Maritozzi Marchigiani!
2
TARTE TROPÉZIENNE
Ingredients
Makes 2 Tarte Tropeziennes
For the dough
150g Whole Milk
90g Double/Heavy Cream
180g Whole Eggs
120g Caster Sugar
12g Salt
120g Plain Flour
495g French Strong Patisserie Flour (you are looking for white patisserie flour with a protein content of around 11-12%. Alternatively you could use white bread flour)
12g Instant Dry Yeast
Zest 1 Medium Orange
120g Unsalted Butter, Cold + Cubed
For the crème pâtissière
500g Whole Milk
1 fresh vanilla bean pod/1.5 tsp vanilla bean paste
75g Caster Sugar
120g Egg Yolks
40g Cornstarch
Pinch of Sea Salt Flakes
For the crème diplomat
Crème pâtissière (Above)
Weight of crème pâtissière in Double/Heavy Cream
For the egg wash
60g Whole Egg
5g Double/Heavy Cream
For the streusel
25g Demerara Sugar (or light brown sugar)
25g Unsalted Butter, Cold
25g Plain/All Purpose Flour
25g Ground Almonds
For the sugar syrup
50g Water
50g Sugar
To bake
Pearl sugar
Special equipment
Stand mixer
7″ cake tin/7″ ring mould
Method
1. In the bowl of a stand mixer, add the orange zest followed by the milk, eggs and cream. On top of this, add the sugar, salt, flours and yeast. Knead the dough on a medium speed for around 15 minutes, making sure to scrape down the sides of the bowl throughout to ensure all the mixture is combined.
2. Next, slowly add the cubed butter a few pieces at a time, leaving about 20-30 seconds between each addition. Continue kneading for 12-15 minutes, until the dough comes away cleanly from the side of the bowl.
3. Once kneaded, take your dough out of the bowl and shape into a ball. Put it in a lightly greased bowl and lightly grease the top of the dough. Cover the top of the dough directly with cling film, and then cover the bowl with cling film. Proof in the fridge overnight (minimum 12 hours)
4. The next day, once your dough has proofed, take it out of the bowl and place it on a lightly floured surface. Lightly flour the top of the dough and your rolling pin, and roll it out into an oval shape to approximately half an inch thick.
5. Cut two circles out of your dough, the same circumference as the bottom of your cake tin or ring mould. (If you’re using a ring mould, you can use the ring mould to cut the dough. If you’re using a cake tin, you can use a pizza wheel to cut around the bottom of the tin.)
6. Place the dough into your greased and lined cake tins/ring moulds. Cover with a tea towel and leave to proof for 2-2.5 hours. Whilst proofing, make your crème pâtissière.
7. Start the crème pâtissière by heating milk and vanilla in a saucepan over a medium heat. Whilst this is heating up, in a separate bowl whisk together the egg yolk, sugar, cornstarch and salt.
8. Once the milk has come to a gentle simmer, slowly pour it over the top of the egg mixture, whisking constantly.
9. Pour the combined mixture back into the saucepan and continue whisking until the mixture starts to thicken. It will take about two minutes to come to a boil. Once it reaches this point, heat and whisk for a further minute to cook out all the cornstarch. You should be left with a thick, pudding-like consistency.
10. Pass the mixture through a sieve onto a baking tray lined with cling film. Cover the surface of the mixture directly with cling film and chill in the fridge for 2 hours. Meanwhile, make the streusel.
11. In a bowl, add all your ingredients and combine them together with your hands until the butter has broken down and it’s a sand-like consistency. Then squeeze the streusel into a ball, cover it in cling film and chill it in the fridge for at least an hour.
12. Just before the dough has finished proofing, preheat your oven to 160C/320F Non- Fan Assisted.
13. Make the egg wash by whisking together the eggs and cream in a bowl. Lightly brush the top of your cakes with the egg wash, then grate the streusel over the top (you’ll have some leftover). Lastly, add a good amount of pearl sugar. Bake the cakes for 35 minutes, until the inside of the cakes are above 90C. Whilst your cakes are baking, make the sugar syrup.
14. In a saucepan, add the sugar and water and bring to a gentle simmer. Stir until all the sugar has dissolved, then leave to one side to cool.
15. Once baked, take your cakes out of their tins and leave to cool on a wire rack (approximately 45 minutes)
16. Once cooled, cut the cakes in half and brush your sugar syrup over the bottom half of the cakes. Next, make your crème diplomate.
17. Take your crème pâtissière out of the fridge and weigh it in a bowl (you should have approximately 525g). Weigh the same weight in double cream and whisk in a bowl until you have a medium stiff peak. It’s important that the cream is not under whipped as if it is too soft, it will result in a soft crème diplomate that won’t be able to support the weight of the brioche and it will ‘smoosh’ out when you place the lid on top.
18. Going back to your crème pâtissière, whisk it lightly until smooth, then fold in your whipped cream a third at a time, until it’s just combined. This is your crème diplomate. Add the mixture to a piping bag with a 15mm round tip nozzle.
19. Pipe the cream in large droplets all over the base of the cakes, then gently put the tops of the cakes back on top. Dust with icing sugar, then your cakes are ready to serve!
Shop the Equipment


Chocolate Babka
TIER 1
Chocolate Babka
I love the design of this Babka! It’s such a showstopper and so unbelievably tasty. This recipe teaches you the foundations of enriched dough, which we fill with a super easy chocolate filling. It’s just the braiding that requires a bit more brain power, but watch the video and I’ll walk you through it step by step – I promise it’s easier than it looks!
2
BABKAS
Ingredients
Makes 2 Babkas
For the dough
750g White Bread Flour
150g Caster Sugar
15g Instant Dry Yeast
225g Whole Milk
165g Whole Eggs
9g Salt
1 Tsp Vanilla Bean Paste
150g Unsalted Butter, Cold + Cubed
For the chocolate filling
240g Unsalted Butter
160g Caster Sugar
80g Cocoa Powder
Pinch of sea salt flakes
For the egg wash
2 Egg Yolks (35g)
Splash of Water
For the sugar syrup
100g Caster Sugar
100g Water
Special equipment
Stand mixer
2 x 2lb loaf tins
Method
1. Into the bowl of a stand mixer, add the milk and eggs followed by the strong white bread flour, the sugar, salt and yeast. Lastly, add the vanilla bean paste. Knead together on a medium-low speed (speed 3 on a KitchenAid) for 8 minutes.
2. Next, slowly add the butter a few pieces at a time (waiting 20-30 seconds between each addition), and keep kneading until smooth. You may need to scrape down the sides of the bowl to make sure all the butter is incorporated. This will take about 10-12 minutes.
3. Once your dough is ready, lift it out of the bowl and shape it into a tight ball. Place the dough into a lightly greased bowl and lightly grease the top of the dough (I use an oil spray but alternatively, you can put some oil on your hands and gently rub the dough). Cover the surface of the dough directly with cling film, and the top of the bowl. Chill in the fridge overnight (minimum 12 hours).
4. Just before you’re ready to roll your dough, make the chocolate filling.
5. In a saucepan, melt the butter over a medium heat
6. In a separate bowl, add the sugar, cocoa powder and salt
7. Once your butter has melted, pour it over the dry ingredients and whisk until combined
8. Allow the mixture to cool at room temperature for about 15 minutes, stirring with a spatula occasionally until it becomes the consistency of soft butter. It may take longer if your room temperature is a little warmer. To speed it up, just pop it in the fridge and stir every few minutes.
9. Once your Babka dough has chilled, lightly flour your surface and place the dough on top. Flour the dough and roll it out to roughly 18”x24” (roughly the width of your two loaf tins placed side by side). The dough should be nice and thin.
10. Next, spread your chocolate filling all over the top of the dough, right to the edges.
11. Using your hands, starting with the edge closest to you, roll the dough into a tight log, then place it in the freezer for 10 minutes (you can bend it slightly to make sure it fits!).
12. Once your dough has chilled, cut off any rough ends and then cut the dough lengthways directly down the centre. Next, place one half of the log over the top of the other half in a cross shape. Starting with one side of the cross, braid the dough into a tight plait, then repeat with the other side.
13. Line the bottom of your loaf tins with a piece of parchment paper. Place one of your tins next to the dough, cut the dough to the same length as the tin, then place it in your tin. Repeat with the other tin. You’ll likely have a little dough remaining.
14. Cover the tins with a tea towel and leave to proof for 2 hours. If you’re in a particularly cold kitchen, you can put your tins in the oven and add a small cup of boiling water to the bottom of the oven. Replace this every 30 minutes or so to speed up the proofing process slightly.
15. Preheat the oven to 160C/320F Non- Fan Assisted just before the time is up.
16. Once your Babkas have proofed, mix together the egg wash ingredients and paint it over the Babkas.
17. Just before adding your Babkas to the oven, add some boiling water to a tray and place this on the bottom shelf of your oven. Add the Babkas to the middle shelf and bake for 60-70 minutes. To check they are cooked in the middle, probe the centre of the Babkas with a digital thermometer – they should be over 90C/195F.
18. Whilst the Babkas are baking, make your sugar syrup. Add the water and sugar to a saucepan and stir over a medium heat until it’s gently simmering and all the sugar has dissolved.
19. Once baked, remove the Babkas from the oven and lightly run a knife around the outside of the tins to loosen them. Tip them onto a wire rack and use a pastry brush to soak them in the sugar syrup. Wrap the Babkas in cling film and leave to cool for 1 hour. It’s important to leave them for an hour to allow the middle of the Babkas to completely set.
20. Once cooled, your Babka’s are ready to serve! They’re best eaten straight away (or within a few hours) as they have the tendency to dry out a little, but if you want to serve them later I’d pop them in the oven for 5-7 minutes before serving.
Shop the Equipment


Salted Caramel Bundt Cake
TIER 2
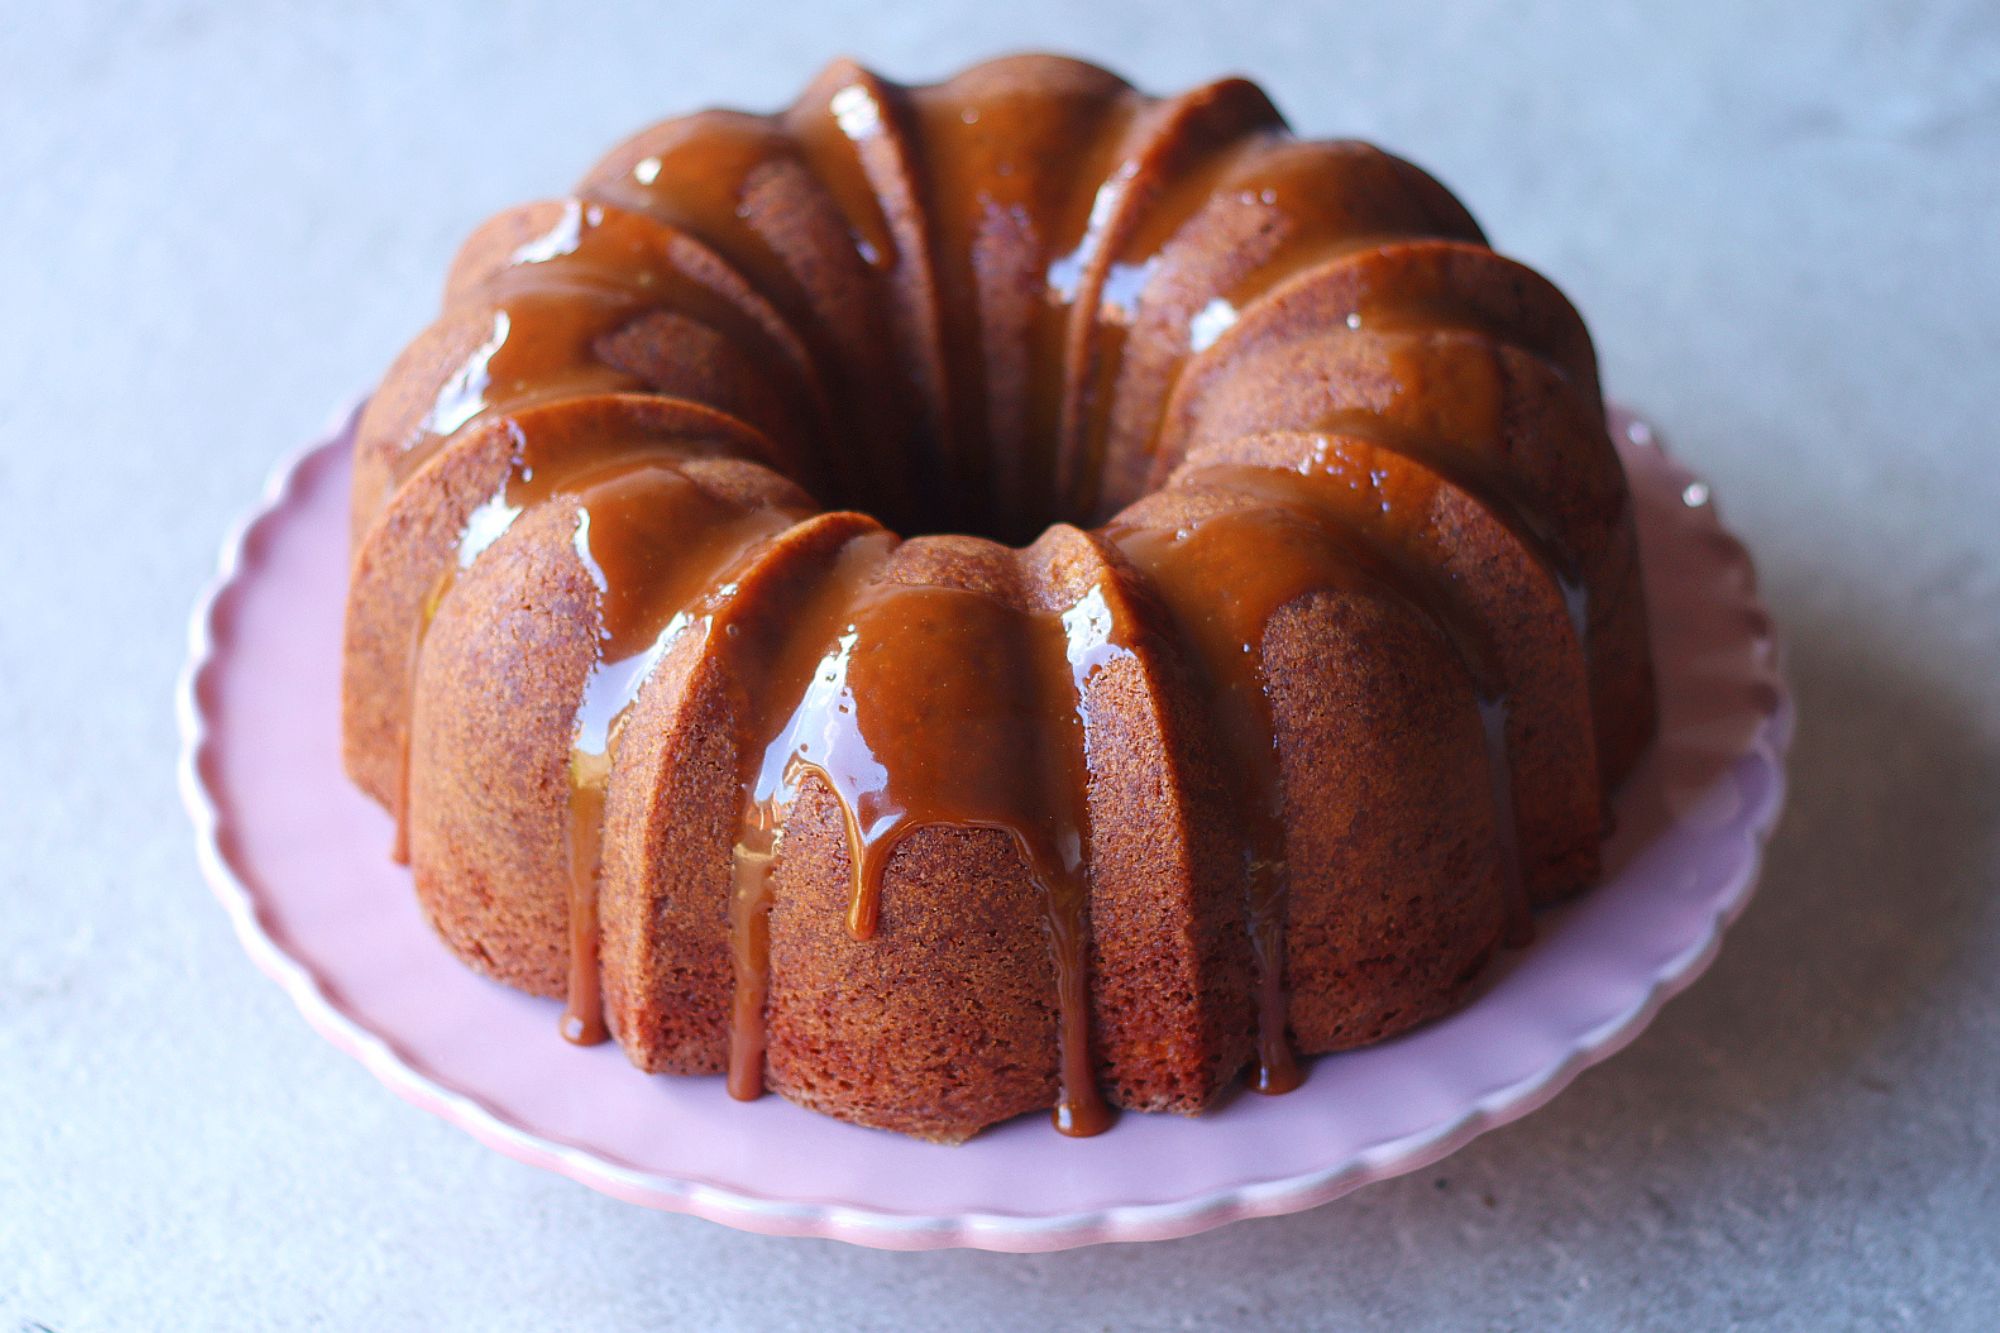
Salted Caramel Bundt Cake
This recipe we advance the ‘flavoured sugar’ technique from Tier 1 and make a powdered salted caramel to add to the cake batter. This was a bit of a fluke whilst recipe testing but wow, the flavour of this cake is unreal! I’ve topped it with a decorative salted caramel sauce that’s quite chewy in texture. If you want something softer, switch it out for the salted caramel recipe in Tier 2 of the Chocolate Tart classes!
112 CUP BUNDT CAKE
Ingredients
Makes 1 12 Cup Bundt Cake
For the caramel sugar
320g Caster/Granulated Sugar
4g Fine Sea Salt
For the caramel cake
245g Caramel Sugar (Recipe Above)
95g Caster/Granulated Sugar
95g Light Brown Sugar
465g Unsalted Butter, Room Temperature
385g Whole Eggs, Room Temperature
1 Tsp Vanilla Bean Paste
465g Self Raising Flour
35g Boiling Water
Soft unsalted butter + flour to coat the bundt tin
For the caramel sauce
125g Caster/Granulated Sugar
65g Water
75g Double Cream
30g Unsalted Butter
Pinch Sea Salt Flakes
Special equipment
Blender
Stand Mixer
12 Cup Bundt Tin
Method
Caramel Sugar
1. Into a medium frying pan, add about ⅕ of the sugar, spreading it evenly across the pan.
2. Place the pan onto a medium heat, and gently shake the pan to agitate the caramel, until it has melted.
3. Add another ⅕ of the sugar on top and agitate the pan again to dissolve the sugar, until it has melted.
4. Continue adding the sugar in increments, ensuring it is fully melted before adding the next addition. At this point, you can begin to use a rubber spatula to stir it through.
5. Once you have added all of the sugar, add in the salt and continue to stir it with a rubber spatula until it reaches a deep amber colour.
6. Immediately remove it from the heat and pour it evenly onto a baking tray lined with a silicon mat.
7. Allow to cool at room temperature for 30 minutes, until it has set completely firm.
8. Once set, break the caramel into shards and place it into a high powered blender and blender for 5-10 seconds, into a fine powder*
* Once you have blended the sugar, it is important to use it immediately for the cake, otherwise it will begin to absorb moisture and go very sticky.
Caramel Cake
1. Preheat the oven to 180C/355F Non-Fan Assisted. Take soft butter (not melted), and use a pastry brush to brush the inside of the bundt tin to ensure an even coating. Sieve over a few tablespoons of plain/all-purpose flour and shake it around the tin to coat. Tap out the excess and set the tin to one side.
2. Take the caramel sugar and weigh 245g.
3. Into the bowl of a stand mixer, add the soft butter and all the sugars. With the paddle attachment, beat it on a medium speed for 3-4 minutes, until the mixture is thicker and paler in consistency, scraping down the bowl as needed.
4. Add the eggs in four parts, beating for a few seconds between each addition (still at a medium speed). Then add the vanilla bean paste. At this point, the batter will look split but don’t panic.
5. Sift in the self-raising flour, and mix on a low speed just until the flour has been absorbed.
6. Finally, tip in the boiling water and mix to combine. This will help to loosen the cake batter slightly.
7. Use a spatula to evenly scoop the cake batter into the lined bundt tin, then using the back of a slightly warm spoon, spread the top of the batter out just to smooth it slightly.
8. Place the cake into the oven and bake for 45-55 minutes or until a skewer inserted comes out clean.
9. Allow it to cool in the tin for 5 minutes before placing a wire rack on top, and then flip the cake out to release it. Allow to cool for 30 minutes before adding the Caramel Sauce
Caramel Sauce
Note: if you want a softer, runny caramel sauce I would recommend using the Tier 2 salted caramel recipe from the October’s chocolate tart recipe.
1. Into a medium saucepan add the water, then the sugar. Place it on a medium heat.
2. Cook the caramel, until it reaches a deep golden brown colour, being careful not to burn it.
3. Pour in the cream and add the butter. Be careful as this will bubble quite violently. Use a hand whisk to mix it through and continue to cook for about 30 seconds on a medium low heat until you have a smooth glossy caramel. Stir in a good pinch of sea salt flakes and whisk them through.
4. The caramel can be served immediately as a warm sauce, or poured over the top of the cake in a decorative drip. The caramel will set as it cools, and turn into a more stringy, chewy texture, like a candy bar! It holds its shape very well, so is perfect to leave at room temperature on the cake for when you are ready to serve.
Shop the Equipment


Baileys Yule Log
We would love to see your Bake It Better creations!
Show off your skills by sharing your desserts
#BakeItBetter