
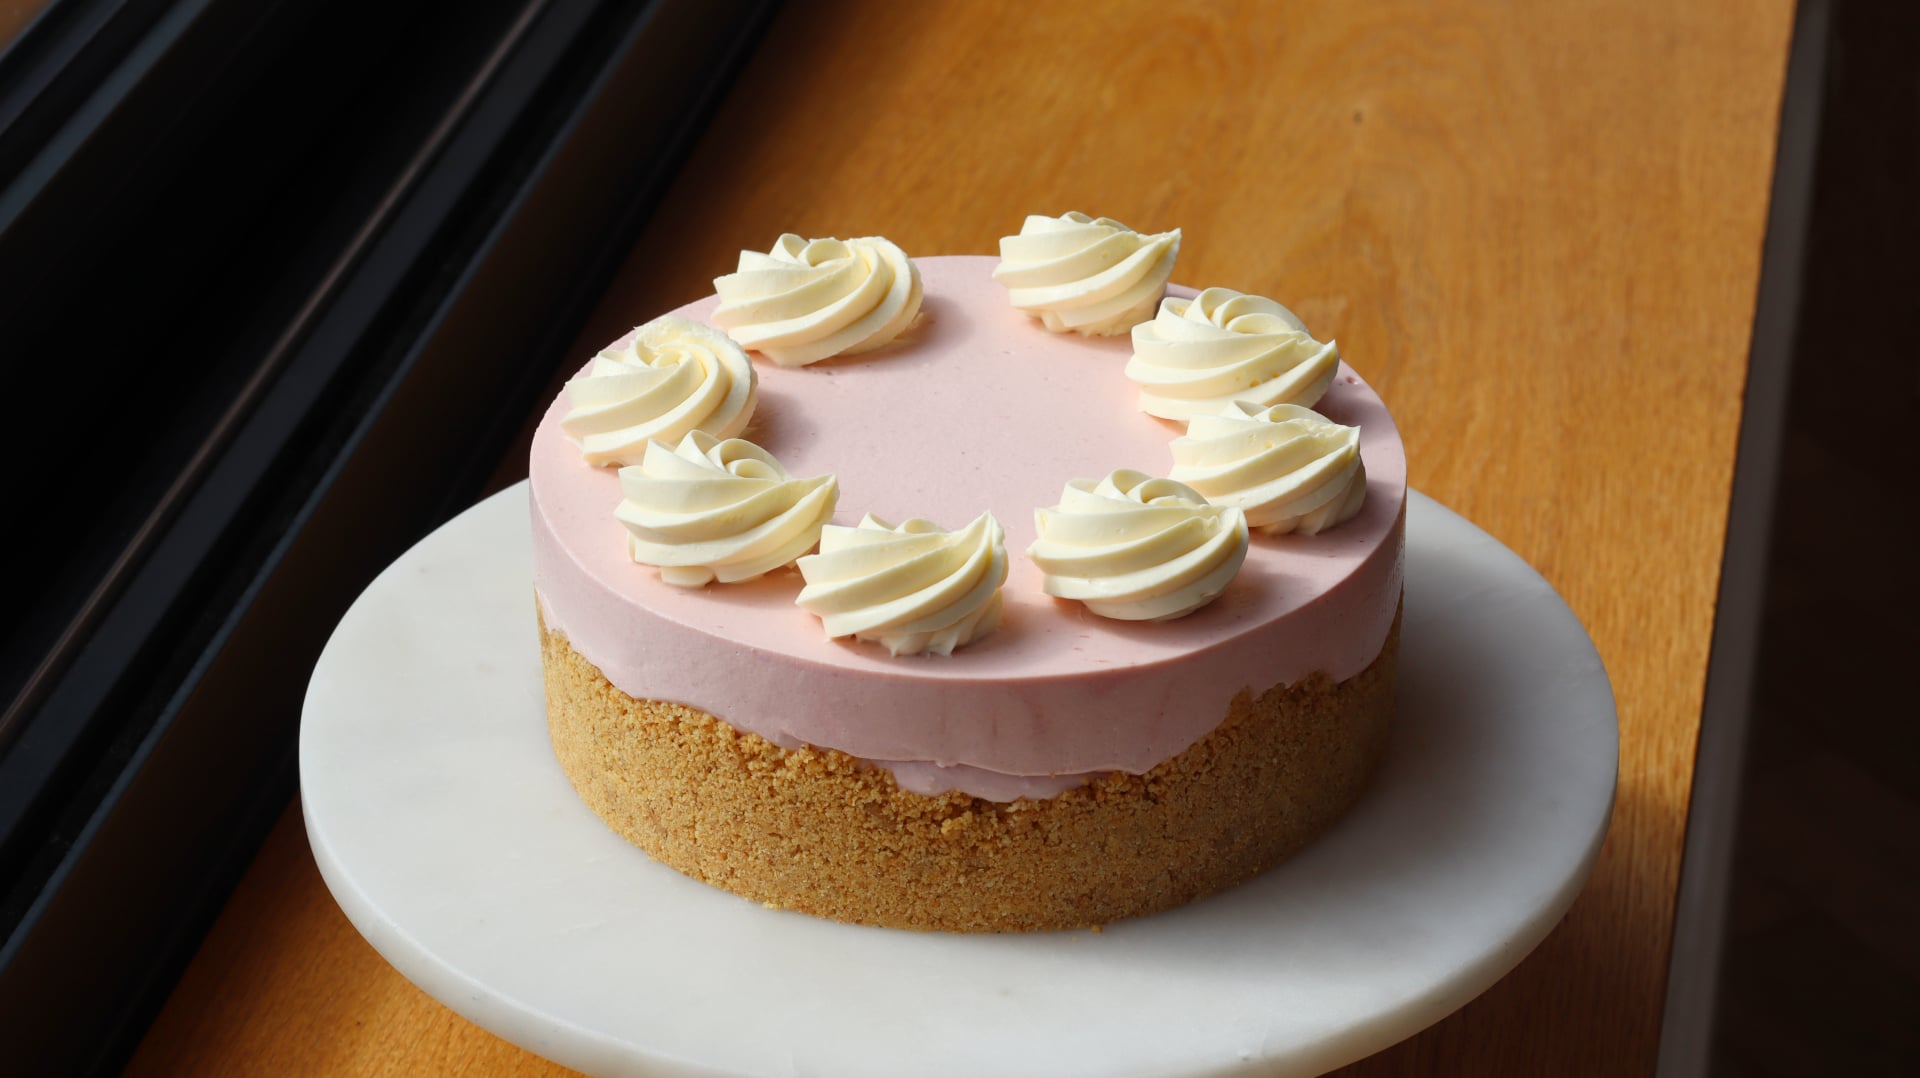
No-Bake Strawberry Cheesecake
TIER 1
No-Bake Strawberry Cheesecake
Everyone needs a foolproof, no-bake strawberry cheesecake recipe, and this one is quick to make with a smooth and creamy texture. It’s a simple biscuit base teamed with a brightly coloured strawberry cheesecake filling, which holds its texture really well. We make it in a ring mold for a more professional finish, and pipe mascarpone cream on top for a final touch of elegance.

1
7-INCH CAKE
Ingredients
Makes 1 7-inch cake
Gelatin Mass
10g Powdered Gelatin (Platinum/Knox Bloom)
60g Cold Water
Biscuit Base
180g Digestives/Graham Crackers
70g Unsalted Butter, Melted
Pinch of Flakey Sea Salt
Zest ¼ Lemon
Strawberry Cheesecake
50g Gelatin Mass (or 2.5 gelatin leaves, any grade)
230g Strawberry Puree
125g Caster/White Sugar
500g Full Fat Cream Cheese
325g Double/Heavy Cream
Mascarpone Cream
300g Double/Heavy Cream, Divided
20g Gelatin Mass (or 1 gelatin leaf, any grade)
50g Mascarpone
30g White Chocolate
Special equipment
Hand blender
Food processor (optional)
18x6cm ring mold
Silicon mat
Digital thermometer
Stand mixer or Electric hand whisk
Blow torch or Heat gun
Piping bag
Star tip nozzle
Method
Gelatin Mass
1. Add the powdered gelatin and water to a small bowl and stir together to combine. Set this aside in the fridge to bloom for 15 minutes.
- 10g Powdered Gelatin (Platinum/Knox Bloom)
- 60g Cold Water
Mascarpone Cream
1. Into a tall measuring jug, add gelatin mass, white chocolate and mascarpone. Set this aside.
- 20g Gelatin Mass
- 30g White Chocolate
- 50g Mascarpone
2. Add 200g of the cream into a small saucepan and place it over a medium heat. Stir until the mixture is steaming then remove it from the heat and pour it into the measuring jug.
- 200g Double/Heavy Cream
3. Allow it to sit for 2 minutes before blending until smooth. Add in the remaining 100g of cream and blend again.
- 100g Double/Heavy Cream
4. Pour the mixture onto a baking tray and cover the surface with clingfilm. Refrigerate it for a minimum of 3 hours.
Biscuit Base
1. Into a blender, add the biscuits, and blend to a fine crumb. Pour these into a medium bowl.
- 180g Digestives/Graham Crackers
2. Add the butter into a small saucepan and stir until melted.
- 70g Unsalted Butter
3. Add the salt and lemon to the bowl, then stir in the melted butter, starting with about half and stirring just until the mixture is sticking together. You don’t want it to be too soggy.
- Pinch of Flakey Sea Salt
- Zest ¼ Lemon
4. Line a baking sheet with a silicon mat and place a 18x6cm ring mold in the centre.
5. Line the tart ring with the biscuits, starting with the sides so they go up about halfway up the side of the ring, then fill in the base. Ensure it is quite thin and smooth. We don’t want an overly thick base/sides so if there is any left over you can eat it!
6. Set this in the freezer while you make the cheesecake filling.
Strawberry Cheesecake
1. Into a small saucepan, add the strawberry puree and gelatin mass. Stir this over a low heat until the gelatin mass has melted. It should be around 50/60C (122-140F). If it doesn’t get warm enough the gelatin won’t melt and you will get chunks! If you are using gelatin leaves, just soak them in cold water until soft, then add them to the pan along with the puree and heat until melted as above. Set the pan aside to cool, it needs to be around 40C/104F when we use it, or just above body temp.
- 50g Gelatin Mass (or 2.5 gelatin leaves, any grade)
- 230g Strawberry Puree
2. Into the bowl of a stand mixer or a large bowl if using an electric hand mixer, add the cream cheese and sugar and beat for a minute until smooth.
- 125g Caster/White Sugar
- 500g Full Fat Cream Cheese
3. Add in the cooled strawberry mixture and beat again until combined, scraping down the bowl as needed.
4. Add the cream into the bowl of a stand mixer or a large bowl if using an electric hand whisk, and whisk to medium/soft peaks.
- 325g Double/Heavy Cream
5. Working quickly as the cheesecake mixture will be beginning to thicken as the gelatin activates, fold the cream in, in two parts.
6. Remove the chilled base from the freezer and pour the cheesecake mixture in, right to the top. Use a palette knife to smooth it, so it is flush with the top of the ring mold. Refrigerate the cheesecake for 3 hours.
Assembly
1. Once chilled remove it from the fridge and lift it onto your serving plate. Use a blow torch or heat gun to gently warm the sides of the ring mold and carefully lift it off.
2. Remove the chilled mascarpone cream from the fridge and add it to the bowl of a stand mixer fitted with a whisk attachment (or a large bowl if using an electric hand whisk). Whisk it until it reaches a medium peak, then add it into a piping bag fitted with an open star tip nozzle.
3. Pipe 6 swirls around the outside of the cheesecake and then serve.
Shop the Equipment


Elevated Strawberry Cheesecake
TIER 2
Elevated Strawberry Cheesecake
Taking inspiration from a modern Fraisier cake, this cheesecake has a fun, but slightly tricky design, made by “wrapping” a smooth cream around the outside using acetate. The cheesecake is frozen for a short time, so we also look at how to adjust the ingredients in the cheesecake mixture to help ensure a smooth, and ice-free texture! Excuse my slightly unique way to create the shape – I’m open to any alternative suggestions!
1
7-INCH CAKE
Ingredients
Makes 1 7-inch cheesecake
Gelatin Mass
10g Powdered Gelatin (Platinum/Knox Bloom)
60g Cold Water
Mascarpone Cream
300g Double/Heavy Cream, Divided
20g Gelatin Mass (or 1 gelatin leaf, any grade)
50g Mascarpone
30g White Chocolate
Genoise Sponge
220g Whole Eggs
130g Caster/White Sugar
30g Unsalted Butter, Melted
Zest ¼ Lemon
125g Plain/All-Purpose Flour
Pinch of Salt
Strawberry Cheesecake
50g Gelatin Mass (or 2.5 gelatin leaves, any grade)
230g Strawberry Puree
125g Caster/White Sugar
35g Invert Sugar/Trimoline
550g Full Fat Cream Cheese
325g Double/Heavy Cream
Pinch of Salt
2 Tbsp Strawberry Jam To Fill
Fresh Strawberries To Decorate
Special equipment
Hand blender
39x27cm baking tray
Silicon mat
Electric hand whisk
Stand mixer (optional)
Digital thermometer
18x6cm ring mold
Acetate
Blow torch or Heat gun
Pastry rods (optional)
Method
Gelatin Mass
1. Add the powdered gelatin and water to a small bowl and stir together to combine. Set this aside in the fridge to bloom for 15 minutes.
- 10g Powdered Gelatin (Platinum/Knox Bloom)
- 60g Cold Water
Mascarpone Cream
1. Into a tall measuring jug, add gelatin mass, white chocolate and mascarpone. Set this aside.
- 20g Gelatin Mass
- 30g White Chocolate
- 50g Mascarpone
2. Add 200g of the cream into a small saucepan and place it over a medium heat. Stir until the mixture is steaming then remove it from the heat and pour it into the measuring jug.
- 200g Double/Heavy Cream
3. Allow it to sit for 2 minutes before blending until smooth. Add in the remaining 100g of cream and blend again.
- 100g Double/Heavy Cream
4. Pour the mixture onto a baking tray and cover the surface with clingfilm. Refrigerate it for a minimum of 3 hours.
Genoise Sponge
1. Preheat the oven to 175C non-fan assisted (160C/320F fan assisted). Take a 39x27cm baking tray, lightly grease it with butter and line it neatly with parchment paper.
2. For the sponge, add the eggs, sugar & lemon zest into a medium bowl and place it over a pan of gently simmering water.
- 220g Whole Eggs
- 130g Caster/White Sugar
- Zest ¼ Lemon
3. Using a hand whisk, whisk them together until they reach 40C/104F on a digital thermometer.
4. Remove it from the heat and add the mixture to the bowl of a stand mixer, fitted with a whisk attachment (or a medium bowl if using an electric hand whisk)
5. Whisk on a medium-high speed for 3-5 minutes, or until the mixture is thick and holds a ribbon when you drizzle it from the whisk.
6. Remove the bowl from the stand mixer and sift over the flour and salt.. Fold this together, being as gentle as possible until there are no more lumps of flour.
- 125g Plain/All-Purpose Flour
- Pinch of Salt
7. Take a small portion of the batter and add it into a bowl. Pour in the melted butter and fold this mixture together so there are no streaks of butter.
- 30g Unsalted Butter, Melted
8. Add this back into the main bowl and fold it through to incorporate.
9. Pour the mixture onto the lined baking tray and spread it out evenly with an offset spatula.
10. Bake it in the oven for 15 minutes, then remove it and allow it to cool completely.
Strawberry Cheesecake
1. Into a small saucepan, add the strawberry puree. Place the entire pan onto a tared scale and note the weight.
- 230g Strawberry Puree
2. Place it over a medium low heat and stir it occasionally, until the puree has reduced by 85g (from 230g to 145g). You can do this by placing the pan back on the tared scale as you are cooking it to see how much the weight has reduced by.
3. Remove it from the heat and stir in the gelatin mass until it has completely melted. Set the pan aside to cool, it needs to be around 40C/104F when we use it, or just above body temp.
- 50g Gelatin Mass (or 2.5 gelatin leaves, any grade)
4. Into the bowl of a stand mixer or a large bowl if using an electric hand mixer, add the cream cheese, invert sugar and caster/white sugar and beat for a minute until smooth.
- 125g Caster/White Sugar
- 550g Full Fat Cream Cheese
- 35g Invert Sugar/Trimoline
5. Add in the cooled strawberry mixture and beat again until combined, scraping down the bowl as needed.
6. Add the cream into the bowl of a stand mixer or a large bowl if using an electric hand whisk, and whisk to medium/soft peaks.
- 325g Double/Heavy Cream
7. Working quickly as the cheesecake mixture will be beginning to thicken as the gelatin activates, whisk in the first half of cream, then fold the remaining cream in with a spatula until smooth. Right at the end fold through a pinch of salt.
- Pinch of Salt
Assembly
1. Take a 18x6cm ring mold and cut a disc of the genoise sponge and lift it onto a baking tray lined with a silicon mat.
2. Spread the strawberry jam across the sponge and place the rind mold around the outside.
- 1-2 Tbsp Strawberry Jam
3. Scoop the cheesecake mixture into the ring mold, pressing it in firmly with a spatula to remove any air pockets. Fill the ring mold right to the top then flatten it with a warm spatula so that it is flush with the ring mold.
4. Place it into the freezer for 2 hours.
5. Just before it is chilled, cut a piece of acetate so that it is long enough to wrap around the outside of the cheesecake and about ½” taller.
6. Remove the chilled mascarpone cream from the fridge and add into the bowl of a stand mixer fitted with a whisk attachment (or a medium bowl if using an electric hand whisk). Whisk to a medium soft peak.
7. Lay the acetate flat on your work surface (it can help to oil the surface slightly so it sticks in place) and use a palette knife to spread the cream evenly across the acetate.
8. Remove the cheesecake from the freezer and gently heat the ring mold with a blow torch to remove it.
9. Carefully lift the acetate from the work surface and wrap the cream around the outside of the cheesecake. Once it is stuck on there you can’t really move it (!) so try and do this as carefully as possible the first time around.
10. This is where you have to get a little creative to create the ‘dents’ in the cream. I used a few skewers, rested against small cups to weigh down the outside edge of the acetate in different places, to create the indent. But feel free to use whatever you think might work! Your acetate might even be flexible enough that you can just press it into shape with your fingers.
11. Place it carefully back into the freezer for 30-60 minutes, just until the mascarpone cream has frozen and you can peel away the acetate cleanly without it ripping the cream.
12. Once it is ready, peel off the acetate and lift the cheesecake onto your serving plate.
13. Slice some strawberries and place them in the centre of the cheesecake. For evenly sized strawberries, first trim off the tops. Then place each strawberry between two pastry rods set to around 10–12mm high and carefully slice off the base. This creates strawberries with a flat top and bottom, all at a consistent height, so they sit neatly and evenly inside the cheesecake.
14. To make the strawberries glossy, you can brush them with a little bit of nappage or melted marmalade jam (with a splash of water).
15. Allow the cheesecake to defrost for around 30 minutes at room temperature before serving (you can check it has thawed by inserting a skewer into the centre and checking there is no resistance).
Shop the Equipment


Chocolate Orange Tiramisu
TIER 1
Chocolate Orange Tiramisu
I couldn’t make ladyfingers and not use them in a tiramisu! In Tier 1 we keep the technique of a tiramisu very classic – no cream! But I’ve mixed things up with a chocolate orange flavour. You soak your homemade ladyfingers biscuits in espresso, and layer them between orange mascarpone cream and chocolate shavings. This is a great dessert you can make ahead of time.
8-10
SERVINGS
Ingredients
Makes 8-10 Servings
Savoiardi Biscuits
115g Egg Yolks
25g Whole Eggs
40g Caster/White Sugar (A)
100g Plain/All-Purpose Flour (A)
260g Egg Whites
100g Caster/White Sugar (B)
1.5g Fine Salt
35g Plain/All-Purpose Flour (B)
Icing Sugar To Finish
Orange Mascarpone Cream
600g Mascarpone
65g Egg Yolks
50g Caster/White Sugar (A)
Zest 2 Oranges
145g Egg Whites
50g Caster/White Sugar (B)
Coffee Soaking Syrup
150g Freshly Brewed Coffee
15g Kahlua
Dark Chocolate, Grated
Special equipment
10mm round tip nozzle
Piping bag
Stand mixer
Method
Savoiardi Biscuits
1. Pre-heat the oven to 160C/320F non-fan assisted.
2. Take 2 large sheets of baking paper and draw two sets of train track lines on the baking sheets, 90mm/3.5” tall. Flip these upside down (so the ink doesn’t touch the pastry) and place them on a baking sheet.
3. Take a small round tip nozzle (10mm) and add it into a piping bag. The piping nozzle needs to be smaller than you think, as the batter will spread slightly as it is piped.
4. Into a medium bowl, add the egg yolks, whole eggs, and sugar (A). Whisk this to combine, then add the flour (B) and whisk to form a thick paste. Set this to one side.
5. Into the bowl of a stand mixer, add the egg whites (room temperature) along with the salt.
6. With the whisk attachment, whisk on a medium-low speed until it becomes frothy, with small bubbles on top (this will take a few minutes).
7. Slowly add in the sugar (B), about a tablespoon at a time. Once you have added all the sugar, whisk until you have a stiff peak.
8. Take about ⅕ of the meringue mixture and whisk it through the egg yolk mixture. This will be quite stiff, so it needs to be whisked firmly to smooth it out.
9. Add the remaining meringue in 2-3 parts, gently folding it through to ensure you don’t beat out too much air.
10. Once smooth, sift over the remaining flour (B) and fold through until there are no more lumps.
11. Add the mixture into your piping bag and let it rest for a few minutes; this will just make it slightly easier to pipe.
12. Using the guides on your baking tray, pipe individual lines, ensuring they’re not too close together, as they will spread slightly.
13. Once piped, add a good dusting of icing sugar over the top, wait 1-2 minutes, and then repeat.
14. Place them directly into the oven and bake until a deep golden brown colour – be sure not to underbake them. It should take around 30 minutes, but it can depend on how big you’ve piped them and your oven.
15. Remove them from the oven and then allow them to cool at room temperature. If you want to make these ahead of time, you can place them in an airtight container and freeze them for up to 2 months.
Orange Mascarpone Cream
1. Into a medium bowl, add the sugar (A) and zest of 1 orange, then massage this zest into the sugar.
2. Add the egg yolks and whisk by hand for a minute until thickened slightly.
3. Add the mascarpone and remaining orange zest, and whisk again until completely smooth. Set this to one side.
4. Into the bowl of a stand mixer, add the egg whites and whisk on a medium-low speed until frothy.
5. Slowly add the sugar about a tablespoon at a time. Once you’ve added all the sugar keep whisking until it reaches a stiff peak.
6. Take the meringue, and fold it through the egg yolk mixture in three parts until smooth and evenly combined.
Coffee Soaking Syrup
1. Combine the two ingredients in a shallow dish.
Assembly
1. Take the cooled lady fingers and check to see how they fit into your chosen dish. If you need to cut them down to size, use a knife or a microplane to shave them down so that they fit snugly in the dish.
2. Take the lady fingers and soak them one by one, then, lay them into the base of your tiramisu dish.
3. Once the bottom of the dish is covered, take a few large spoonfuls of the mascarpone cream mixture and spread this evenly across the lady fingers with an offset spatula.
4. Using a microplane, grate a fine layer of dark chocolate over the cream (or cocoa powder)
5. Repeat this two more times, finishing with a layer of the mascarpone cream. Use an offset spatula to completely smooth the top so that it is flush with the rim of the dish.
6. Place the tiramisu into the fridge to chill – ideally 4-6 hours, but overnight is absolutely fine too.
7. When ready to serve, remove it from the fridge and grate over one final layer of dark chocolate (or cocoa powder) and serve.
Shop the Equipment


Berry Charlotte Cake
TIER 2
Berry Charlotte Cake
In Tier 2 we take the precision of the ladyfingers to another level, using them to decorate the outside of this berry charlotte cake. When piping them, we want to get them as neat and as even as possible so making the Tier 1 tiramisu is a great place to build your confidence. The charlotte cake has a light berry mousse, with two layers of the lady fingers covered in raspberry jam, and it’s finished with a smooth mascarpone cream. This is frozen overnight and takes a little while to defrost, so keep those timings in mind!
8-10
SERVINGS
Ingredients
Makes 8-10 Servings
Savoiardi Biscuits
115g Egg Yolks
25g Whole Eggs
40g Caster/White Sugar (A)
100g Plain/All-Purpose Flour (A)
260g Egg Whites
100g Caster/White Sugar (B)
1.5g Fine Salt
35g Plain/All-Purpose Flour (B)
Caster/White Sugar To Coat
Berry Bavarois Mousse
6g Gelatin Powder (220-250 Bloom) + 36g Cold Water (or 2 Sheets of Gelatin, soaked)
75g Egg Yolks
30g Caster/White Sugar
50g Whole Milk
300g Double/Heavy Cream (A)
250g Fruit Puree (Raspberry or Strawberry)
400g Double/Heavy Cream (B)
Mascarpone Cream
3g Powdered Gelatin + 18g Cold Water (or 1 Gelatin Sheet, Soaked)
250g Double/Heavy Cream (A)
100g Mascarpone
15g Icing/Powdered Sugar
50g Double/Heavy Cream (B), Cold
To Assemble
Crushed Pistachios
Raspberry/Strawberry Jam
Fresh Strawberries/Raspberries, Sliced
Special equipment
10mm round tip nozzle
Piping bag
Stand mixer
Digital thermometer
Hand blender
7” ring mold
1M star tip nozzle
Method
Savoiardi Biscuits
1. Pre-heat the oven to 160C/320F non-fan assisted.
2. Take 2 large sheets of baking paper and draw two sets of train track lines on the baking paper, each 90mm/3.5” tall. Flip these upside down (so the ink doesn’t touch the pastry) and place them on a baking sheet.
3. Take another baking sheet and draw two 7” circles on baking paper. Flip this upside down.
4. Take a small round tip nozzle (10mm) and put it into a piping bag. The piping nozzle needs to be smaller than you think, as the batter will spread slightly as it is piped.
5. Into a medium bowl, add the egg yolks, whole eggs, and sugar (A). Whisk this to combine, then add the flour (B) and whisk to form a thick paste. Set this to one side.
6. Into the bowl of a stand mixer, add the egg whites (room temperature) along with the salt.
7. With the whisk attachment, whisk on a medium-low speed until it becomes frothy, with small bubbles on top (this will take a few minutes).
8. Slowly add in the sugar (B), about a tablespoon at a time. Once you have added all the sugar, whisk until you have a stiff peak.
9. Take about ⅕ of the meringue mixture and whisk it through the egg yolk mixture. This will be quite stiff, so it needs to be whisked firmly to smooth it out.
10. Add the remaining meringue in 2-3 parts, gently folding it through to ensure you don’t beat out too much air.
11. Once smooth, sift over the remaining flour (B) and fold through until there are no more lumps.
12. Add the mixture into your piping bag and let it rest for a few minutes; this will just make it slightly easier to pipe.
13. Using the guides on your baking tray, pipe two large 7” circles and then individual lines for the lady fingers. You will need 25-30 lady fingers, depending on the size of the ring mold you are using for the mousse. The more you can make, the better! But remember, they need to be baked immediately or the meringue will begin to collapse.
14. Once piped, sprinkle a thin coating of caster/white sugar over the top.
15. Place them directly into the oven and bake until a deep golden brown colour.
Note – as we are baking multiple trays of ladyfingers and sponge discs for the charlotte cake, the placement in the oven affects browning. The top tray will turn golden first because it’s directly exposed to the heat from the top of the oven, while the lower trays are shielded, preventing them from browning properly. We don’t care about the 7” disc brownings, but we need both sets of lady fingers to be golden, so rotate the trays halfway through baking, bringing the lower trays to the top and vice versa. Just do it very very quickly, so we don’t deflate the lady fingers.
16. Bake everything for around 30 minutes, being sure not to underbake the lady fingers especially. They need to be firm to the touch. What I like to do is pop the 7” circles back in the oven just to get them slightly more golden.
17. Remove them from the oven and then allow them to cool at room temperature. Leave the 7” discs out at room temperature but freeze the remaining lady fingers in a sealed tupperware as we won’t need these until the next day.
18. If you want to make these ahead of time, you can place them in an airtight container and freeze them for up to 2 months.
Berry Bavarois Mousse
1. Add the powdered gelatin into a small bowl and pour the cold water over the top. Let it bloom for 5-10 minutes. If using a gelatin sheet, soak this in ice-cold water.
2. Into a medium bowl, add the egg yolks and sugar and whisk briefly to combine.
3. Meanwhile, add the cream and milk to a medium saucepan and heat just until it is steaming.
4. Slowly pour the hot cream over the egg yolk mixture and whisk to combine.
5. Pour it back into the pan and whisk constantly, cooking until it reaches 82C/180F on a digital thermometer, then immediately remove it from the heat. You need to do this quickly or it will begin to scramble.
6. Pour it straight through a sieve into a tall measuring jug.
7. Scoop in the bloomed gelatin powder (or squeeze the water out of the gelatin sheet), and then use a hand blender to blend until smooth.
8. Pour in the fruit puree and blend to combine.
9. Pour this mixture into a tray and cover the surface with cling film. We need this to cool to around 30C/86F on a digital thermometer, so refrigerating it can be the quickest way to chill it.
10. Once at temperature, add the remaining cream to the bowl of a stand mixer and whisk on a medium speed until you have a medium stiff peak.
11. Pour the chilled fruit mixture into a bowl, and then whisk in the whipped cream in 3 parts until you have a smooth mousse.
Assembly Part 1
1. Take the cooled 7” savaordi biscuit discs and, using your 7” ring mold, trim them down to size.
2. Line the inside of the 7” cake ring mold with acetate and place this onto a tray lined with a baking mat.
3. Take a few tablespoons of jam and spread this evenly across each disc, then place one into the base of the ring mold.
4. Take the berry bavarois mousse and fill the ring mold up halfway.
5. Add the second savoiardi disc.
6. Pour the remaining mousse in, filling it to the top of the rind mold. It should settle evenly, but if it needs it, flatten it with a palette knife.
7. Place this into the freezer, ideally overnight, but a minimum of 6 hours.
Mascarpone Cream
1. Add the powdered gelatin into a small bowl and pour the cold water over the top. Let it bloom for 5-10 minutes. If using a gelatin sheet, soak this in ice cold water.
2. Into a medium saucepan, add the cream and heat until it is steaming.
3. Remove it from the heat, and add the bloomed gelatin into a tall measuring jug and pour over the hot cream.
4. Blend to combine, then add the sugar and mascarpone and blend again.
5. Finally, add the remaining cold cream and blend one more time.
6. Cover the surface with clingfilm and refrigerate for 6 hours or overnight.
Note – there is no vanilla in this, but you can absolutely add it, if you want that flavour! Add it to the cream when you are heating it.
Assembly Part 2
1. Remove the frozen berry bavarois from the freezer, and lift it onto your serving dish. Peel off the acetate.
2. Leave it at room temperature for about 30 minutes – 1 hour to soften, this will make it easier to stick the lady fingers on. Alternatively, you can use a heat gun/blow torch to warm the sides and press the lady fingers on.
3. Once the edges have softened slightly, remove the lady fingers from the freezer, and then trim them down slightly so they are all of identical height. You can also use a microplane to lightly shave the edges to get them nice and straight.
4. Press them into the side of the cake – just note that the longer you leave them on the cake, the softer they will become. So if you want them to be a bit more crunchy, then it is best to place them on the cake just as you are serving. But note the cake needs quite some time to defrost!
5. Remove the mascarpone cream from the fridge and add it to a stand mixer fitted with a whisk attachment.
6. Whisk on a medium speed until it holds a medium peak, being careful not to over whip it.
7. Add the mixture into a piping bag fitted with a 1M star tip nozzle.
8. Pipe a spiral border around the edge of the cake.
9. Finish the cake by decorating it with some crushed pistachios and freshly sliced fruit.
10. The cake needs around 3-4 hours in total once removed from the freezer to defrost so just take those timings into consideration before serving.
Shop the Equipment

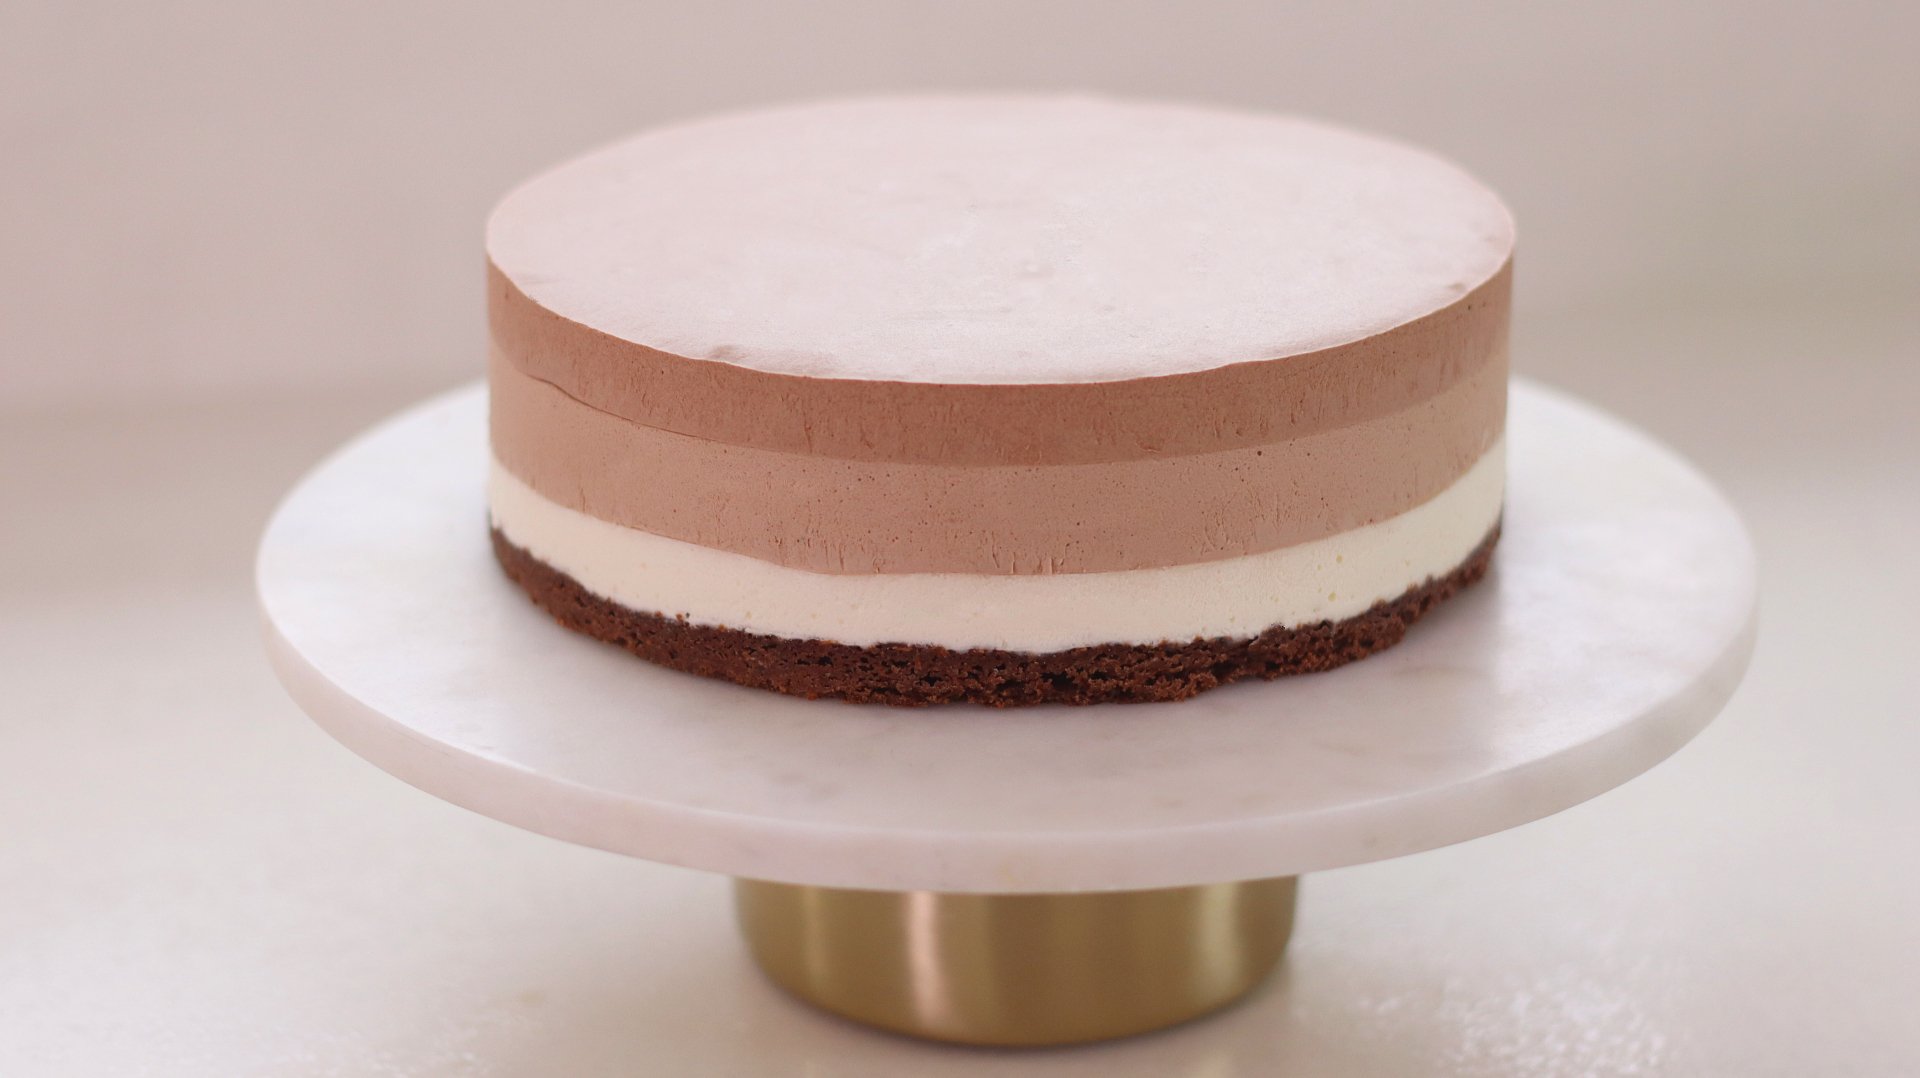
Triple Chocolate Cheesecake
TIER 1
Triple Chocolate Cheesecake
Unlike a traditional dense cheesecake, this one has a light, mousse-like texture (Triple Chocolate… Choussecake?!). The process is simple as we start by making a ganache with cream cheese, then fold in whipped cream to create that incredible texture. Each layer is easy to replicate since the measurements are nearly identical, with just a few small tweaks. The only tricky part is waiting for each layer to set! But once it’s ready to serve, you’re left with a beautiful ombré effect.
1
8" CHEESECAKE
Ingredients
Makes 1 8-inch Cheesecake
Chocolate Cookie Base
120g Oreos
20g-40g Unsalted Butter
Milk Mixture
275g Whole Milk
30g Honey
White Chocolate Layer
75g Milk Mixture (Above)
60g White Chocolate, Chopped
75g Double/Heavy cream
90g Cream Cheese, Full Fat
60g Double/Heavy cream
Milk Chocolate Layer
75g Milk Mixture (Above)
60g Milk Chocolate, Chopped
6g Cocoa Powder
75g Double/Heavy cream
90g Cream Cheese, Full Fat
60g Double/Heavy cream
Dark Chocolate Layer
75g Milk Mixture (Above)
65g Dark Chocolate (70% Cocoa Solids), Chopped
75g Double/Heavy cream
90g Cream Cheese, Full Fat
60g Double/Heavy cream
Special equipment
Food processor
8×2.75” ring mold
Acetate (optional)
Hand blender
Stand mixer
Method
Chocolate Cookie Base
1. Add the Oreos into a food processor and blend to a fine crumb. If you want, you can remove the white filling and just use 120g of Oreo biscuits.
2. Pour these into a medium bowl and set it to one side.
3. Add the butter into a small saucepan and place it on a low heat until melted.
4. Slowly pour about half of the butter mixture into the Oreos and stir to combine. Keep adding butter until the mixture resembles slightly wet sand. Oreos don’t require as much butter to pull together unlike a traditional biscuit base so add it slowly to avoid a very wet biscuit mixture.
5. Take an 8×2.75” ring mold and place a piece of acetate along the inside. Acetate isn’t completely necessary as we are freezing the mousse. If you don’t have acetate you can simply heat the outside of the ring mold with a hair dryer/heat gun when you need to demold it. Acetate just makes this process much easier and you end up with a slightly cleaner finish. Place the ring onto a baking tray.
6. Pour the Oreo mixture into the base of the ring and use the back of a measuring cup or something flat, to smooth the base out so that it is even. Place the tray into the freezer.
Milk Mixture
1. Add the milk and honey into a small saucepan, and place it over a medium-low heat until it is steaming – stirring occasionally. We are going to split this mixture between all three cheesecake bases.
The process for making the layers is identical, so it is easiest to set up three measuring jugs at once, each with the chopped chocolate in, then pour in the weighed milk mixture.
White Chocolate Layer
1. Into a tall jug, add the chopped chocolate, and pour over 75g of the hot milk mixture. The mixture needs to be hot so that the chocolate melts. Let it sit for 2 minutes before blending until smooth.
2. Add in the cream cheese, and the 75g of double/heavy cream. Blend again until smooth and there are no lumps of cream cheese. Cover the surface with clingfilm and refrigerate for 3 hours (or longer if needed).
Milk Chocolate Layer
1. Into a tall jug, add the chopped chocolate, and cocoa powder, and pour over 75g of the hot milk mixture. The mixture needs to be hot so that the chocolate melts. Let it sit for 2 minutes before blending until smooth.
2. Add in the cream cheese, and the 75g of double/heavy cream. Blend again until smooth and there are no lumps of cream cheese. Cover the surface with clingfilm and refrigerate for 3 hours (or longer if needed).
Dark Chocolate Layer
1. Into a tall jug, add the chopped chocolate, and pour over 75g of the hot milk mixture. The mixture needs to be hot so that the chocolate melts. Let it sit for 2 minutes before blending until smooth.
2. Add in the cream cheese, and the 75g of double/heavy cream. Blend again until smooth and there are no lumps of cream cheese. Cover the surface with clingfilm and refrigerate for 3 hours (or longer if needed).
Assembly
The assembly process is slightly tedious, as you have to wait for each layer to set before you can add the next one!
1. Remove the white chocolate layer from the fridge and place it into a medium bowl or the bowl of a stand mixer fitted with a whisk attachment. Whisk on a medium speed, until the mixture thickens and holds a medium peak. Set this to one side.
2. Into a bowl, add the remaining 60g of double/heavy cream and whisk until it holds a medium peak. Note – 60g can actually be quite tough to whisk if you are using an electric stand mixer so it is worth mixing 100g so that the whisk attachment can actually catch it, then just weigh the required 60g of cream.
3. Take the 60g of whipped cream, and fold this through the white chocolate layer, until smooth and combined. The final texture of the mixture should be thick, but still soft and slightly runny. We want a texture where we can pour the mousse into the tin and it will almost settle itself without too much assistance!
4. Remove the chilled chocolate base from the freezer and pour the white chocolate layer in. It should spread to the edges and settle, but if not just use a palette knife or a spoon to gently spread it, so that it is even. You can even give the tray a bit of a tap on the work surface to help it settle. Place the tray into the freezer for 30-60 minutes, or until the white chocolate layer feels firm enough to the touch to support another layer of mousse.
5. Repeat this exact same process with the milk chocolate and dark chocolate layers, freezing the mousse in between the milk and dark chocolate each layer. Note that because these layers have more cocoa solids, they will become thicker more quickly as you whisk them, so be careful not to over-whisk them and let them become too thick.
6. Once you have added the dark chocolate layer, place the entire cheesecake into the freezer. If you need to serve this quickly, 2-3 hours in the freezer will be absolutely fine, but you can also freeze it overnight too.
7. When you are ready to serve, remove the cheesecake from the freezer, and lift it onto your serving dish. Carefully pull off the ring mold and then peel away the acetate, to reveal a smooth cheesecake. The cheesecake now needs 2 hours to defrost before you can eat it (maybe slightly less if you only freeze it for 2-3 hours). Or, you can defrost it for 2 hours then get it straight into the fridge.
8. Just a note that the longer you leave it at room temperature, you will begin to see the base ‘weep’. This is just because the sugar draws moisture from the cheesecake mixture. Nothing has gone wrong, it’s just a natural scientific occurrence of the ingredients of the hygroscopic properties of sugar!
Shop the Equipment


Raspberry & Strawberry Jam
TIER 1
Raspberry & Strawberry Jam
In these recipes we learn the basics of making jams. I walk you through the recipe for raspberry and strawberry jam. The techniques are very similar but I’ll take you through each step, and discuss crucially, the jam setting point, which is a really important temperature to hit to make sure your jam sets! I’ve also included a bonus recipe in the PDF – my dad’s homemade marmalade (thanks Dad!). This was something I grew up eating, so I hope you guys love it as much as me!
4
JAM JARS
Ingredients
Makes 4 Jam Jars
Raspberry Jam
500g Fresh Raspberries
50g Honey
300g Caster/White Sugar
3g Pectin NH + 50g Caster/White Sugar
5g Lemon Juice
Strawberry Jam
750g Fresh Strawberries
450g Caster/White Sugar
225g Water
4.5g Pectin NH + 70g Caster/White Sugar
8g Lemon Juice
BONUS RECIPE
Seville Orange Marmalade (makes 8 jars)
1kg Seville Oranges
Juices of 2 Lemons
2500g Water
2000g Caster/White Sugar
Special equipment
4 x 100g jam jars, sterilised
Digital thermometer
Pectin
Method
Before starting your jam-making, you want to make sure you have cleaned, dried and sterilised your jam jars. Simply wash them in soapy water, dry them, then place them into the oven for 10 minutes at 140C.
Raspberry Jam
1. Into a small bowl, add the pectin and sugar (50g) mixture. Stir the mixture together and set this to one side.
2. Add the fresh raspberries, honey, and remaining sugar into a medium saucepan. Place the pan onto a medium heat and stir it together.
3. Keep cooking the mixture until it reaches 80C on a digital thermometer, and stir in the sugar/pectin mixture.
4. Continue to cook the mixture until it reaches 104C – this can take a little while, between 5-10 minutes so keep a close eye on the thermometer, stirring it pretty continuously.
5. 104C is an important temperature as this is the setting temperature for jams. The closer it gets to this temperature, the thicker and darker the jam will become, and the bubbles will become heavier.
6. As you are cooking it, use a spoon to skim off any foam/impurities that rise to the top.
7. Remove it from the heat, stir in the lemon juice and then distribute it between your jam jars. You should get 2 jars.
8. Leave them to cool to room temperature before refrigerating.
Strawberry Jam
1. Into a small bowl, add the pectin and sugar (70g) mixture. Stir the mixture together and set this to one side.
2. Hull the fresh strawberries and slice them in half. If the strawberries are smaller, then you can leave them whole.
3. Add the sugar and water into a saucepan, and cook it until it reaches 120C.
4. Once at temperature, immediately tip in the strawberries, stir them through the sugar mixture, then add the pectin sugar mixture.
5. Continue to cook the mixture until it reaches 104C – this can take a little while, between 5-10 minutes so keep a close eye on the thermometer, stirring it pretty continuously. 104C is an important temperature as this is the setting temperature for jams. The closer it gets to this temperature, the thicker and darker the jam will become, and the bubbles will become heavier.
5. As you are cooking it, use a spoon to skim off any foam/impurities that rise to the top.
6. Remove it from the heat, stir in the lemon juice and then distribute it between your jam jars. You should get 2 jars (or maybe slightly more)
7. Allow them to cool to room temperature before refrigerating/storing.
Seville Orange Marmalade (My Dad’s Recipe)
1. Wash the Seville oranges if they are dirty.
2. Cut the oranges in half and juice them. Pour the juice into a medium saucepan.
3. Scoop out the flesh from the inside of the oranges and place these into a muslin cloth.
4. Take the remaining peels of the oranges, and cut them into thin strips (or thicker strips if you prefer slightly chunkier strips in your marmelade). Add these to the pan.
5. Add the juice of the lemons into the pan, and place the juiced lemons into the muslin cloth too. Tie thie up so the orange flesh and lemons are secured.
6. Place the muslin into the saucepan, along with the water.
7. Bring the mixture to a boil, and then lower it to a simmer, and continue to cook the mixture until the orange peels are very soft. Anywhere from 1-2 hours!
8. Remove the muslin and squeeze out the juices from it, into the pan.
9. Add in the sugar and boil the mixture, cooking it until it reaches the jam-setting point of 104C.
10. Once it has reached the setting point, remove it from the heat for 15 minutes, and during this time a lot of froth/impurities will rise. Skim these off. The resting time will also help to distribute the orange peels.
11. Scoop the marmalade into your sterilised jam jars (it will make 7-8 jars!). Allow them to cool to room temperature and then place the lids on and refrigerate/store.
Shop the Equipment


Advanced Raspberry Sorbet
TIER 2
Advanced Raspberry Sorbet
In Tier 2 we get our maths head on! We walk through the formula I learnt to make any fruit sorbet, and we put it into practice in this stunning raspberry sorbet. It’s the perfect balance of flavours (thanks to the formula!), and the addition of the stabiliser makes it super smooth. I’ve included a detailed Google Sheets document for you to use to create any fruit sorbet in future, so be sure to check it out.
1
TUB (APPROX. 300G)
Ingredients
Makes 1 Tub (approx. 300g)
202g Caster Sugar
36g Dextrose
3g Stabiliser
299g Water
10g Fresh Lemon Juice
450g Fresh Raspberries
Special equipment
Digital thermometer
Hand blender
Ice-cream machine
Method
For the ‘science’ behind this recipe and the option to create your own flavoured sorbet, follow the guidelines in this document.
1. Pour the cold water into a saucepan and heat over a medium heat to 40C. In a bowl, stir together the sugar, dextrose and stabiliser and then pour into the water once it’s reached temperature. Whisk together until the mixture reaches 85C, then take off the heat and leave to cool to approximately 40C.
2. Once cooled, add the mixture to a bowl and pour in the lemon juice and raspberries. Blend briefly with a hand blender to combine (don’t blend for too long as you will start to blend the raspberry seeds, which will dull the colour of your sorbet). Pass the mixture through a sieve into a bowl, then cover the surface with cling film and put it in the fridge for 12 hours/overnight.
3. The next day, pour the mixture into your ice cream machine and churn for 20-30 minutes until it’s a thick, sorbet-like consistency.
4. Transfer the sorbet into a container and freeze for 1-2 hours before serving.
Shop the Equipment


Basic Lemon Sorbet
TIER 1
Basic Lemon Sorbet
In Tier 1 we walk through the fundamentals of a sorbet, and make a basic sorbet without getting too technical! This is the perfect palate cleanser – quite a tart lemon flavour that’s so refreshing. As we don’t add any stabiliser in this recipe, this sorbet is best served within 24 hours to prevent the sugar from recrystallising. It’s a simple and delicious recipe to get you warmed up for Tier 2!
1
TUB (APPROX. 300G)
Ingredients
Makes 1 Tub (approx. 300g)
145g Caster Sugar
55g Dextrose
435g Water
345g Fresh Lemon Juice
Special equipment
Hand blender
Ice-cream machine
Method
1. Pour the cold water into a saucepan and add the sugar and dextrose. Place over a medium heat and bring it to the boil whilst whisking. Boil for a minute then take the sugar syrup off the heat and leave to cool for approximately 15 minutes (until cool to the touch).
2. Add the mixture to a bowl and pour in the lemon juice (it’s a good idea to sieve this to avoid adding any pips/pulp). Blend with a hand blender to combine. Cover the surface with cling film then put the mixture in the fridge for 4 hours. You can leave this in the fridge for longer, but 4 hours is the ideal maturation time.
3. After 4 hours, pour the mixture into your ice cream machine and churn for 20-30 minutes until it’s a thick, sorbet-like consistency (yours may take longer depending on your machine).
4. Transfer the sorbet into a container and freeze for 1-2 hours before serving.
Shop the Equipment

Black Sesame & Blackberry
We would love to see your Bake It Better creations!
Show off your skills by sharing your desserts
#BakeItBetter

Roasted Hazelnut Tablet
We would love to see your Bake It Better creations!
Show off your skills by sharing your desserts
#BakeItBetter

Tiramisu
We would love to see your Bake It Better creations!
Show off your skills by sharing your desserts
#BakeItBetter

Summer Fruits Cheesecake
We would love to see your Bake It Better creations!
Show off your skills by sharing your desserts
#BakeItBetter

Oreo & Vanilla Cheesecake
We would love to see your Bake It Better creations!
Show off your skills by sharing your desserts
#BakeItBetter

Vanilla Panna Cotta
We would love to see your Bake It Better creations!
Show off your skills by sharing your desserts
#BakeItBetter

Strawberry Popsicle
We would love to see your Bake It Better creations!
Show off your skills by sharing your desserts
#BakeItBetter

Vanilla Bean Ice Cream
We would love to see your Bake It Better creations!
Show off your skills by sharing your desserts
#BakeItBetter

Chocolate Parfait
We would love to see your Bake It Better creations!
Show off your skills by sharing your desserts
#BakeItBetter

Chocolate Praline Bon Bons
We would love to see your Bake It Better creations!
Show off your skills by sharing your desserts
#BakeItBetter

Salted Caramel Bon Bons
We would love to see your Bake It Better creations!
Show off your skills by sharing your desserts
#BakeItBetter

Tempering Chocolate
We would love to see your Bake It Better creations!
Show off your skills by sharing your desserts
#BakeItBetter