
Coffee Parfait
TIER 2
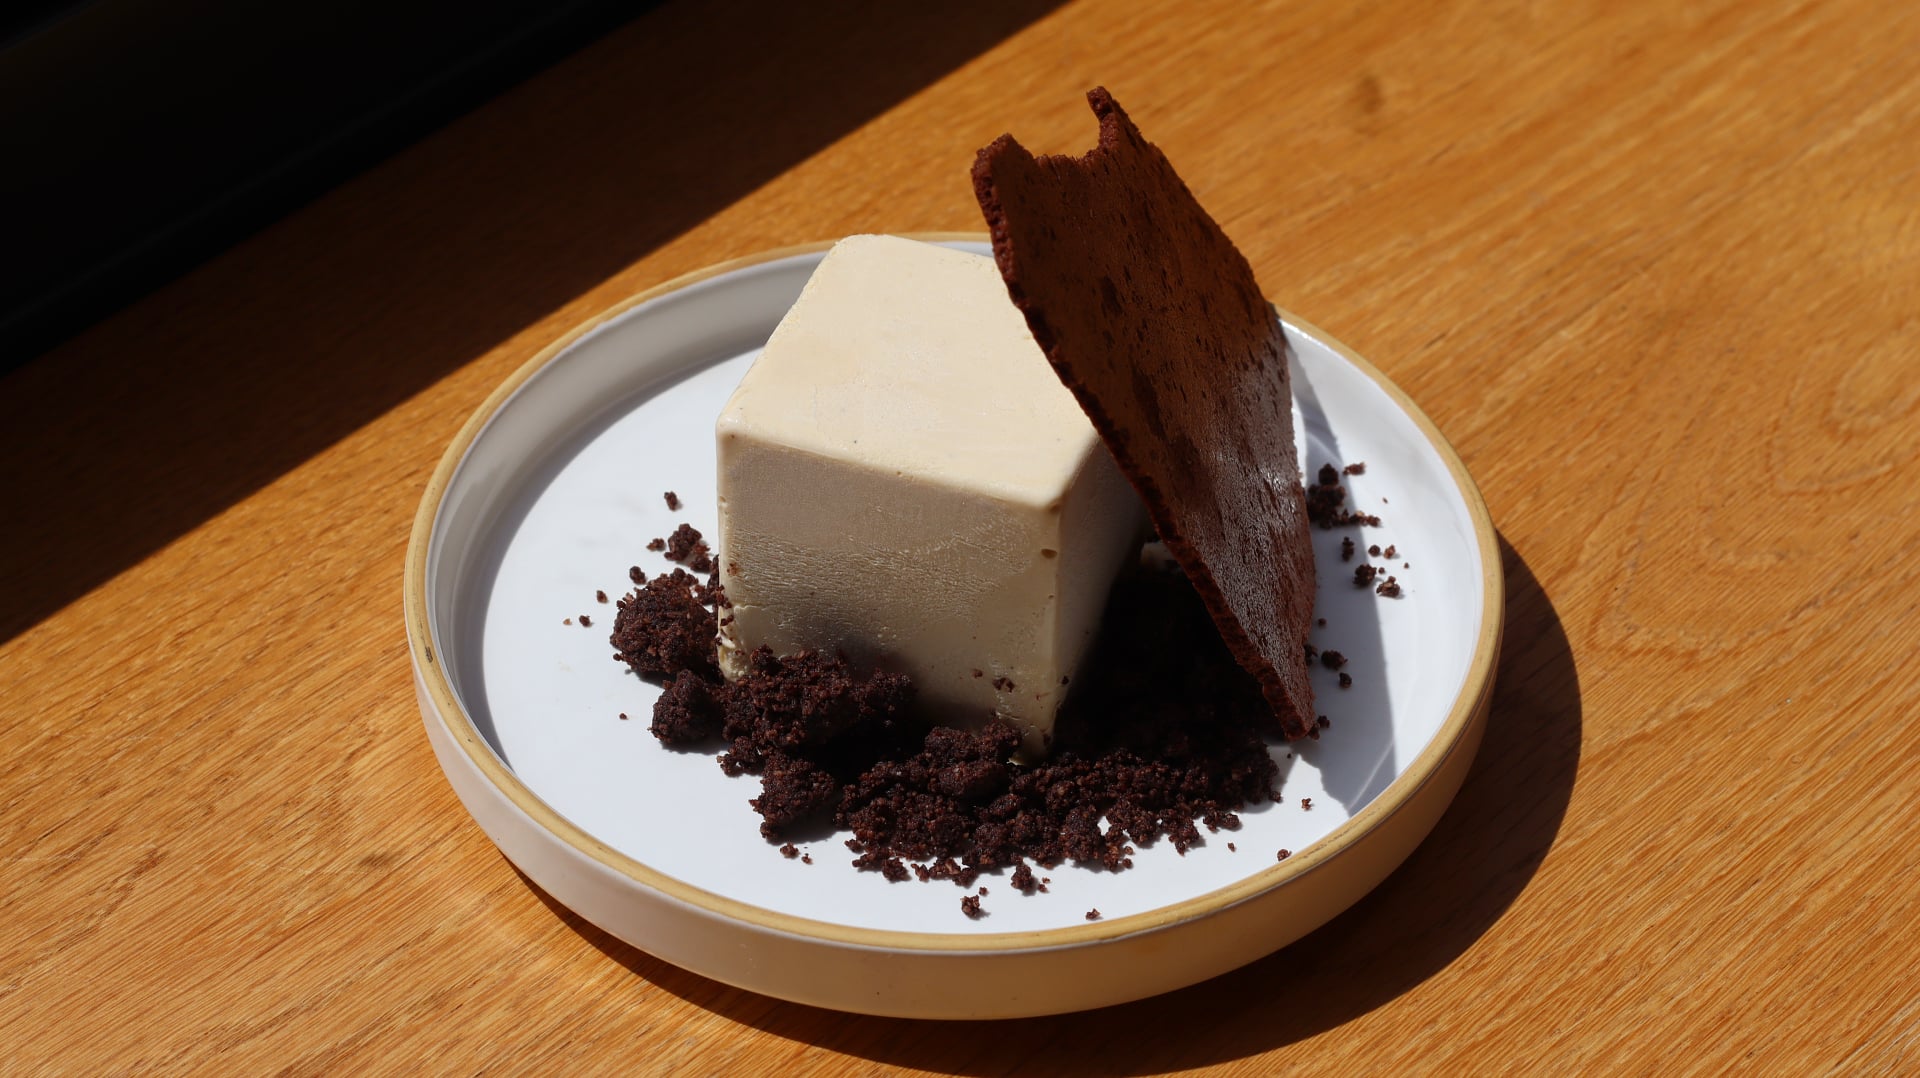
Coffee Parfait
Taking the same recipe as Tier 1, we just replace water for espresso in the sugar syrup. The coffee brings a slightly more bitter flavour which complements the sweeter profile of the parfait really well. The star of the show is the dehydrated chocolate mousse. Think crunchy meringue shards, but made with a rich chocolate mousse. Finally it’s served with an almond cocoa crumble and a cold chocolate sauce.

6
INDIVIDUAL PARFAITS
Ingredients
Makes 6 individuals parfaits
Coffee Parfait
300g Double Cream
80g Egg Yolks
85g Caster Sugar
35g Espresso
15g Honey
Pinch of Flaked Salt
Chocolate Almond Crumble
55g Ground Almonds
40g Plain/All-Purpose Flour
40g Light Brown Sugar
50g Unsalted Butter, Cold & Cubed
25g Cocoa Powder
Pinch of Flaked Salt
Dehydrated Chocolate Meringue
190g Double/Heavy Cream
200g Dark Chocolate, 70% Cocoa Solids, Finely Chopped
135g Egg Whites
55g Caster/White Sugar
Pinch of Flaked Salt
Chocolate Sauce
50g Whole Milk
30g Espresso
50g Double/Heavy Cream
10g Caster/White Sugar
40g Dark Chocolate, 70% Cocoa Solids
Pinch of Flaked Salt
Special equipment
Stand mixer
Digital thermometer
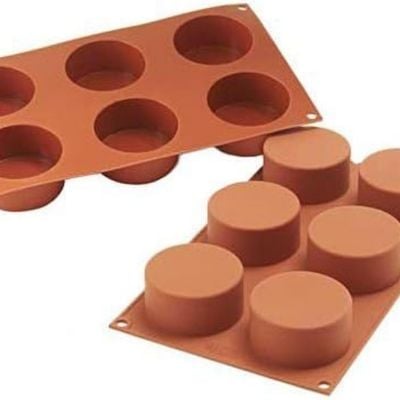
Silicon cylinder mold
Silicon mat
Raplette (optional)
Method
Coffee Parfait
1. Into the bowl of a stand mixer, add the egg yolks and whisk on a medium speed.
-
- 80g Egg Yolks
2. Meanwhile, in a small saucepan, add the espresso, honey and sugar. Place this onto a medium heat.
-
- 85g Caster Sugar
- 35g Espresso
- 15g Honey
3. Continue to cook the sugar mixture until it reaches 118C/244F. It can be a little bit tough as the coffee will cause the mixture to bubble up quite a lot. So if you get to around 114-116C on your digital thermometer that will be totally fine! Remove it from the heat and immediately slowly pour it over the whisking egg yolk mixture. Be careful not to pour the mixture directly onto the whisk or it will splatter. Whisk for 5 minutes on a medium high speed or until the mixture is thick, pale and holds a ribbon. Remove the bowl from the mixer and set it aside.
4. Add the cream, a pinch of flaked salt to a medium bowl and whisk by hand until it forms a medium soft peak.
-
- 300g Double Cream
- Pinch of Flaked Salt
5. Whisk the cream into the egg yolk base in two parts. You should end up with a nice smooth mixture.
6. Pour the mixture evenly across a silicon cube mold and freeze for 4 hours or overnight.
Chocolate Almond Crumble
1. Preheat the oven to 175C/345F non-fan assisted.
2. Into the bowl of a stand mixer, add all of the ingredients and mix on a medium low speed with a paddle attachment until it forms a crumble-like consistency.
-
- 55g Ground Almonds
- 40g Plain/All-Purpose Flour
- 40g Light Brown Sugar
- 50g Unsalted Butter, Cold & Cubed
- 25g Cocoa Powder
- Pinch of Flaked Salt
3. Squeeze the mixture between your hands to clump it together slightly. Pour the mixture onto a lined baking tray and bake for 12 minutes. Remove from the oven and allow to cool.
Dehydrated Chocolate Mousse
1. Preheat the oven to 100C/215F non-fan assisted.
2. Add the chopped chocolate to a tall measuring jug and set it aside.
-
- 200g Dark Chocolate, 70% Cocoa Solids, Finely Chopped
3. Pour the cream into a small saucepan and place it over a medium heat. Once it is hot, but not boiling, pour it over the chocolate. Allow it to sit for 2 minutes, then use a hand blender to blend until smooth. Transfer the mixture to a medium bowl.
-
- 190g Double/Heavy Cream
4. Into the bowl of a stand mixer, add the egg whites and whisk on a medium speed until frothy.
-
- 135g Egg Whites
5. Slowly add the sugar a tablespoon at a time. Then once you have added all the sugar, keep whisking until you have a medium stiff peak.
-
- 55g Caster/White Sugar
6. Take ⅓ of the meringue and whisk it through the chocolate base to even out the textures.
7. Fold the remaining meringue through in two parts along with a pinch of flaked sea salt.
8. Take a silicon baking mat and spread a thin layer of the mousse evenly across it. A raplette is a great tool to get an even thickness but using a palette knife is fine too. You will have excess mousse so pour it into jars and chill in the fridge to have as a dessert!
9. Slide the silicon mat onto a baking tray and bake for 1 hour and 40 minutes. The mousse should feel firm to the touch and if you break a piece off it should snap like a meringue shard.
10. Remove it from the oven and set aside. This is best made on the same day otherwise it will begin to soften. If it does, just pop it back in the oven t §00C for 20-30 minutes until it is firm again.
Chocolate Sauce
1. Add the espresso, cream, milk and sugar to a small saucepan. Place this on a medium heat.
-
- 50g Whole Milk
- 30g Espresso
- 50g Double/Heavy Cream
- 10g Caster/White Sugar
2. Meanwhile add the chocolate to a tall jug.
-
- 40g Dark Chocolate, 70% Cocoa Solids
3. Once the cream is hot, pour it over the chocolate and blend until smooth. Add a pinch of salt and then transfer it into a pouring jug, covered, and refrigerate for an hour.
Assembly
1. Remove the frozen coffee parfaits from the freezer and place them onto your serving plates.
2. Add a few tablespoons of the crumble around the base.
3. Snap off a large shard of the dehydrated chocolate mousse and rest this against the side of the parfait.
4. When ready to serve, pour the cold chocolate sauce over the top.
5. These are best after sitting at room temperature for about 5 minutes to soften slightly but just be aware they will melt around the edges just slightly (the crumble will hide this!)
Shop the Equipment


Coffee & Peanut Financier
TIER 1
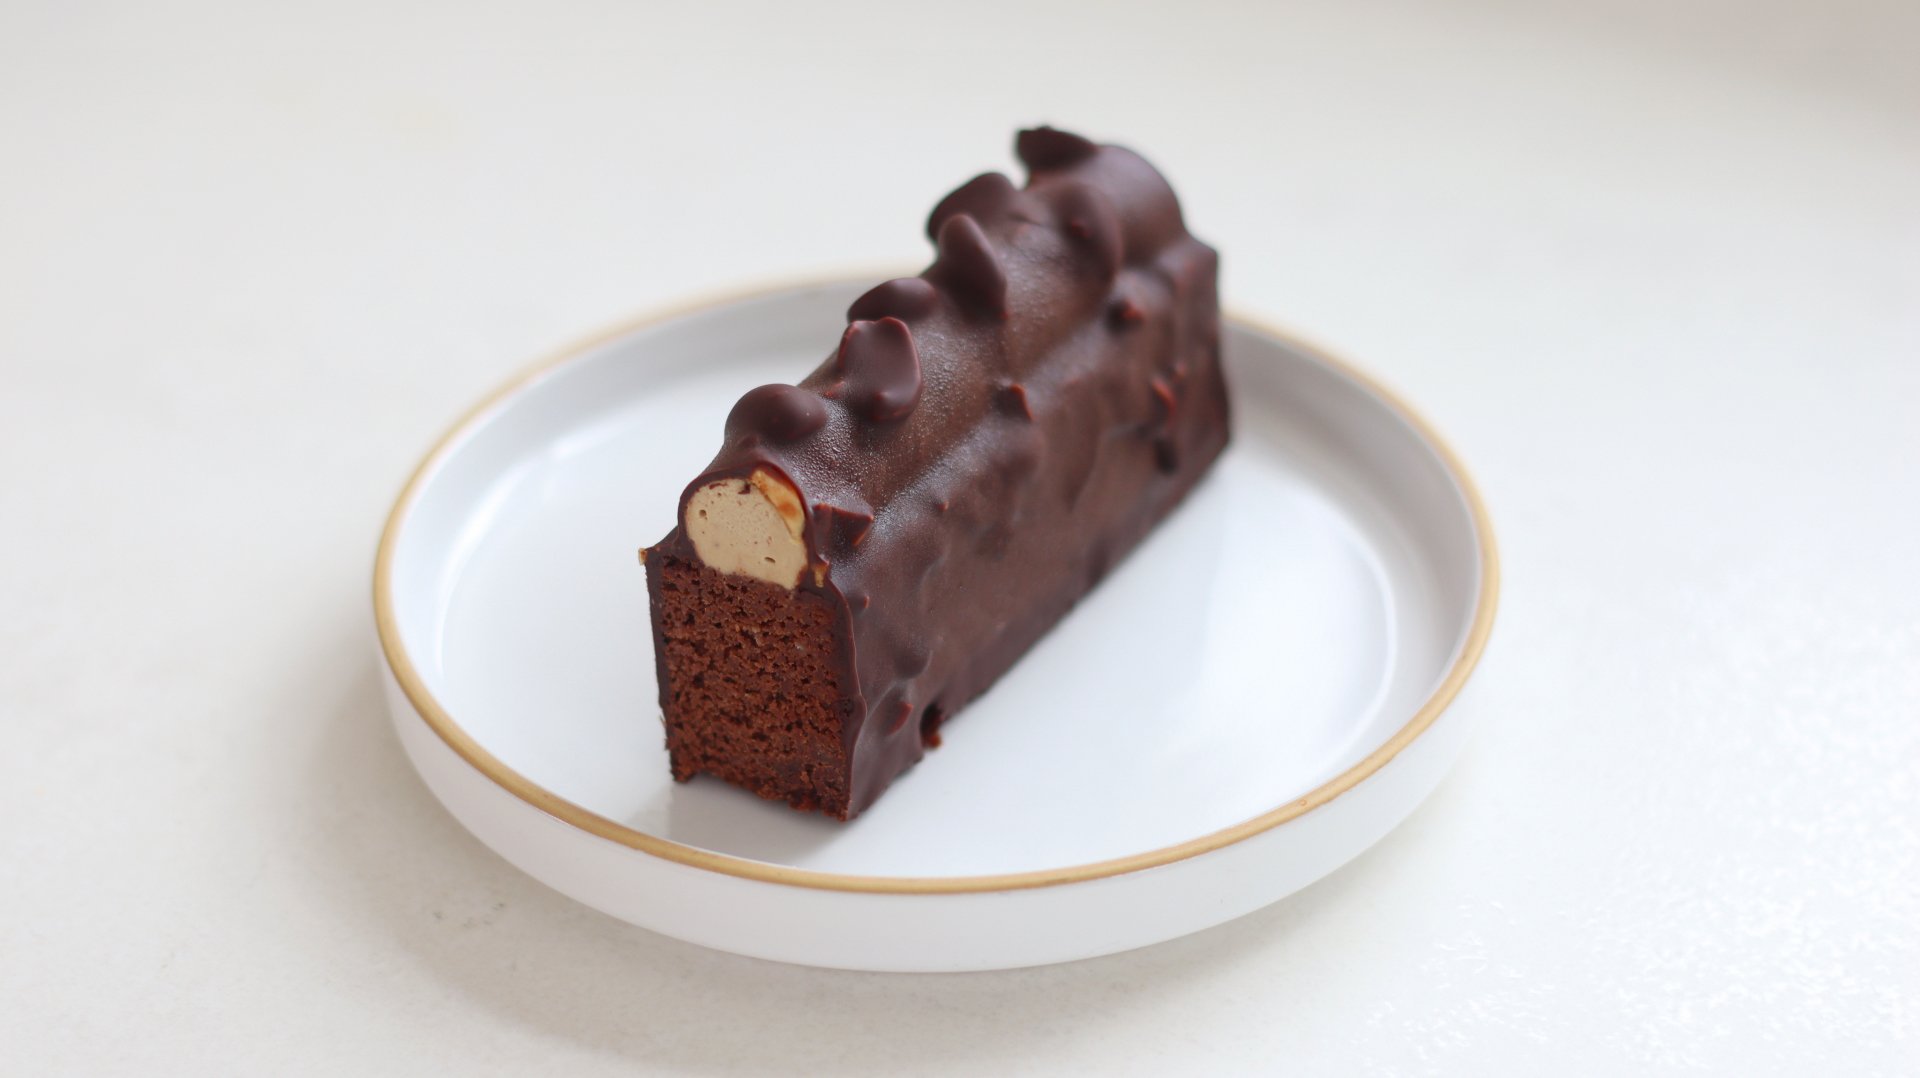
Coffee & Peanut Financier
I’m a huge fan of “finger” style desserts and the great thing about this recipe is that it builds all the fundamental elements you’ll need to take on tier 2. The financier is almost like a brownie texture with a smooth coffee cremeux and a simple chocolate glaze. Peanut and coffee is a delicious combination but feel free to swap the peanuts with any other nut. The financier also stores really well so you can bake it, wrap it tightly and store it in the fridge for a few days until you need it.
12-14
FINANCIERS
Ingredients
Makes 12-14 Financiers
Coffee Cremeux
5g Powdered Gelatin + 30g Water
400g Double Cream
115g Egg Yolks
60g Sugar
1 Vanilla Pod
75g Espresso
1g Freshly Ground Coffee
Small Pinch of Flaky Salt
Chocolate Peanut Financier
200g Unsalted Butter
560g Dark Chocolate (70%)
160g Plain Flour
200g Icing Sugar
16g Baking Powder
2g Fine Sea Salt
520g Double Cream
400g Egg Whites
160g Ground Peanuts or Almonds
Chopped Peanuts To Garnish
Chocolate Peanut Glaze
300g Dark Chocolate, 70% cocoa solids
30g Neutral Oil
30g Chopped Peanuts
Special equipment
Digital thermometer
Hand blender
13×9” cake tin
Stand mixer
Piping bag
Large round tip nozzle
Method
1. Into a small bowl, add the gelatin and water to a small saucepan and let it bloom for 10 minutes.
2. Into a medium saucepan, add the cream, espresso, coffee grounds and beans from the fresh vanilla pod. Place it over a medium heat until steaming.
3. Meanwhile, whisk together the egg yolks and sugar until combined.
4. Pour the hot cream over the egg mixture, whisking to combine, then add it back into the saucepan. Place it over a medium heat.
5. Cook to 80-82C on a digital thermometer, then immediately pass it through a sieve, on top of a tall measuring jug.
6. Scoop in the bloomed gelatin and blend till smooth with a hand blender. Sprinkle in a pinch of flaky sea salt and stir it through with a spatula. Pour the mixture into a bowl and refrigerate for a minimum of 6 hours.
7. For the financier, preheat the oven to 160C/320F non-fan assisted (145C for fan assisted). Lightly grease a 13×9” cake tin with soft butter. Cut a strip of parchment paper long enough to cover the base of the tin and extend up and over two opposite sides, creating “handles.” Press it into the tin so it sticks to the base and sides. Then cover the other sides with two strips of parchment.
8. Add the chocolate and butter to a medium bowl and melt this over a pan of gently simmering water. Once melted, set it to one side to cool slightly.
9. Meanwhile, sift together the flour, icing sugar, baking powder and salt. Add the ground peanuts on top and whisk to combine.
10. Pour the cream and egg whites on top and whisk by hand just until combined and there are no streaks of dry ingredients.
11. Pour in the melted chocolate mixture and whisk again to combine.
12. Pour the smooth batter into the lined tray and bake in the oven for 70-75 minutes.
13. Remove it from the oven and allow it to cool for 30 minutes before refrigerating for 1 hour.
14. When the financiers have cooled, use the parchment handles to lift it out of the tin and onto a chopping board. Cut it into 12-14 rectangles, or as small/large as you would like to make them.
15. Remove the coffee cremeux from the fridge and add the mixture into a stand mixer fitted with a whisk attachment. Whisk on a medium speed until it has thickened to a medium stiff peak. Add the mixture into a piping bag fitted with a large round tip nozzle.
16. Pipe long lines of the cremeux along the top of the financier, and then use a slightly warm knife to trim off the ends so they are flush with the edge of the financier.
17. Place some chopped peanuts into the top of the cremeux, then place the financiers into the freezer for 3-6 hours or until they are solid.
18. When they are frozen, prepare the glaze. Add the chocolate and oil into a bowl and place it over a pan of simmering water, stirring until it is melted.
19. Remove it from the heat and stir through the chopped peanuts. The glaze needs to be around 45C/113F when you use it. Pour the mixture into a tall but thin rectangular container. Take the temperature and heat it up if needed or allow it to cool further.
20. Remove the financiers from the freezer and place a knife into the bottom. Dip the financier into the glaze until it is completely covered, then lift it up, allowing the excess to drip off before quickly flipping it over and placing it onto a tray.
21. Repeat this with the remaining financiers.
22. The financiers can be left at room temperature for 30 minutes then served, or stored in the fridge until needed.
Coffee Bean Petit Gateaux
TIER 2
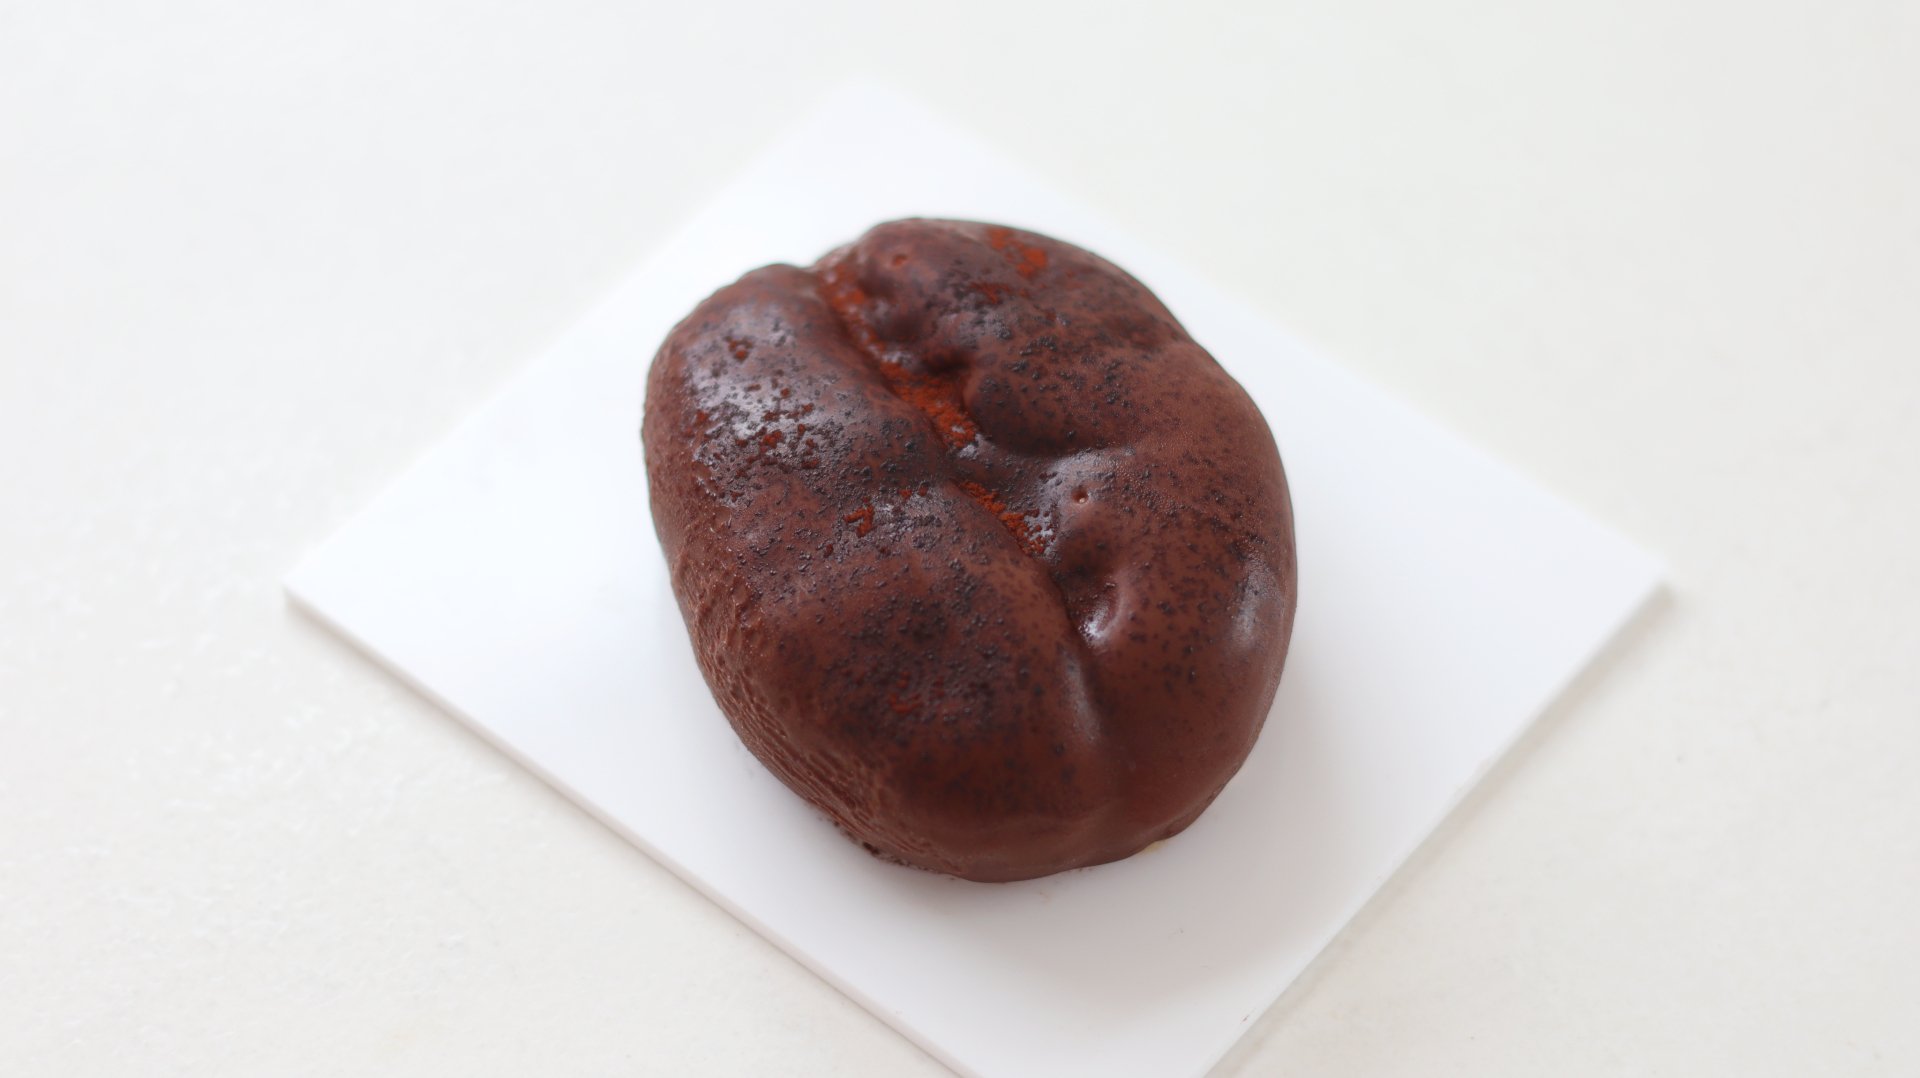
Coffee Bean Petit Gateaux
The showstopper! This style of dessert was made famous by pastry chef Cedric Grolet but no one ever seems to show you how to actually make them! The recipe has quite a few elements to prepare with a coffee cremeux, chocolate financier, recomposed streusel and a chocolate glaze. I’m a coffee snob, so I would always recommend using the freshest coffee you can get for the best flavour. If you don’t have the fancy coffee bean silicon mold, then feel free to freeze it in any small silicon mold you’ve got.
8-10
COFFEE BEANS
Ingredients
Makes 8-10 Coffee Beans
Coffee Cremeux
5g Powdered Gelatin + 30g Water
400g Double Cream
115g Egg Yolks
60g Sugar
1 Vanilla Pod
75g Espresso
1g Freshly Ground Coffee
Small Pinch of Flaky Salt
Chocolate Financier
130g Double Cream
100g Egg Whites
50g Icing Sugar
40g Ground Almonds
40g Plain Flour
4g Baking Powder
Pinch of Salt
50g Unsalted Butter
140g Dark Chocolate (70% Cocoa Solids)
Coffee Hazelnut Praline
220g Roasted Hazelnuts, Skinned
80g Pecans
12g Whole Coffee Beans
200g Sugar
50g Water
1 Vanilla Pod
Flakey Salt
Streusel
110g Light Brown Sugar
110g Ground Hazelnuts or Almonds
95g Plain/All-Purpose Flour
2g Bicarbonate of Soda
1g Fine Sea Salt
110g Cold Unsalted Butter, Cubed
Recomposed Streusel
215g Streusel
50g Dark Chocolate (70%)
25g Unsalted Butter
70g Coffee Hazelnut Praline
Chocolate Glaze
350g 55% Chocolate
300g Cocoa Butter
30g Neutral Oil
Cocoa Powder to Finish
Special equipment
Digital thermometer
35x25cm baking tray
Food processor
Stand mixer
Piping bag
Coffee bean silicon mold
Method
1. Into a small bowl, add the gelatin and water to a small saucepan and let it bloom for 10 minutes.
2. Into a medium saucepan, add the cream, espresso, coffee grounds and beans from the fresh vanilla pod. Place it over a medium heat until steaming.
3. Meanwhile, whisk together the egg yolks and sugar until combined.
4. Pour the hot cream over the egg mixture, whisking to combine, then add it back into the saucepan. Place it over a medium heat.
5. Cook to 80-82C on a digital thermometer, then immediately pass it through a sieve, on top of a tall measuring jug.
6. Scoop in the bloomed gelatin and blend till smooth with a hand blender. Sprinkle in a pinch of flaky sea salt and stir it through with a spatula. Pour the mixture into a bowl and refrigerate for a minimum of 6 hours.
7. For the financier, preheat the oven to 160C/320F non-fan assisted (145C for fan assisted). Lightly grease a 35x25cm baking tray with soft butter and line it with parchment paper – alternatively use a silicon sponge roll mat. Add the chocolate and butter to a medium bowl and melt this over a pan of gently simmering water. Once melted, set it to one side to cool slightly.
8. Meanwhile, sift together the flour, icing sugar, baking powder and salt. Add the ground almonds on top and whisk to combine.
9. Pour the cream and egg whites on top and whisk by hand just until combined and there are no streaks of dry ingredients.
10. Pour in the melted chocolate mixture and whisk again to combine.
11. Pour the smooth batter into the lined tray and bake in the oven for 15-17 minutes.
12. Remove it from the oven and allow it to cool for 30 minutes before refrigerating for at least 1 hour. You can also freeze this.
13. For the coffee hazelnut praline, into a medium saucepan, add the sugar and water. Place it on a medium heat, and cook the mixture until it reaches 116C/240F on a digital thermometer.
14. Once at temperature, pour in the hazelnuts, pecans, coffee beans and the beans from a fresh vanilla pod. Stir constantly with a spatula. The mixture will initially look quite clumpy, then the sugar will crystallise, but eventually, as you keep stirring, the sugars will caramelise and you should have a deep golden caramel surrounding the nuts. It will take around 3-5 minutes.
15. Immediately remove the pan from the heat, and tip the caramelised nuts onto a baking tray lined with a silicon mat. Sprinkle some sea salt flakes on top and let it set completely at room temperature for 30 minutes.
16. The praline should then be completely cool and solid to the touch. Break it into pieces and add it into a high-powered food processor. Blend for 3-4 minutes, scraping it down every so often, until you have a smooth, nutty paste. Store in an airtight container.
17. Into the bowl of a stand mixer, fitted with the paddle attachment, add all of the ingredients for the streusel.
18. Mix on a low speed until the butter has broken down and the mixture is sandy in texture.
19. Transfer this to a baking tray, lined with a silicon mat and spread it out. Place it into the freezer for 30 minutes. Meanwhile preheat the oven to 175C/345F non-fan assisted.
20. Place the chilled mixture into the oven and bake for 30 minutes. After around 15 minutes it should be slightly golden around the edges. Remove it from the oven and stir it all together with a spatula then place it back in the oven to bake until it is an even golden colour.
21. Once baked, allow it to cool at room temperature for at least 30 minutes.
22. For the recomposed streusel, add the chocolate, butter and praline into a bowl and place this over a pan of simmering water. Stir it together until the chocolate and butter have completely melted. Remove it from the heat.
23. Tip in the cooled streusel and stir to combine. Ensure if there are any large pieces of streusel, that you crush them slightly so they are smaller, before adding them in.
24. Pour the mixture onto a sheet of parchment paper and place a second sheet on top. Use a rolling pin to roll it relatively thin, then place it into the freezer for 30 minutes.
25. To assemble the dessert, remove the coffee cremeux from the fridge and whisk it to a medium peak in a stand mixer – avoid whipping it too stiff. Add the mixture into a piping bag.
26. If your coffee bean silicon mold has a cutter, use this to cut the out inserts from the recomposed streusel and financier. Sandwich them together with a little bit of cremeux. If you don’t have a cutter, then you can use a sharp knife to cut the required shapes that will fit your coffee bean mold. You can also freeze this dessert in any silicon mold you have!
27. Take the coffee bean silicon mold (or any silicon mold) and pipe the cremeux into the mold, filling it up about ¾ of the way. Use a spatula to press the cremeux to the edges, then place the financier/streusel insert into the cremeux. Top up the mold if needed with cremeux and then smooth the top with a palette knife. Repeat this for all of the molds you have. Place the molds onto a tray and freeze them for at least 12 hours.
28. Once frozen, remove them from the molds then place the desserts back in the freezer on a tray lined with a silicon mat for a further hour.
29. For the glaze, add the chocolate, cocoa butter and oil into a medium bowl. Place this over a pan of gently simmering water and stir it until it is completely melted.
30. The glaze needs to be at 45C/113F when you dip the desserts. Pour the mixture into a small, deep container that is just slightly larger than your dessert.
31. Remove one dessert at a time, and place a knife into the base. Dip the dessert into the so that it is covered right to the edge, then lift it up and hold it at a 45 degree angle until the dripping slows. Then lift it upright until it has set.
32. Dip a pastry brush back into the glaze and quickly brush this all around the bean to ‘rough’ it up slightly.
33. Finally, dust a thin layer of cocoa powder on top of the coffee bean then very quickly and carefully blow torch it to darken the cocoa powder slightly. Lift it onto a small serving dish.
34. Repeat this for all the remaining desserts, and then leave them in the fridge for at least an hour or overnight before serving.

Chocolate Orange Tiramisu
TIER 1
Chocolate Orange Tiramisu
I couldn’t make ladyfingers and not use them in a tiramisu! In Tier 1 we keep the technique of a tiramisu very classic – no cream! But I’ve mixed things up with a chocolate orange flavour. You soak your homemade ladyfingers biscuits in espresso, and layer them between orange mascarpone cream and chocolate shavings. This is a great dessert you can make ahead of time.
8-10
SERVINGS
Ingredients
Makes 8-10 Servings
Savoiardi Biscuits
115g Egg Yolks
25g Whole Eggs
40g Caster/White Sugar (A)
100g Plain/All-Purpose Flour (A)
260g Egg Whites
100g Caster/White Sugar (B)
1.5g Fine Salt
35g Plain/All-Purpose Flour (B)
Icing Sugar To Finish
Orange Mascarpone Cream
600g Mascarpone
65g Egg Yolks
50g Caster/White Sugar (A)
Zest 2 Oranges
145g Egg Whites
50g Caster/White Sugar (B)
Coffee Soaking Syrup
150g Freshly Brewed Coffee
15g Kahlua
Dark Chocolate, Grated
Special equipment
10mm round tip nozzle
Piping bag
Stand mixer
Method
Savoiardi Biscuits
1. Pre-heat the oven to 160C/320F non-fan assisted.
2. Take 2 large sheets of baking paper and draw two sets of train track lines on the baking sheets, 90mm/3.5” tall. Flip these upside down (so the ink doesn’t touch the pastry) and place them on a baking sheet.
3. Take a small round tip nozzle (10mm) and add it into a piping bag. The piping nozzle needs to be smaller than you think, as the batter will spread slightly as it is piped.
4. Into a medium bowl, add the egg yolks, whole eggs, and sugar (A). Whisk this to combine, then add the flour (B) and whisk to form a thick paste. Set this to one side.
5. Into the bowl of a stand mixer, add the egg whites (room temperature) along with the salt.
6. With the whisk attachment, whisk on a medium-low speed until it becomes frothy, with small bubbles on top (this will take a few minutes).
7. Slowly add in the sugar (B), about a tablespoon at a time. Once you have added all the sugar, whisk until you have a stiff peak.
8. Take about ⅕ of the meringue mixture and whisk it through the egg yolk mixture. This will be quite stiff, so it needs to be whisked firmly to smooth it out.
9. Add the remaining meringue in 2-3 parts, gently folding it through to ensure you don’t beat out too much air.
10. Once smooth, sift over the remaining flour (B) and fold through until there are no more lumps.
11. Add the mixture into your piping bag and let it rest for a few minutes; this will just make it slightly easier to pipe.
12. Using the guides on your baking tray, pipe individual lines, ensuring they’re not too close together, as they will spread slightly.
13. Once piped, add a good dusting of icing sugar over the top, wait 1-2 minutes, and then repeat.
14. Place them directly into the oven and bake until a deep golden brown colour – be sure not to underbake them. It should take around 30 minutes, but it can depend on how big you’ve piped them and your oven.
15. Remove them from the oven and then allow them to cool at room temperature. If you want to make these ahead of time, you can place them in an airtight container and freeze them for up to 2 months.
Orange Mascarpone Cream
1. Into a medium bowl, add the sugar (A) and zest of 1 orange, then massage this zest into the sugar.
2. Add the egg yolks and whisk by hand for a minute until thickened slightly.
3. Add the mascarpone and remaining orange zest, and whisk again until completely smooth. Set this to one side.
4. Into the bowl of a stand mixer, add the egg whites and whisk on a medium-low speed until frothy.
5. Slowly add the sugar about a tablespoon at a time. Once you’ve added all the sugar keep whisking until it reaches a stiff peak.
6. Take the meringue, and fold it through the egg yolk mixture in three parts until smooth and evenly combined.
Coffee Soaking Syrup
1. Combine the two ingredients in a shallow dish.
Assembly
1. Take the cooled lady fingers and check to see how they fit into your chosen dish. If you need to cut them down to size, use a knife or a microplane to shave them down so that they fit snugly in the dish.
2. Take the lady fingers and soak them one by one, then, lay them into the base of your tiramisu dish.
3. Once the bottom of the dish is covered, take a few large spoonfuls of the mascarpone cream mixture and spread this evenly across the lady fingers with an offset spatula.
4. Using a microplane, grate a fine layer of dark chocolate over the cream (or cocoa powder)
5. Repeat this two more times, finishing with a layer of the mascarpone cream. Use an offset spatula to completely smooth the top so that it is flush with the rim of the dish.
6. Place the tiramisu into the fridge to chill – ideally 4-6 hours, but overnight is absolutely fine too.
7. When ready to serve, remove it from the fridge and grate over one final layer of dark chocolate (or cocoa powder) and serve.
Shop the Equipment


Espresso Burnt Basque Cheesecake
TIER 2
Espresso Burnt Basque Cheesecake
We don’t use coffee often in Bake It Better, but it’s a flavour I absolutely love! A classic burnt Basque cheesecake is usually made without a biscuit base, but here, we’re taking it up a notch with our own homemade chocolate biscuit base. I’ve also included some great techniques to give the cheesecake a more refined finish—less rustic than most recipes! If coffee isn’t your thing, feel free to skip the espresso and coffee beans and swap in fresh vanilla instead!
1
9" CHEESECAKE
Ingredients
Makes 1 9-inch Cheesecake
Chocolate Cookie Base
70g Unsalted Butter, Cubed & Cold
55g Plain/All-Purpose Flour
12g Cocoa Powder
45g Ground Almonds
35g Caster/White Sugar
1g Baking Powder
Pinch of Sea Salt Flakes
Coffee Cheesecake
450g Double/Heavy Cream + extra
45g Coffee Beans, Whole
880g Cream Cheese
265g Caster Sugar
38g Plain Flour
290g Whole Eggs, Whisked Together
25g Freshly Brewed Espresso
Special equipment
9” springform/loose bottom cake tin
Stand mixer
Hand blender
Food processor
Method
Chocolate Cookie Base
1. Take a 9” springform/loose bottom cake tin, and lightly grease the base and sides. Place a circle of parchment along the bottom and a strip around the side.
2. Into the bowl of a stand mixer (or you can do this with your hands), add all of the ingredients.
3. With the paddle attachment, mix on a low speed until it resembles a crumble-like texture and the butter has broken down. If doing this by hand, just rub the mixture between your fingers.
4. Remove the mixture from the bowl and tip it into the base of the cake tin. Use your hands to press it flat into the tin – it will be quite dry/dusty initially, but pressing it down will help form it into a dough. Then use the back of a flat glass to press it firmly down.
5. Place the tin into the freezer, while you pre-heat the oven to 175C/345F Non-fan assisted.
6. Put the tin into the oven and bake the base for 20 minutes. Remove it from the oven and allow it to cool at room temperature for 15 minutes.
7. Once it has cooled, lay a few large sheets of foil underneath the pan – we will need these later!
Coffee Cheesecake
1. Into a medium saucepan, add the cream and whole coffee beans. Place the lid on the pan and place it on a medium heat. Once it comes to a simmer, turn the heat off and allow it to steep for 30 minutes.
2. Pre-heat the oven to 210C/410F fan-assisted.
3. Remove the lid and pour the mixture into a tall jug, then use a hand blender to blend for about 30 seconds.
4. Pour the mixture through a sieve and into a bowl on a scale. You will have lost some weight due to evaporation, so you need to top up the mixture with more fresh double/heavy cream, until it weighs 365g.
5. Into a food processor or blender, add the cream cheese, flour, and sugar. Blend on a low speed for about 2 minutes until the mixture is smooth. We’re trying to avoid adding in too much air so it is important to do this on a low speed. Scrape down the mixture a few times to ensure it incorporates properly.
6. Pour in the eggs and blend until combined on a low speed. Scrape down the food processor when/if needed.
7. Finally, pour in the coffee cream and freshly brewed coffee and blend on low until combined. Scrape down the food processor and blend again.
8. Give the bowl a very firm tap on the work surface to get rid of any excess bubbles, then pour the mixture, through a sieve, straight over the biscuit base.
9. Take two tea towels, and soak them in water. Fold them into a neat rectangle shape and then wrap them around the outside of the tin. Then, take the foil that you laid down, and wrap this up and around the tea towels (to stop them from burning!)
10. Place the tray into the centre of the oven and bake for around 35-40 minutes. The cheesecake should be dark on top, with a very significant wobble when you gently shake the tray. About ¾ of the cheesecake should wobble. If you think the cheesecake is done, but maybe you want it a little darker on top, you can put it under a hot grill just for a minute or two to add some colour. For me, I found 36 minutes was perfect.
11. Remove it from the oven and allow it to cool at room temperature for 1 hour, before refrigerating overnight. It’s important to let it chill overnight to really set the cheesecake.
12. The next day, remove it from the tin, and then use a hot knife to cut slices.
Shop the Equipment


Tiramisu Cake
TIER 1
Tiramisu Cake
This is a subtle coffee flavoured cake, filled and decorated with vanilla and chocolate mascarpone swiss meringue buttercream, and topped with a chocolate ganache. I’ve used a scalloped edged scraper to create a funky texture as the design to this cake – relatively simple but so effective! Just make sure not to keep going over the cake. Have confidence in yourself! And remember, no one can see the back 😉
LARGE 7-INCH
CAKE
Ingredients
Makes 1 Large 7-inch Cake
Coffee Cake
455g Caster Sugar
495g Unsalted Butter, Room Temperature
405g Whole Eggs
21g Baking Powder
485g Cake Flour (or Plain/All-Purpose Flour)
2g Salt
5g Instant Coffee
45g Boiling Water
Coffee Sugar Syrup
100g Sugar
100g Water
2g Instant Coffee
Mascarpone Swiss Meringue Buttercream
400g Egg Whites
700g Caster Sugar
7g Fine Sea Salt
1kg Unsalted Butter, cubed
2 Tsp Vanilla Bean Paste
200g Mascarpone
Chocolate Mascarpone Swiss Meringue Buttercream
300g Mascarpone Swiss Meringue Buttercream
100g Dark Chocolate, 70% Cocoa Solids
Chocolate Ganache
50g Dark Chocolate, Finely Chopped
140g Double/Heavy Cream
Cocoa Powder To Decorate
Special equipment
4 7-inch cake tins
Stand mixer
Digital thermometer
Rotating cake stand
Flat edged scraper
Scalloped edged scraper
Heat gun (or a hair dryer)
St Honore piping nozzle
Hand blender
Method
Coffee Cake
1. Preheat the oven to 180C/355F Non-Fan Assisted. Lightly grease 4×7” tins with soft butter, and place a circle of parchment in the bottom. Tip in a tablespoon of flour and shake this around to coat the tin and then tip out any excess.
2. Into a medium bowl, sift together the flour, salt & baking powder, then whisk to combine. Set this to one side.
3. Into the bowl of a stand mixer, add the butter and sugar. Beat it with the paddle attachment for 3-4 minutes, or until light and fluffy.
4. Scrape the bowl, then back on a medium low speed, slowly add the eggs in about 6 additions, leaving about 10-15 seconds between each addition. Don’t worry if the batter looks slightly curdled at this stage.
5. Tip in the flour mixture and mix on a low speed until there are no more dry ingredients visible. Scrape down the bowl, really ensuring to scrape the bottom so that there are streaks of butter.
6. Finally, stir together the boiling water and the instant coffee powder. Pour this coffee mixture into the cake batter and mix on a low speed until combined. If you feel your batter is still a little too thick, just add a little more boiling water to loosen it.
7. Weigh 440g of batter into each tin. The batter will be quite thick so use the back of a hot spoon to spread it out roughly to the edges of the tin.
8. Bake the cakes for 30 minutes or until a skewer inserted comes out clean and the cakes have an even golden colour.
9. While still warm, gently loosen the edges of the cake from the cake tin with a palette knife, and then flip them out onto a wire rack. Let them cool for a few minutes before wrapping them tightly in clingfilm and refrigerating. Ideally you would chill them overnight but 4 hours is enough time too.
Mascarpone Swiss Meringue Buttercream
1. In a stand mixer bowl over a pan of simmering water, whisk together the egg whites, caster sugar and sea salt until the mixture reaches 65C on a digital thermometer.
2. Once the mixture comes to temperature, immediately add the bowl to your stand mixer and mix on a medium speed for 10-15 minutes, until the bottom of the bowl is tepid to touch.
3. Next, with your stand mixer on a medium speed, add the butter a little at a time, leaving 5-10 seconds between each addition. Once it’s all been added, continue mixing for another 5 minutes.
4. Finally, add the mascarpone and vanilla and, using the paddle attachment, mix on a low speed for 5 more minutes.
5. To make the chocolate mascarpone swiss meringue buttercream, melt the chocolate over a bain marie, let it cool for 3 minutes then whisk through 300g of the plain mascarpone swiss meringue buttercream. If the buttercream seems too soft when you’ve whisked throught the chocolate, just pop it in the fridge for a few minutes so it can thicken slightly.
6. When you’re ready to start decorating your cakes, add the buttercreams to piping bags.
Coffee Sugar Syrup
1. In a saucepan over a medium heat, mix the sugar, water and coffee together until the sugar has dissolved. Leave to one side to cool.
Crumb Coat
1. Using a serrated knife, evenly cut the top off your cake layers to make them level.
2. Put a cake board on top of a rotating cake stand. Secure the cake board down with some wet kitchen paper.
3. Add a small dollop of buttercream to your cake board and place your first layer on top, cut side up. Using a spoon, add some sugar syrup to the top of the cake layer.
4. Next, pipe a dollop of chocolate buttercream in the centre of the cake layer. Then, add a circle of the vanilla buttercream around the chocolate buttercream. Follow this with a circle of chocolate, and finish it with a circle of vanilla. Make sure you end with the vanilla buttercream round the outside.
5. Repeat this with the second and third cake layers, so you have three layers of buttercream in total. Place your final layer on top, making sure the cut side is facing down.
6. Next it’s time to crumb coat the cake. Add more vanilla buttercream to the outside of the cake – you can be messy here! Then, using a palette knife, spread the buttercream out over the entire outside of the cake, making sure all the gaps between the layers are filled.
7. Next, hold a flat edge scraper against the outside of the cake at about a 30 degree angle. In one swift motion, spin the cake whilst keeping a straight hold of the scraper. Repeat this a few times, filling in any gaps with extra buttercream. You should be left with an even crumb coat around the cake. Then, take your palette knife and smooth the top of the cake.
8. Chill the cake until the buttercream feels firm to touch. About 20 minutes in the freezer or 30-40 minutes in the fridge.
Decoration
1. Once your buttercream has chilled, take a palette knife and spread a thick layer of your vanilla buttercream over the outside of the cake (don’t worry about the top). You want to make sure this buttercream is quite soft with few air bubbles, so I like to add it back into the stand mixer and use a heat gun or hair dryer to just loosen it a little before using. Melting it slightly will give you a soft, bubble free buttercream,
2. Then, using a scalloped edged cake scraper, use the same technique as the crumb coat. Heat the edge of the scraper with a heat gun or hair dryer, then hold it at a 30 degree angle against the side of the cake, and in one swift motion spin your cake, holding the scraper steady.
3. You’ll likely be left with a few gaps/air pockets. Fill these in with some buttercream and repeat the process, making sure you heat your scraper slightly before attempting the scrape. I wouldn’t recommend doing this more than 3 times or you will scrape off too much buttercream.
4. Once you’re happy with the design of the cake, use a palette knife to scrape off any excess buttercream from the top of the cake.
5. Next, add your remaining vanilla buttercream to a piping bag fitted with a St. Honore nozzle. Holding the piping bag firmly, at the edge of the top of the cake pipe in a zigzag motion whilst spinning your cake stand. Try and do this in one spin until you have covered the entire edge of the cake.
6. Finally, make your chocolate ganache. In a saucepan, heat the double cream over a medium heat until it’s simmering. Add the chopped chocolate to a narrow tall jug, then pour over the heated cream. Use a hand blender to blend the mixture until smooth. Try to avoid vigorously moving the blender to ensure you don’t add too many air bubbles to the ganache. Let it sit for 2 minutes.
7. Add a dusting of cocoa powder over the piped edges of your cake. Then slowly pour the ganache over the top of the cake until you’ve covered about ⅔ of the cake top. Gently tilt the cake to fill the entire top.
Shop the Equipment


Tiramisu
We would love to see your Bake It Better creations!
Show off your skills by sharing your desserts
#BakeItBetter
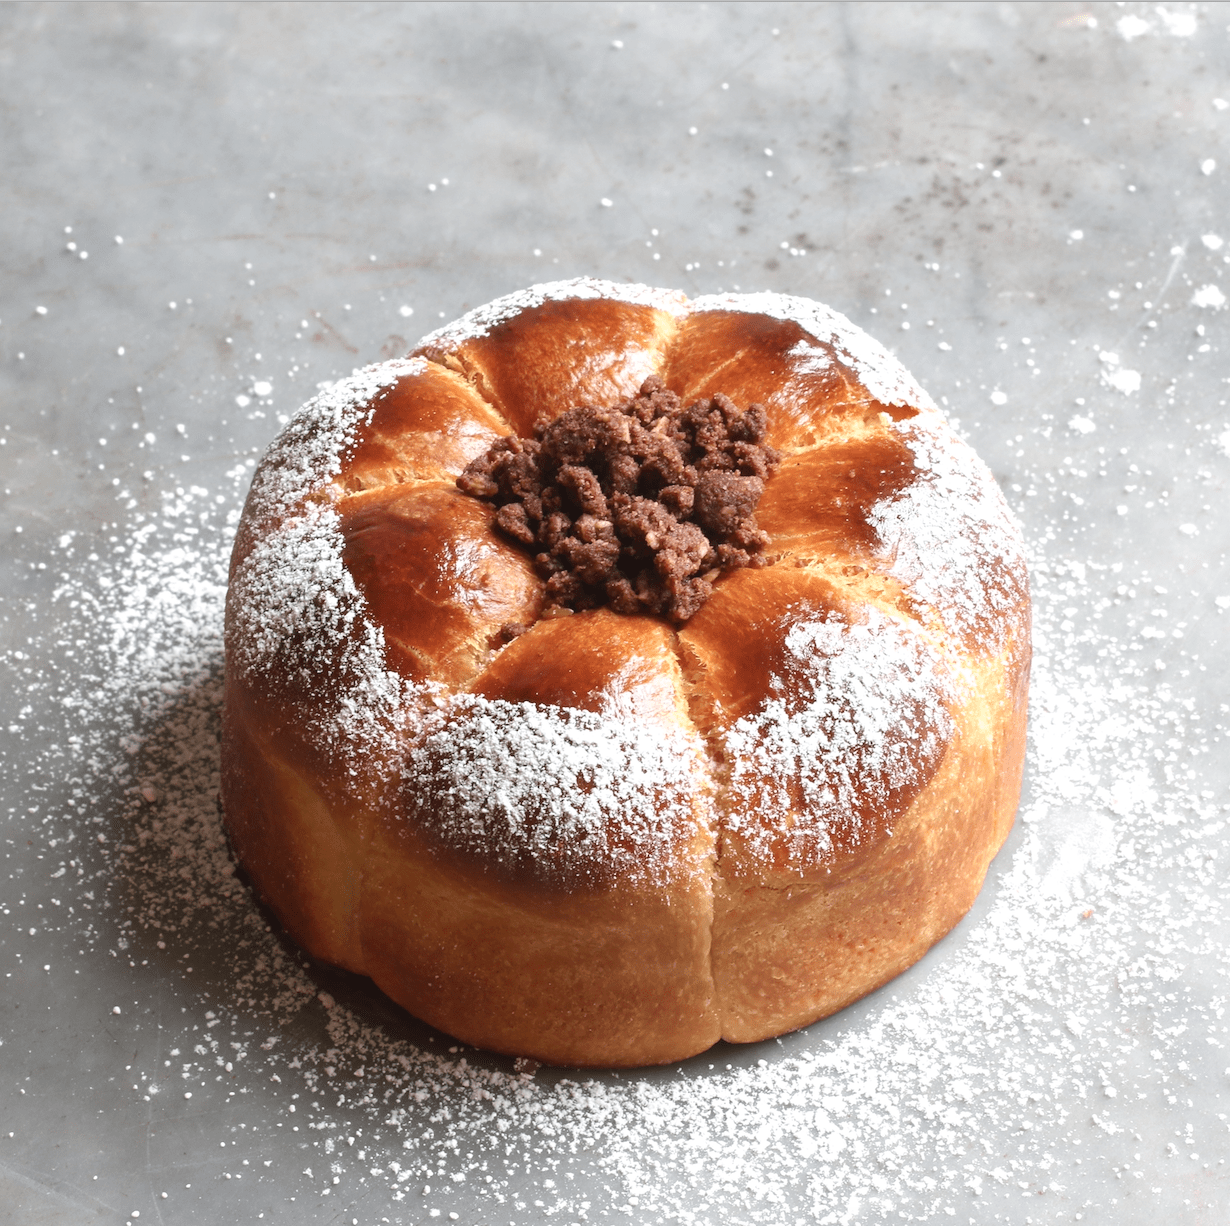
Coffee Brioche
We would love to see your Bake It Better creations!
Show off your skills by sharing your desserts
#BakeItBetter