

île Flottante
TIER 1
île Flottante
For Tier 1 I decided to try a twist on the classic Île Flottante, inspired by working in the kitchen with Tom Aiken. Typically made by poaching a meringue and serving it in a warm bowl crème anglaise, this version is much more refined, with a Swiss meringue that is cut into a perfect disc. We fill the centre with crème anglaise and then top it with a thin caramel disc and clear caramel sauce.

4
INDIVIDUAL DESSERTS
Ingredients
Makes 4 île Flottantes
Crème Anglaise
125g Double Cream
250g Whole Milk
75g Caster/White Sugar
75g Egg Yolks
1 Fresh Vanilla Pod
Pinch of Flaky Sea Salt
Caramel Sauce
200g Caster/White Sugar
60g Water
100g Water
Caramel Discs
70g Caster/White Sugar
70g Liquid Glucose
Swiss Meringue
300g Egg Whites
205g Caster/White Sugar
5g White Vinegar
Roasted & Chopped Almonds or Hazelnuts To Serve
Special equipment
Digital thermometer
13″ x 9″ x 2” baking dish
Stand mixer
Blender
9cm/3.5” cookie cutter
Piping bag
Method
Crème Anglaise
1. Into a medium saucepan, add the milk, cream and beans scraped from a fresh vanilla pod (keep the leftover vanilla pod as we will use this in the caramel sauce). Place this onto a medium low heat, stirring occasionally.
2. Meanwhile, add the egg yolks and sugar to a medium bowl and whisk for 30 seconds to combine.
3. Once the cream is hot, slowly pour it over the egg yolk mixture, whisking to combine.
4. Pour the entire mixture back into the saucepan and whisk until it reaches between 82-85C (180-185F) on a digital thermometer.
5. Immediately remove it from the heat and pass it through a sieve into a clean bowl. Whisk through a pinch of salt.
6. Place a sheet of clingfilm on the surface and refrigerate the mixture for at least an hour. Alternatively, place it over a bowl of ice water and that will thicken it quickly.
Caramel Sauce
1. Into a small saucepan, add 100g of water, along with the leftover vanilla pod from above. Place this over a low heat so that it becomes steamy.
2. Meanwhile, add the remaining 60g of water and sugar into a medium saucepan. Place it on a medium heat, and cook it to 180C/355F on a digital thermometer. This will be a light golden colour.
3. Whisk in the hot vanilla water and cook for a further 30 seconds. Pour it through a sieve, into a clean bowl. Cover the bowl with clingfilm and refrigerate it for at least an hour. Alternatively, place it over a bowl of ice water and that will thicken it quickly.
Caramel Discs
1. Into a medium saucepan, add the glucose and sugar.
2. Place it over a medium heat and allow the mixture to bubble up and start to caramelise.
3. Once it begins to go a light golden colour you can stir it.
4. Stir it occasionally until it turns a deep golden colour, then immediately remove it from the heat and pour it onto a silicon mat.
5. Allow it to set at room temperature for 30 minutes.
Swiss Meringue
1. Take a 13x9x2” baking dish (something deep), and very lightly grease the bottom with butter and place a sheet of parchment along the base. Pre-heat the oven to 160C/320F non-fan assisted.
2. Into the bowl of a stand mixer, add the egg whites, sugar and vinegar.
3. Place this over a pan of gently simmering water and whisk constantly until it reaches around 60-65C (140-149F) on a digital thermometer.
4. Immediately remove it from the heat and place it onto the stand mixer fitted with a whisk attachment. Whisk for 5 minutes on a medium high speed, until it is thick and glossy and holds a medium stiff peak. Be very careful not to over whisk this as it is a slightly lower amount of sugar, so we don’t want to make the meringue go grainy by mixing it for too long.
5. Tip the meringue into the lined baking tray and use a palette knife to smooth it so it is flat.
6. Place it into the oven and bake for 12-15 minutes, until it is a light golden brown colour on top. Remove it from the oven but leave the oven on.
Assembly
1. While the meringue is cooling, blend the caramel to a fine powder. Take a sieve, and sieve the powder in an even layer onto a baking tray lined with a silicon mat. You may not need all of the caramel powder.
2. Use a 9cm/3.5” cookie cutter to create indents in the powder, gently shimmying it around to create a circular outline.
3. Place the tray into the oven and bake for 2-4 minutes, or until the caramel powder has just melted and it is a glass like consistency. Remove the tray from the oven and allow it to cool.
4. Pour the chilled creme anglaise into a small saucepan and just gently stir it over a low heat until it is steaming, then transfer it into a serving jug.
5. Scoop the thickened caramel sauce into a piping bag and set this to one side.
6. The meringue should have cooled for around 10-15 minutes now.
7. Use the 9cm/3.5” cookie cutter which is slightly warm, to cut 4 discs.
8. The easiest way to remove them is to pull away the excess meringue around the disc, then carefully slide a palette knife underneath the disc, and lift it onto your serving plate.
9. Use a teaspoon to dig a hole out of the centre of each meringue disc, but do not cut all the way through to the bottom.
10. Pour the warm creme anglaise into the hole, then with a palette knife, slide it underneath a caramel disc and place this on top.
11. Cut a small hole in the end of the piping bag, and drizzle this across the caramel disc.
12. Finally finish with a sprinkle of roasted nuts for texture and serve immediately.

Salted Caramel Cookies
TIER 2
Salted Caramel Cookies
In Tier 2 we step things up by adding a brown sugar streusel and salted caramel to the basic cookie dough recipe. The roasted hazelnuts in the dough add an amazing flavour, and the texture combination of this with the streusel and salted caramel is next level! The salted caramel centre can be swapped out for other fillings too – ganache, lemon cremeux, hazelnut praline etc!
8
COOKIES
Ingredients
Makes 8 Cookies
Hazelnut Sablé
350g Plain/All-Purpose Flour
190g Unsalted Butter, Cold & Cubed
120g Icing/Powdered Sugar
45g Ground Hazelnuts (or Almonds)
1g Fine Sea Salt
65g Whole Eggs
Streusel
60g Cold Unsalted Butter, Cubed
60g Light Brown Sugar
75g Ground Almonds/Hazelnuts
60g Plain/All Purpose Flour
Pinch of Sea Salt
Zest ¼ Lemon
Salted Caramel
175g Double/Heavy Cream
45g Whole Milk
135g Liquid Glucose Syrup, Divided
80g Caster/White Sugar
2g Flakey Sea Salt
60g Unsalted Butter
Special equipment
78mm Tart Ting
50mm Cookie Cutter
Stand mixer
Rolling pin
Silcon mats (optional)
Piping bags (optional)
Method
Salted Caramel
1. In a medium saucepan on the stovetop over medium heat, combine the milk, heavy cream, and 45 grams of corn/glucose syrup. Bring to a gentle simmer, whisking the mixture to ensure the syrup has fully dissolved. Remove the saucepan from the heat but ensure the mixture stays warm.
2. In a medium saucepan on the stovetop over medium heat, combine the superfine/caster sugar and the remaining 45 grams of glucose sugar. Cook until the mixture turns a deep caramel colour, whisking slowly to help disperse the sugar.
3. Once golden, immediately pour in the hot cream mixture, being very careful as it will bubble up violently. Whisk the mixture and cook for 1 minute.
4. Remove the saucepan from the heat and pour the mixture through a sieve and into a large bowl. Let the mixture cool for 2 minutes. Add the sea salt flakes and butter. Blend or whisk until smooth.
5. Pour the mixture into a container and leave at room temperature.
Streusel
1. Into the bowl of a stand mixer, fitted with the paddle attachment, add all of the ingredients.
2. Mix on a low speed until the butter has broken down and the mixture is sandy in texture. This will take a few
3. Transfer this to a baking tray and place it into the freezer while you make the sablé.
Hazelnut Sablé
1. Into the bowl of a stand mixer, fitted with the paddle attachment, add all of the ingredients except the egg.
2. Pour in the whole egg and mix on low speed for 30 seconds, then stop the mixer and use your hands to squeeze the dough together to form a dough.
3. Place the dough in between two silicon mats or pieces of parchment paper, and using a rolling pin, roll it to around 7mm/0.25” thick.
4. Place this in the freezer for 20 minutes.
5. Once chilled, work quickly and use the 78mm tart ring to cut out discs, then cut the middle of the dough out with a 50mm cookie cutter to leave you with donut shape. Place these onto a tray lined with parchment paper, ensuring you keep the tart rings around the outside of the dough. Place these back into the freezer for 15 minutes, meanwhile preheat your oven to 160C/320F Non-fan assisted.
6. Place the dough into the oven and bake for 12 minutes – it should turn a very light golden colour.
7. Once baked, let them cool for a few minutes before pressing the sables out of the tart ring and letting them cool completely.
8. Use the same tart ring and place it back onto the baking tray. Add a few tablespoons of the chilled streusel and press it down with the back of a spoon so you have an even layer.
9. Take the chilled hazelnut sablé and press this on top of the streusel, it should fit snugly into the tart ring. You need to make sure the sablé is touching the streusel. (If you find it won’t touch – when it is baking, it will soften, so after a few minutes you can press it down while it is in the oven).
10. Place the cookies into the oven and bake for around 20 minutes, or until they are a golden colour.
11. Remove them from the oven and allow to cool for a few minutes before pressing them out of the tart rings.
12. Ensure the caramel is a soft, almost runny honey-like texture, and pipe this into the centre of the biscuits. The caramel will be soft and runny if served immediately but will thicken the longer they sit at room temperature.
Shop the Equipment


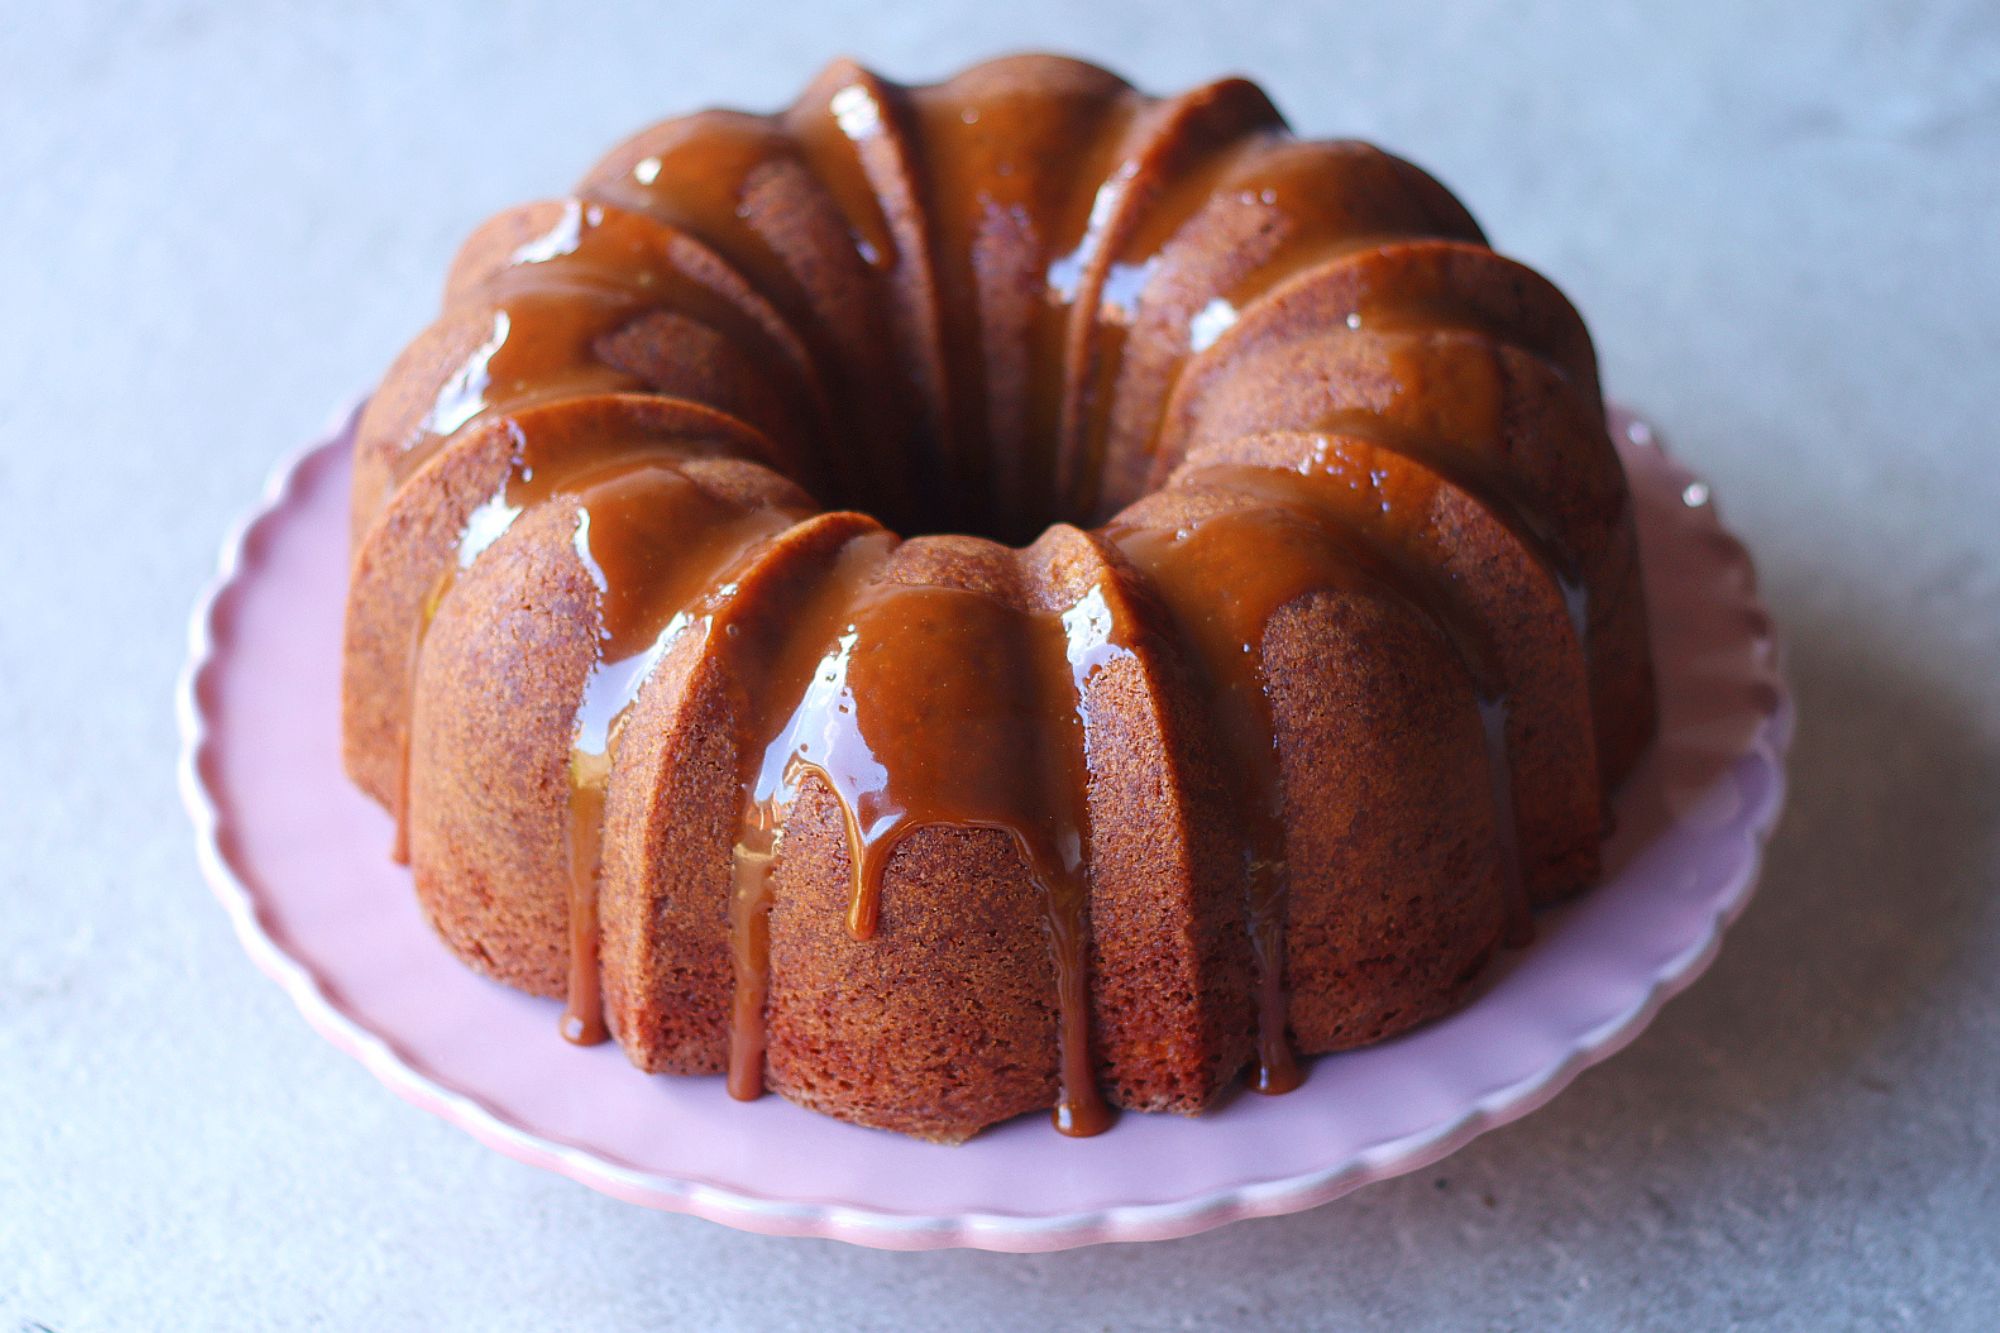
Salted Caramel Bundt Cake
TIER 2
Salted Caramel Bundt Cake
This recipe we advance the ‘flavoured sugar’ technique from Tier 1 and make a powdered salted caramel to add to the cake batter. This was a bit of a fluke whilst recipe testing but wow, the flavour of this cake is unreal! I’ve topped it with a decorative salted caramel sauce that’s quite chewy in texture. If you want something softer, switch it out for the salted caramel recipe in Tier 2 of the Chocolate Tart classes!
112 CUP BUNDT CAKE
Ingredients
Makes 1 12 Cup Bundt Cake
For the caramel sugar
320g Caster/Granulated Sugar
4g Fine Sea Salt
For the caramel cake
245g Caramel Sugar (Recipe Above)
95g Caster/Granulated Sugar
95g Light Brown Sugar
465g Unsalted Butter, Room Temperature
385g Whole Eggs, Room Temperature
1 Tsp Vanilla Bean Paste
465g Self Raising Flour
35g Boiling Water
Soft unsalted butter + flour to coat the bundt tin
For the caramel sauce
125g Caster/Granulated Sugar
65g Water
75g Double Cream
30g Unsalted Butter
Pinch Sea Salt Flakes
Special equipment
Blender
Stand Mixer
12 Cup Bundt Tin
Method
Caramel Sugar
1. Into a medium frying pan, add about ⅕ of the sugar, spreading it evenly across the pan.
2. Place the pan onto a medium heat, and gently shake the pan to agitate the caramel, until it has melted.
3. Add another ⅕ of the sugar on top and agitate the pan again to dissolve the sugar, until it has melted.
4. Continue adding the sugar in increments, ensuring it is fully melted before adding the next addition. At this point, you can begin to use a rubber spatula to stir it through.
5. Once you have added all of the sugar, add in the salt and continue to stir it with a rubber spatula until it reaches a deep amber colour.
6. Immediately remove it from the heat and pour it evenly onto a baking tray lined with a silicon mat.
7. Allow to cool at room temperature for 30 minutes, until it has set completely firm.
8. Once set, break the caramel into shards and place it into a high powered blender and blender for 5-10 seconds, into a fine powder*
* Once you have blended the sugar, it is important to use it immediately for the cake, otherwise it will begin to absorb moisture and go very sticky.
Caramel Cake
1. Preheat the oven to 180C/355F Non-Fan Assisted. Take soft butter (not melted), and use a pastry brush to brush the inside of the bundt tin to ensure an even coating. Sieve over a few tablespoons of plain/all-purpose flour and shake it around the tin to coat. Tap out the excess and set the tin to one side.
2. Take the caramel sugar and weigh 245g.
3. Into the bowl of a stand mixer, add the soft butter and all the sugars. With the paddle attachment, beat it on a medium speed for 3-4 minutes, until the mixture is thicker and paler in consistency, scraping down the bowl as needed.
4. Add the eggs in four parts, beating for a few seconds between each addition (still at a medium speed). Then add the vanilla bean paste. At this point, the batter will look split but don’t panic.
5. Sift in the self-raising flour, and mix on a low speed just until the flour has been absorbed.
6. Finally, tip in the boiling water and mix to combine. This will help to loosen the cake batter slightly.
7. Use a spatula to evenly scoop the cake batter into the lined bundt tin, then using the back of a slightly warm spoon, spread the top of the batter out just to smooth it slightly.
8. Place the cake into the oven and bake for 45-55 minutes or until a skewer inserted comes out clean.
9. Allow it to cool in the tin for 5 minutes before placing a wire rack on top, and then flip the cake out to release it. Allow to cool for 30 minutes before adding the Caramel Sauce
Caramel Sauce
Note: if you want a softer, runny caramel sauce I would recommend using the Tier 2 salted caramel recipe from the October’s chocolate tart recipe.
1. Into a medium saucepan add the water, then the sugar. Place it on a medium heat.
2. Cook the caramel, until it reaches a deep golden brown colour, being careful not to burn it.
3. Pour in the cream and add the butter. Be careful as this will bubble quite violently. Use a hand whisk to mix it through and continue to cook for about 30 seconds on a medium low heat until you have a smooth glossy caramel. Stir in a good pinch of sea salt flakes and whisk them through.
4. The caramel can be served immediately as a warm sauce, or poured over the top of the cake in a decorative drip. The caramel will set as it cools, and turn into a more stringy, chewy texture, like a candy bar! It holds its shape very well, so is perfect to leave at room temperature on the cake for when you are ready to serve.
Shop the Equipment


Chocolate and Caramel Tartlets
TIER 2
Chocolate and Caramel Tartlets
For this recipe, we use the same pastry and filling from Tier 1, but we advance it by using individual perforated tart rings, and by creating a Chocolate Namelaka and a Salted Caramel. I’ve used a #127 piping nozzle to create a funky design around the edge, but you can do whatever you fancy!
6
TARTLETS
Ingredients
Makes 6 Tartlets
For the chocolate pastry
70g powdered/icing sugar
100g unsalted butter, cold and cubed
20g cocoa powder
50g egg yolks
180g all purpose/plain flour, plus a pinch of sea salt
For the cocoa egg wash
40g egg yolks, plus 5g cocoa powder
10g heavy/double cream
For the Namelaka
3g powdered gelatin
18g cold water
160g dark chocolate, 70% cocoa solids
120g whole milk
12g glucose
240g heavy/double cream, cold
For the salted caramel
88g heavy/double cream
23g whole milk
68g glucose syrup, divided
40g superfine/caster sugar
1g flaky sea salt
30g unsalted butter
For the filling
100g eggs
50g granulated/caster sugar
pinch of sea salt
110g heavy/double cream
200g whole milk
80g dark chocolate, 70% cocoa solids
Special equipment
Stand mixer with paddle and whisk attachments
6x 3 x 0.78 inch (7.6×1.98cm) perforated tart rings
2x piping bags, plus a #127 tip piping nozzle
Hand blender
Method
Chocolate pastry and egg wash
- Into the bowl of a stand mixer fitted with the paddle attachment, sift in the sugar. Add the butter and the cocoa powder.
- Beat for 2 to 3 minutes, or until the mixture forms a smooth paste, pausing to scrape down the sides as needed.
- Add in the egg yolks, scrape down the sides and beat for 30 seconds, or until incorporated.
- Scrape down the bowl once again to ensure no butter is stuck to the sides. Add the flour and salt and mix on low speed for about 20 to 30 seconds, or until the mixture pulls together into a dough.
- Squeeze the mixture in your hand to form a rough ball. Place the ball of dough onto a silicone mat. Place a second silicone mat on top and roll the mixture into a rough rectangle, getting it around 0.15 to 0.2 inch (4mm to 5mm) thick. If you don’t have silicone mats you can roll the dough between parchment paper, but it will be more difficult as it has less grip. Place it in the freezer for 20 minutes.
- While the dough is chilling, take the perforated tart ring and very lightly grease the inside with soft butter. This helps to prevent the dough from sticking to the ring.
- Remove the chilled dough from the freezer and, working quickly, peel the top silicone mat off of the dough. Press the 4 tart rings firmly into the dough, lift them up, and transfer them to a perforated tray lined with a perforated baking mat. The dough should be cold enough that it attaches to the ring as you lift it up. Place the tray in the fridge while you cut the walls.
- With the remaining dough, use a ruler and a sharp knife to cut 4 strips of dough each measuring 9.6 x 0.9 inches (24.4 x 2.3cm). These measurements seem quite precise, but this will ensure the dough fits perfectly into the tart rings with no excess overlapping. If they feel too warm to lift up, place them back in the freezer for 5 minutes just so they can cool back down slightly.
- Remove the baking tray with the tart bases from the fridge and remove one strip of dough for the walls.
- Working quickly, take the strip of dough and place it inside the tart ring. Use your fingers to gently press together this strip of dough, against the base of the tart. The idea is to slightly push down the wall of dough so that it meets the dough on the base of the tart shell and there are no gaps. If at any point you feel the dough is too warm or is tearing, place everything back in the freezer for 10 minutes then carry on.
- Repeat this with the remaining tarts, again, chilling the dough if needed. At this point, squeeze together the remaining scraps of dough, and repeat the process, rolling the dough and chilling it, so that you can create the final 2 tart shells.
- Once you have lined all the tart shells, avoid trying to move them in case the dough tears. Chill the entire tray for 15 minutes and pre-heat your oven to 350°F/175°C.
- Remove the shells from the freezer and holding a knife perpendicular to the tart shell, trim off the excess pastry hanging over the tart ring so that the pastry is flush.
- Place the tart shells in the oven, and bake for 15 minutes. While they bake, thoroughly whisk together the ingredients for the egg wash.
- Remove the tarts from the oven and allow them to cool for 5 minutes. At this point, the pastry should have retracted slightly from the ring mold, and you should be able to lift it off easily.
- Lift the shells up and using a pastry brush, apply an even egg wash all over the tart. Place them back on the tray and into the oven for a further 5-8 minutes. The pastry is blind baked now ready to add your filling.
Namelaka
- In a small bowl, combine the powdered gelatin and cold water. Mix well and allow to bloom for 5 minutes.
- To a medium bowl, add the chocolate and place the bowl over a pan of gently simmering water without allowing the bowl to touch the water. Stir until the chocolate has completely melted. Remove the bowl from the heat and set aside.
- To a small saucepan over medium heat, combine the milk and glucose. Stir the mixture until steaming. Remove the saucepan from the heat and stir in the bloomed gelatin until it completely dissolves.
- Slowly pour this mixture over the melted chocolate, stirring in small circles in the center of the chocolate as you pour. Initially, the mixture will look quite split and oily, but as you add the remaining milk, everything will pull together.
- Add the cold cream and use a hand blender or a hand whisk to mix until combined. Cover the surface with plastic wrap/cling film and refrigerate for a minimum of 5 hours or ideally overnight.
Salted Caramel
- In a medium saucepan on the stovetop over medium heat, combine the milk, heavy cream, and 23 grams of corn/glucose syrup. Bring to a gentle simmer, whisking the mixture to ensure the syrup has fully dissolved. Remove the saucepan from the heat but ensure the mixture stays warm.
- In a medium saucepan on the stovetop over medium heat, combine the superfine/caster sugar and the remaining 45 grams of glucose sugar. Cook until the mixture turns a deep caramel color, whisking slowly to help disperse the sugar.
- Once golden, immediately pour in the hot cream mixture, being very careful as it will bubble up violently. Whisk the mixture and cook for 1 minute.
- Remove the saucepan from the heat and pour the mixture through a sieve and into a large bowl. Let the mixture cool for 2 minutes. Add the sea salt flakes and butter. Blend or whisk until smooth.
- Pour the mixture into a container and chill for at least 3 hours
Filling
- Lower the oven temperature to 285°F/140°C.
- To a medium bowl, add the chocolate and place the bowl over a pan of gently simmering water. Stir until the chocolate has completely melted. Remove the bowl from the heat and set aside.
- In a medium bowl, whisk together the eggs, sugar, and salt for 1 minute.
- In a small saucepan over a medium heat, combine the milk and cream. Heat until the mixture is steaming.
- Slowly pour the milk mixture over the eggs, whisking to combine as you pour.
- Slowly pour this mixture over the melted chocolate, using a spatula to stir the mixture in small circles in the center as you pour. Once everything has been combined, use a spoon to scoop off any foamy bubbles on the top.
Assembly
- Place the tray with the tarts on, in the middle of the oven and carefully pour in the chocolate filling—just to the top of the tart shell. Bake for about 25 or 30 minutes or until they have a very small wobble in the center.
- Remove the tarts from the oven and allow them to cool to room temperature before refrigerating for 3 hours.
- Remove the namelaka from the fridge and add it to the bowl of a stand mixer fitted with the whisk attachment. Whisk on medium speed until you get a medium–stiff peak.
- Add the mixture to a piping bag fitted with a small St. Honore nozzle. Holding the piping bag just slightly below vertical, pipe the namelaka around the outside edge of the tart in a zigzag motion, leaving a small gap in the center. If you have a cake turntable, this can make it a little easier to spin the tart as you pipe.
- Add the salted caramel to a piping bag and snip a small hole off the end. Pipe this into the center of the tart.
- Allow the tarts to sit at room temperature for 30 minutes before serving.
Shop the Equipment


Snickers
We would love to see your Bake It Better creations!
Show off your skills by sharing your desserts
#BakeItBetter

Gourmet Brownie
We would love to see your Bake It Better creations!
Show off your skills by sharing your desserts
#BakeItBetter

We would love to see your Bake It Better creations!
Show off your skills by sharing your desserts
#BakeItBetter

Chocolate Hazelnut Tart
We would love to see your Bake It Better creations!
Show off your skills by sharing your desserts
#BakeItBetter

Salted Caramel Bon Bons
We would love to see your Bake It Better creations!
Show off your skills by sharing your desserts
#BakeItBetter

Macarons
We would love to see your Bake It Better creations!
Show off your skills by sharing your desserts
#BakeItBetter