

Strawberry Shortcake
TIER 3
Strawberry Shortcake

4
INDIVIDUAL DESSERTS
Ingredients
Makes 4 individual desserts
Pistachio Praline
120g Unsalted Pistachios
60g Caster Sugar
2 Tbsp Water
Pinch Salt
Pistachio Sponge
120g Whole Eggs
85g Caster Sugar
95g Plain Flour
2 Tsp Baking Powder
20g Ground Almonds
60g Double/Heavy Cream
65g Unsalted Butter (To Make 40g Brown Butter)
100g Pistachio Praline
Pinch Salt
Sable Breton
125g Soft Unsalted Butter
110g Caster Sugar
2g Salt
55g Egg Yolks
160g Plain Flour
5g Baking Powder
½ Tsp Vanilla Bean Paste
Vanilla Chantilly
300g Double/Heavy Cream
1-2 Tsp Icing/Powdered Sugar
½ Tsp Vanilla Bean Paste
Chocolate Decoration
Red Cocoa Butter
Gold Lustre Dust
200-300g Tempered White Chocolate
Sliced Fresh Strawberries & Crushed Pistachios to Decorate
Special equipment
9” Square Brownie Tin
High Powered Food Processor
Round Cookie Cutters
Stand Mixer
Acetate
Digital Thermometer
Method
Pistachio Praline
*Note – this is quite a small batch of praline, enough for the cake recipe, but if your food processor isn’t overly powerful, it may be worth doubling this recipe so that there is enough mixture in the food processor for it to “catch” the praline and blend it. Otherwise the blade will be spinning around blending air and all the praline will be stuck to the sides.
1. Place the unsalted, shelled pistachios onto a baking tray. Place them in the oven to roast gently at 175C/350F for 8-10 minutes. They should be fragrant and lightly toasted when done, but keep an eye on them so they don’t burn!
-
- 120g Unsalted Pistachios
2. Meanwhile, place the water and sugar into a medium saucepan. Place it over a medium heat and try not to stir it. Heat the mixture until it reaches a nice deep golden colour. Once it is done, immediately pour it onto a silicon mat to set.
-
- 60g Caster Sugar
- 2 Tbsp Water
3. Once the caramel has set and is nice and firm to the touch (about 30 minutes – 1 hour), add it into a high powered food processor along with the roasted pistachios and a small pinch of salt.
-
- Pinch of Salt
4. Start by bending on a low speed and slowly increase it.
5. Initially the mixture will look quite powdery and dry – you will need to scrape down the sides of the food processor at least 6-8 times, stopping the machine every 20 seconds or so to make sure it is fully incorporated. The key is to start on a medium low speed, so the blade isn’t running too fast that it spits all the mixture to the edges.
6. After about 5 minutes of blending and scraping down, you should end up with a nice green paste, that is a similar texture to a natural peanut butter. If your mixture is very dry, you can add a very small amount of groundnut oil to help loosen it and it will blend much easier.
7. Scrape the praline out of the food processor and weigh 100g of it, ready for the cake batter.
Pistachio Cake
1. Preheat the oven to 210C/410F Non-Fan Assisted . Lightly grease a 9×9” square tin, and then line the base & sides with parchment paper.
2. Start by browning your butter – place the unsalted butter into a small saucepan and place it over a medium heat.
-
- 65g Unsalted Butter
3. Melt the butter and continue to cook until the butter starts to smell nutty and the bubbling noises have stopped. Keep a close eye on the butter as it can burn. Once brown, pour the butter into another bowl, weighing the 40g needed for the recipe. Keep it somewhere warm.
4. Into a medium bowl, add the eggs and sugar. Whisk the mixture for 1-2 minutes by and until it is slightly lighter in colour.
-
- 120g Whole Eggs
- 85g Caster Sugar
5. On top of the eggs, add the flour, baking powder, salt & ground almonds. Whisk the mixture until it is combined, do not overbeat it. Simply mix until the dry ingredients are incorporated.
-
- 95g Plain Flour
- 2 Tsp Baking Powder
- 20g Ground Almonds
6. Next, pour in the cream and whisk to combine.
-
- 60g Double/Heavy Cream
7. Finally, add in the warm brown butter and the pistachio praline you made earlier. Whisk to combine until you have an even batter.
-
- 40g Brown Butter
- 100g Pistachio Praline
8. Pour the batter into the greased tin, and place it into the oven. Bake for 11-15 minutes. Every oven is different so keep an eye on it, it should be a nice golden colour on top so be careful not to overcook it. Remove it from the oven and allow it to cool.
Sable Breton
1. Into the bowl of a stand mixer (or a large bowl if you are using a hand mixer), add the soft unsalted butter, vanilla & sugar and beat on a medium speed until it is white & pale in colour.
-
- 125g Soft Unsalted Butter
- 110g Caster Sugar
- ½ Tsp Vanilla Bean Paste
2. Next, add in the egg yolk and salt. Beat to combine. You will need to scrape down the bowl so it is fully incorporated.
-
- 55g Egg Yolk
- 2g Salt
3. Finally, sieve in the baking powder and flour. Mix on a low speed until just combined. You might need to scrape down the bottom of the bowl to ensure all the soft butter is fully incorporated.
-
- 160g Plain Flour
- 5g Baking Powder
4. Scoop the mixture out and place it into between two silpats or pieces of parchment. Using a rolling pin, roll it as thin as possible. Refrigerate for 30 minutes to an hour, until it is firm to the touch. Preheat the oven to 180C/355F.
5. Remove the sable breton from the fridge and cut it into discs, 3.5” wide.
6. Place them onto a baking tray and bake for 15 minutes or until lightly golden around the edge.
7. As they bake, they may spread slightly and lose their shape, so as soon as they come out of the oven, take the cookie cutter, and cut them down to size again so they are neat.
Chocolate Decoration
Tempering chocolate is a whole series we have covered in Bake It Better so I would advise watching those videos for the full explanation and techniques on how to temper. You can also skip this decoration and ignore these steps!
1. Take your bottle of red cocoa butter and place it in the microwave, heating it in small bursts, shaking it every time you remove it from the microwave. Don’t melt the entire bottle, you simply want to melt enough to the point where, when you shake the bottle you can feel a small amount of liquid in there, but the main body of the cocoa butter is still unmelted. As you shake the bottle, this will ensure the cocoa butter remains in temper.
2. Cut eight strips of acetate – around 12.5” long and 2” high. If you are making the desserts slightly larger, simply measure the circumference of your dessert to ensure the acetate collar will fit around the outside.
3. Take four of the strips of acetate and wrap them around large circular objects that are similar in circumference to your dessert – it could be a plastic bottle or container. Remember that once the collar has set, it will essentially hold this exact size, so if you place it around an object that is too large, it will be too large for your final dessert. Place the containers onto a tray.
4. My dessert was 3.5” wide, so I used a plastic container that was between 3.5” – 4” wide. You wrap the bottom in acetate so that the tempered chocolate doesn’t stick to the container.
5. Place the remaining 4 strips of acetate onto a large silicon mat. If the acetate curls up, simply stick the edges down with a small piece of sellotape.
6. Take the melted, tempered cocoa butter and squeeze drops of it onto your strips of acetate.
7. Use a sponge or a pastry brush to spread the cocoa butter evenly across the acetate. The cocoa butter will set quite quickly as you spread it. It should set within a minute or so.
8. Ensuring the cocoa butter has set (you will see it no longer looks wet), take a small pastry brush and dust the acetate strip with gold lustre dust.
9. Next, place your white chocolate into a medium bowl over a pan of very gently simmering water.
-
- 200g High Quality White Chocolate
10. Stir the chocolate constantly until it reaches a temperature of 45C/113F on a digital thermometer.
11. Immediately remove the chocolate from the heat and stir in the remaining, unmelted chocolate.
-
- 40g High Quality White Chocolate
12. Keep stirring the mixture constantly until it cools to 27C/80F. Place the chocolate back on the pan of gently simmering water and heat it slowly until it reaches 32C/89F. Be very careful not to overheat it.
13. Dry the bottom of the bowl with a tea towel, then ladle the chocolate evenly between the 4 strips of acetate coloured with cocoa butter. Spread the chocolate out evenly with a palette knife.
14. Allow the chocolate to set at room temperature until it is no longer wet, and is dry when you touch it, but is still flexible. If you let it cool too much, it will snap when you lift it up.
15. Very carefully lift the strip of acetate up, and wrap it around the acetate covered container you set up earlier and leave it to set. You can let it set at room temperature for an hour (if your room temperature is not too hot) or place it in the fridge for 15-20 minutes.
16. Once the chocolate has set, very carefully remove the container from the centre, and peel away the acetate, being careful not to snap the chocolate.
Final Assembly
1. Take the pistachio sponge, and cut 3.5” circles to match the size of your sable breton.
2. Place the sponge on top of the sable breton biscuit base.
3. To make the chantilly, add all of the ingredients to a mixing bowl and whisk by hand until you have a medium peak.
-
- 300g Double/Heavy Cream
- 1 Tsp Vanilla Bean Paste
- 1.5 Tsp Icing/Powdered Sugar
4. Spoon the chantilly onto the centre of the sponge.
5. Take the chocolate collar and carefully wrap it around the dessert.
6. Slice the fresh strawberries and decorate the top of the dessert along with some crushed pistachio.
7. Finish with edible gold leaf and serve.

Gourmet Brownie
TIER 2
Gourmet Brownie
8
BROWNIES
Ingredients
Makes 8 brownies
Chocolate Chip Brownie
250g Dark Chocolate (70% Cocoa)
120g Unsalted Butter
215g Whole Eggs (4 Large)
300g Caster Sugar
50g Light Brown Sugar
60g Plain, All Purpose Flour
25g Cocoa Powder
1 Tsp Salt
1 Tsp Vanilla Bean Paste
Handful Chocolate Chips
Chocolate Ganache
Depending on how thick you want the layer of ganache to be you can adjust the amount of ganache accordingly below. I used a thick layer but it is very decadent!
Thick
600g Double Cream
300g Dark Chocolate
Medium
400g Double Cream
200g Dark Chocolate
Thin
200g Double Cream
100g Dark Chocolate
Muscovado Chantilly
2.5g Powdered Gelatin + 15g Cold Water
400g Double/Heavy Cream
40g Dark Muscovado Sugar
Soft Caramel
This will make more than you need but you can cut them into little rectangles, wrap them in baking paper so you have little caramel chews!
100g Water
200g Caster Sugar
120g Glucose
20g Honey
160g Double/Heavy Cream
100g Butter, Room Temperature
Heavy Pinch of Salt
Special equipment
9” Square Brownie Tin
Stand Mixer
Digital Thermometer
Hand Blender
8” Round Metal Ring Mold (or any silicon/metal mold)
Piping Bags
4B Nozzle
Round Tip Nozzle
Method
Chocolate Chip Brownie
1. Preheat the oven to 180C/350F Non-Fan Assisted . Lightly grease a 9×9” square tin, and then line all the sides & base with parchment paper.
2. Into a medium bowl, add the chocolate and butter. Place the bowl over a pan of gently simmering water.
-
- 250g Dark Chocolate
- 120g Unsalted Butter
3. Into a medium bowl, whisk together the flour, salt and cocoa powder.
-
- 60g Plain, All-Purpose Flour
- 25g Cocoa Powder
- 1 Tsp Salt
4. Into a separate bowl, whisk together the sugar, vanilla, eggs & sugar. Whisk until combined, no need to beat too much air into the mixture. It should take around 30 seconds.
-
- 300g Caster Sugar
- 50g Light Brown Sugar
- 215g Whole Eggs
- 1 Tsp Vanilla Bean Paste
5. Take the cooled melted chocolate and very slowly pour this over the eggs, whisking constantly. If the mixture is too hot, it can scramble the eggs and cause the mixture to split so make sure it has cooled enough.
6. Next, sift over the dry ingredients and fold the batter together with a spatula. Mix it until the dry ingredients have incorporated.
7. Pour the batter into your lined tin, and then spread it to the edges. Sprinkle some chocolate chips on top, along with some flakey salt.
8. Place the tin into the oven and bake for 30-35 minutes. Every oven is different so keep an eye on them after about 25 minutes.
9. They should have a very small wobble in the centre when they are done.
10. Let them cool completely at room temperature – at least 2-3 hours.
Chocolate Ganache
Depending on the thickness you want, you can adjust the recipe accordingly.
1. Add your double/heavy cream into a medium saucepan and bring it to a gentle simmer.
-
- 600g Double/Heavy Cream (For a thick layer of ganache)
2. Meanwhile, add your chocolate (finely chopped if you are not using chocolate chunks) into a tall container.
-
- 300g Dark Chocolate (For a thick layer of ganache)
3. Once the cream is hot, pour it over the chocolate and let it steep for 2 minutes. Then use a hand blender to blend until smooth and all the chocolate is completely melted into the cream.
4. At this point the ganache is too liquid, so you need to put it in the fridge for 1-1.5 hours, stirring every 15 minutes or so (this will prevent it from setting too firm on top). We want it to be a slightly thicker pourable consistency as at the moment it is too runny so every time you stir it, check the consistency.
5. Once the ganache is at the right consistency take your cooled brownies, still in the tin, and pour the ganache over the top. The brownies shouldn’t have shrunk so the ganache shouldn’t really leak down the edges.
6. The ganache will still be relatively liquid, so carefully transport it into the fridge to chill overnight.
Muscovado Chantilly
1. Into a small saucepan, add the powdered gelatin and the cold water. Stir the mixture together and let it bloom for 5 minutes. After this time it should look drier in consistency and all the water will have been absorbed.
-
- 2.5g Powdered Gelatin
- 15g Cold Water
2. Into a medium saucepan, add the cream and muscovado sugar. Whisk the mixture over medium heat, until it is steaming and the sugar has dissolved completely.
-
- 400g Double/Heavy Cream
- 40g Dark Muscovado Sugar
3. Once hot, remove it from the heat, and scoop in the bloomed gelatin you made earlier.
4. Whisk it until the gelatin has completely dissolved.
5. Pour the chantilly into a bowl, cover the surface with cling film and refrigerate it overnight.
Soft Caramel
1. Into a medium saucepan, add the water, glucose, honey and sugar. Place it over a medium heat.
-
- 100g Water
- 200g Caster Sugar
- 120g Glucose
- 20g Honey
2. Meanwhile add the cream to a small saucepan and pace it over a low heat so that it is warm.
-
- 160g Double/Heavy Cream
3. Cook the sugar water mixture until it reaches a nice deep golden colour, you can stir it gently occasionally to ensure it is all fully incorporated. Don’t be scared to take it to a nice deep colour, as when you add the cream it will automatically become much lighter in colour. So if you don’t cook the caramel enough, you will end up with quite pale caramels.
4. Once you have a deep caramel, immediately remove it from the heat and pour in the warm cream. Be careful as it will bubble up quite violently.
5. Place the mixture back on the heat, and cook it until it reaches 120C/248F on a digital thermometer. This won’t take long.
6. Remove it from the heat and pour it into a tall container. Add in the soft, unsalted butter, a big pinch of salt, and blend the mixture until it is nice and smooth.
-
- 100g Unsalted Butter, Room Temperature
- Big Pinch of Salt
7. Allow it to cool slightly, about 5 minutes, then take any mold – it could be a metal ring mold lined with a sheet of cling film, or a silicon mold – but make sure you grease it lightly with some neutral oil. I used a 8” ring mold and lined the bottom with a sheet of cling film. The bigger your mold the thinner your caramels will be.
8. Place your mold onto a tray and pour the caramel in.
9. Let it set at room temperature for 3 hours, or overnight.
Assembly
1. Remove the chilled brownie from the fridge.
2. Add the chantilly to the bowl of a stand mixer (or a large bowl if you are using a hand whisk) and whisk on a medium speed until you have a medium peak to the mixture. Be careful not to over whisk it, as if you whisk for too long it could start to split so keep a close eye on it.
3. Split the chantilly between two piping bags, one fitted with a round tip nozzle and the other with a star tip nozzle. I used a 4B nozzle and a 12mm Round Tip Nozzle.
4. Pipe alternating dollops of cream all over the brownie in any pattern.
5. Then, using a hot knife, cut the brownies into 8 squares, or any shape you like! If the brownie is still quite cold from the fridge it can be slightly tough to cut, so you can always leave it out for a little while then cut it. Alternatively, cut it first THEN decorate with the cream! That saves you from messing up the cream when you cut it.
6. Once you have cut through the brownies, you can quickly use a warm palette knife, to clean up the edge of the cream and make sure that no chocolate has “bled” onto it.
7. Remove the soft caramel from your mold, and cut this into small cubes on a chopping board. Decorate the top of the brownie with the caramel and serve.
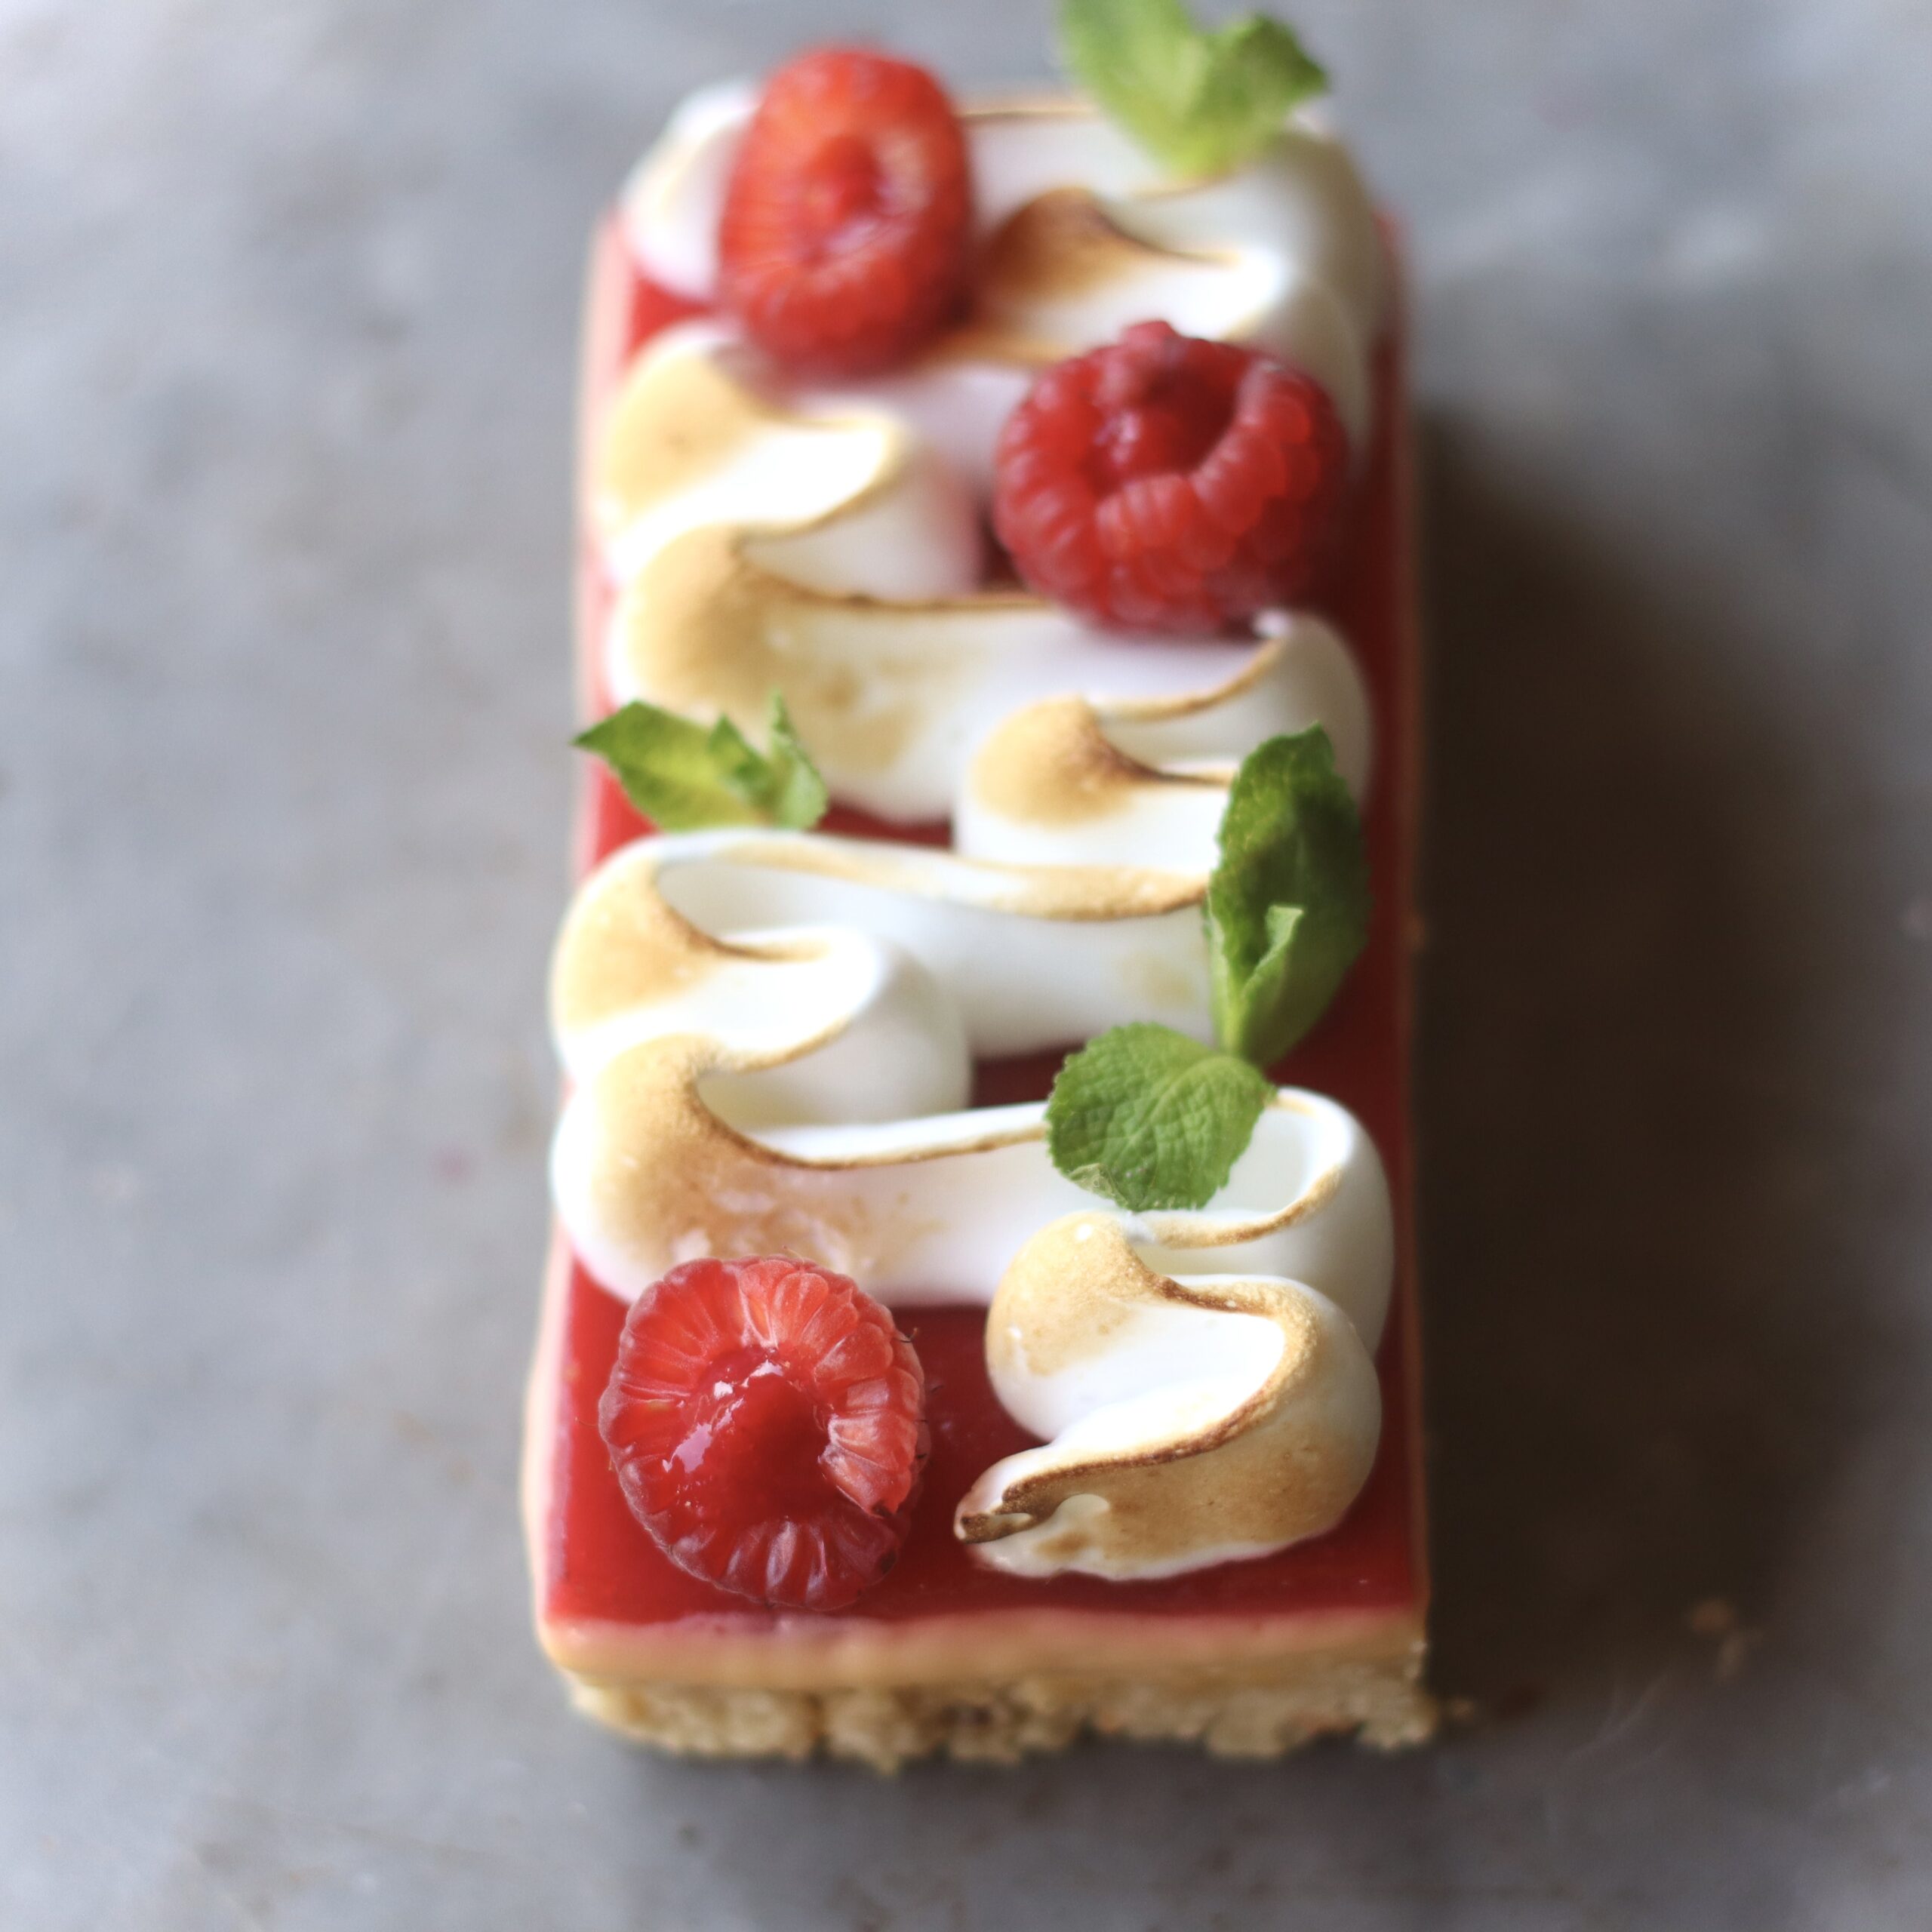
Passion Fruit Slice
TIER 1
Passion Fruit Slice
8
SLICES
Ingredients
Makes 8 slices
Oat Crumble
100g Unsalted Butter, Cold
100g Caster Sugar
50g Ground Almonds
50g Ground Hazelnuts
40g Oats
60g Plain Flour
Pinch Salt
Zest ½ Lemon
Passion Fruit Cremeux
200g Egg Yolks
130g Whole Eggs
150g Sugar
300g Passion Fruit Puree
250g Unsalted Butter, Soft
Raspberry Gel
2-3 Tbsp Water
200g Fresh Raspberries
10g Lemon juice
4g Gelatin + 24g Cold Water
Italian Meringue
80g Egg Whites
210g Sugar
50g Water
Fresh Raspberries + Mint To Decorate
Special equipment
9” Square Brownie Tin
Hand Blender
Digital Thermometer
Stand Mixer
Piping Bag
126 Piping Nozzle
Blow Torch
Method
Oat Crumble
The addition of the oats give this quite a creamy flavour, making it slightly less sweet – if you want more of a streusel like flavour that is sweeter, simply use 100g flour and do not add the oats.
1. Into a large bowl, add all the ingredients for the crumble.
-
- 100g Unsalted Butter, Cold + Cubed
- 100g Caster Sugar
- 50g Ground Almonds
- 50g Ground Hazelnuts
- 40g Oats
- 60g Plain Flour
- Pinch Salt
- Zest ½ Lemon
2. Use your fingers to rub the butter into the crumble, working the dry ingredients in, until it begins to clump together and form a crumble. Alternatively, place it into a stand mixer and mix on a low speed.
3. Place the mixture into the freezer for 15 minutes to chill. Preheat your oven to 175C/350F.
4. Take a 9” square brownie tin and grease the inside, and line the base + sides with parchment paper.
5. Pour the crumble into the tin and use a spoon or a spatula to press it flat.
6. Place the crumble into the oven to bake. It should take around 20-25 minutes, until it is lightly golden around the edge. Remove it from the oven and allow it to cool completely.
Passion Fruit Cremeux
1. Into a medium bowl, add the passion fruit puree, sugar, eggs and egg yolks.
-
- 200g Egg Yolks
- 130g Whole Eggs
- 150g Sugar
- 300g Passion Fruit Puree
2. Place the bowl of a pan of gently simmer water. With a hand whisk, whisk constantly until the mixture has thickened and begins to hold a slight ribbon as you whisk. Be careful not to overcook it or the eggs will begin to scramble.
3. Immediately remove it from the heat and pour the mixture through a sieve into a tall container.
4. Slowly add the butter, a piece at a time, using a hand blender to blend until the butter is fully incorporated and you have a nice smooth cremeux.
-
- 250g Unsalted Butter, Soft (Room Temperature)
5. Take the smooth cremeux and pour it over the cooled oat base. Rotate the pan slightly so it fills the gaps and place it in the fridge for 4-5 hours until it is firm.
Raspberry Gel
1. Into a small saucepan, add the powdered gelatin and the cold water. Stir the mixture together and let it bloom for 5 minutes. After this time it should look drier in consistency and all the water will have been absorbed.
-
- 4g Powdered Gelatin
- 34g Cold Water
2. Into a medium saucepan, add the raspberries, water and lemon juice.
-
- 2-3 Tbsp Water
- 200g Fresh Raspberries
- 10g Lemon juice
3. Stir the mixture over a medium heat until the raspberries have broken down and released their juices.
4. Scoop in the bloomed gelatin and stir it through.
5. Pour the mixture into a tall container and blend very briefly. Then pour it through a sieve to catch the raspberry seeds.
6. Remove the chilled passion fruit base from the fridge and pour the raspberry gel on top. Tilt the tray to spread it out evenly.
7. Place this in the fridge for 3 hours until the raspberry gel has set up.
Final Assembly & Decoration
1. About an hour before you are ready to decorate, place the entire tray in the freezer, this will help to firm up the gel and make it much easier to slice.
2. Remove the tray from the freezer and use a hot knife to slice it into 8 rectangles. Carefully lift them onto a tray and place them back in the fridge.
3. To make the meringue, add the egg whites into the bowl of a stand mixer. Mix on a medium speed.
-
- 80g Egg Whites
4. While the egg whites are whisking, place the water and sugar into a small saucepan. Place it over a medium heat, and heat it up until the sugar has completely dissolved and the mixture has reached a temperature of 118C/244F on a digital thermometer. By this point the egg whites should be thick and frothy.
-
- 210g Caster Sugar
- 50g Water
5. Immediately remove the pan from the heat, increase the speed of the mixer to high and slowly drizzle in the hot sugar syrup.
6. Once you have added all the syrup, whisk for 5-7 minutes, until the bowl is cool to the touch and you have stiff, glossy peaks to your meringue.
7. Add the meringue into a piping bag fitted with a 126 nozzle. Remove the slices from the fridge and pipe a wavy line across the top.
8. Gently torch the meringue with a blow torch.
9. Decorate the rest of the dessert with some fresh raspberries (you can pipe some coulis into these for an added touch!), and garnish with mint.
10. Try to keep these chilled so that the cremeux stays relatively stable as if it becomes too hot it could start to weaken and become a bit unstable.