
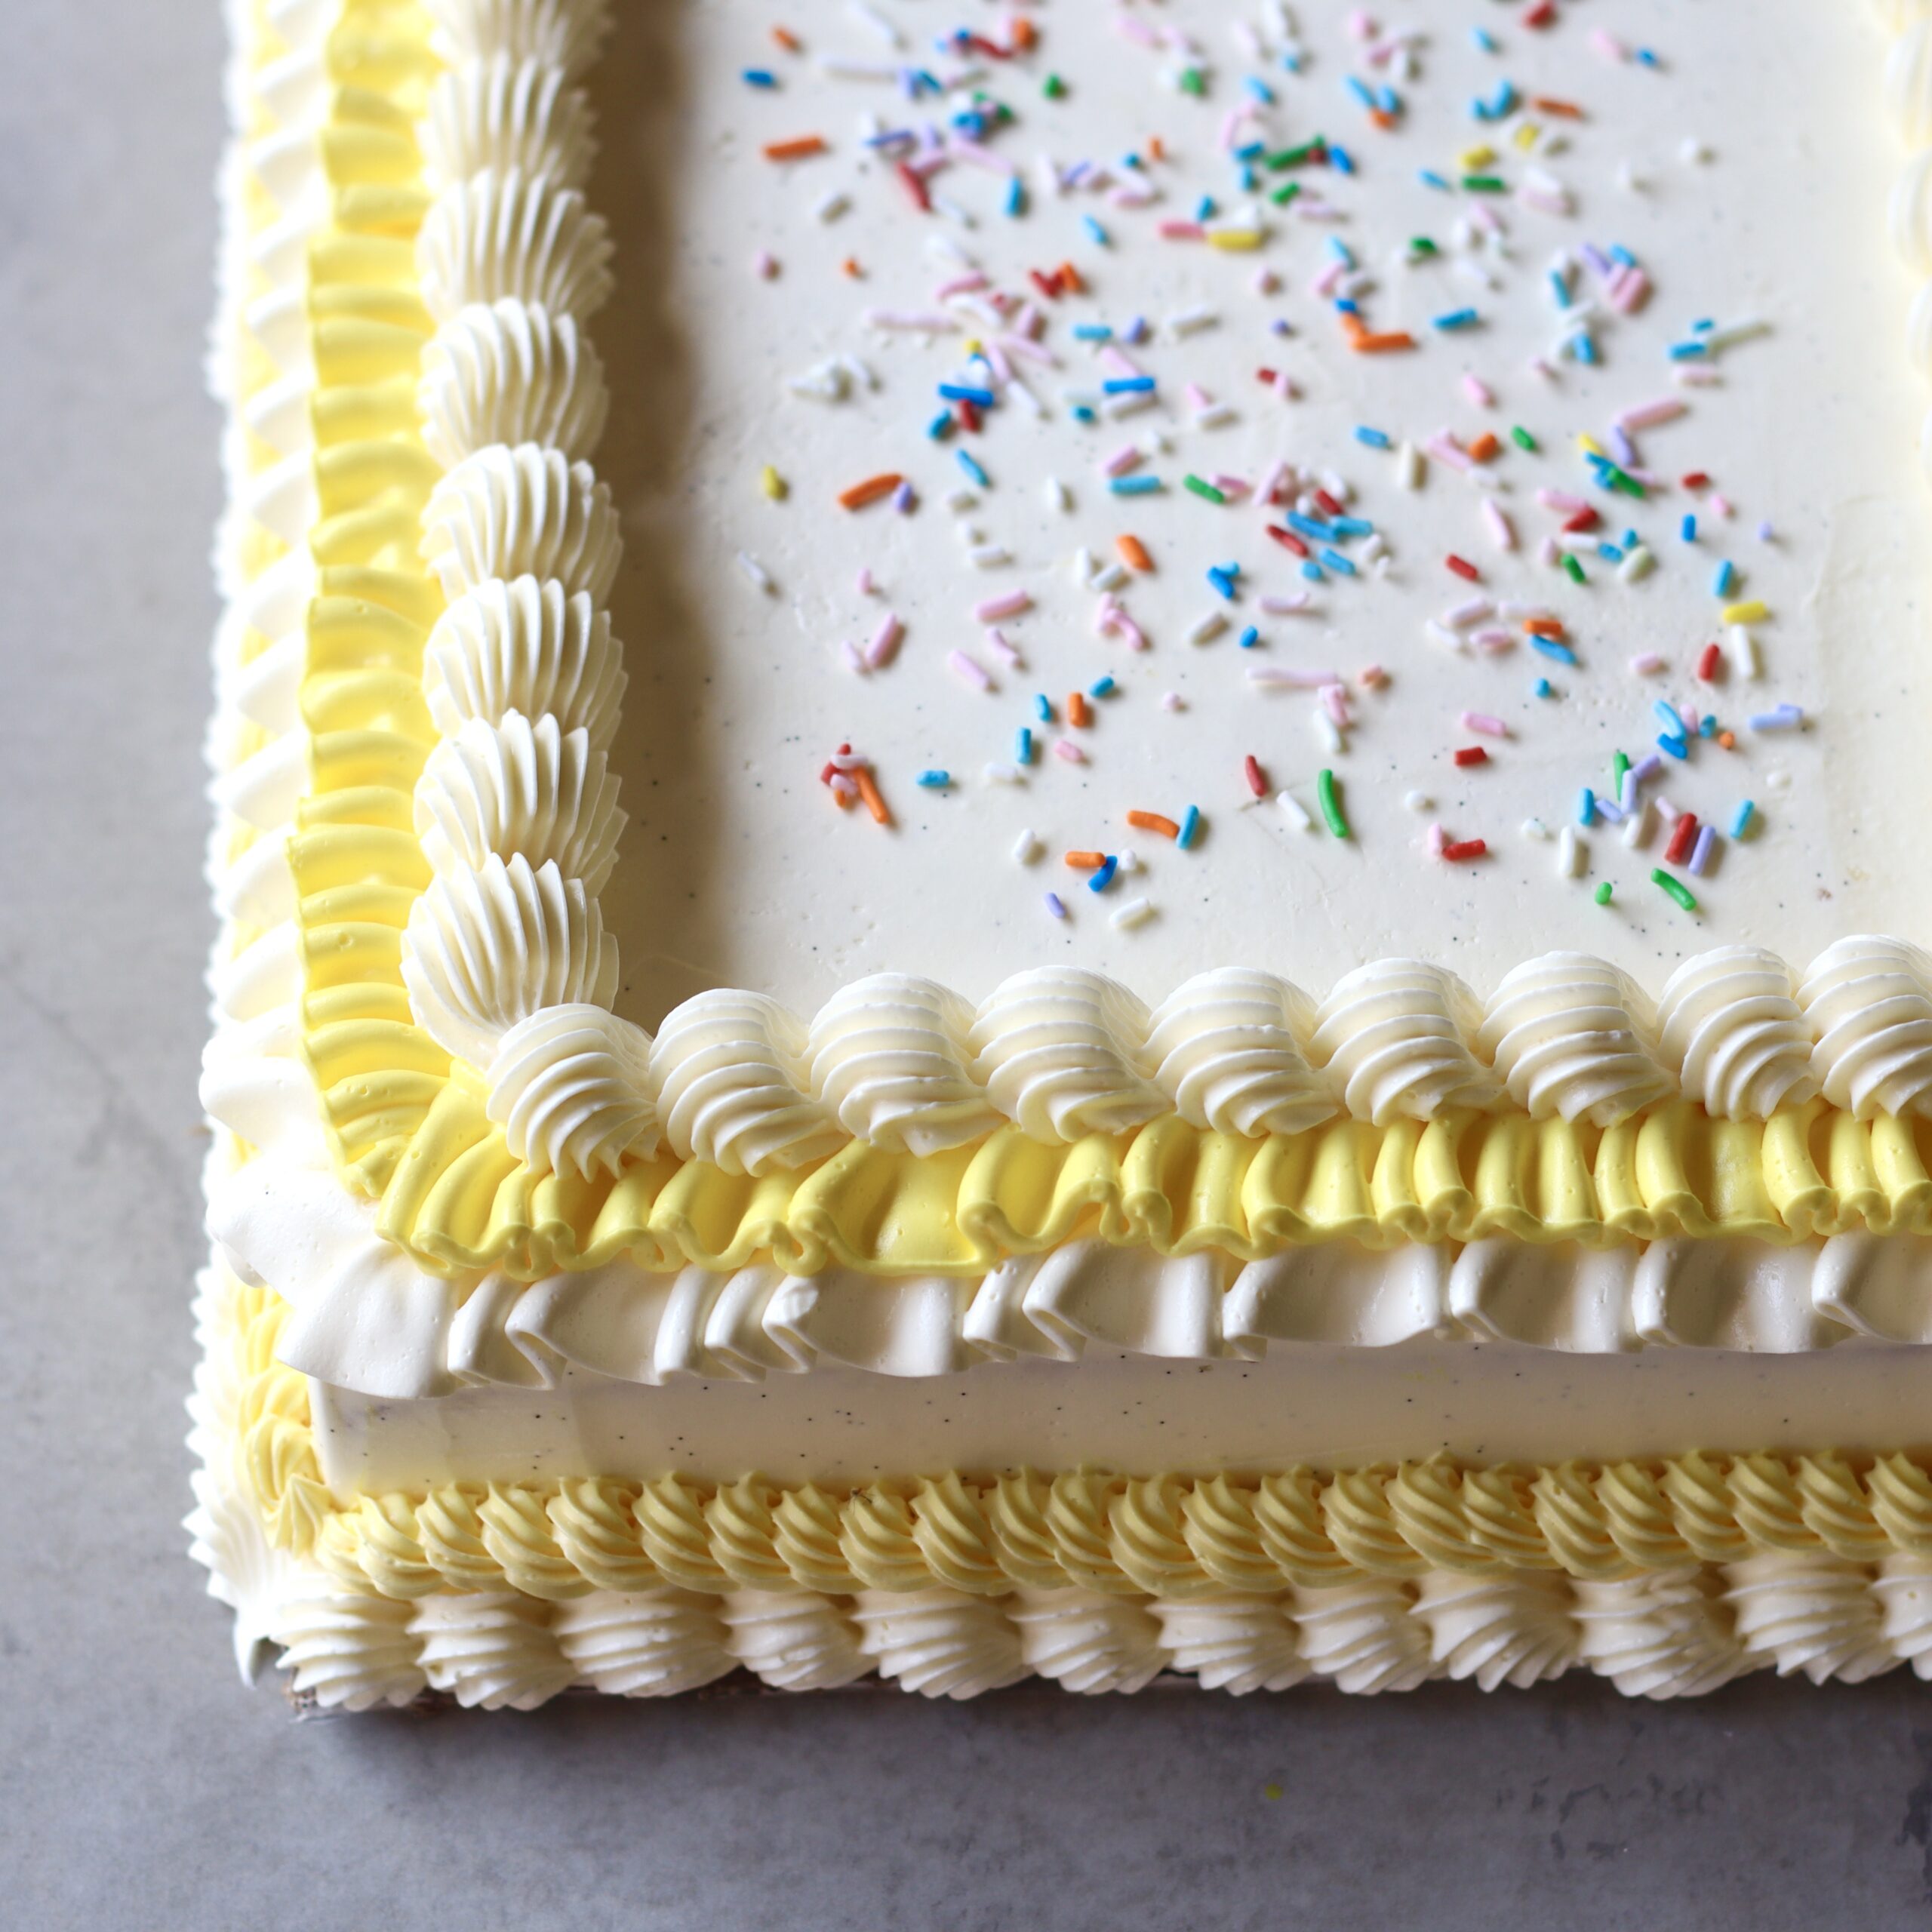
Lemon Sheet Cake
TIER 3
Lemon Sheet Cake

1
9"x13" SHEET CAKE
Ingredients
Makes 1 9″x13″ sheet cake
Lemon Sheet Cake
410g Caster Sugar
410g Cake Flour
26g Baking Powder
410g Whole Eggs
170g Vegetable Oil
140g Whole Milk, Room Temperature
240g Unsalted Butter
Zest 1 Lemon
1 Tsp Lemon Extract
Lemon Sugar Syrup
30g Water
30g Lemon Juice
60g Sugar
Lemon Curd
Zest of ½ Lemon
50g Lemon Juice
45g Caster Sugar
50g Whole Eggs
75g Unsalted Butter
Vanilla Swiss Meringue Buttercream
300g Egg Whites
560g Caster Sugar
9g Salt
Beans from 1 Fresh Vanilla Pod
750g Unsalted Butter, Room Temperature
Yellow Gel Food Colour
Special equipment
Stand Mixer
9×13” Cake Tin
Piping Bags
#4B Piping Nozzle
Ruffle Tip Piping Nozzle x 2
#18 Star Tip Nozzle
Digital Thermometer
Method
Lemon Sheet Cake
1. Preheat your oven to 185C/365F non-fan assisted.
2. Place the butter into a saucepan and melt it over a low heat (avoid boiling it). Once it has just melted, set it to one side to cool slightly.
-
- 240g Unsalted Butter
3. In a large bowl or the bowl of a stand mixer, add the sugar, flour & baking powder. Mix until they are evenly combined.
-
- 410g Caster/Superfine Sugar
- 410g Cake Flour
- 26g Baking Powder
4. In a separate jug, whisk together the eggs, oil, milk, lemon zest & lemon extract. Then, while mixing the dry ingredients on a slow speed, pour in the wet mixture. Mix everything until the wet & dry ingredients are evenly combined, scraping down the bowl to ensure everything is mixed in. Be careful not to overbeat the mixture.
-
- 410g Whole Eggs, Whisked
- 170g Vegetable Oil
- 140g Whole Milk, Room Temperature
- Zest 1 Lemon
- 1 Tsp Lemon Extract
5. Finally, pour in the melted butter and mix the batter slowly until everything is evenly combined.
6. Lightly grease a 9×13” rectangular cake tin. Place a sheet of parchment paper on the bottom to stop the cake from sticking.
7. Pour the batter into the cake tin and place the tin into the oven. Bake for around 40 minutes or until a skewer inserted comes out clean. Every oven is different so keep an eye on the cake. You will see it turns a very nice golden brown colour on top and that is when it is close to being done. While the cake is baking you can make the sugar syrup.
Lemon Sugar Syrup
1. Place the sugar, water and lemon juice into a medium saucepan and bring it to the boil until all of the sugar has dissolved. Make sure you don’t boil it for too long otherwise it will thicken too much as it cools. Set to one side to use when the cake is ready.
-
- 30g Water
- 30g Lemon Juice
- 60g Sugar
2. Once the cake has baked, remove it from the oven and place a wire rack on top of the tray. Very carefully flip the tray over so that the cake releases onto the wire rack.
3. Peel off the sheet of parchment paper and then immediately soak the cake with the lemon sugar syrup.
4. Wrap the cake in cling film and then place the entire cake in the fridge to chill for 3-4 hours. This will help to make sure the cake is nice and moist.
Lemon Curd
1. Into a stainless steel bowl, add the eggs, sugar, lemon juice and lemon zest.
-
- Zest of ½ Lemon
- 50g Lemon Juice
- 45g Caster Sugar
- 50g Whole Eggs
2. Place the bowl over a pan of simmering water.
3. Whisking constantly until the mixture has thickened, almost like a custard consistency.
4. Immediately remove it from the heat and pass it through a sieve onto a tall jug.
5. Allow the mixture to cool to around 40C/105F (it will only take a few minutes), and then add in the soft butter.
-
- 75g Unsalted Butter, Soft
6. Use a hand blender to blend until the mixture is completely smooth.
7. Place a sheet of cling film on top and refrigerate the curd until you are ready to use it.
8. If you chill it overnight you may need to warm it up just slightly before you use it so that it is softer to spread.
Vanilla Swiss Meringue Buttercream
1. Into a large metal bowl, or the bowl of a stand mixer, add the egg whites, sugar, vanilla and salt.
-
- 300g Egg Whites
- 560g Caster Sugar
- 9g Salt
- Beans from 1 Fresh Vanilla Pod
2. Place the bowl of a pan of gently simmering water. Whisk the mixture constantly until the sugar has dissolved and it reached a temperature of around 65C/149F on a digital thermometer.
3. Once at temperature, remove it from the heat and place it onto a stand mixer. Attach the whisk and whisk for 5-7 minutes, or until the bowl feels completely cool to the touch.
4. With the mixer still on a medium speed, slowly add in the soft butter, one piece at a time. As long as the butter is soft, you should be able to add it in relatively quickly. Wait about 10 seconds in between each addition.
-
- 750g Unsalted Butter, Soft & Room Temperature
5. Initially it will look quite soupy, then it may begin to look curdled, but don’t panic – this is normal.
6. Once you have added all the butter, keep whisking for a further 3-4 minutes until the buttercream is completely smooth.
Assembly
1. Remove the cake from the fridge and use a serrated knife to trim all the edges of the cake (not the top though!), getting rid of the golden brown edges to reveal a nice soft cake on the inside.
2. Then, cut the cake in half horizontally so you have two nice even slabs of cake.
3. Place one half of the cake onto a cake board so the sliced sponge is facing out.
4. Take a few scoops of the vanilla buttercream and scoop this into the centre. Use an offset spatula to spread this out as evenly as possible to the edges.
5. Then, on top of that pipe or spread on a nice layer of that lemon curd. It should be a nice soft consistency that you can spread easily.
6. Place the second slab of cake on top.
7. To create the crumb coat, add a big dollop of buttercream on the cake and use an offset spatula to spread it over. Try and neaten it up as best as possible, using the spatula to scrape off any excess buttercream.
8. Once you are happy with the crumb coat, place the cake in the fridge for 20-30 minutes.
9. Remove the cake from the fridge and apply a second layer of buttercream, again using your spatula to spread it out as evenly as possible and a cake scraper to make it smooth. As you are scraping the sides you may see you get a build up of frosting on the top – what you can do is freeze the cake for 15 minutes, then use a sharp knife to trim off that excess buttercream around the outside.
10. When you have a rectangular cake that is relatively smooth and even coverage of buttercream, chill the cake for 20 minutes in the fridge and then we can start to decorate.
11. Split the remaining buttercream into 2 batches, leaving one batch white, and colour the remaining batch with a vibrant yellow gel food colour. We are then going to add the white + yellow buttercream into 4 different piping bags:
-
- 1 x Ruffle tip – White Buttercream
- 1 x Ruffle Tip – Yellow Buttercream
- 1 x 4B Tip – White Buttercream
- 1 x 18 Star Tip – Yellow Buttercream
12. Remove the chilled cake from the fridge and start with the White Buttercream – 4B Piping Bag. Start at the bottom of the cake and pipe and shell border by applying even pressure to create a dollop of buttercream, stop piping and then drag the piping bag down to create a flick at the bottom of the shell. Repeat this technique, joining the dollops as you go along the outside edge of the cake.
13. Next, take the Yellow Buttercream – 18 Star Tip, and just above the shell border you just piped, apply even pressure, and pipe in an anti-clockwise circular motion to create a constant loop of tight spirals.
14. Move to the top of the cake and take the White Buttercream – Ruffle Tip Piping Bag. Apply even pressure and holding the piping nozzle so that the opening of the nozzle is perpendicular to the cake i.e it is facing outwards and to the left, (not facing up or down) pipe and even draping of the ruffled buttercream right along the edge of the cake. Try to ensure there are no air bubbles in your piping bag so that you can apply consistent pressure on the bag without stopping as you pipe.
15. Once you have piped the white ruffle around the entire top side of the cake, pick up the Yellow Buttercream – Ruffle Tip Piping Bag and pipe a second line of yellow ruffles, just above the white ones.
16. Finally, take the White Buttercream- 4B Piping Nozzle, and cover up the edge of the yellow ruffle buttercream with a shell design, just as we did in step 12.
17. Fill the centre of the cake with sprinkles or candles (whatever you fancy) and then let the cake come to room temperature for at least an hour before serving.

Chocolate Sheet Cake
TIER 2
Chocolate Sheet Cake
1
9"x13" SHEET CAKE
Ingredients
Makes 1 9″x13″ sheet cake
Chocolate Sheet Cake
340g Unsalted Butter
340g Brewed Coffee
85g Cocoa Powder
170g Dark Chocolate
430g Light Brown Sugar
6 Large Eggs + 3 Large Egg Yolks (Cold)
255g Plain Flour
1 Tbsp Baking Soda
½ Tsp Salt Chocolate Chips
Brown Sugar Ganache
200g Dark Chocolate
25g Unsalted Butter
35g Light Brown Sugar
200g Double Cream
75g Sour Cream
Chocolate Swiss Meringue Buttercream
200g Egg Whites
375g Sugar
500g Unsalted Butter, Soft & Room Temperature
6g Salt
1 Tsp Vanilla Bean Paste or 1 Fresh Vanilla Pod
200g Melted Dark Chocolate
Chocolate Drip
100g Dark Chocolate
60g Unsalted Butter
Special equipment
Stand Mixer
9×13” Cake Tin
Piping Bag
1M Star Tip Nozzle
Digital Thermometer
Method
Chocolate Cake
1. Preheat the oven to 175C/345F. Into a large bowl, add the butter, and pour over the hot coffee.
-
- 340g Unsalted Butter
- 340g Brewed Coffee
2. Whisk the mixture together until the butter has completely melted. If the coffee is a little cool, then just pop the bowl over a pan of gently simmering water until melted.
3. Once melted, add in the chocolate and cocoa powder and whisk the mixture together. Again, you want to whisk this until the chocolate has completely melted. If it needs a little heating, just pop it over a pan of simmering water.
-
- 85g Cocoa Powder
- 170g Dark Chocolate
4. Add in the sugar and whisk until there are no more lumps of sugar.
-
- 430g Light Brown Sugar
5. Add in the cold eggs and whisk to combine.
-
- 6 Large Eggs + 3 Large Egg Yolks (Cold)
6. Finally, sift in the flour, salt & baking soda. Gently whisk the mixture together until there are no more dry parts of flour.
-
- 255g Plain Flour
- 1 Tbsp Baking Soda
- ½ Tsp Salt
7. Take a 9×13” rectangle cake pan. Lightly spray it with a cake release spray. Place a sheet of parchment paper on the bottom of the tin. If you are not using cake release spray, coat the base with soft butter, place the sheet of parchment down. Then grease the edges with butter and dust them with cocoa powder.
8. Pour the cake batter into the tin.
9. Take a handful of chocolate chips and dust them lightly in flour. Shake off any excess flour then sprinkle them on top of the cake.
-
- Chocolate Chips
10. Place the cake into the oven and bake for around 40-45m, or until a skewer comes out clean from the centre. It may take longer – every oven is different so keep an eye on it.
11. Once baked, let it cool in the tion for 5 minutes, then carefully place a wire rack on top of the tin.
12. Take a tea towel, and hold the wire rack against the top of the tray. Very carefully flip the tray over, then slowly lift the cake pan so that the cake releases onto the wire rack.
13. Allow it to cool for 5 minutes, then wrap the cake tightly in cling film and refrigerate the cake for 4-6 hours. This is optional but helps to keep the cake moist.
Brown Sugar Ganache
1. Add the chocolate into a medium bowl, then place it over a pan of gently simmering water. Stir until it is completely melted.
-
- 200g Dark Chocolate
2. Set that to one side to stay warm, while you add the cream, sugar and butter to a saucepan. Place it on a medium low heat, stirring constantly until the butter has melted and the sugar has dissolved into the cream. Make sure the cream is not boiling – just hot.
-
- 25g Unsalted Butter
- 35g Light Brown Sugar
- 200g Double Cream
3. Slowly pour the cream into the chocolate in three additions.
4. With your spatula, stir the cream into the chocolate, stirring from the centre of the bowl in very tight circular motions. This is an important technique in order to properly emulsify the ganache (Although if you do have one, you can use a hand blender to blend the cream and chocolate together until smooth).
5. Once you have added all the cream, fold the sour cream into the ganache.
-
- 75g Sour Cream
6. Set the mixture to one side (cover the surface directly with cling film), until it has set into a spreadable frosting consistency. Roughly 2-3 hours at room temperature, but it may take more/less depending on your environment.
7. Once the ganache has set up and the cake has cooled. Use a sharp serrated knife to carefully slice the cake in half horizontally. This can be a little tough to do evenly as it is a large cake, but if you have a cake leveller, that makes things a lot easier! At this point it is worth placing the cake on a cake board so it is easy to maneuver.
8. Use a palette knife to evenly spread the frosting onto one layer of the cake.
9. Carefully sandwich the second layer of cake on top. 10. Place the cake in the fridge while you make the buttercream.
Chocolate Swiss Meringue Buttercream
1. Into a large metal bowl, or the bowl of a stand mixer, add the egg whites, sugar, vanilla and salt.
-
- 200g Egg Whites
- 375g Sugar
- 6g Salt
- 1 Tsp Vanilla Bean Paste or 1 Fresh Vanilla Pod
2. Place the bowl of a pan of gently simmering water. Whisk the mixture constantly until the sugar has dissolved and it reached a temperature of around 65C/149F on a digital thermometer.
3. Once at temperature, remove it from the heat and place it onto a stand mixer. Attach the whisk and whisk for 5-7 minutes, or until the bowl feels completely cool to the touch. As this is mixing, melt your chocolate. You want to ensure it is warm when you add it in, but not too hot, so by starting it now, it should be at a good temperature when you are ready to use it.
-
- 200g Dark Chocolate, Melted
4. With the mixer still on a medium speed, slowly add in the soft butter, one piece at a time. As long as the butter is soft, you should be able to add it in relatively quickly. Wait about 10s in between each addition.
-
- 500g Unsalted Butter, Soft & Room Temperature
5. Initially it will look quite soupy, then it may begin to look curdled, but don’t panic – this is normal.
6. Once you have added all the butter, keep whisking for a further 3-4 minutes until the buttercream is completely smooth.
7. Next, pour in the melted chocolate. Keep whisking (you may need to scrape down the sides to fully incorporate all the chocolate) until you have a smooth chocolate buttercream.
Assembly Part 1
1. Remove the chilled cake from the fridge and place a heaped scoop of chocolate buttercream on top.
2. With an offset spatula, spread the buttercream as evenly as possible around the entire cake. Don’t worry too much about perfectly sharp edges or making sure it is completely smooth, we are just adding a rough crumb coat.
3. Add enough buttercream and keep smoothing it out until you have a relatively even crumb coat. Lift the cake into the fridge for 30 minutes to chill.
4. After 30 minutes, remove the cake from the fridge and add a second layer of buttercream, this time slightly thicker. Again, use an offset spatula to spread the buttercream out as evenly as possible but don’t panic too much about perfectly smooth edges. Just use your palette knife & cake scraper to get it as sharp as you want.
5. Lift the cake and place it in the fridge while you make the chocolate drip.
Chocolate Drip
1. Into a medium bowl, add the chocolate & unsalted butter.
-
- 100g Dark Chocolate
- 60g Unsalted Butter
2. Place the bowl over a pan of very gently simmering water and stir it until it has completely melted.
3. Remove the bowl from the heat and let it cool, gently stirring occasionally until it has cooled to around 30-32C (86F-89F) on a digital thermometer.
Final Assembly
1. Once the drip is at temperature, remove the cake from the fridge.
2. Add the drip into a piping bag or using a spoon, carefully drip the chocolate over the edge of the cake.
3. Next, take the remaining buttercream and add it into a piping bag fitted with a 1M star tip nozzle.
4. Applying even pressure, start at the top of the cake, and pipe and even shell border, covering the parts of the cake where the top of the drip can be seen. The key to getting an even border, is just to apply even pressure, squeeze a dollop of the buttercream, stop piping, then drag the piping bag towards you.
5. Once you have covered the top, repeat the piping along the bottom of the cake.
6. Then at this point, you can decorate the centre of the cake any way you want! I chose to fill the centre with chocolate curls, but you could add candles or sprinkles…whatever you fancy!
7. Allow the cake to come to room temperature for at least an hour before serving so the ganache can warm up.

Berries & Cream Cake
TIER 1
Berries & Cream Cake
1
9"x13" SHEET CAKE
Ingredients
Makes 1 9″x13″ sheet cake
Genoise Sponge
300g Whole Egg
240g Caster Sugar
240g Plain Flour
50g Melted Butter
Zest ½ Lemon
1 Tsp Lemon Extract
1 Tsp Vanilla Bean Paste/1 Fresh Vanilla Pod (Optional)
Sugar Syrup
30g Lemon Juice
30g Water
60g Sugar
Or
60g Water
60g Sugar
1 Tsp Vanilla Bean Paste
Vanilla Chantilly Cream
400g Double/Heavy Cream
1-2 Tsp Icing/Powdered Sugar
Fresh Berries To Decorate
Special equipment
Stand Mixer or Electric Hand Whisk
9×13” Cake Pan
Method
Genoise Sponge
This sponge can be flavoured with either lemon/vanilla – or both. I like a lemon cake so I just used lemon extract & zest, but feel free to adjust the flavour to your preference.
1. Preheat the oven to 175C/345F.
2. Into a large bowl, or the bowl of a stand mixer, add the eggs, sugar & lemon zest.
-
- 300g Whole Egg
- 240g Caster Sugar
- Zest ½ Lemon
- 1 Tsp Lemon Extract
2. Place the bowl over a pan of gently simmering water, and whisk constantly until it has thickened slightly and looks paler in colour. If you have a digital thermometer, it should go above around 45C/112F.
3. Once thicker, remove it from the pan, and with an electric hand whisk, or you can place it on a stand mixer – whisk it for 3-5 minutes until it is much thicker, and the mixture holds a ribbon.
4. Next, sift the flour over the top, and fold it in with a spatula. This can be a little tough as you really need to scrape the bottom of the bowl to make sure you get all the flour as sometimes it can get stuck at the bottom, but also try to avoid going crazy and knocking out too much air from the mixture.
-
- 240g Plain, All-Purpose Flour
5. Once the flour is incorporated, pour in the melted butter (and vanilla if you are using it) and fold the mixture again to make sure there are no more streaks of butter.
-
- 50g Melted, Unsalted Butter
6. Take a 9×13” rectangle cake pan, and lightly grease the inside with butter or cake release spray. Place a sheet of parchment paper on the bottom.
7. Pour the cake batter into the tin, then slide it into the pre-heated oven. Bake for around 20-25 minutes or until the cake is nice and golden and a skewer inserted comes out clean.
Sugar Syrup
You have two options for the sugar syrup – vanilla or lemon. Choose whichever version you would prefer to use. If you are making vanilla – skip the lemon juice and do 60g water instead + 1 Tsp vanilla bean paste.
1. Into a small saucepan, add the lemon juice, water and sugar.
-
- 30g Lemon Juice
- 30g Water
- 60g Sugar
2. Place it on a medium heat and bring it to a boil, ensuring the sugar has completely dissolved. Make sure the syrup doesn’t boil for too long otherwise it will become slightly too thick and make it more difficult to spread onto the cake.
3. Set the pan to one side while the cake bakes.
Assembly Part 1
1. When the cake has baked, remove it from the oven, and carefully run a knife around the edge of the cake pan to make sure it has completely released. Then place a wire rack on top of the tin and carefully flip it over so the cake is now on the wire rack.
2. Allow it to cool for a few minutes, then peel off the sheet of parchment paper on the bottom.
3. Take the sugar syrup and use a spoon or a pastry brush to soak the cake all over. This will add some moisture back into the cake.
4. At this point, you can wrap the cake tightly in cling film and refrigerate it (overnight ideally) or let it cool to room temperature to decorate. I find that wrapping it in cling film and then refrigerating it, while it’s still warm, helps to lock in a little more moisture.
Vanilla Chantilly
1. Once the cake has cooled, take a sharp serrated knife and trim the edges off. This will give you a nice clean edge and also get rid of the slightly drier edges.
2. Add the cream, vanilla and sugar to a bowl and use a hand whisk (or electric whisk) and whisk until the cream is thicker but not holding stiff peaks.
-
- 400g Double/Heavy Cream
- 1-2 Tsp Icing/Powdered Sugar
3. The thickness is crucial here, as if you whisk the mixture to stiff peaks then try and spread it, it will split.
4. The more you move the cream, the more it will thicken, so you need to under whip the cream, to a very soft peak, then pour it on the cake.
5. Use a spatula so spread it around in nice whirls to the edges.
6. Take fresh berries of your choice and place them all over the cream.