
Vanilla Parfait
TIER 1
Vanilla Parfait
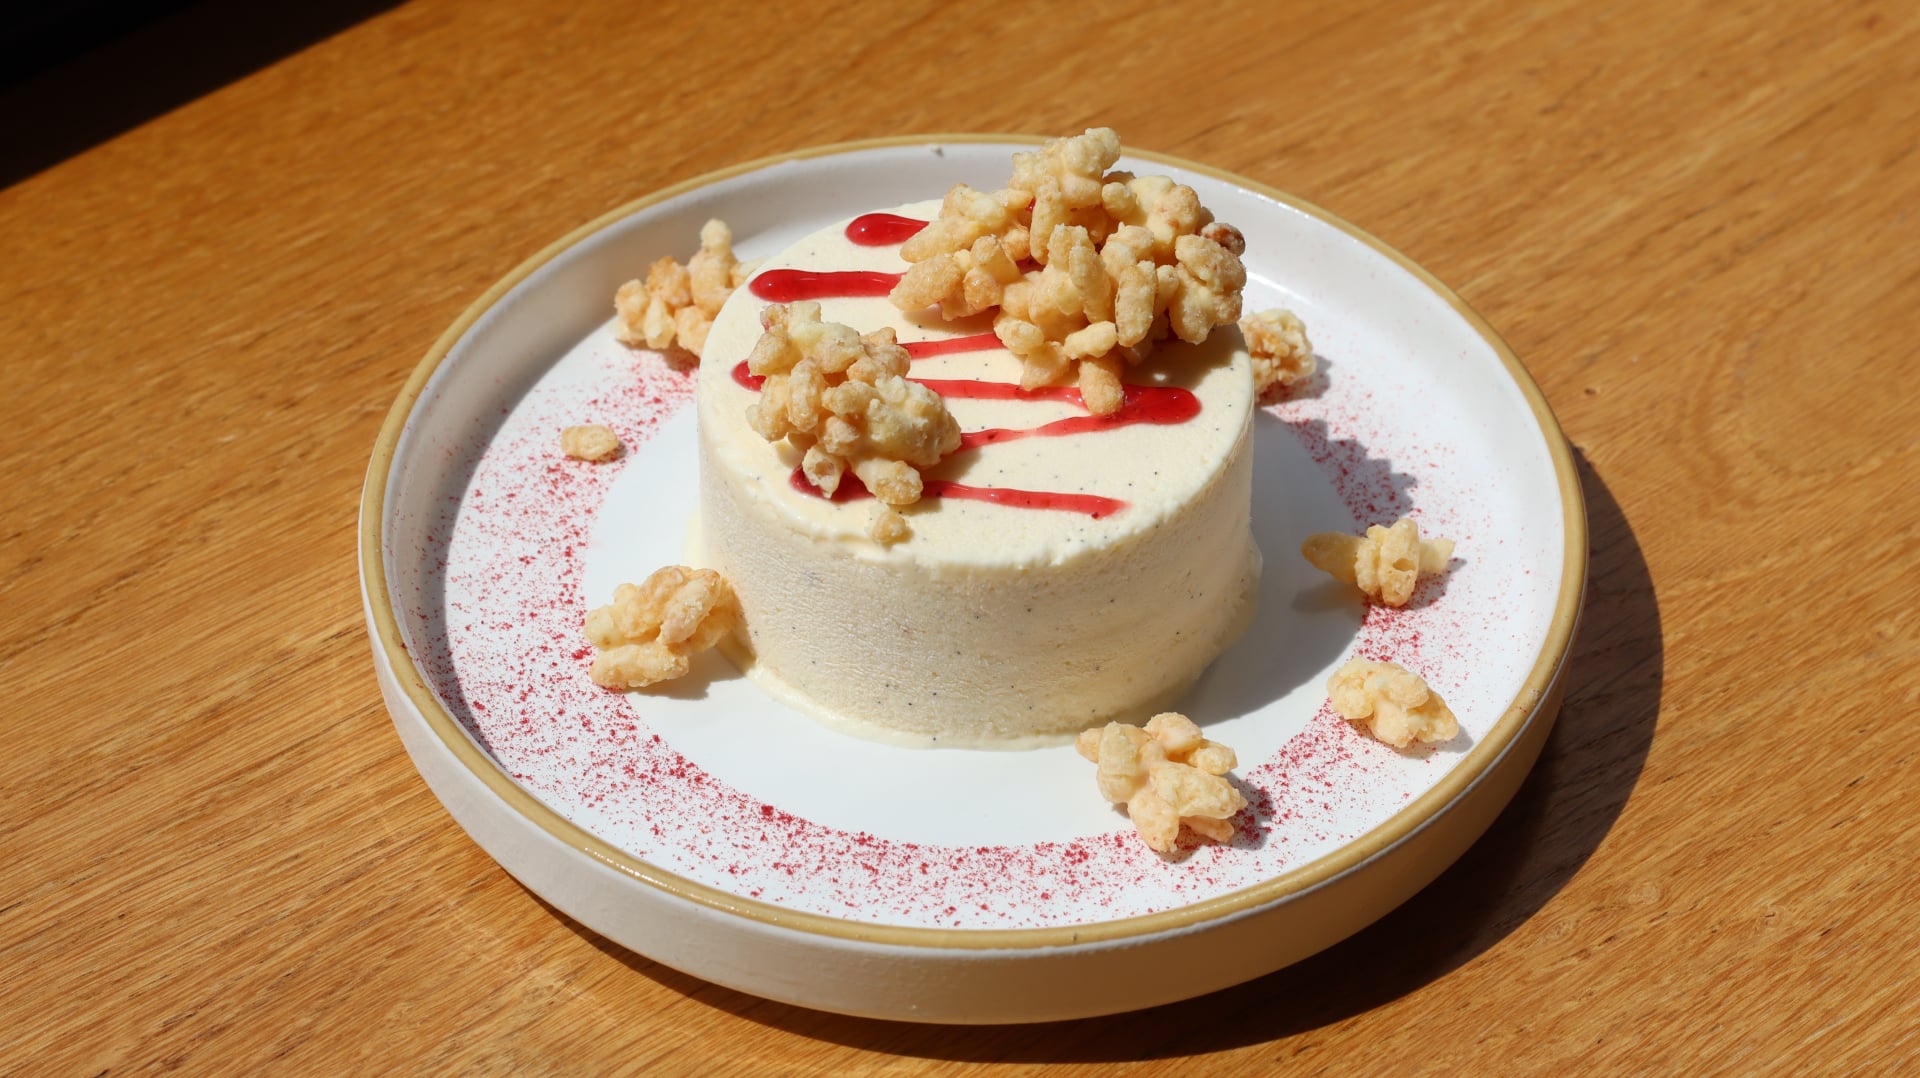
In Tier 1 we tackle the perfect base recipe that you can really take in any direction. I walk you through how to elevate it with toasted milk powder puffed rice to bring some crunch, and a bright raspberry consommé (sounds fancier than it is!).

6
INDIVIDUAL PARFAITS
Ingredients
Makes 6 individual parfaits
Vanilla Parfait
80g Egg Yolks
85g Caster Sugar
25g Water
15g Honey
300g Double/Heavy Cream
1 Vanilla Pod
Pinch of Flaked Salt
Raspberry Consomme
300g Frozen Raspberries
30g Caster/White Sugar
Raspberry Gel
Raspberry Consomme (Above)
1% Agar Agar Powder
Toasted Milk Powder Puffed Rice
25g Rice Krispies
10g Skimmed Milk Powder (to make 5g toasted milk powder)
35g White Chocolate
10g Unsalted Butter
Pinch of Flakey Salt
Raspberry Powder To Dust
Special equipment
Stand mixer
Digital thermometer
Silicon disc mold
Small blender
Piping bag
Method
Vanilla Parfait
1. Into the bowl of a stand mixer, add the egg yolks and whisk on a medium speed.
-
- 80g Egg Yolks
2. Meanwhile, in a small saucepan, add the water, honey and sugar. Place this onto a medium heat.
-
- 85g Caster Sugar
- 25g Water
- 15g Honey
3. Continue to cook the sugar mixture until it reaches 118C/244F. Remove it from the heat and immediately slowly pour it over the whisking egg yolk mixture. Be careful not to pour the mixture directly onto the whisk or it will splatter. Whisk for 5 minutes on a medium high speed or until the mixture is thick, pale and holds a ribbon. Remove the bowl from the mixer and set it aside.
4. Add the cream, a pinch of flaked salt and beans scraped from a fresh vanilla pod (or 1 tsp of vanilla bean paste) to a medium bowl and whisk by hand until it forms a medium soft peak.
-
- 300g Double Cream
- 1 Vanilla Pod
- Pinch of Flaked Salt
5. Whisk the cream into the egg yolk base in two parts (it is actually slightly easier to whisk than fold with a spatula like I said in the video!). You should end up with a nice smooth mixture.
6. Pour the mixture evenly across a silicon disc mold and freeze for 4 hours or overnight.
Raspberry Consomme
1. Into a medium bowl, add the raspberries and sugar. Stir them together then cover the bowl tightly with clingfilm.
-
- 300g Frozen Raspberries
- 30g Caster/White Sugar
2. Place the bowl over a pan of very gently simmering water and allow it to cook for 45 minutes. By this point it should have released a deep red syrup.
3. Pass the mixture through a sieve. Split it in half, reserving one half for the gel. Keep the remainder in a jug in the fridge.
Raspberry Gel
1. Weigh half of the raspberry consomme, it will be roughly 70g. Take that weight and weigh 1% of agar agar powder (0.7g).
2. Add the consomme and agar agar powder to a small saucepan and bring it to the boil for 1 minute.
3. Remove it from the heat and transfer it to a container and refrigerate until needed. *Note you will need a very small blender to blend this mixture as it is such a small quantity. If not, you can simply replace this with some raspberry jam!
Toasted Milk Powder Puffed Rice
1. Preheat the oven to 160C/320F.
2. Onto a baking tray, add the rice krispies to one side and bake for 4 minutes.
-
- 25g Rice Krispies
3. Remove the tray from the oven and add the skimmed milk powder to the other side.
-
- 10g Skimmed Milk Powder
4. Bake for a further 6-7 minutes, stirring the milk powder occasionally until it is a golden brown colour. Be careful not to burn it.
5. Remove the tray from the heat and allow them to cool for 15 minutes.
6. Into a medium bowl, add the white chocolate and butter. Melt it over a pan of gently simmering water.
-
- 35g White Chocolate
- 10g Unsalted Butter
7. Remove it from the heat and add in the rice krispies, then sift in 5g of the toasted milk powder.
8. Stir it together and tip it onto a tray lined with baking paper. Add a good pinch of flaked sea salt over the top – very important!
9. The mixture should be ‘sticky’ enough that the krispies are clumping together.
10. Place it into the fridge for 15-30 minutes to set, then break it into clusters and keep it in the fridge until ready to use.
Assembly
1. Remove the raspberry gel from the fridge and add it into a small blender – it is a very small amount so you need a small blender like a spice grinder. Blend the mixture until it is a smooth pipeable texture. Add it into a piping bag and snip a small hole off the end.
2. Decorate the outside of each plate with a dusting of raspberry powder. I like to place a lid on the plate, then dust around that before lifting it up to create a nice stencil.
3. Remove the parfait from the freezer and place it in the centre.
4. Pipe the raspberry gel over the top of the parfait and finish with a few clusters of the puffed rice.
5. These are best after sitting at room temperature for about 5 minutes to soften slightly but just be aware they will melt around the edges just slightly.
6. To serve, pour the raspberry consomme over the top.
Shop the Equipment


Coffee Parfait
TIER 2
Coffee Parfait
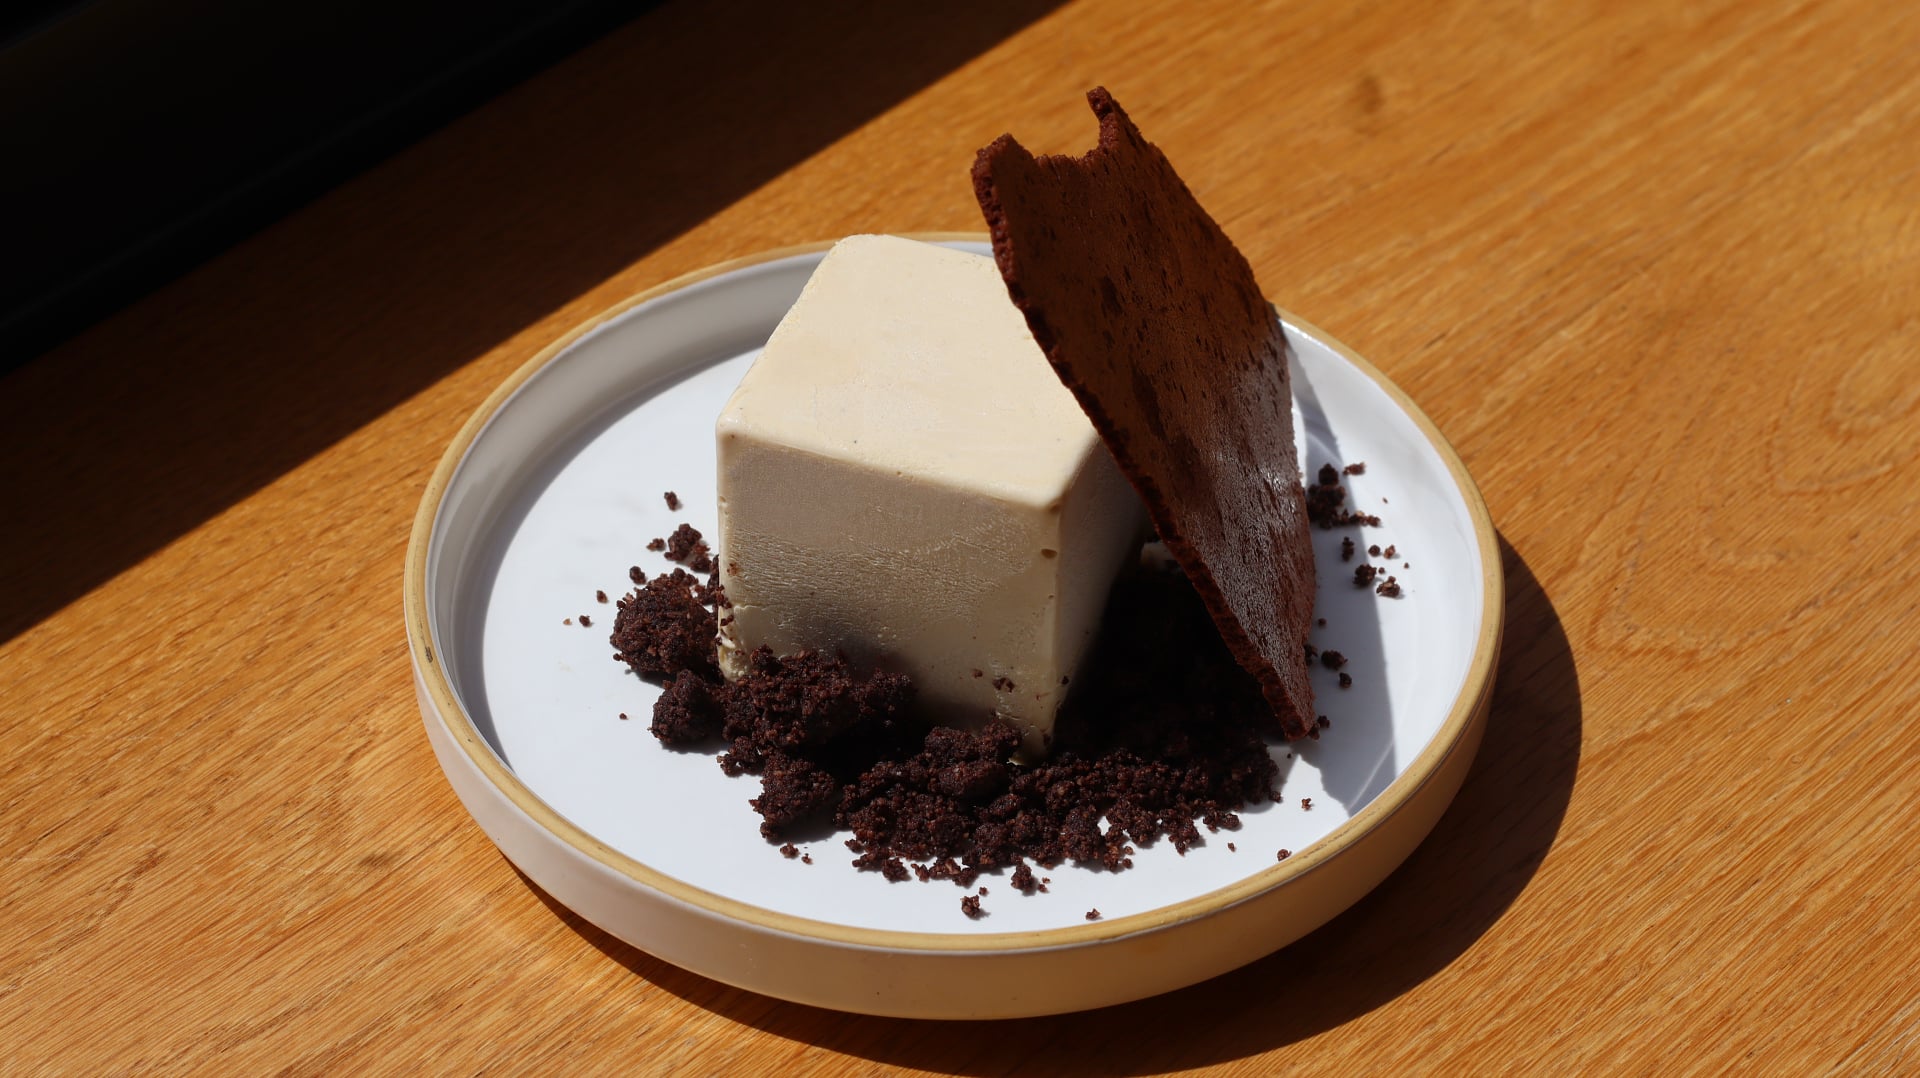
Taking the same recipe as Tier 1, we just replace water for espresso in the sugar syrup. The coffee brings a slightly more bitter flavour which complements the sweeter profile of the parfait really well. The star of the show is the dehydrated chocolate mousse. Think crunchy meringue shards, but made with a rich chocolate mousse. Finally it’s served with an almond cocoa crumble and a cold chocolate sauce.
6
INDIVIDUAL PARFAITS
Ingredients
Makes 6 individuals parfaits
Coffee Parfait
300g Double Cream
80g Egg Yolks
85g Caster Sugar
35g Espresso
15g Honey
Pinch of Flaked Salt
Chocolate Almond Crumble
55g Ground Almonds
40g Plain/All-Purpose Flour
40g Light Brown Sugar
50g Unsalted Butter, Cold & Cubed
25g Cocoa Powder
Pinch of Flaked Salt
Dehydrated Chocolate Meringue
190g Double/Heavy Cream
200g Dark Chocolate, 70% Cocoa Solids, Finely Chopped
135g Egg Whites
55g Caster/White Sugar
Pinch of Flaked Salt
Chocolate Sauce
50g Whole Milk
30g Espresso
50g Double/Heavy Cream
10g Caster/White Sugar
40g Dark Chocolate, 70% Cocoa Solids
Pinch of Flaked Salt
Special equipment
Stand mixer
Digital thermometer
Silicon cylinder mold
Silicon mat
Raplette (optional)
Method
Coffee Parfait
1. Into the bowl of a stand mixer, add the egg yolks and whisk on a medium speed.
-
- 80g Egg Yolks
2. Meanwhile, in a small saucepan, add the espresso, honey and sugar. Place this onto a medium heat.
-
- 85g Caster Sugar
- 35g Espresso
- 15g Honey
3. Continue to cook the sugar mixture until it reaches 118C/244F. It can be a little bit tough as the coffee will cause the mixture to bubble up quite a lot. So if you get to around 114-116C on your digital thermometer that will be totally fine! Remove it from the heat and immediately slowly pour it over the whisking egg yolk mixture. Be careful not to pour the mixture directly onto the whisk or it will splatter. Whisk for 5 minutes on a medium high speed or until the mixture is thick, pale and holds a ribbon. Remove the bowl from the mixer and set it aside.
4. Add the cream, a pinch of flaked salt to a medium bowl and whisk by hand until it forms a medium soft peak.
-
- 300g Double Cream
- Pinch of Flaked Salt
5. Whisk the cream into the egg yolk base in two parts. You should end up with a nice smooth mixture.
6. Pour the mixture evenly across a silicon cube mold and freeze for 4 hours or overnight.
Chocolate Almond Crumble
1. Preheat the oven to 175C/345F non-fan assisted.
2. Into the bowl of a stand mixer, add all of the ingredients and mix on a medium low speed with a paddle attachment until it forms a crumble-like consistency.
-
- 55g Ground Almonds
- 40g Plain/All-Purpose Flour
- 40g Light Brown Sugar
- 50g Unsalted Butter, Cold & Cubed
- 25g Cocoa Powder
- Pinch of Flaked Salt
3. Squeeze the mixture between your hands to clump it together slightly. Pour the mixture onto a lined baking tray and bake for 12 minutes. Remove from the oven and allow to cool.
Dehydrated Chocolate Mousse
1. Preheat the oven to 100C/215F non-fan assisted.
2. Add the chopped chocolate to a tall measuring jug and set it aside.
-
- 200g Dark Chocolate, 70% Cocoa Solids, Finely Chopped
3. Pour the cream into a small saucepan and place it over a medium heat. Once it is hot, but not boiling, pour it over the chocolate. Allow it to sit for 2 minutes, then use a hand blender to blend until smooth. Transfer the mixture to a medium bowl.
-
- 190g Double/Heavy Cream
4. Into the bowl of a stand mixer, add the egg whites and whisk on a medium speed until frothy.
-
- 135g Egg Whites
5. Slowly add the sugar a tablespoon at a time. Then once you have added all the sugar, keep whisking until you have a medium stiff peak.
-
- 55g Caster/White Sugar
6. Take ⅓ of the meringue and whisk it through the chocolate base to even out the textures.
7. Fold the remaining meringue through in two parts along with a pinch of flaked sea salt.
8. Take a silicon baking mat and spread a thin layer of the mousse evenly across it. A raplette is a great tool to get an even thickness but using a palette knife is fine too. You will have excess mousse so pour it into jars and chill in the fridge to have as a dessert!
9. Slide the silicon mat onto a baking tray and bake for 1 hour and 40 minutes. The mousse should feel firm to the touch and if you break a piece off it should snap like a meringue shard.
10. Remove it from the oven and set aside. This is best made on the same day otherwise it will begin to soften. If it does, just pop it back in the oven t §00C for 20-30 minutes until it is firm again.
Chocolate Sauce
1. Add the espresso, cream, milk and sugar to a small saucepan. Place this on a medium heat.
-
- 50g Whole Milk
- 30g Espresso
- 50g Double/Heavy Cream
- 10g Caster/White Sugar
2. Meanwhile add the chocolate to a tall jug.
-
- 40g Dark Chocolate, 70% Cocoa Solids
3. Once the cream is hot, pour it over the chocolate and blend until smooth. Add a pinch of salt and then transfer it into a pouring jug, covered, and refrigerate for an hour.
Assembly
1. Remove the frozen coffee parfaits from the freezer and place them onto your serving plates.
2. Add a few tablespoons of the crumble around the base.
3. Snap off a large shard of the dehydrated chocolate mousse and rest this against the side of the parfait.
4. When ready to serve, pour the cold chocolate sauce over the top.
5. These are best after sitting at room temperature for about 5 minutes to soften slightly but just be aware they will melt around the edges just slightly (the crumble will hide this!)
Shop the Equipment


No-Bake Strawberry Cheesecake
TIER 1
No-Bake Strawberry Cheesecake
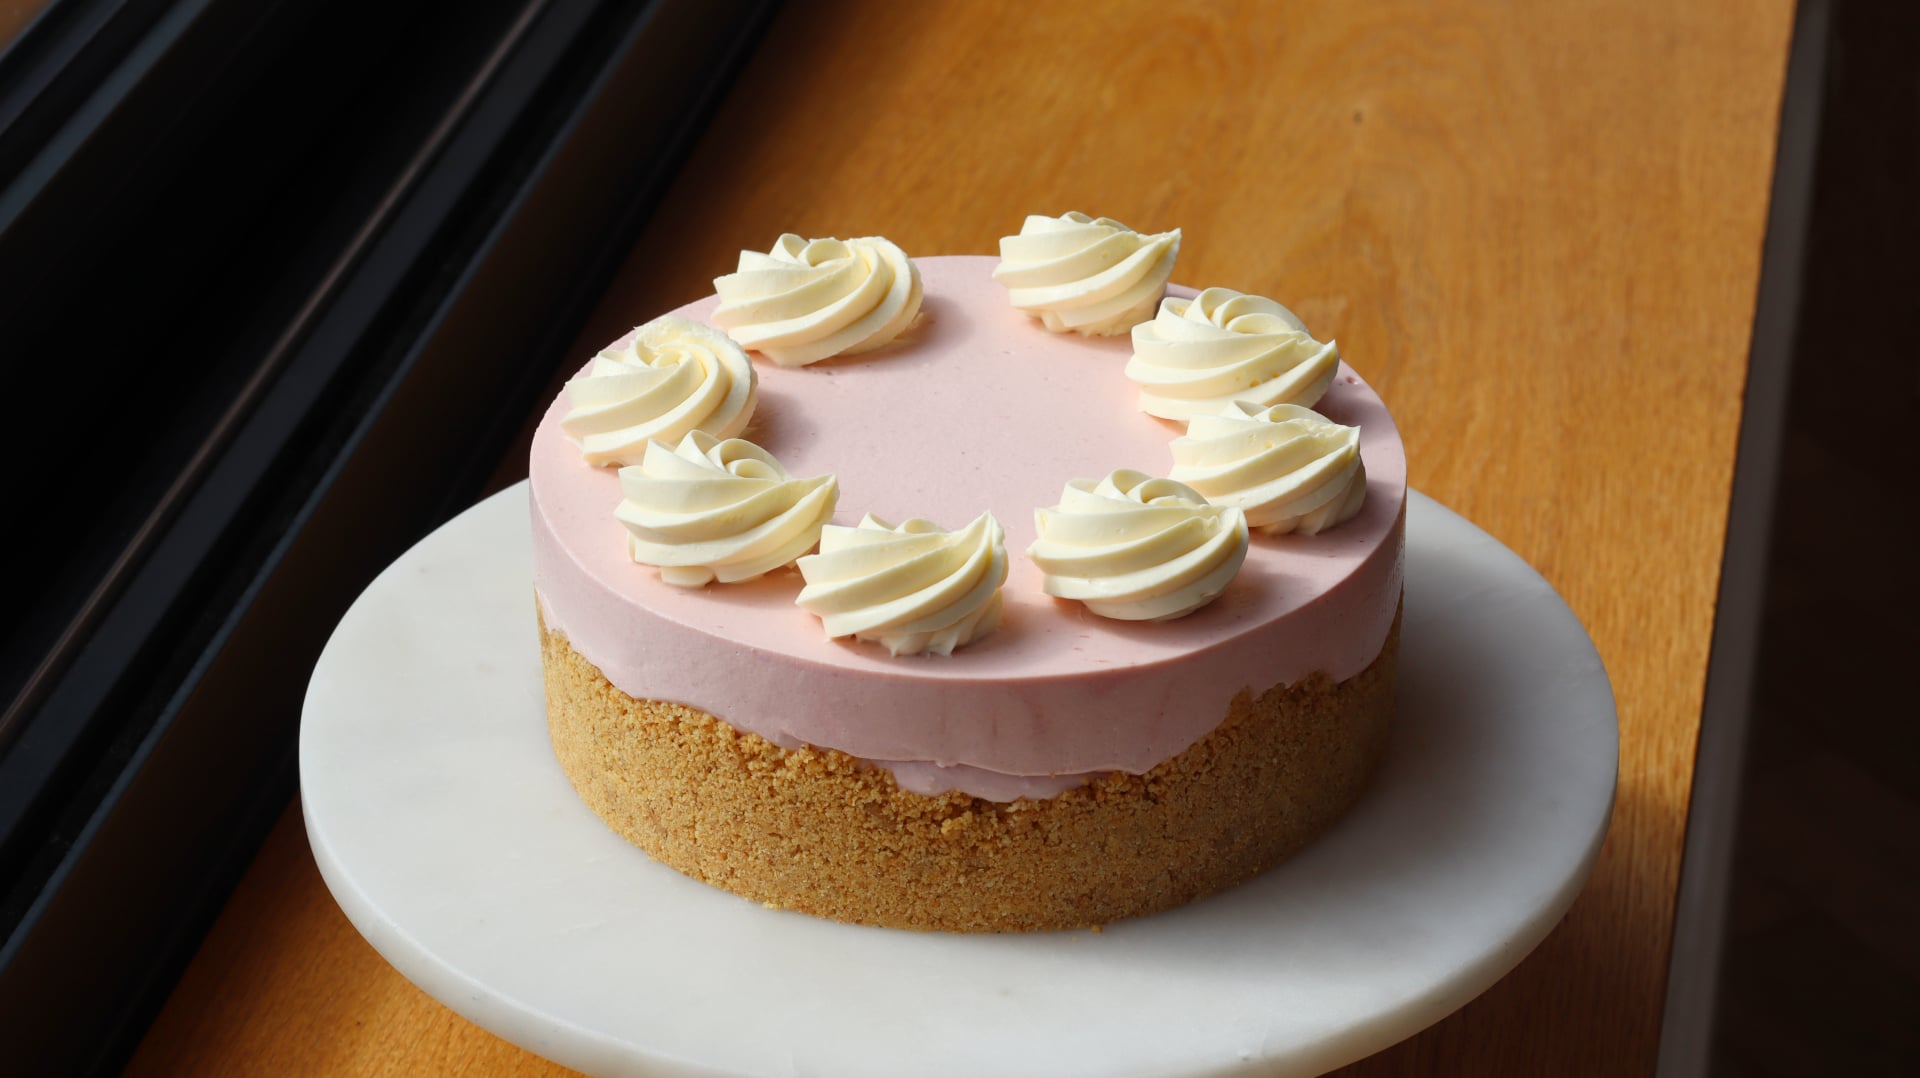
Everyone needs a foolproof, no-bake strawberry cheesecake recipe, and this one is quick to make with a smooth and creamy texture. It’s a simple biscuit base teamed with a brightly coloured strawberry cheesecake filling, which holds its texture really well. We make it in a ring mold for a more professional finish, and pipe mascarpone cream on top for a final touch of elegance.
1
7-INCH CAKE
Ingredients
Makes 1 7-inch cake
Gelatin Mass
10g Powdered Gelatin (Platinum/Knox Bloom)
60g Cold Water
Biscuit Base
180g Digestives/Graham Crackers
70g Unsalted Butter, Melted
Pinch of Flakey Sea Salt
Zest ¼ Lemon
Strawberry Cheesecake
50g Gelatin Mass (or 2.5 gelatin leaves, any grade)
230g Strawberry Puree
125g Caster/White Sugar
500g Full Fat Cream Cheese
325g Double/Heavy Cream
Mascarpone Cream
300g Double/Heavy Cream, Divided
20g Gelatin Mass (or 1 gelatin leaf, any grade)
50g Mascarpone
30g White Chocolate
Special equipment
Hand blender
Food processor (optional)
18x6cm ring mold
Silicon mat
Digital thermometer
Stand mixer or Electric hand whisk
Blow torch or Heat gun
Piping bag
Star tip nozzle
Method
Gelatin Mass
1. Add the powdered gelatin and water to a small bowl and stir together to combine. Set this aside in the fridge to bloom for 15 minutes.
- 10g Powdered Gelatin (Platinum/Knox Bloom)
- 60g Cold Water
Mascarpone Cream
1. Into a tall measuring jug, add gelatin mass, white chocolate and mascarpone. Set this aside.
- 20g Gelatin Mass
- 30g White Chocolate
- 50g Mascarpone
2. Add 200g of the cream into a small saucepan and place it over a medium heat. Stir until the mixture is steaming then remove it from the heat and pour it into the measuring jug.
- 200g Double/Heavy Cream
3. Allow it to sit for 2 minutes before blending until smooth. Add in the remaining 100g of cream and blend again.
- 100g Double/Heavy Cream
4. Pour the mixture onto a baking tray and cover the surface with clingfilm. Refrigerate it for a minimum of 3 hours.
Biscuit Base
1. Into a blender, add the biscuits, and blend to a fine crumb. Pour these into a medium bowl.
- 180g Digestives/Graham Crackers
2. Add the butter into a small saucepan and stir until melted.
- 70g Unsalted Butter
3. Add the salt and lemon to the bowl, then stir in the melted butter, starting with about half and stirring just until the mixture is sticking together. You don’t want it to be too soggy.
- Pinch of Flakey Sea Salt
- Zest ¼ Lemon
4. Line a baking sheet with a silicon mat and place a 18x6cm ring mold in the centre.
5. Line the tart ring with the biscuits, starting with the sides so they go up about halfway up the side of the ring, then fill in the base. Ensure it is quite thin and smooth. We don’t want an overly thick base/sides so if there is any left over you can eat it!
6. Set this in the freezer while you make the cheesecake filling.
Strawberry Cheesecake
1. Into a small saucepan, add the strawberry puree and gelatin mass. Stir this over a low heat until the gelatin mass has melted. It should be around 50/60C (122-140F). If it doesn’t get warm enough the gelatin won’t melt and you will get chunks! If you are using gelatin leaves, just soak them in cold water until soft, then add them to the pan along with the puree and heat until melted as above. Set the pan aside to cool, it needs to be around 40C/104F when we use it, or just above body temp.
- 50g Gelatin Mass (or 2.5 gelatin leaves, any grade)
- 230g Strawberry Puree
2. Into the bowl of a stand mixer or a large bowl if using an electric hand mixer, add the cream cheese and sugar and beat for a minute until smooth.
- 125g Caster/White Sugar
- 500g Full Fat Cream Cheese
3. Add in the cooled strawberry mixture and beat again until combined, scraping down the bowl as needed.
4. Add the cream into the bowl of a stand mixer or a large bowl if using an electric hand whisk, and whisk to medium/soft peaks.
- 325g Double/Heavy Cream
5. Working quickly as the cheesecake mixture will be beginning to thicken as the gelatin activates, fold the cream in, in two parts.
6. Remove the chilled base from the freezer and pour the cheesecake mixture in, right to the top. Use a palette knife to smooth it, so it is flush with the top of the ring mold. Refrigerate the cheesecake for 3 hours.
Assembly
1. Once chilled remove it from the fridge and lift it onto your serving plate. Use a blow torch or heat gun to gently warm the sides of the ring mold and carefully lift it off.
2. Remove the chilled mascarpone cream from the fridge and add it to the bowl of a stand mixer fitted with a whisk attachment (or a large bowl if using an electric hand whisk). Whisk it until it reaches a medium peak, then add it into a piping bag fitted with an open star tip nozzle.
3. Pipe 6 swirls around the outside of the cheesecake and then serve.
Shop the Equipment


Elevated Strawberry Cheesecake
TIER 2
Elevated Strawberry Cheesecake
Taking inspiration from a modern Fraisier cake, this cheesecake has a fun, but slightly tricky design, made by “wrapping” a smooth cream around the outside using acetate. The cheesecake is frozen for a short time, so we also look at how to adjust the ingredients in the cheesecake mixture to help ensure a smooth, and ice-free texture! Excuse my slightly unique way to create the shape – I’m open to any alternative suggestions!
1
7-INCH CAKE
Ingredients
Makes 1 7-inch cheesecake
Gelatin Mass
10g Powdered Gelatin (Platinum/Knox Bloom)
60g Cold Water
Mascarpone Cream
300g Double/Heavy Cream, Divided
20g Gelatin Mass (or 1 gelatin leaf, any grade)
50g Mascarpone
30g White Chocolate
Genoise Sponge
220g Whole Eggs
130g Caster/White Sugar
30g Unsalted Butter, Melted
Zest ¼ Lemon
125g Plain/All-Purpose Flour
Pinch of Salt
Strawberry Cheesecake
50g Gelatin Mass (or 2.5 gelatin leaves, any grade)
230g Strawberry Puree
125g Caster/White Sugar
35g Invert Sugar/Trimoline
550g Full Fat Cream Cheese
325g Double/Heavy Cream
Pinch of Salt
2 Tbsp Strawberry Jam To Fill
Fresh Strawberries To Decorate
Special equipment
Hand blender
39x27cm baking tray
Silicon mat
Electric hand whisk
Stand mixer (optional)
Digital thermometer
18x6cm ring mold
Acetate
Blow torch or Heat gun
Pastry rods (optional)
Method
Gelatin Mass
1. Add the powdered gelatin and water to a small bowl and stir together to combine. Set this aside in the fridge to bloom for 15 minutes.
- 10g Powdered Gelatin (Platinum/Knox Bloom)
- 60g Cold Water
Mascarpone Cream
1. Into a tall measuring jug, add gelatin mass, white chocolate and mascarpone. Set this aside.
- 20g Gelatin Mass
- 30g White Chocolate
- 50g Mascarpone
2. Add 200g of the cream into a small saucepan and place it over a medium heat. Stir until the mixture is steaming then remove it from the heat and pour it into the measuring jug.
- 200g Double/Heavy Cream
3. Allow it to sit for 2 minutes before blending until smooth. Add in the remaining 100g of cream and blend again.
- 100g Double/Heavy Cream
4. Pour the mixture onto a baking tray and cover the surface with clingfilm. Refrigerate it for a minimum of 3 hours.
Genoise Sponge
1. Preheat the oven to 175C non-fan assisted (160C/320F fan assisted). Take a 39x27cm baking tray, lightly grease it with butter and line it neatly with parchment paper.
2. For the sponge, add the eggs, sugar & lemon zest into a medium bowl and place it over a pan of gently simmering water.
- 220g Whole Eggs
- 130g Caster/White Sugar
- Zest ¼ Lemon
3. Using a hand whisk, whisk them together until they reach 40C/104F on a digital thermometer.
4. Remove it from the heat and add the mixture to the bowl of a stand mixer, fitted with a whisk attachment (or a medium bowl if using an electric hand whisk)
5. Whisk on a medium-high speed for 3-5 minutes, or until the mixture is thick and holds a ribbon when you drizzle it from the whisk.
6. Remove the bowl from the stand mixer and sift over the flour and salt.. Fold this together, being as gentle as possible until there are no more lumps of flour.
- 125g Plain/All-Purpose Flour
- Pinch of Salt
7. Take a small portion of the batter and add it into a bowl. Pour in the melted butter and fold this mixture together so there are no streaks of butter.
- 30g Unsalted Butter, Melted
8. Add this back into the main bowl and fold it through to incorporate.
9. Pour the mixture onto the lined baking tray and spread it out evenly with an offset spatula.
10. Bake it in the oven for 15 minutes, then remove it and allow it to cool completely.
Strawberry Cheesecake
1. Into a small saucepan, add the strawberry puree. Place the entire pan onto a tared scale and note the weight.
- 230g Strawberry Puree
2. Place it over a medium low heat and stir it occasionally, until the puree has reduced by 85g (from 230g to 145g). You can do this by placing the pan back on the tared scale as you are cooking it to see how much the weight has reduced by.
3. Remove it from the heat and stir in the gelatin mass until it has completely melted. Set the pan aside to cool, it needs to be around 40C/104F when we use it, or just above body temp.
- 50g Gelatin Mass (or 2.5 gelatin leaves, any grade)
4. Into the bowl of a stand mixer or a large bowl if using an electric hand mixer, add the cream cheese, invert sugar and caster/white sugar and beat for a minute until smooth.
- 125g Caster/White Sugar
- 550g Full Fat Cream Cheese
- 35g Invert Sugar/Trimoline
5. Add in the cooled strawberry mixture and beat again until combined, scraping down the bowl as needed.
6. Add the cream into the bowl of a stand mixer or a large bowl if using an electric hand whisk, and whisk to medium/soft peaks.
- 325g Double/Heavy Cream
7. Working quickly as the cheesecake mixture will be beginning to thicken as the gelatin activates, whisk in the first half of cream, then fold the remaining cream in with a spatula until smooth. Right at the end fold through a pinch of salt.
- Pinch of Salt
Assembly
1. Take a 18x6cm ring mold and cut a disc of the genoise sponge and lift it onto a baking tray lined with a silicon mat.
2. Spread the strawberry jam across the sponge and place the rind mold around the outside.
- 1-2 Tbsp Strawberry Jam
3. Scoop the cheesecake mixture into the ring mold, pressing it in firmly with a spatula to remove any air pockets. Fill the ring mold right to the top then flatten it with a warm spatula so that it is flush with the ring mold.
4. Place it into the freezer for 2 hours.
5. Just before it is chilled, cut a piece of acetate so that it is long enough to wrap around the outside of the cheesecake and about ½” taller.
6. Remove the chilled mascarpone cream from the fridge and add into the bowl of a stand mixer fitted with a whisk attachment (or a medium bowl if using an electric hand whisk). Whisk to a medium soft peak.
7. Lay the acetate flat on your work surface (it can help to oil the surface slightly so it sticks in place) and use a palette knife to spread the cream evenly across the acetate.
8. Remove the cheesecake from the freezer and gently heat the ring mold with a blow torch to remove it.
9. Carefully lift the acetate from the work surface and wrap the cream around the outside of the cheesecake. Once it is stuck on there you can’t really move it (!) so try and do this as carefully as possible the first time around.
10. This is where you have to get a little creative to create the ‘dents’ in the cream. I used a few skewers, rested against small cups to weigh down the outside edge of the acetate in different places, to create the indent. But feel free to use whatever you think might work! Your acetate might even be flexible enough that you can just press it into shape with your fingers.
11. Place it carefully back into the freezer for 30-60 minutes, just until the mascarpone cream has frozen and you can peel away the acetate cleanly without it ripping the cream.
12. Once it is ready, peel off the acetate and lift the cheesecake onto your serving plate.
13. Slice some strawberries and place them in the centre of the cheesecake. For evenly sized strawberries, first trim off the tops. Then place each strawberry between two pastry rods set to around 10–12mm high and carefully slice off the base. This creates strawberries with a flat top and bottom, all at a consistent height, so they sit neatly and evenly inside the cheesecake.
14. To make the strawberries glossy, you can brush them with a little bit of nappage or melted marmalade jam (with a splash of water).
15. Allow the cheesecake to defrost for around 30 minutes at room temperature before serving (you can check it has thawed by inserting a skewer into the centre and checking there is no resistance).
Shop the Equipment

Jaffa Cakes
TIER 1
Jaffa Cakes
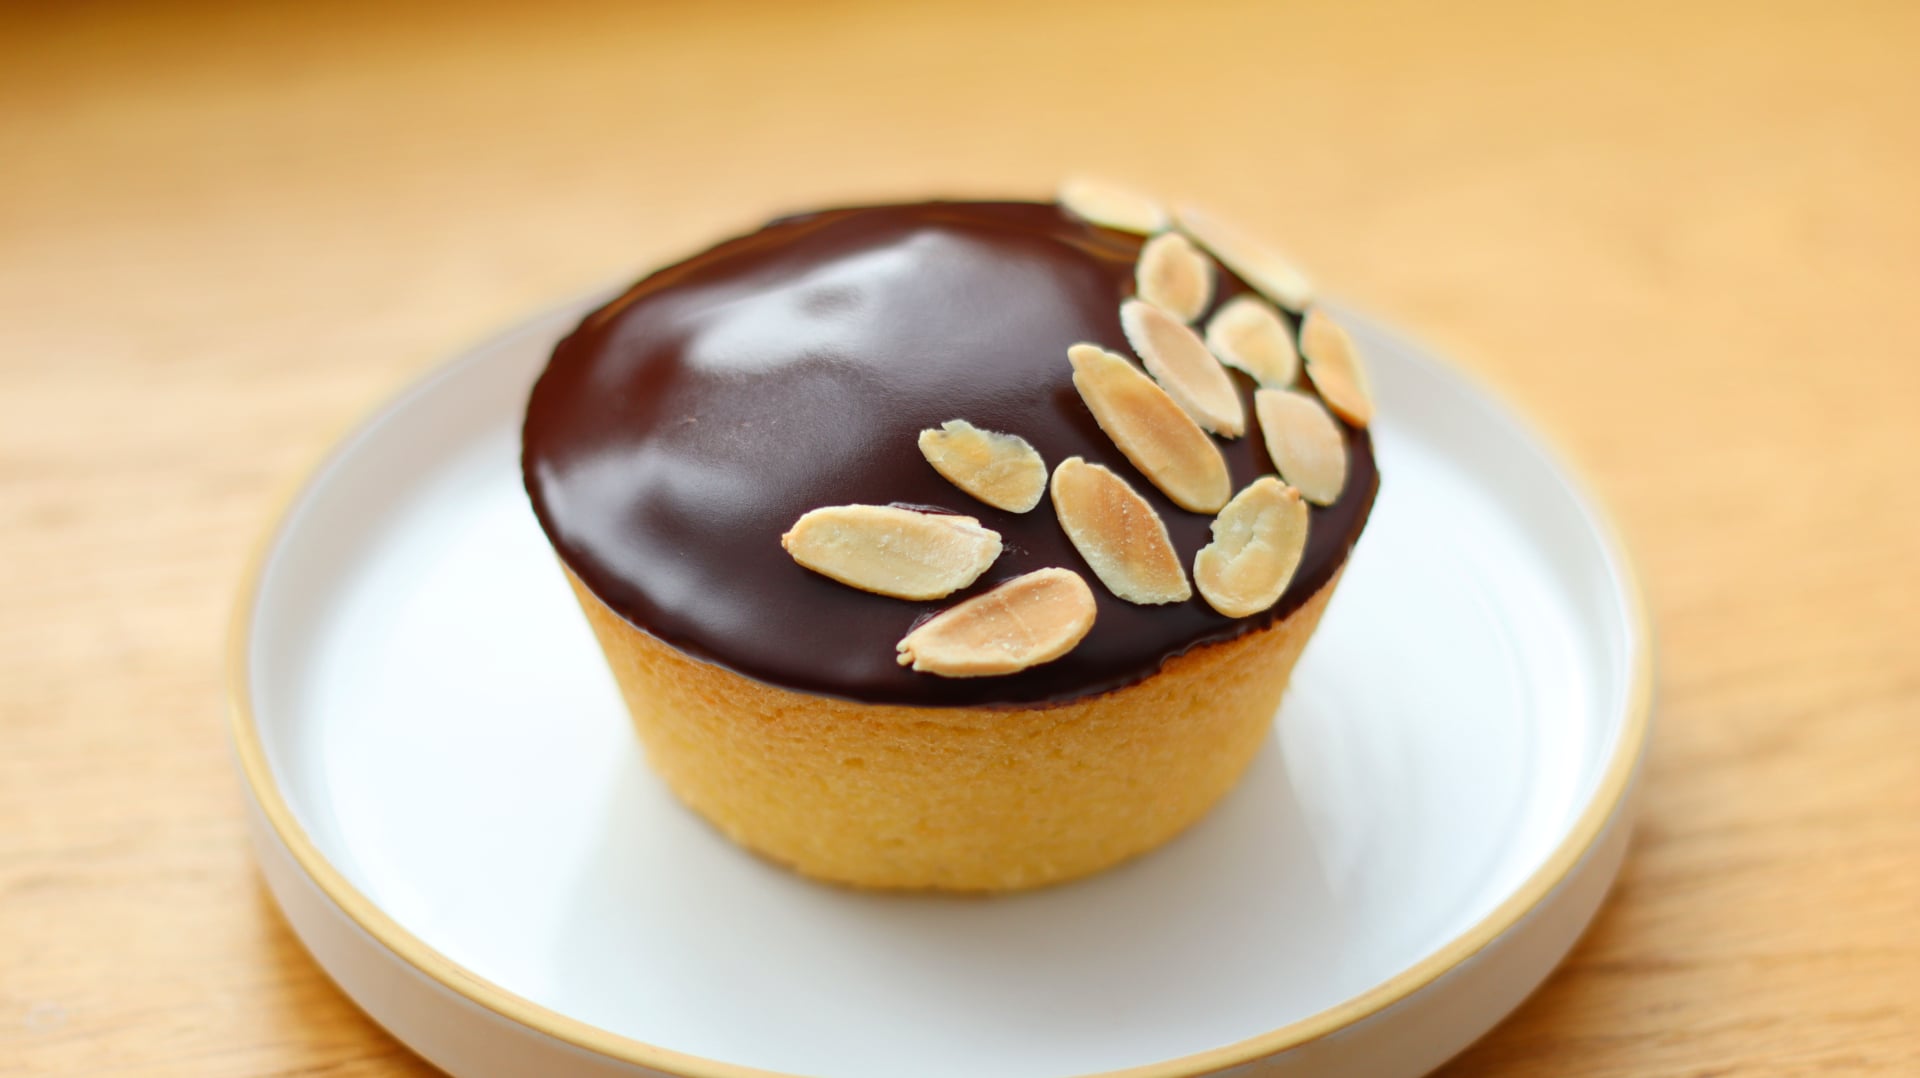
This recipe was heavily inspired by a cake I had at Ottolenghi’s bakery in London, where they sell a gluten-free orange and almond cake. I’ve never been able to find the recipe, so this is my attempt at trying to recreate it. A slightly more advanced take on a Jaffa Cake, it has a soft brown butter financier, filled with an bright orange compote and finished with a glossy chocolate glaze. It may look simple, but the combination of textures and the depth from the brown butter take it to another level.
6
INDIVIDUAL CAKES
Ingredients
Makes 6 individual cakes
Orange Compote
80g Orange Peel
330g Orange Segments
100g Caster/White Sugar
5g Pectin NH
5g Lemon Juice
Brown Butter & Orange Financier
260g Unsalted Butter
230g Egg Whites
4g Orange Zest
215g Powdered/Icing Sugar
110g Self Raising Flour (or 110g Plain/All-Purpose Flour + 1 Tsp Baking Powder)
115g Ground Almonds
1g Fine Sea Salt
Chocolate Glaze
125g Dark Chocolate, 70% Cocoa Solids
12g Honey
8g Water
37g Unsalted Butter
Toasted Flaked Almonds To Garnish
Special equipment
Food processor
Jumbo muffin tin
Piping bags
Method
Orange Compote
1. Cut the oranges into quarters and remove the segments from the peel.
2. Cut the segments into chunks and add the required amount into a saucepan.
-
- 330g Orange Segments
3. Cut the peels into small chunks and add this into the pan.
-
- 80g Orange Peel
4. Place it onto a medium heat.
5. Meanwhile, whisk together the sugar and pectin and set it aside.
-
- 100g Caster/White Sugar
- 5g Pectin NH
6. Cook the orange mixture for about 3-5 minutes, until the segments have started to break down.
7. Whisk in the sugar mixture and cook it for a further 1-2 minutes, ensuring it reaches a boil.
8. Remove the pan from the heat and stir in the lemon juice.
-
- 5g Lemon Juice
9. Pour the entire mixture into a large food processor and blend briefly – about 10 seconds.
10. Pass the mixture through a sieve, onto a baking tray, scraping the bottom of the sieve to catch all of the compote.
11. Press a sheet of clingfilm on the surface and chill for 2-3 hours or overnight.
Brown Butter Orange Financier
1. Preheat the oven to 160C/320F non-fan assisted (145C/295F fan assisted). Lightly grease a jumbo muffin tin with butter and coat the inside with flour, tipping out any excess.
2. Into a small saucepan, add the unsalted butter. Place the pan over a medium heat.
-
- 260g Unsalted Butter
3. Continue to cook the mixture, whisking occasionally until it is a deep golden brown colour, and smells very nutty. Be careful not to burn it.
4. Immediately remove it from the heat and pour it into a clean bowl on a tared scale, and weigh 220g of brown butter. Set this aside to cool for 10-15 minutes.
5. Into a medium bowl, add the egg whites and whisk for 30 seconds until frothy.
-
- 230g Egg Whites
6. Tip in the sugar and orange zest and whisk again to combine. If the icing sugar is quite lumpy, sift it in.
-
- 4g Orange Zest
- 215g Powdered/Icing Sugar
7. Whisk in the self raising flour, ground almonds and salt until there are no streaks of flour.
-
- 110g Self Raising Flour (or 110g Plain/All-Purpose Flour + 1 Tsp Baking Powder)
- 115g Ground Almonds
- 1g Fine Sea Salt
8. Finally, pour in the cooled brown butter and whisk to combine.
9. Pour the batter equally into the prepared tin, just below ⅘ of each cavity.
10. Bake in the centre of the oven for 30 minutes or until an even golden brown colour.
11. Once baked, remove them from the oven, and allow them to cool in the tin for 30 minutes, then pop them out onto a wire cooling rack. The cakes are too soft to place straight onto a wire rack from the oven, so need to stay in the tin to hold their shape. Cool for a further 15-30 minutes.
12. Once cooled, use a small serrated knife to cut a hole out of the top of the financier. Keep the lid of the cake and set this aside.
13. Remove the orange compote from the fridge and briefly stir it to loosen it, then add it into a piping bag.
14. Pipe the compote into the hole in each cake, just to the top, then add the lid of cake back on top.
15. Place the cakes back in the fridge.
Chocolate Glaze
1. Into a small bowl, add all of the ingredients for the glaze.
-
- 125g Dark Chocolate, 70% Cocoa Solids
- 12g Honey
- 8g Water
- 37g Unsalted Butter
2. Place the bowl onto a pan of gently simmering water, and stir it with a spatula until it is smooth.
3. Immediately remove it from the heat and transfer it to a bowl that is just slightly bigger than your cake. If the bowl is too big, it will be difficult to get enough depth to the glaze to effectively dip it.
4. Remove the cakes from the fridge and immediately dip them into the glaze. Flip them upside down and then set them on a wire rack.
5. The glaze can appear slightly bumpy so if you want a really smooth finish you will need to do a second dip of the glaze.
6. Place the cakes in the fridge or freezer just briefly to set the glaze on top so it is no longer wet to the touch.
7. Warm the glaze back up over a bain marie, transfer if back into the small bowl, and dip the cakes a second time.
8. Let the glaze set for 5-10 minutes, then sprinkle some toasted flaked almonds on top to finish.
Shop the Equipment
Orange Blossom Cake
TIER 2
Orange Blossom Cake
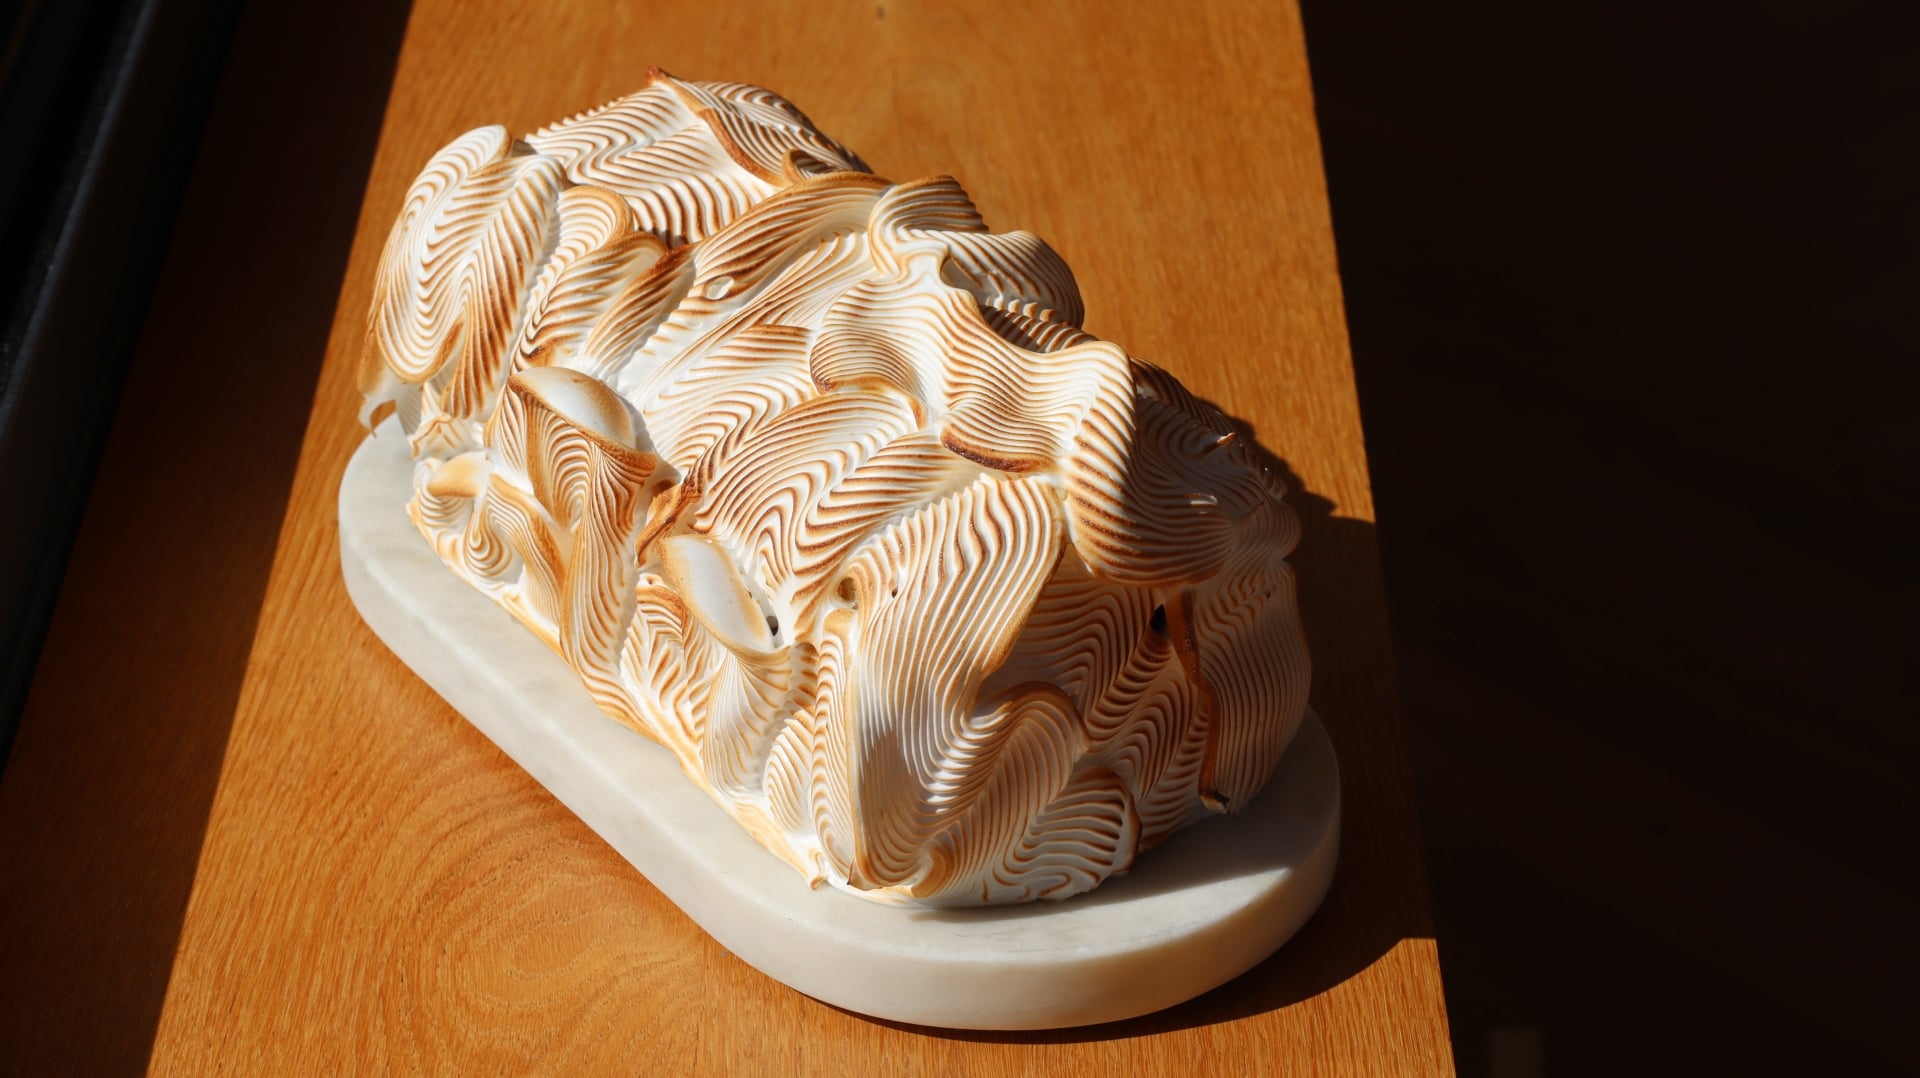
For this recipe we use a different style of brown butter sponge, layered with a 55% chocolate crémeux and the same orange compote from Tier 1. The real standout for me is the orange blossom meringue that coats the outside. Using a 789 nozzle creates the most dramatic design. It’s a real showstopper, and so satisfying to pipe!
1
CAKE
Ingredients
Makes 8-10 servings
Orange Compote
80g Orange Peel
330g Orange Segments
100g Caster/White Sugar
5g Pectin NH
5g Lemon Juice
55% Chocolate Cremeux
200g Dark Chocolate, 55% Cocoa Solids
120g Whole Eggs
150g Whole Milk
150g Double/Heavy Cream
Pinch of Flaked Sea Salt
Brown Butter Sponge
120g Unsalted Butter + Warm Water*
205g Caster/White Sugar
4g Orange Zest
2g Fine Sea Salt
205g Cake or Plain/All-Purpose Flour
13g Baking Powder
205g Whole Eggs
95g Vegetable Oil
70g Whole Milk
Orange Blossom Meringue
125g Egg Whites
80g Water
345g Caster/White Sugar
½ Tsp Orange Blossom
Beans From ½ Fresh Vanilla Pod
Special equipment
Food processor
Digital thermometer
39x27cm baking tray
Piping bags
Stand mixer
789 basket weave nozzle
Blow torch
Method
Orange Compote
1. Cut the oranges into quarters and remove the segments from the peel.
2. Cut the segments into chunks and add the required amount into a saucepan.
-
- 330g Orange Segments
3. Cut the peels into small chunks and add this into the pan.
-
- 80g Orange Peel
4. Place it onto a medium heat.
5. Meanwhile, whisk together the sugar and pectin and set it aside.
-
- 100g Caster/White Sugar
- 5g Pectin NH
6. Cook the orange mixture for about 3-5 minutes, until the segments have started to break down.
7. Whisk in the sugar mixture and cook it for a further 1-2 minutes, ensuring it reaches a boil.
8. Remove the pan from the heat and stir in the lemon juice.
-
- 5g Lemon Juice
9. Pour the entire mixture into a large food processor and blend briefly.
10. Pass the mixture through a sieve, onto a baking tray, scraping the bottom of the sieve to catch all of the compote.
11. Press a sheet of clingfilm on the surface and chill for 2-3 hours or overnight.
55% Chocolate Cremeux
1. Chop the chocolate into small pieces and add this into a tall measuring jug.
-
- 200g 55% Dark Chocolate
2. Into a medium bowl, add the cream, milk and eggs. Place this over a pan of gently simmering water.
-
- 120g Whole Eggs
- 150g Whole Milk
- 150g Double/Heavy Cream
3. Whisk the mixture constantly until it reaches around 82C/179F on a digital thermometer.
4. Immediately remove it from the heat and pass it through a sieve, over the chocolate.
5. Let it sit for 2 minutes, then blend with a hand blender until smooth. Add in a big pinch of the flaked sea salt and stir it through.
-
- Flaked Sea Salt
6. Pour the mixture onto a baking tray and cover the surface with cling film. Refrigerate for 2-3 hours until it is a more pipeable consistency. If chilled for longer, it might need to sit at room temperature to warm up slightly before being used.
Brown Butter Sponge
1. Preheat your oven to 190C/375F non-fan assisted. Lightly grease a 39x27cm baking tray and line it with parchment paper. Set this to one side.
2. Place the butter into a saucepan and melt it over a medium heat. Cook it for 3-5 minutes, whisking occasionally until it reaches a deep nutty colour and smells very fragrant.
-
- 120g Unsalted Butter
3. Immediately remove it from the heat, and pour it into a clean bowl, set on a tared scale. Take the weight of butter and add whisk in enough warm water to bring the weight back up to 120g. It will be roughly 20-30g of warm water. Don’t use cold water or it will cause chunks of the butter to solidify. Allow this to cool for 10 minutes.
4. In a large bowl, add the sugar and massage through the orange zest for a minute with your fingertips.
-
- 205g Caster/Superfine Sugar
- 4g Orange Zest
5. Sift in the remaining dry ingredients and whisk to combine.
-
- 2g Fine Sea Salt
- 205g Cake or Plain/All-Purpose Flour
- 13g Baking Powder
6. In a separate jug, whisk together the eggs, oil & milk. Then, while whisking the dry ingredients, pour in the wet mixture. Mix everything until the wet & dry ingredients are evenly combined, scraping down the bowl to ensure everything is mixed in. Be careful not to overbeat the mixture.
-
- 205g Whole Eggs
- 95g Vegetable Oil
- 70g Whole Milk
7. Finally, pour in the cooled brown butter and mix the batter slowly until everything is evenly combined.
8. Pour the cake batter into the lined tray, and bake in the centre of the oven. Bake for around 20 minutes, or until the sponge is an even golden brown colour.
9. Remove the sponge from the oven and allow it to cool for 30 minutes.
Assembly Part 1
1. Flip it out of the tray and onto a large piece of parchment or a silicon mat.
2. Cut the sponge into 3 even rectangles using a sharp serrated knife. You can probably get 4 rectangles, but I prefer to do 3 smaller rectangles and keep the rest to snack on, otherwise the cake is too tall.
3. Lift the sponges onto a baking tray lined with parchment.
4. Remove the chocolate cremeux from the fridge and add it into a piping bag. It should be a nice pipeable texture.
5. On two of the sponges, pipe a border of the cremeux, then pipe two parallel lines down the centre, leaving two gaps for the compote.
6. Remove the compote from the fridge and add this into a piping bag.
7. Fill the gaps with the compote. The cremeux will act as a border to keep the compote in place. Place the sponges into the freezer for 30 minutes so the cremeux firms up slightly so that it has more strength once you stack it.
8. Once chilled, stack the filled sponges, then top with the final unfilled sponge, golden side up. Fill in any gaps where the sponges have been stacked with the remaining cremeux, using a palette knife to smooth it. Place the entire cake back in the freezer while you make the meringue.
Orange Blossom Meringue
1. Into the bowl of a stand mixer fitted with a whisk attachment, add the egg whites and whisk on a medium low speed.
-
- 125g Egg Whites
2. Meanwhile, add the water and sugar to a small saucepan and place it over a medium heat.
-
- 80g Water
- 345g Caster/White Sugar
3. Continue to cook the sugar syrup until it reaches 118C/244F on a digital thermometer. Immediately remove it from the heat and slowly pour it over the whisking egg whites (increase to medium speed), which at this point, should be foamy.
4. Once you have added all of the sugar syrup, whisk on medium high speed for 5-7 minutes, or until the meringue is stiff and the bowl is cool to the touch.
5. Finally, add in the orange blossom and fresh vanilla beans, and whisk to incorporate. Taste it to see if you want more orange blossom.
-
- ½ Tsp Orange Blossom
- Beans From ½ Fresh Vanilla Pod
6. Add the meringue to a piping bag fitted with a 789 basket weave nozzle.
7. Remove the cake from the freezer and lift it onto a tray with two ring molds underneath (or anything to prop it up).
8. Pipe the meringue in a wavy pattern all over the cake so that it is completely covered.
9. Finally, blow torch the meringue to finish. Carefully lift it off of the ring molds with a large palette knife and onto your serving plate. Allow it to come to room temperature for 30-60 minutes before serving.
Shop the Equipment

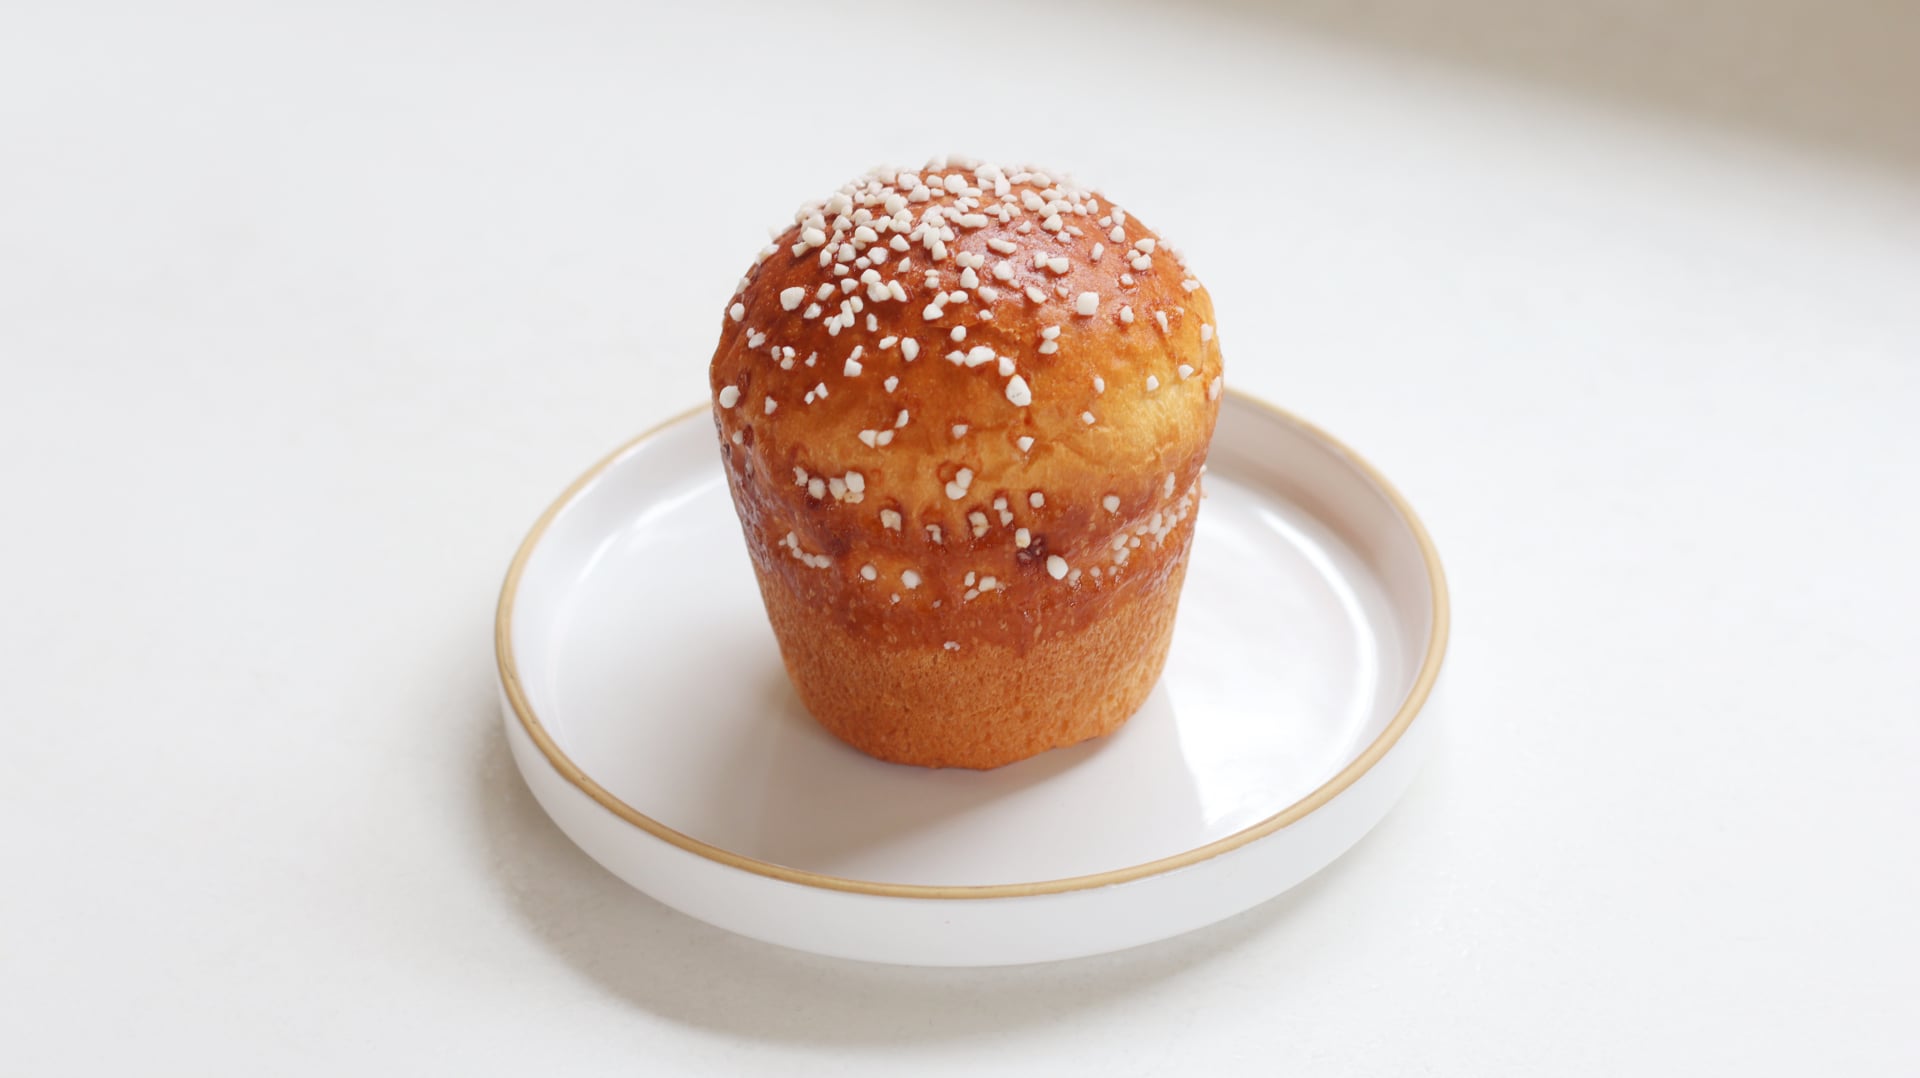
Sugar Brioche
TIER 1
Sugar Brioche
In Tier 1 we tackle the fundamentals of the dough. It’s not overly enriched so it’s nice and easy to handle, and the addition of a yudane gives it extra bounce and structure, resulting in a beautifully soft, springy finish. The buttery crumb and bursts of sweetness from the pearl sugar on top make it an amazing breakfast pastry. I like mine served warm with a little butter and jam.
10-12
INDIVIDUAL BRIOCHE
Ingredients
Makes 10-12 individual brioche
Yudane
50g Boiling Water
50g Strong White Bread Flour
Brioche Dough
150g Whole Eggs
100g Whole Milk
420g Strong White Bread Flour
12g Fine Sea Salt
40g White Sugar
6g Instant Dry Yeast or 12g Fresh Yeast
140g Unsalted Butter, Cubed (Remove from the fridge 15 minutes before)
Egg Wash
30g Egg Yolk
30g Double/Heavy Cream
Pearl Sugar To Decorate
Special equipment
Stand mixer
Muffin tin (I use the Wilton 2105-9921 6-Cup Giant Muffin Pan)
Method
1. Into a small bowl, add 50g of strong white bread flour. Boil the water and pour this over the top, stirring it together to form a paste. Cover this and set it aside to cool for 1 hour (or 20 minutes in the fridge)
- 50g Strong White Bread Flour
- 50g Boiling Water
2. Into the bowl of a stand mixer, add the cooled Yudane (above) with the wet ingredients on top.
- 150g Whole Eggs
- 100g Whole Milk
3. Add the remaining dry ingredients on top and with the dough hook attached, knead for 8-10 minutes on a medium speed. The dough should be more cohesive in consistency, but the gluten will not have fully developed, so it will not be completely smooth.
- 420g Strong White Bread Flour
- 12g Fine Sea Salt
- 40g White Sugar
- 6g Instant Dry Yeast or 12g Fresh Yeast
4. Add the cubed butter, a few pieces at a time, waiting around 20 seconds in between each addition.
- 140g Unsalted Butter, Cubed
5. Once all the butter has been incorporated, knead for a further 1-2 minutes. By which point the dough should feel very smooth and elastic.
6. Remove the dough from the mixer and lift it onto your work surface. Shape it into a smooth ball, and lift it into a medium bowl which has been lightly oiled.
7. Place a sheet of cling film directly on the surface of the dough, and another around the bowl. Refrigerate the dough overnight. 12-16 hours.
8, The next day, remove the dough from the fridge and cut it into 95g pieces if using a jumbo muffin tin, or 65g pieces, if using a regular muffin tin. Note – you may need to lightly grease the tin with butter if you think it might stick. A non-stick cooking spray works really well for this. Alternatively, if you are using a regular muffin tin, you can use paper muffin liners.
9. Place the smooth side of dough down on the work surface and flatten it slightly. Fold the edges towards the centre, to create a dumpling-like shape.
10. Flip the dough over and with your hand cupped around in it in a ‘C’ shape, rotate the dough underneath your palm, to create tension, and a smooth ball.
11. Lift each dough ball into your tin.
12. Place the tray of dough balls into the oven, switched off, and place a small pot of boiling water in the corner, changing it every 30-45 minutes.
13. The dough will take 2-3 hours to proof. It is ready when it has doubled in size. For the jumbo tin, it will rise to about ⅔ of the tin, whereas in a regular muffin tray, it will balloon slightly above the rim of the tin.
14. Just before the dough has finished proofing, remove it from the oven and pre-heat it to 185C/365F non-fan assisted (170C/340F fan-assisted).
15. Whisk together the egg wash ingredients, then brush a light layer of egg wash over the top of each bun. Finally, add a generous sprinkling of pearl sugar on top.
16. Bake them in the oven for 25 minutes (jumbo muffin tin) or 18-20m if using a smaller muffin tin. They should be an even golden brown colour on top.
17. Remove the trays from the oven and allow the dough to cool for a minute before carefully lifting them out of the tray and onto a wire cooling rack. If they are not coming out, carefully run a knife around the outside of the dough, then tap the tray firmly on its side, and they should drop out.
18. They can be eaten warm or cooled to room temperature before serving.
Shop the Equipment


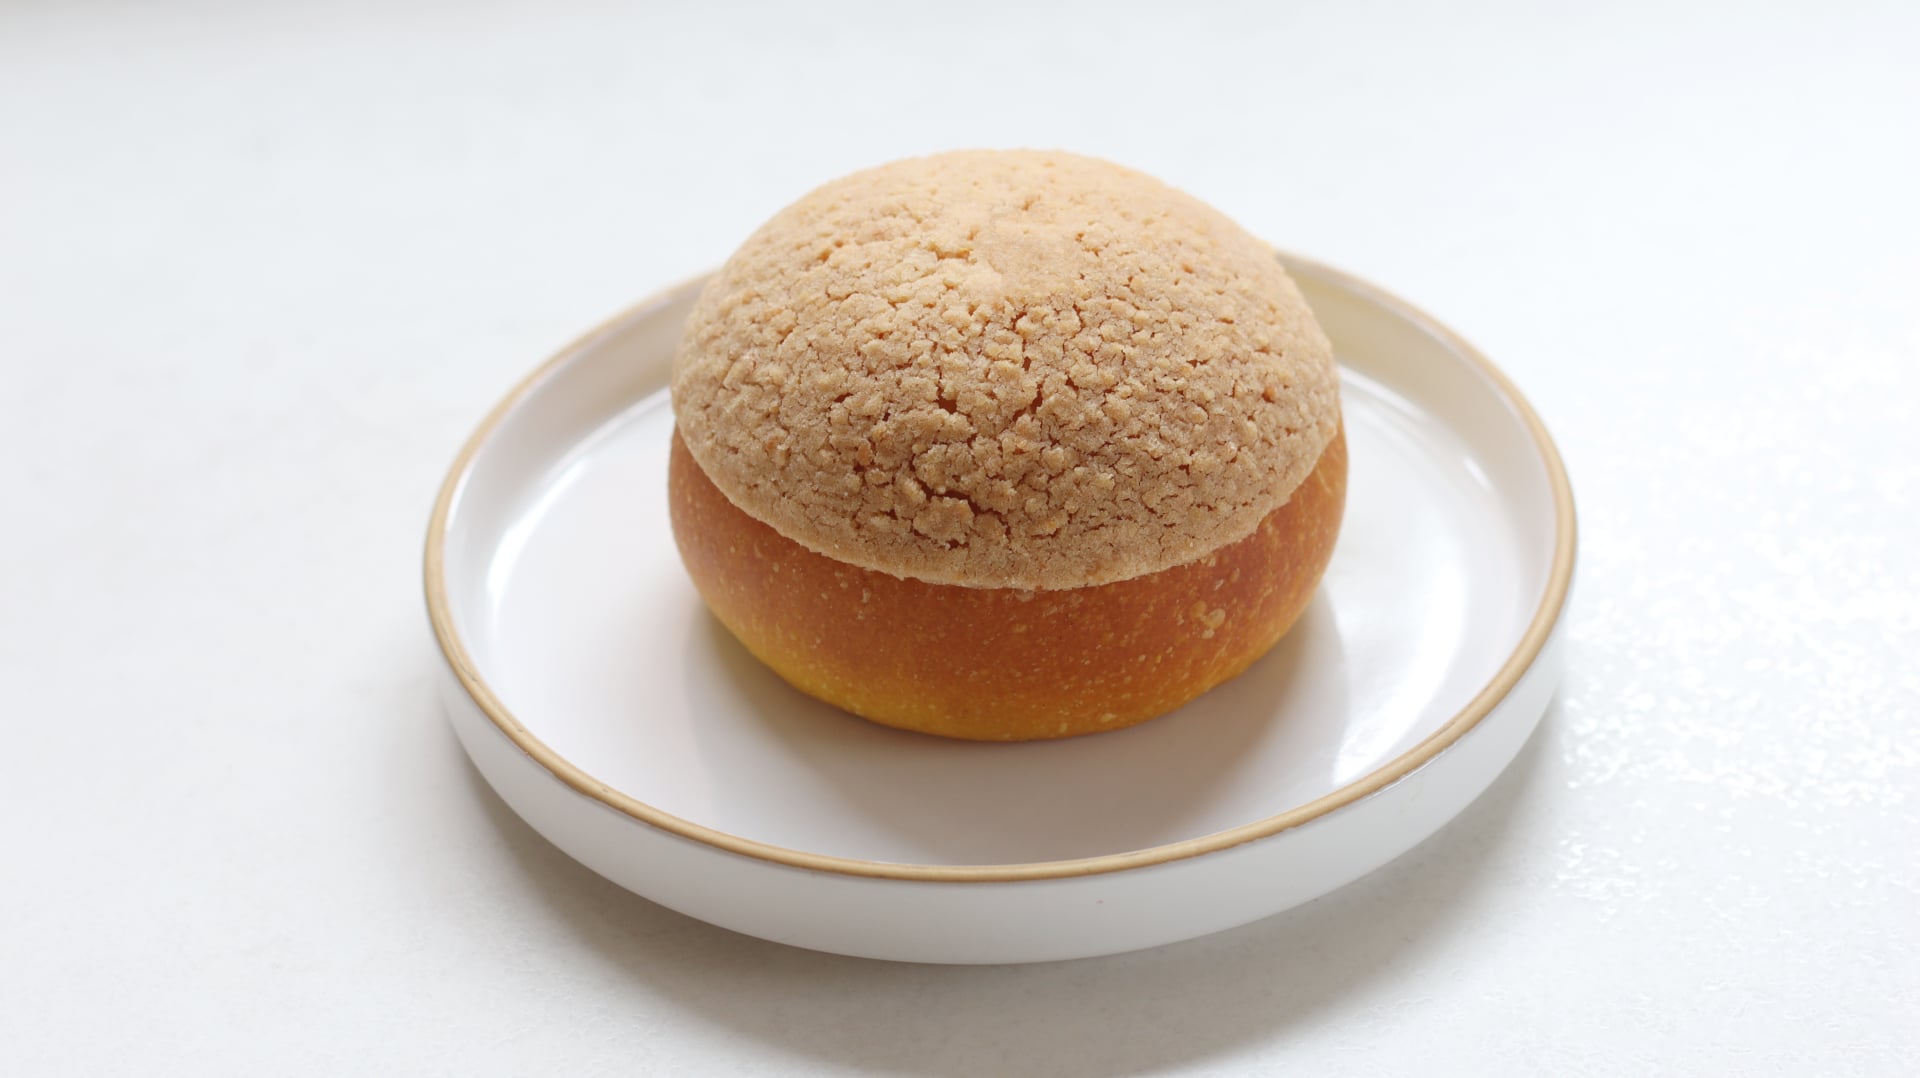
Brioche au Craquelin
TIER 2
Brioche Au Craquelin
In Tier 2 we follow the same technique for the dough as Tier 1. Then, similar to a concha, we top this brioche with a crisp craquelin layer (one we’ve made plenty of times during choux pastry month!). Just like with choux, it adds a sweet, crunchy texture while also helping control the bake, giving you a neat, professional finish. I show you how to fill the brioche with a simple raspberry compote, but feel free to get creative with your fillings!
14-16
INDIVIDUAL BRIOCHE
Ingredients
Makes 14-16 Individual Brioche
Yudane
50g Boiling Water
50g Strong White Bread Flour
Brioche Dough
150g Whole Eggs
100g Whole Milk
420g Strong White Bread Flour
12g Fine Sea Salt
40g White Sugar
6g Instant Dry Yeast or 12g Fresh Yeast
140g Unsalted Butter, Cubed (Remove from the fridge 15 minutes before)
Craquelin
75g Plain/All-Purpose Flour
75g Caster/White Sugar
75g Ground Almonds
85g Unsalted Butter, Cold & Cubed
1g Fine Sea Salt
Raspberry Compote
400g Raspberry Puree
40g Caster/White Sugar*
8g Pectin NH
10g Fresh Lemon Juice
Special equipment
Stand mixer
Silicon mats
7cm cookie cutter
Digital thermometer (optional)
Piping bag
Long cream filling piping tip
Method
Dough
1. Into a small bowl, add 50g of strong white bread flour. Boil the water and pour this over the top, stirring it together to form a paste. Cover this and set aside to cool for 1 hour (or 20 minutes in the fridge)
- 50g Strong White Bread Flour
- 50g Boiling Water
2. Into the bowl of a stand mixer, add the cooled Yudane (above) with the wet ingredients on top.
- 150g Whole Eggs
- 100g Whole Milk
3. Add the remaining dry ingredients on top and with the dough hook attached, knead for 8-10 minutes on a medium speed. The dough should be more cohesive in consistency, but the gluten will not have fully developed, so it will not be completely smooth.
- 420g Strong White Bread Flour
- 12g Fine Sea Salt
- 40g White Sugar
- 6g Instant Dry Yeast or 12g Fresh Yeast
4. Add the cubed butter, a few pieces at a time, waiting around 20 seconds in between each addition.
- 140g Unsalted Butter, Cubed
5. Once all the butter has been incorporated, knead for a further 1-2 minutes. By which point the dough should feel very smooth and elastic.
6. Remove the dough from the mixer and lift it onto your work surface. Shape it into a smooth ball, and lift it into a medium bowl which has been lightly oiled.
7. Place a sheet of cling film directly on the surface of the dough, and another around the bowl. Refrigerate the dough overnight. 12-16 hours.
Craquelin
1. Add all of the ingredients into the bowl of a stand mixer, and beat using the paddle attachment until it forms a smooth paste.
- 75g Plain/All-Purpose Flour
- 75g Caster/White Sugar
- 75g Ground Almonds
- 85g Unsalted Butter, Cold & Cubed
- 1g Fine Sea Salt
2. Scoop the mixture out and place it in between two large silicon mats (or pieces of parchment paper). Using a rolling pin, roll the dough to around 2-4mm thick. Place it in the freezer for at least 30 minutes.
3. Remove the dough from the freezer and working quickly, peel off the silicon mats/parchment paper and cut discs, using a 7cm/2.75” cookie cutter. Cut as many discs as possible and lift these onto a baking tray lined with a silicon baking mat. Place them back in the freezer until you need them.
4. You will need to re-roll the scraps of dough and then repeat steps 2-3 to cut enough discs. You will need around 16 in total.
Dough Continued
1. The next day, remove the dough from the fridge and cut it into 50g pieces.
2. Place the smooth side of dough down on the work surface and flatten it slightly. Fold the edges towards the centre, to create a dumpling-like shape.
3. Flip the dough over and with your hand cupped around in it in a ‘C’ shape, rotate the dough underneath your palm, to create tension, and a smooth ball.
4. Lift each dough ball onto a lined baking tray – you will need 2-3 trays. Depending on the size of the tray, you should be able to fit 6 per tray (or 8 if you have large baking trays) Ensure they have enough space to proof.
5. Place the trays into the oven, switched off, and place a small pot of boiling water in the corner, changing it every 30-45 minutes.
6. The dough will take 2-3 hours to proof. It is ready when it has doubled in size.
Raspberry Compote
1. Into a small bowl, whisk together the sugar and pectin and set aside.
- 40g Caster/White Sugar*
- 8g Pectin NH
2. Add the raspberry puree into a medium saucepan, and heat it to around 45C (or just until it is slightly warm), then tip in the sugar/pectin mixture.
- 400g Raspberry Puree
3. Whisk until the mixture comes to a boil, then remove it from the heat and whisk in the lemon juice.
- 10g Fresh Lemon Juice
4. Pour the mixture into a bowl, cover the surface with clingfilm, and refrigerate until needed. It will need a few hours to cool, so do this while the dough is proofing. Note – the amount of sugar will depend on the sweetness of your raspberries, so if you find the mixture is not sweet enough as it is cooking (have a little taste!), then you can add more.
Baking & Assembly
1. Just before the dough has finished proofing, remove the trays from the oven and preheat it to 185C/365F non-fan assisted (170C/340F fan-assisted). You may not be able to bake all the trays at once which is fine, just cover one of the trays with a tea towel while the first two trays bake.
2. Remove the discs of craquelin from the freezer and place them into the centre of each bun.
3. Bake them in the oven for 20 minutes. The craquelin should be an even golden brown colour on top.
4. Remove the trays from the oven and lift them straight onto a wire cooling rack, to cool for at least 30 minutes.
5. Once cooled, quickly whisk the raspberry compote together to smooth it, and place it into a piping bag with a long “cupcake filler” nozzle.
6. Pierce a hole in the base of the bun, and pipe some compote in. Flip the buns back over and serve.
Shop the Equipment


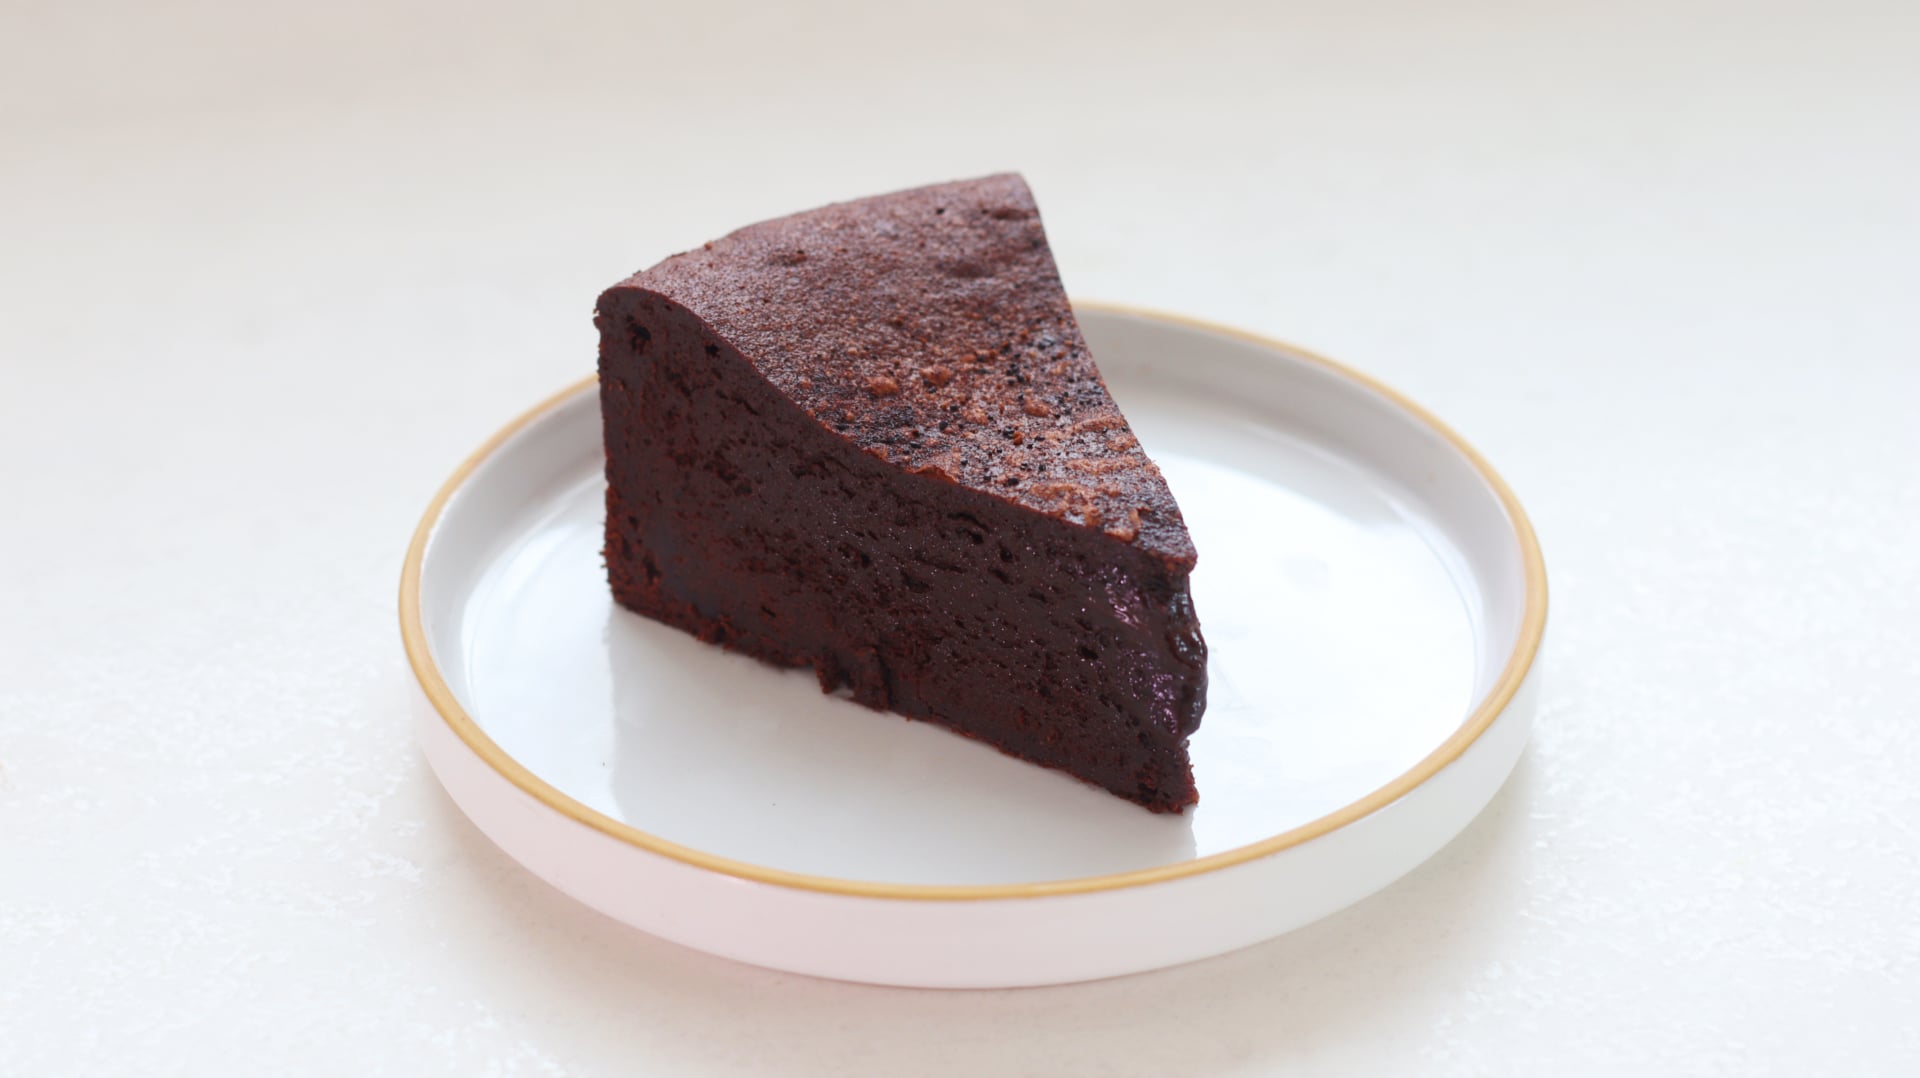
Chocolate Fondant Cake
TIER 1
Chocolate Fondant Cake
I love this dessert for how simple yet decadent it is, but my favourite part is how well it works as a make ahead option. During testing, I baked it, left it in the fridge overnight, then reheated it the next day and it still had an incredible gooey centre. Serve it simply with softly whipped vanilla cream.
8-10
SERVINGS
Ingredients
Makes 8-10 servings
300g Dark Chocolate (70% Cocoa Solids), Chopped
100g Milk Chocolate, Chopped
200g Unsalted Butter, Room Temperature
190g Caster/White Sugar
60g Light Brown Sugar
335g Whole Eggs
20g Egg Yolks
3g Flakey Sea Salt
90g Plain/All-Purpose Flour
15g Cocoa Powder
Special equipment
20cm/8” cake ring mold
Stand mixer or electric hand whisk
Method
1. Preheat the oven to 145C/295F non-fan assisted (130C/365 Fan). Take a 20cm/8” cake ring mold and lightly grease it with butter then dust the inside with cocoa powder. Tap out any excess.
2. Place this onto a piece of parchment paper, slightly scrunched around the edge of it so it hugs the cake ring slightly. Lift this onto a baking tray lined with a silicon baking mat.
3. Add the chopped chocolate to a medium bowl and place this over a pan of gently simmering water. Stir this occasionally until it is completely melted, then set this to one side to cool slightly.
- 300g Dark Chocolate (70% Cocoa Solids), Chopped
- 100g Milk Chocolate, Chopped
4. Into the bowl of a stand mixer, (or a large bowl if using an electric hand mixer), add the room temperature butter and sugars. Beat this on a medium speed with the paddle attachment for 3-4 minutes, or until thicker and paler in consistency. Scrape down the sides.
- 200g Unsalted Butter, Room Temperature
- 190g Caster/White Sugar
- 60g Light Brown Sugar
5. Slowly drizzle in the eggs (previously whisked together in a bowl) and scrape down the bowl a few times as you add the eggs to ensure the butter is fully incorporated. Don’t worry if once you add the eggs the mixture looks slightly split.
- 335g Whole Eggs
- 20g Egg Yolks
6. Pour in the slightly cooled chocolate mixture and mix just until it forms a smooth, chocolate batter.
7. Finally, sift in the flour and cocoa powder, and sprinkle over the salt. Stir this together with a spatula until there are no more dry ingredients.
- 3g Flakey Sea Salt
- 90g Plain/All-Purpose Flour
- 15g Cocoa Powder
8. Pour the batter into the prepared cake ring and spread it flat with a spatula.
9. Place it into the centre of the oven and bake for 45 minutes.
10. Once baked, remove it from the oven and allow it to cool for at least 30 minutes (this will give a very gooey consistency) or even longer. You can even refrigerate it, then place it back into a hot oven (200C/390F for 5 minutes) and then serve it. This will make the centre soft again (although not quite as soft as when you serve it the same day). This is best served with some freshly whipped cream.
Shop the Equipment

Chocolate Fondant with Strawberry Sorbet
TIER 2
Chocolate Fondant with Strawberry Sorbet
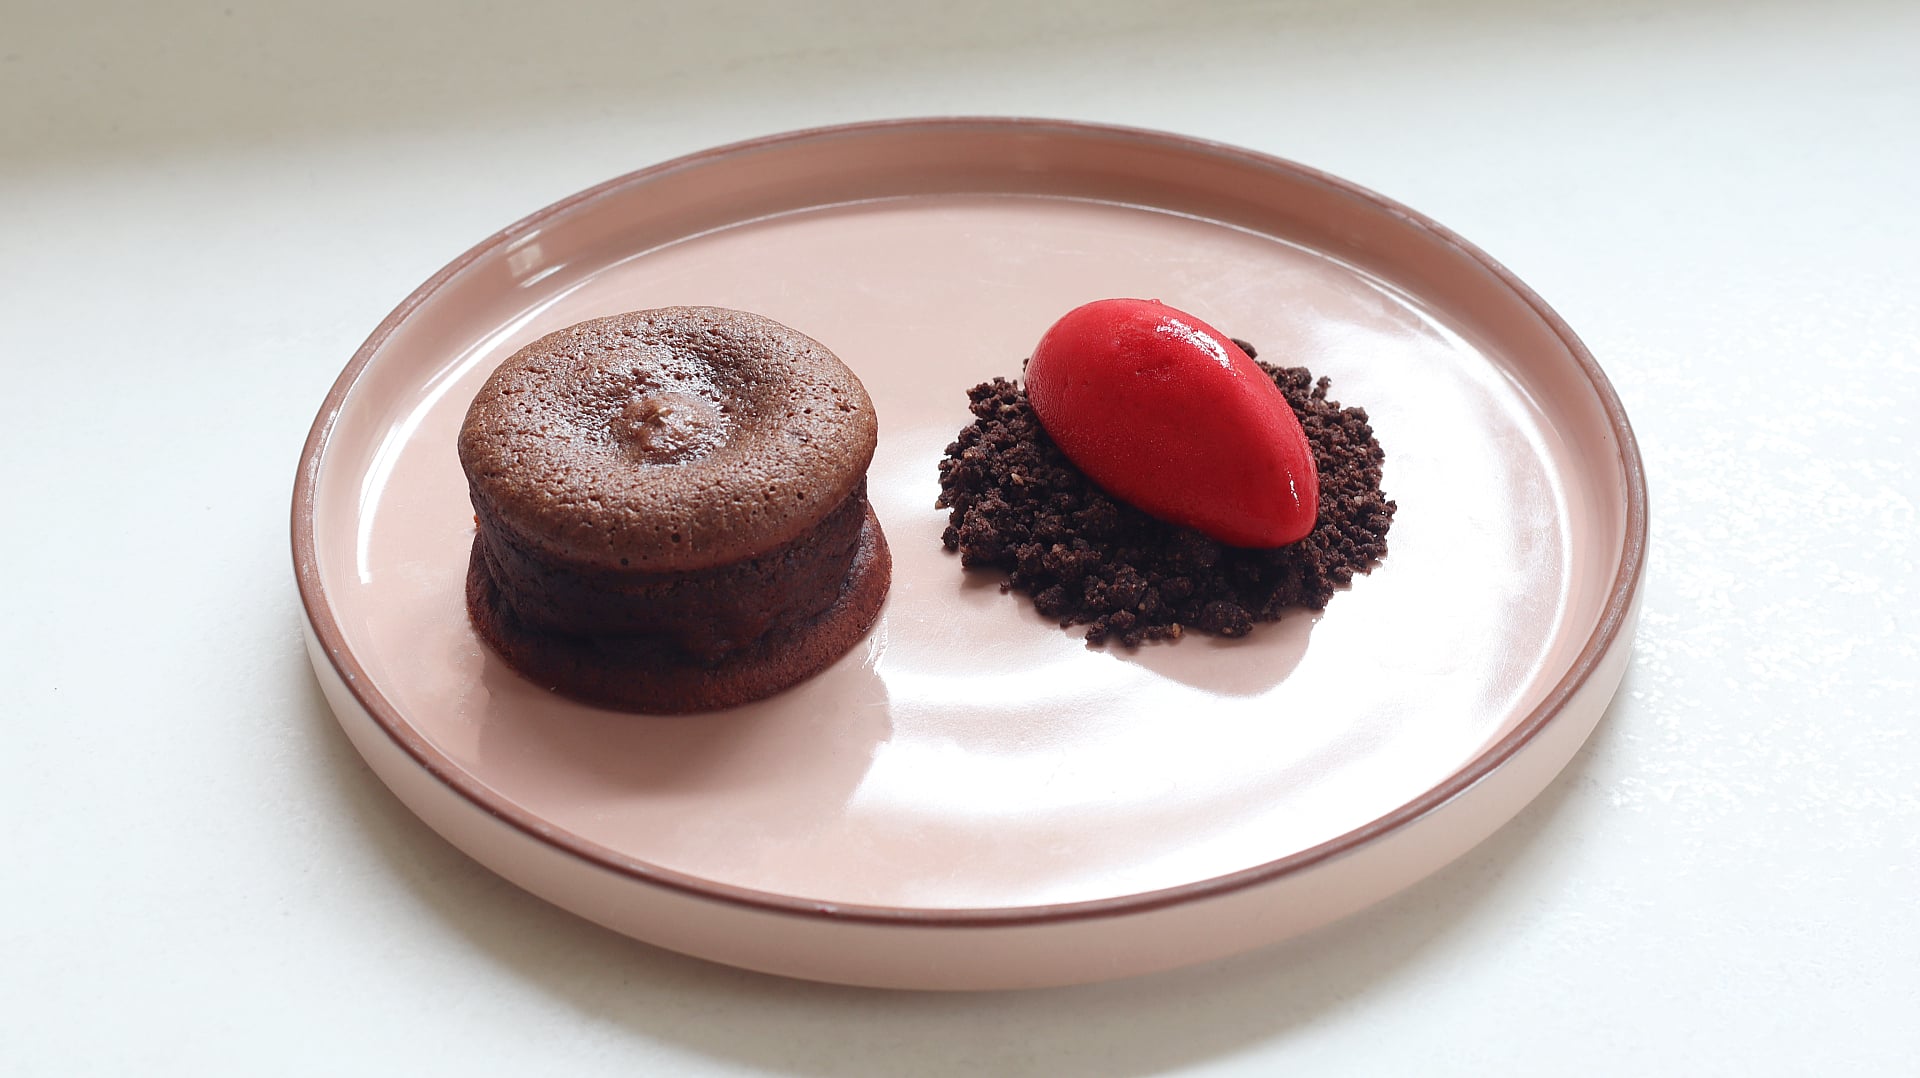
This is a more refined take on the Tier 1 recipe. The fondants are baked in individual ring moulds and plated with chocolate soil and raspberry sorbet. The soil adds crunch and a subtle saltiness, while the sorbet brings brightness and balance to the plate. All the elements can be prepared in advance, then the fondants are baked just before serving.
4
FONDANTS
Ingredients
Makes 4 Fondants
Strawberry Sorbet
90g Water
160g Caster/White Sugar
35g Liquid Glucose or any invert sugar
2g Locust Bean Gum or NH Pectin
450g Strawberry Puree
Citric Acid To Taste (1-2g)
Fine Sea Salt To Taste
Chocolate Crumble
50g Caster/White Sugar
50g Ground Almonds
30g Plain/All-Purpose Flour
20g Cocoa Powder
3g Flakey Salt
35g Unsalted Butter, Melted
Chocolate Fondant
200g Dark Chocolate (70% Cocoa Solids), Chopped
200g Unsalted Butter, Room Temperature
200g Icing/Powdered Sugar
220g Whole Eggs
75g Egg Yolks
55g Plain/All-Purpose Flour
45g Cocoa Powder
Pinch of Flakey Sea Salt
Special equipment
Digital thermometer
Hand blender
Ice cream machine
4 7×3.5cm (2.7×1.3”) metal ring molds
Stand mixer or electric hand whisk
Piping bags (optional)
Method
Strawberry Sorbet
1. Place a medium bowl inside a large bowl that is filled with ice water. Set this to one side.
2. Into a medium saucepan, add the water, sugar, glucose and locust bean gum.
- 90g Water
- 160g Caster/White Sugar
- 35g Liquid Glucose or any invert sugar
- 2g Locust Bean Gum or NH Pectin
3. Whisk the mixture over a medium heat until it reaches 85C/185F on a digital thermometer.
4. Immediately remove it from the heat and pour it into the medium bowl you set aside, over the ice. Stir this occasionally until it reaches around 10C/50F on a digital thermometer.
5. Transfer the cooled mixture to a tall measuring jug, then pour the strawberry puree on top. Blend till smooth with a hand blender.
- 450g Strawberry Puree
6. Add in the citric acid (or lemon juice) and blend. Taste the mixture and add more if needed to suit your taste.
- 1-2g Citric Acid
7. The mixture can be churned immediately in your ice cream machine, or left in the fridge for up to 24 hours.
8. When you are ready to churn it, add a pinch of salt and stir this through. Then pour it into your machine, churning according to the machine instructions. It usually takes around 15-30 minutes until it is a thick, scoopable texture.
9. Once it is done, it will still be slightly soft, so transfer it to a tupperware and place it back in the freezer for 2-3 hours. Then it will be the perfect scooping texture.
Chocolate Soil
1. Preheat the oven to 160C/320F non-fan assisted (145C/295F fan-assisted)
2. Place all the dry ingredients into a bowl and stir together with a spatula.
- 50g Caster/White Sugar
- 50g Ground Almonds
- 30g Plain/All-Purpose Flour
- 20g Cocoa Powder
- 3g Flakey Salt
3. Pour in the melted butter and stir together to form a crumbly chocolate mix.
- 35g Unsalted Butter, Melted
4. Tip the crumble onto a baking sheet and bake for 12 minutes. Remove from the oven and allow it to cool completely. If you would like the soil to be a finer consistency you can blend it briefly in a food processor but it’s optional! Store the mixture and set to one side.
Chocolate Fondant
1. Preheat the oven to 190C/375C non-fan assisted (175C/345F fan-assisted).
2. Lightly grease four 7×3.5cm (2.7×1.3”) metal ring molds with soft butter and then coat with cocoa powder, tapping out the excess. Place these onto a baking tray lined with a silicon mat or baking paper.
3. Place the chocolate into a bowl and place this over a pan of gently simmering water, stirring occasionally until it has melted. Remove it from the heat to cool for 5 minutes.
- 200g Dark Chocolate (70% Cocoa Solids), Chopped
4. Add the butter and sugar to the bowl of a stand mixer fitted with a paddle attachment and beat on a medium speed for 2-3 minutes, until it is very thick and pale.
- 200g Unsalted Butter, Room Temperature
- 200g Icing/Powdered Sugar
5. Lower the speed, and drizzle in the eggs slowly, scraping down the side of the bowl as needed.
- 220g Whole Eggs
- 75g Egg Yolks
6. Pour in the cooled chocolate and mix to combine, scraping down the bowl as needed.
7. Finally, sift in the flour and cocoa powder, along with a good pinch of the salt. Stir this through with a spatula until you have a smooth, thick batter.
- 55g Plain/All-Purpose Flour
- 45g Cocoa Powder
- Pinch of Flakey Sea Salt
8. Add the mixture to a piping bag and pipe it into the greased ring molds, filling them about ¾ of the way up.
9. Place the tray into the centre of the oven and bake for 14 minutes. They should feel slightly firm/bouncy when you touch the edge and then the centre should look slightly molten.
Assembly
1. While they are baking, prepare the plates. Take the chocolate soil and pour 1-2 tbsp on the side.
2. Remove the sorbet from the freezer and let it warm up for a few minutes before using a warm spoon to scoop some on top of the soil. Do this, just before the fondant comes out of the oven.
3. Once the fondants are baked, place a palette knife underneath each one and carefully lift it onto the serving plate.
4. Carefully remove the ring mold and peel away the baking paper. Serve immediately.
Shop the Equipment


Apple & Almond Puff Pastry Tart
TIER 1
Apple & Almond Puff Pastry Tart
In Tier 1 we’re mastering the essential technique of laminating inverse puff pastry. This is trickier as the dough is wrapped in a butter block which means it can get a little sticky, but the resulting pastry melts in the mouth. We’ve covered laminating a few times so if you’ve tried those classes, you will be really confident heading into this. Once the dough has rested, we cut it into discs, fill it with an almond cream and finally add some sliced apples. After your first bite, you’ll want to eat the whole tray!
6
TARTS
Ingredients
Makes 6 Individual Tarts
Inverse Puff Pastry
Butter Block
100g Plain/All-Purpose Flour
300g Unsalted Butter, Room Temperature
Dough
200g Plain/All-Purpose Flour
4g Fine Sea Salt
120g Double/Heavy Cream
20g Cold Water
5g White Vinegar
Almond Cream
55g Unsalted Butter, Soft
55g Icing Sugar
130g Ground Almonds
10g Cornstarch/Cornflour
45g Whole Eggs, Room Temperature
2-3 Pink Lady Apples
Egg Wash
35g Egg Yolk
30g Double/Heavy Cream
Icing/Powdered Sugar To Decorate
Special equipment
Stand mixer
Digital thermometer
12cm cookie cutter
Piping bag
Method
Inverse Puff Pastry
Butter Block
1. Add the soft butter and flour into a stand mixer fitted with a paddle attachment. Beat for 1-2 minutes on a medium speed until smooth, scraping down the bowl as needed.
- 100g Plain/All-Purpose Flour
- 300g Unsalted Butter, Room Temperature
2. Trace a rectangle 35 x 20 cm/14 x 8 inches in the centre of a large sheet of parchment paper or acetate, then flip it over. Place the butter mixture into the centre, folding over the edges of the paper and taping them in place if needed.
3. Use a rolling pin to roll it into a rectangle with even thickness. Chill for 3 hours in the fridge or overnight.
Dough
1. For the dough, add all the ingredients to a large bowl and stir together until there are no more dry ingredients. It can help to squeeze it together with your hands.
- 200g Plain/All-Purpose Flour
- 4g Fine Sea Salt
- 120g Double Cream
- 20g Cold Water
- 5g White Vinegar
2. Tip the mixture onto a lightly floured work surface and knead it for 1–2 minutes. Initially, it will be quite dry, but as you continue to work it, it will become smooth and gain some very slight elasticity.
3. Trace a rectangle 17.5 x 20cm into the centre of a large sheet of baking parchment or acetate and flip it over. Place the dough in the centre and fold over the edges of the parchment, taping it in place if needed. Roll the dough to the edges until you have an even block. Refrigerate for 3 hours, or ideally overnight. A longer chill is preferable to relax the gluten.
4. Once both have chilled, remove the butter block from the fridge, it needs to be 9–10°C (48–50°F) before using. Once it is close to temperature, remove the dough from the fridge; this needs to be at 6–7°C (43–45°F).
5. Place the dough block in the centre of the butter and fold the butter over, sealing the seam with your fingers. Be quite generous with flouring the work surface and the dough here, or the butter will stick.
6. Rotate the dough 90 degrees so the seam is facing you horizontally, and use a sharp knife to score the edges of the dough where it is folded over the butter. This will release tension and make it easier to roll.
7. Lightly roll the dough to give it some slight width, then rotate the dough 90 degrees again so the seam is now vertically in line with your body.
8. Roll the dough lengthways into a long rectangle, being liberal with the flour so that it doesn’t stick, until it reaches a thickness of about 5–7mm. Use a sharp knife to trim off any wonky ends and dust off any excess flour.
9. Perform a double fold, folding one side of the dough up about 1/5th of the way, bringing the opposite side over to meet it, and then folding the whole piece in half. Wrap the dough tightly in cling film, and place it in the freezer for 15 minutes, then into the fridge for 10 minutes.
10. Remove the dough from the fridge, and with the open seam facing you (i.e if you were looking at the dough straight on, you would be able to see where it has been folded over itself), use a sharp knife again, to score the edges of the dough where it is folded.
11. Turn the dough 90 degrees so the open seam is now horizontal to you and give the dough a quick roll, to give it a little bit of width.
12. Turn the dough 90 degrees again so the open seam is facing you again and begin to roll the dough. Roll the dough into a long even rectangle, very very lightly flouring it, just as we did in step 8.
13. Perform another double fold, and place it in the freezer for 15 minutes, then into the fridge for 10 minutes.
14. Repeat this process one more time, but finishing with a single fold rather than a double fold. To do this, take one-third of the dough and fold it up, then take the other third of dough and fold this over the top.
15. Wrap the dough tightly in clingfilm and refrigerate, ideally overnight. Again, a longer chill helps to relax the gluten.
Almond Cream
1. Into a stand mixer fitted with a paddle attachment, beat the butter and icing sugar on a medium-low speed until smooth, 1-2 minutes.
- 55g Unsalted Butter, Soft
- 55g Icing Sugar
2. Scrape down the sides and add the ground almonds and cornstarch, then mix again just until combined.
- 130g Ground Almonds
- 10g Cornstarch/Cornflour
3. Finally pour in the eggs and beat until it is evenly combined.
- 45g Whole Eggs, Room Temperature
4. Cover this and set it to one side at room temperature.
Assembly
1. Preheat the oven to180C/355F Non-Fan assisted (165C/330 Fan).
2. Remove the puff pastry from the fridge and lightly flouring it, roll it into a rough square shape, around 3-4mm thick.
3. Using a 12cm/4.5” cookie cutter, cut 6 discs of pastry and lift these onto a baking tray lined with a silicon baking mat (or a perforated tray lined with a perforated baking mat). Cut more discs if you have enough dough.
4. Add the pistachio cream into a piping bag, and pipe and even layer into the centre of the puff pastry, leaving about a 1.5cm/0.6” border around the outside.
5. Take the apples and core them, then cut them in half. Next, thinly slice them with a knife or a mandolin.
6. Stack the apple slices together, fanning them apart just slightly and place enough into the tart to cover the pistachio cream, but avoid going over the border of puff pastry.
7. Whisk the egg wash ingredients together and with a pastry brush, very lightly brush the border of puff pastry. You can sprinkle some coarse brown/demerara sugar over the top too for some added crunch, or even toasted flaked almonds.
- 35g Egg Yolks
- 30g Double/Heavy Cream
8. Place these into the centre of the oven and bake for around 35-40 minutes, or until a golden brown colour.
9. Remove them from the oven and lift them onto a wire rack to cool for 15 minutes, then serve. They can be eaten warm or you can allow them to cool completely. Before serving, add a dusting of icing/powdered sugar to finish.
Shop the Equipment


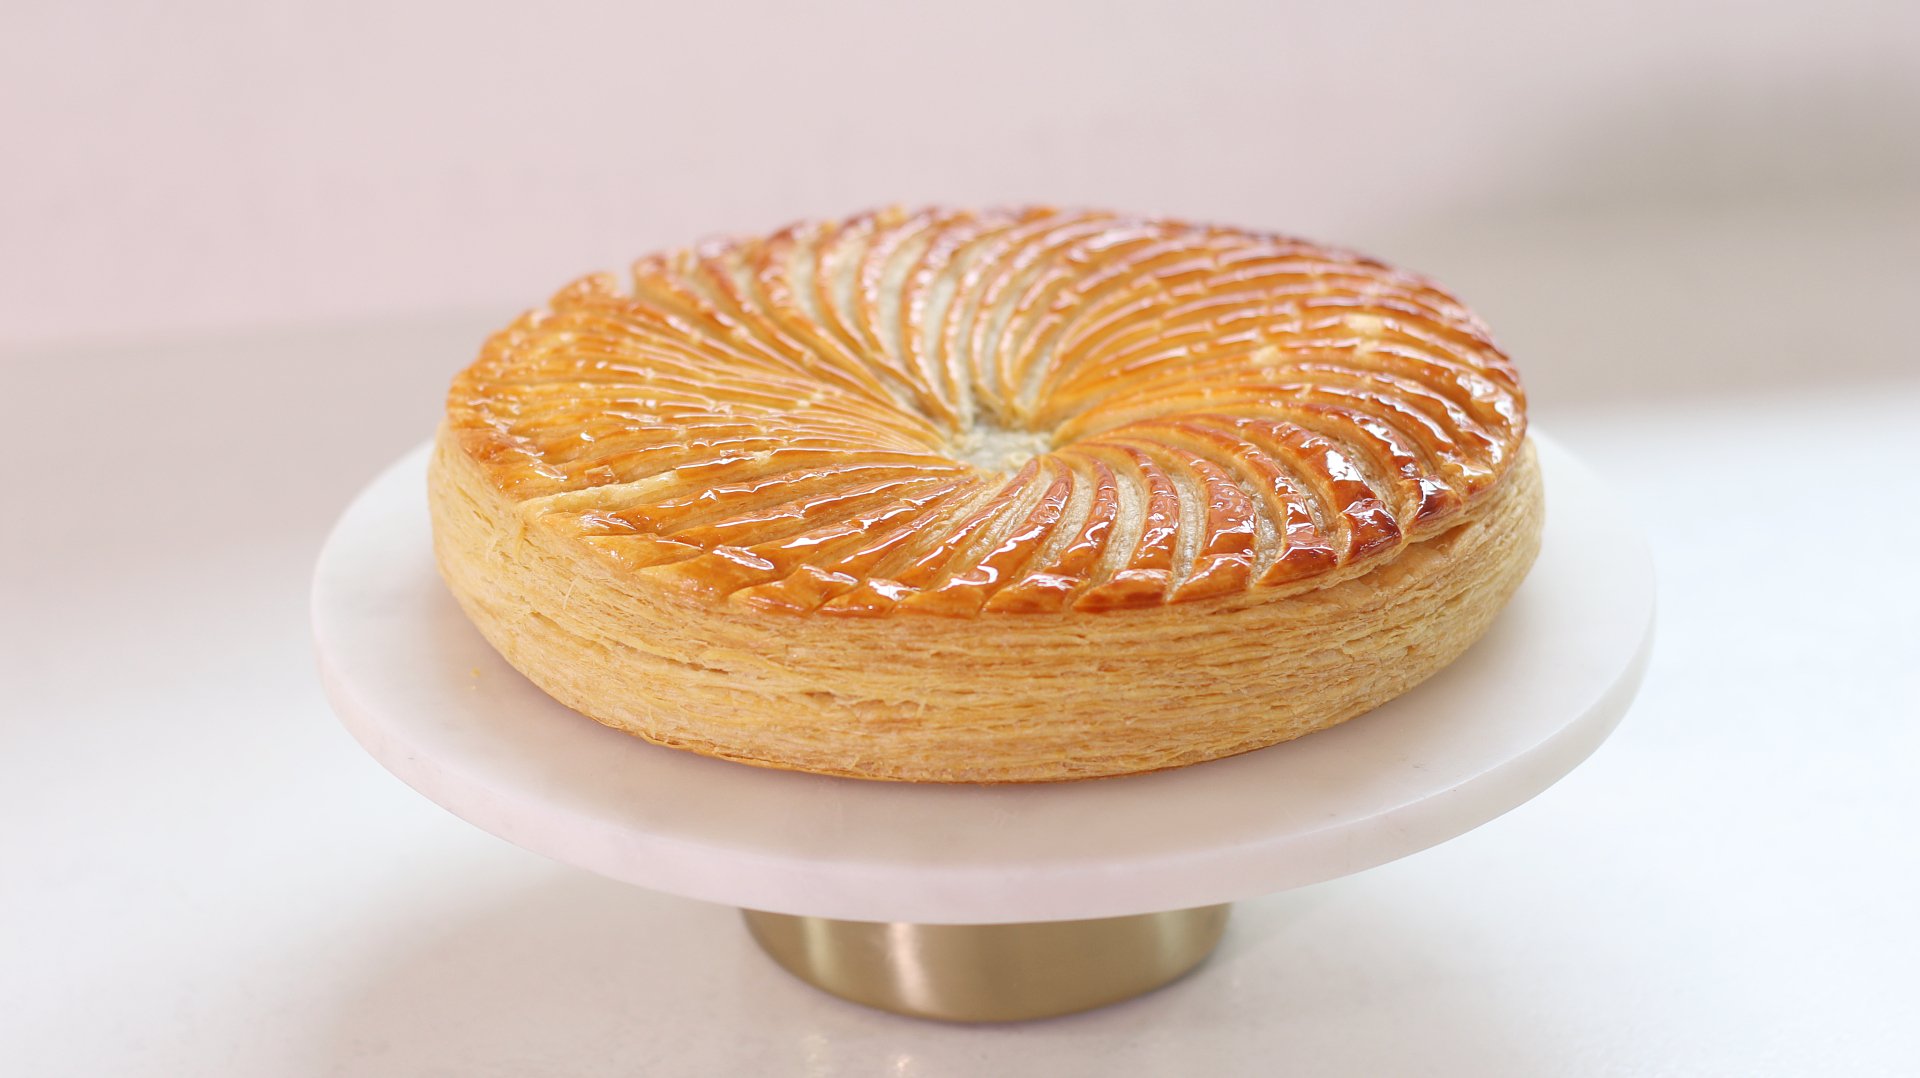
Pistachio Galette Des Rois
TIER 2
Pistachio Galette Des Rois
For Tier 2 I was determined to use our inverse puff pastry to make a Galette Des Rois. After all my fails, I realised I wasn’t resting the dough enough and that I needed to adjust my filling slightly to add more nuts. The resulting galette has the most amazing puff, that stays even, holds its shape and has a soft, pistachio filling. Although we’re at the end of galette season, I think it’s something you should make all year round it’s that good! Take your time with this recipe, especially paying attention to the scoring pattern. There’s lots of helpful tips in the PDF recipe so much sure to download that.
8-10
SERVINGS
Ingredients
Makes 8-10 Servings
Inverse Puff Pastry (x2)
Butter Block
100g Plain/All-Purpose Flour
300g Unsalted Butter, Room Temperature
Dough
200g Plain/All-Purpose Flour
4g Fine Sea Salt
120g Double/Heavy Cream
20g Cold Water
5g White Vinegar
Pistachio Cream
85g Unsalted Butter, Soft
85g Icing Sugar
130g Ground Pistachios
70g Ground Almonds
15g Cornstarch/Cornflour
70g Whole Eggs, Room Temperature
Egg Wash
35g Egg Yolk
30g Double/Heavy Cream
Hot Syrup
50g Caster Sugar
35g Water
Special equipment
Stand mixer
Digital thermometer
Silicon mat
18cm ring mold (optional)
Piping bag
23cm disc (for measuring)
Method
Inverse Puff Pastry
Note that you will need two batches of pastry (one for the top of the galette, and one for the bottom). As we are laminating by hand, I prefer to do this in two separate batches to ensure not too much gluten is developed. So you will need to create this recipe twice.
Butter Block
1. Add the soft butter and flour into a stand mixer fitted with a paddle attachment. Beat for 1-2 minutes on a medium speed until smooth, scraping down the bowl as needed.
- 100g Plain/All-Purpose Flour
- 300g Unsalted Butter, Room Temperature
2. Trace a rectangle 35 x 20 cm/14 x 8 inches in the centre of a large sheet of parchment paper or acetate, then flip it over. Place the butter mixture into the centre, folding over the edges of the paper and taping them in place if needed.
3. Use a rolling pin to roll it into a rectangle with even thickness. Chill for 3 hours in the fridge or overnight.
Dough
1. For the dough, add all the ingredients to a large bowl and stir together until there are no more dry ingredients. It can help to squeeze it together with your hands.
- 200g Plain/All-Purpose Flour
- 4g Fine Sea Salt
- 120g Double Cream
- 20g Cold Water
- 5g White Vinegar
2. Tip the mixture onto a lightly floured work surface and knead it for 1–2 minutes. Initially, it will be quite dry, but as you continue to work it, it will become smooth and gain some very slight elasticity.
3. Trace a rectangle 17.5 x 20cm into the centre of a large sheet of baking parchment or acetate and flip it over. Place the dough in the centre and fold over the edges of the parchment, taping it in place if needed. Roll the dough to the edges until you have an even block. Refrigerate for 3 hours, or ideally overnight. A longer chill is preferable to relax the gluten.
4. Once both have chilled, remove the butter block from the fridge, it needs to be 9–10°C (48–50°F) before using. Once it is close to temperature, remove the dough from the fridge; this needs to be at 6–7°C (43–45°F).
5. Place the dough block in the centre of the butter and fold the butter over, sealing the seam with your fingers. Be quite generous with flouring the work surface and the dough here, or the butter will stick.
6. Rotate the dough 90 degrees so the seam is facing you horizontally, and use a sharp knife to score the edges of the dough where it is folded over the butter. This will release tension and make it easier to roll.
7. Lightly roll the dough to give it some slight width, then rotate the dough 90 degrees again so the seam is now vertically in line with your body.
8. Roll the dough lengthways into a long rectangle, being liberal with the flour so that it doesn’t stick, until it reaches a thickness of about 5–7mm. Use a sharp knife to trim off any wonky ends and dust off any excess flour.
9. Perform a double fold, folding one side of the dough up about 1/5th of the way, bringing the opposite side over to meet it, and then folding the whole piece in half. Wrap the dough tightly in cling film, and place it in the freezer for 15 minutes, then into the fridge for 10 minutes.
10. Remove the dough from the fridge, and with the open seam facing you (i.e if you were looking at the dough straight on, you would be able to see where it has been folded over itself), use a sharp knife again, to score the edges of the dough where it is folded.
11. Turn the dough 90 degrees so the open seam is now horizontal to you and give the dough a quick roll, to give it a little bit of width.
12. Turn the dough 90 degrees again so the open seam is facing you again and begin to roll the dough. Roll the dough into a long even rectangle, very very lightly flouring it, just as we did in step 8.
13. Perform another double fold, and place it in the freezer for 15 minutes, then into the fridge for 10 minutes.
14. Repeat this process one more time, but finishing with a single fold rather than a double fold. To do this, take one-third of the dough and fold it up, then take the other third of dough and fold this over the top.
15. Wrap the dough tightly in cling film and refrigerate, ideally overnight. Again, a longer chill helps to relax the gluten.
Pistachio Cream
1. Into a stand mixer fitted with a paddle attachment, beat the butter and icing sugar on a medium-low speed until smooth, 1-2 minutes.
- 85g Unsalted Butter, Soft
- 85g Icing Sugar
2. Scrape down the sides and add in the ground pistachios, ground almonds and cornstarch, then mix again just until combined.
- 130g Ground Pistachios
- 70g Ground Almonds
- 15g Cornstarch/Cornflour
3. Finally pour in the eggs and beat until it is evenly combined.
- 70g Whole Eggs, Room Temperature
4. You will need 320g of mixture so pour the batter into a bowl and weigh the required amount.
5. To make the mixture neat, place an 18cm ring mold onto a baking tray lined with a silicon mat. Scoop the mixture in, and level it so it is smooth with a palette knife. Place this into the freezer for 1-2 hours. You can also place a fève into the mixture (or a whole pistachio) which is very traditional.
6. If you do not have a ring mold, the mixture can just be piped fresh onto the puff pastry. In this case, add it into a piping bag fitted with a large round tip nozzle and refrigerate until your pastry has been rolled out. (Once you have rolled out one portion of the pastry, pipe and even disc, 18 cm wide)
Assembly
1. Remove one batch of inverse puff pastry from the fridge and lightly flouring it, roll it into a rough square shape, around 3-4mm thick. Carefully lift this onto a lined baking tray and place it into the fridge.
2. Roll out the second piece of pastry to the same thickness.
3. Remove the first batch of pastry from the fridge and with it still on the tray, lift the frozen pistachio cream and place the disc into the centre of the pastry.
4. Lightly brush around the disc of pistachio cream with water – do not go to heavy on the water, just enough to moisten is to the pastry sticks together,
5. Lift the second piece of pastry on top, and using your hands, lightly cup around the outside of the cream layer, tucking it so it hugs the filling. This pushes out any trapped air. Ensure the two layers of pastry are firmly sealed together,
6. Finally, take a disc (like the bottom of a tart ring) that is 23cm in diameter, and place this on top. Use a sharp knife/box cutter, cut around this, to create a neat 23cm galette. Use a skewer to prick a few small holes all over it.
7. At this point we want to rest it again, to relax the gluten in the dough and prevent it from shrinking. Ideally this should be refrigerated overnight (covered with cling film) or 1-2 hours.
8. Once it has chilled, prepare the egg wash, whisking together the ingredients.
9. Meanwhile, preheat the oven to 180C/355F Non-Fan assisted (165C/330 Fan).
10. Remove the galette from the fridge and flip it over, onto a baking tray with a silicon baking mat (or ideally a perforated tray with a perforated mat if you have one) so the smooth side is on top. Brush the egg wash evenly over the surface of the dough. Note – for a deeper, darker finish to your galette, you can apply one layer of egg wash, then refrigerate it for 45m, then add another layer, before proceeding with the scoring.
- 35g Egg Yolk
- 30g Double/Heavy Cream
11. Use a sharp knife to gently score the dough, ensuring you don’t cut through the dough, in a decorative pattern. I use the design below. Once you have completed the scoring, use a skewer, to create 5-8 holes, piercing through the top layer of puff pastry (indicated by the green dots). This will allow the steam to escape.
12. Place the galette into the centre of the oven and bake for 45 minutes, then lower the temperature to 170C/340F non-fan assisted (155/310F fan assisted) and bake for a further 20-30 minutes, or until the galette is a deep golden brown colour.
13. Just before it has finished baking, prepare the hot syrup, by adding the ingredients to a small saucepan, and bringing them to the boil until the sugar has dissolved. Set this to one side.
- 50g Caster Sugar
- 35g Water
14. Once the galette is a deep golden brown colour, remove it from the oven and lift it onto a wire cooling rack. Brush a thin layer of sugar syrup over the top and then allow it to cool for 30 minutes before serving.
Shop the Equipment


île Flottante
TIER 1
île Flottante
For Tier 1 I decided to try a twist on the classic Île Flottante, inspired by working in the kitchen with Tom Aiken. Typically made by poaching a meringue and serving it in a warm bowl crème anglaise, this version is much more refined, with a Swiss meringue that is cut into a perfect disc. We fill the centre with crème anglaise and then top it with a thin caramel disc and clear caramel sauce.
4
INDIVIDUAL DESSERTS
Ingredients
Makes 4 île Flottantes
Crème Anglaise
125g Double Cream
250g Whole Milk
75g Caster/White Sugar
75g Egg Yolks
1 Fresh Vanilla Pod
Pinch of Flaky Sea Salt
Caramel Sauce
200g Caster/White Sugar
60g Water
100g Water
Caramel Discs
70g Caster/White Sugar
70g Liquid Glucose
Swiss Meringue
300g Egg Whites
205g Caster/White Sugar
5g White Vinegar
Roasted & Chopped Almonds or Hazelnuts To Serve
Special equipment
Digital thermometer
13″ x 9″ x 2” baking dish
Stand mixer
Blender
9cm/3.5” cookie cutter
Piping bag
Method
Crème Anglaise
1. Into a medium saucepan, add the milk, cream and beans scraped from a fresh vanilla pod (keep the leftover vanilla pod as we will use this in the caramel sauce). Place this onto a medium low heat, stirring occasionally.
2. Meanwhile, add the egg yolks and sugar to a medium bowl and whisk for 30 seconds to combine.
3. Once the cream is hot, slowly pour it over the egg yolk mixture, whisking to combine.
4. Pour the entire mixture back into the saucepan and whisk until it reaches between 82-85C (180-185F) on a digital thermometer.
5. Immediately remove it from the heat and pass it through a sieve into a clean bowl. Whisk through a pinch of salt.
6. Place a sheet of clingfilm on the surface and refrigerate the mixture for at least an hour. Alternatively, place it over a bowl of ice water and that will thicken it quickly.
Caramel Sauce
1. Into a small saucepan, add 100g of water, along with the leftover vanilla pod from above. Place this over a low heat so that it becomes steamy.
2. Meanwhile, add the remaining 60g of water and sugar into a medium saucepan. Place it on a medium heat, and cook it to 180C/355F on a digital thermometer. This will be a light golden colour.
3. Whisk in the hot vanilla water and cook for a further 30 seconds. Pour it through a sieve, into a clean bowl. Cover the bowl with clingfilm and refrigerate it for at least an hour. Alternatively, place it over a bowl of ice water and that will thicken it quickly.
Caramel Discs
1. Into a medium saucepan, add the glucose and sugar.
2. Place it over a medium heat and allow the mixture to bubble up and start to caramelise.
3. Once it begins to go a light golden colour you can stir it.
4. Stir it occasionally until it turns a deep golden colour, then immediately remove it from the heat and pour it onto a silicon mat.
5. Allow it to set at room temperature for 30 minutes.
Swiss Meringue
1. Take a 13x9x2” baking dish (something deep), and very lightly grease the bottom with butter and place a sheet of parchment along the base. Pre-heat the oven to 160C/320F non-fan assisted.
2. Into the bowl of a stand mixer, add the egg whites, sugar and vinegar.
3. Place this over a pan of gently simmering water and whisk constantly until it reaches around 60-65C (140-149F) on a digital thermometer.
4. Immediately remove it from the heat and place it onto the stand mixer fitted with a whisk attachment. Whisk for 5 minutes on a medium high speed, until it is thick and glossy and holds a medium stiff peak. Be very careful not to over whisk this as it is a slightly lower amount of sugar, so we don’t want to make the meringue go grainy by mixing it for too long.
5. Tip the meringue into the lined baking tray and use a palette knife to smooth it so it is flat.
6. Place it into the oven and bake for 12-15 minutes, until it is a light golden brown colour on top. Remove it from the oven but leave the oven on.
Assembly
1. While the meringue is cooling, blend the caramel to a fine powder. Take a sieve, and sieve the powder in an even layer onto a baking tray lined with a silicon mat. You may not need all of the caramel powder.
2. Use a 9cm/3.5” cookie cutter to create indents in the powder, gently shimmying it around to create a circular outline.
3. Place the tray into the oven and bake for 2-4 minutes, or until the caramel powder has just melted and it is a glass like consistency. Remove the tray from the oven and allow it to cool.
4. Pour the chilled creme anglaise into a small saucepan and just gently stir it over a low heat until it is steaming, then transfer it into a serving jug.
5. Scoop the thickened caramel sauce into a piping bag and set this to one side.
6. The meringue should have cooled for around 10-15 minutes now.
7. Use the 9cm/3.5” cookie cutter which is slightly warm, to cut 4 discs.
8. The easiest way to remove them is to pull away the excess meringue around the disc, then carefully slide a palette knife underneath the disc, and lift it onto your serving plate.
9. Use a teaspoon to dig a hole out of the centre of each meringue disc, but do not cut all the way through to the bottom.
10. Pour the warm creme anglaise into the hole, then with a palette knife, slide it underneath a caramel disc and place this on top.
11. Cut a small hole in the end of the piping bag, and drizzle this across the caramel disc.
12. Finally finish with a sprinkle of roasted nuts for texture and serve immediately.
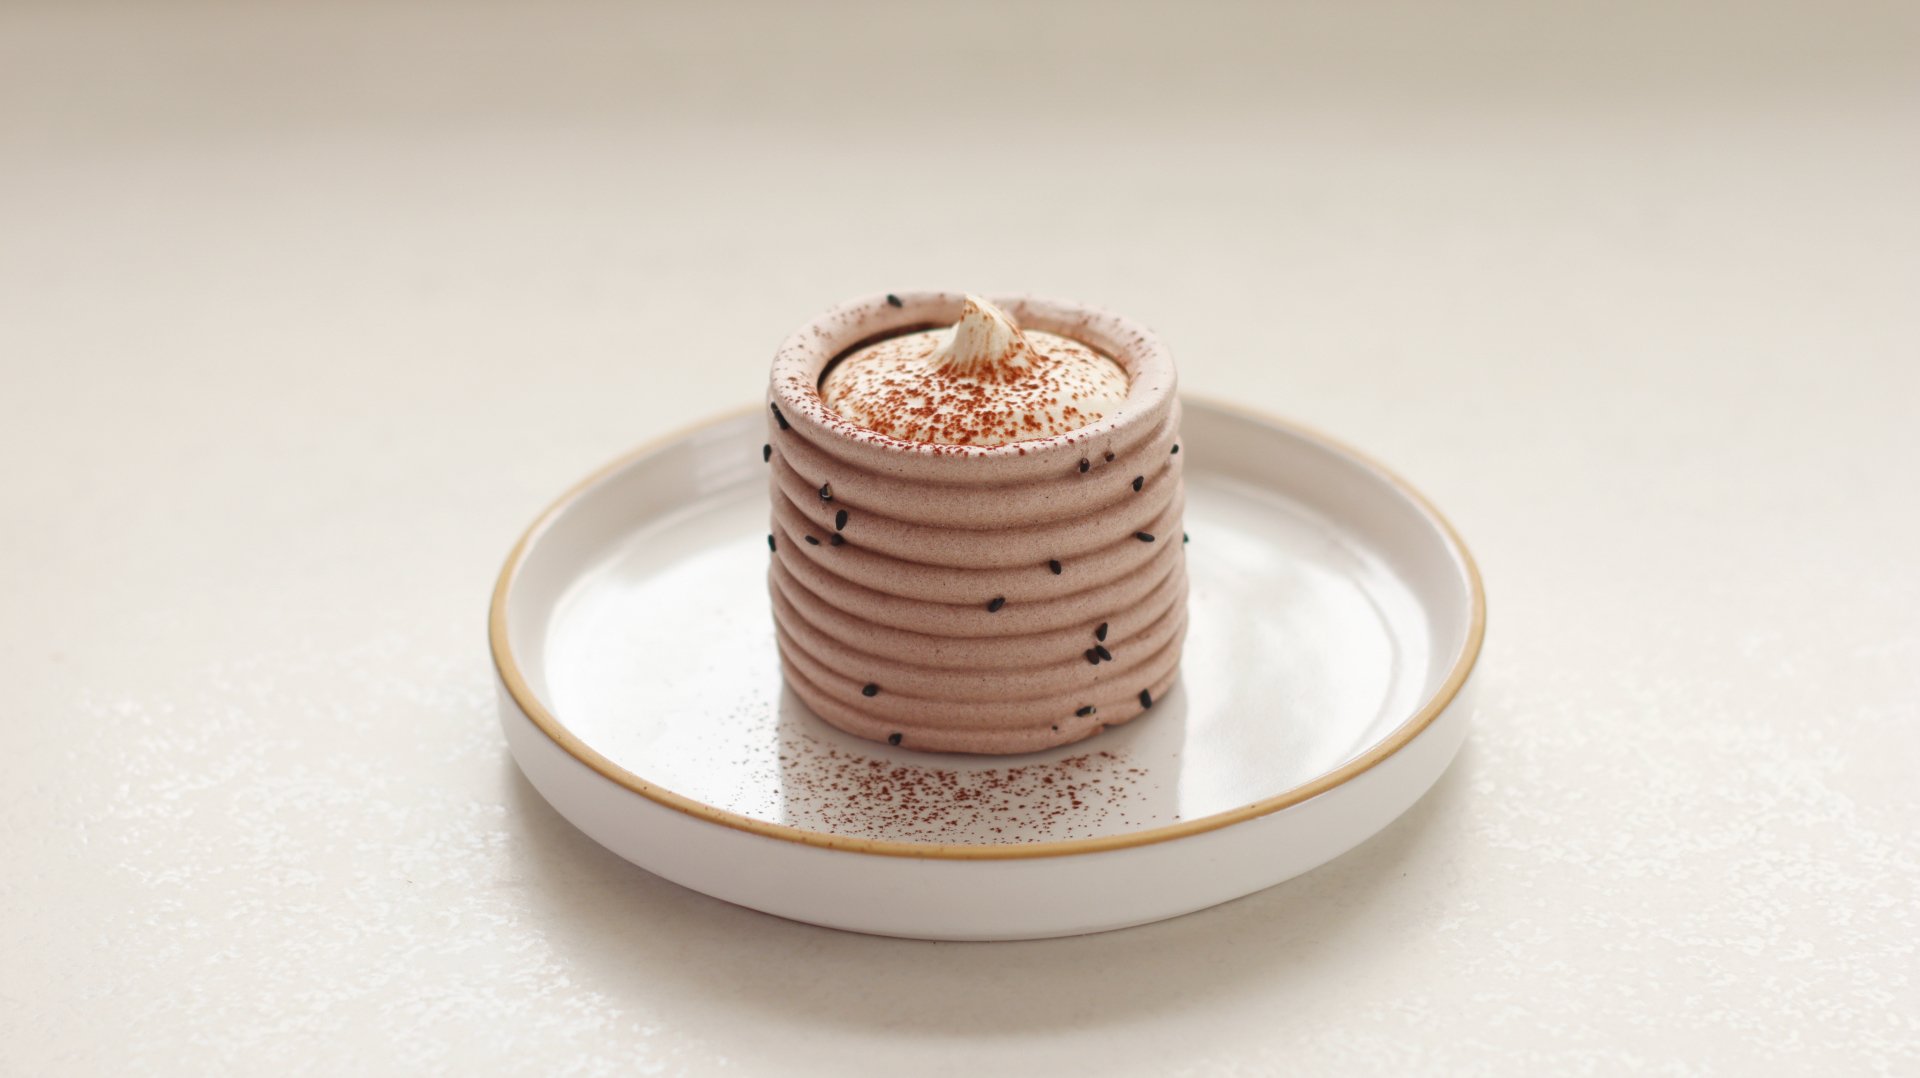
Chocolate & Black Sesame Meringue
TIER 2
Chocolate & Black Sesame Meringue
Sticking with the theme of Swiss meringue, we use the same technique as the Île Flottante to make a Swiss-French cocoa meringue and then use a very delicate piping technique to create the perfect cylinder shape. It’s filled with a chocolate brown, black sesame meringue and softly whipped cream. The meringue can be tricky to pipe (I failed more than a few times!), but there is enough mixture in the recipe to have a few practice attempts too.
6
INDIVIDUAL DESSERTS
Ingredients
Makes 6 individual desserts
Chocolate Meringue
100g Egg Whites
100g Caster/White Sugar
Pinch of Cream of Tartar
75g Icing/Powdered Sugar
10g Cocoa Powder
Black Sesame Seeds
Chocolate Brownie
170g Dark Chocolate (70% Cocoa Solids)
85g Unsalted Butter
160g Whole Egg
85g Caster/White Sugar
40g Plain/All-Purpose Flour
Pinch of Flaky Sea Salt
Black Sesame Praline
220g Black Sesame Seeds
90g Caster/White Sugar
15g Water
10-20g Neutral Oil (Groundnut)
Pinch of Flaky Sea Salt
Mascarpone Cream
100g Mascarpone
15g Icing/Powdered Sugar
250g Double/Heavy Cream
½ Fresh Vanilla Pod
Cocoa Powder To Decorate
Special equipment
Silikomart sf098 silicon mold (or similar)
Digital thermometer
Stand mixer
Piping bags
Small leaf tip nozzle
Rotating cake stand/children’s pottery wheel (!)
13×9” baking tray
Silicon mat
High powered food processor
Cookie cutter
Method
Chocolate Meringue
1. Preheat the oven to 80C/175F non-fan assisted.
2. For this design, I used the Silikomart sf098 silicon mold. I use scissors to carefully cut out each cylinder individually, then use a pastry brush and lightly grease them with a neutral oil. Alternatively, you can use a ring mold, that is lightly greased, and then cover it neatly with a sheet of parchment/baking paper.
3. Into the bowl of a stand mixer, add the egg whites, sugar and cream of tartar.
4. Place this over a pan of gently simmering water and whisk constantly until it reaches around 50C (122F) on a digital thermometer.
5. Immediately remove it from the heat and place it onto the stand mixer fitted with a whisk attachment. Whisk for 3-5 minutes on a medium high speed, until it is thick, glossy and holds a stiff peak.
6. Into a medium bowl, sift together the icing/powdered sugar and cocoa powder so that they are evenly combined.
7. Tip this mixture on top of the meringue and incorporate it with a whisk, then gently finish it, by folding it with a spatula until there are no more streaks.
8. Add the mixture into a piping bag fitted with a small leaf tip nozzle.
9. Place the lightly greased cylinder onto a rotating cake stand (you will need help to spin this!) or an electric spinning wheel (I use a child’s clay pottery wheel). Starting at the bottom and applying even pressure, pipe tight lines, slowly moving the nozzle up until the meringue covers the entire cylinder.
10. Place a palette knife carefully underneath the mold and then lift it onto a lined baking tray. Repeat this with the remaining molds – you should have enough meringue to make 6.
11. Pinch a few black sesame seeds in between your finger tips, and flick them onto the meringue so they stick to the outside. We just want a light coating.
12. Place them into the oven and bake for 3 hours. Once the time is up, turn the oven off and open the door and leave them in there to cool for 1-2 hours before attempting to remove them. They need to cool completely and then they will lift off easily. These can also be made a few days ahead of time and stored in an airtight container.
Chocolate Brownie
1. Lightly grease a 13×9” baking tray and line the base and sides with parchment paper. Meanwhile pre-heat the oven to 160C/320F non-fan assisted.
2. Into a medium bowl, add the chocolate and butter. Melt this over a pan of gently simmering water, stirring occasionally, and then remove it from the heat and set it aside to cool for 5 minutes.
3. Into a medium bowl, add the egg, sugar and salt and whisk for 30 seconds to combine.
4. Pour in the melted chocolate mixture and whisk to combine.
5. Add in the flour and whisk just until there are no more streaks of dry ingredients.
6. Pour the batter into the lined tin, spreading it to the edges with a palette knife. Place the tray into the centre of the oven and bake for 8-12 minutes or until the mixture has just set.
7. Remove it from the oven and allow it to cool for 30 minutes, then refrigerate for a minimum of 2-3 hours.
Black Sesame Praline
1. Preheat the oven to 175C/345F.
2. Pour the black sesame seeds onto a baking tray, and roast these for 10 minutes in the pre-heated oven.
3. Remove the tray from the oven and allow them to cool.
4. Into a medium saucepan, add the water followed by the sugar.
5. Place this on a medium heat and cook it until it reaches a deep golden brown colour. If you need to stir it, do this once it has turned a light golden colour.
6. Once a deep golden brown colour, tip in the toasted sesame seeds and stir to combine.
7. Work quickly and immediately tip the mixture onto a silicon baking mat.
8. Add a pinch of flaky salt on top and allow it to set for 30-60 minutes at room temperature or until it has set firm.
9. Break the mixture into a high powdered food processor and blend for 30-60 seconds. Scrape down the sides while still blending, slowly trickle in the neutral oil, just enough until it is a slightly looser texture. You don’t want to add too much oil as this can overpower the taste so use as little as possible. If you have a really high powered food processor you may not need any oil at all, but it will need to be blended for quite some time to get it to a looser consistency.
10. Transfer the smooth mixture to a bowl and set aside.
Assembly & Mascarpone Cream
1. Carefully lift the cooled meringue off of the molds and set them to one side.
2. Remove the brownie from the fridge, and using a cookie cutter, cut discs, about the same size as the hole in your meringue cylinder. I like to stack two discs of meringue together.
3. Carefully press the brownie disc into the bottom of the meringue, then lift it onto your serving plate.
4. Add the black sesame praline to a piping bag, and pipe a small spiral of it on top of the brownie.
5. Finally, add the mascarpone, icing/powdered sugar, cream and beans scraped from a fresh vanilla pod, to the bowl of a stand mixer, fitted with a whisk attachment. Whisk on a medium speed until it forms medium-soft peaks. Be very careful not to overwhisk this, it needs to be quite a soft texture.
6. Add that mixture to a piping bag fitted with a large round tip nozzle.
7. Pipe the cream into the meringue shell, filling it all the way to the top.
8. Finish with a light dusting of cocoa powder, and then serve immediately.
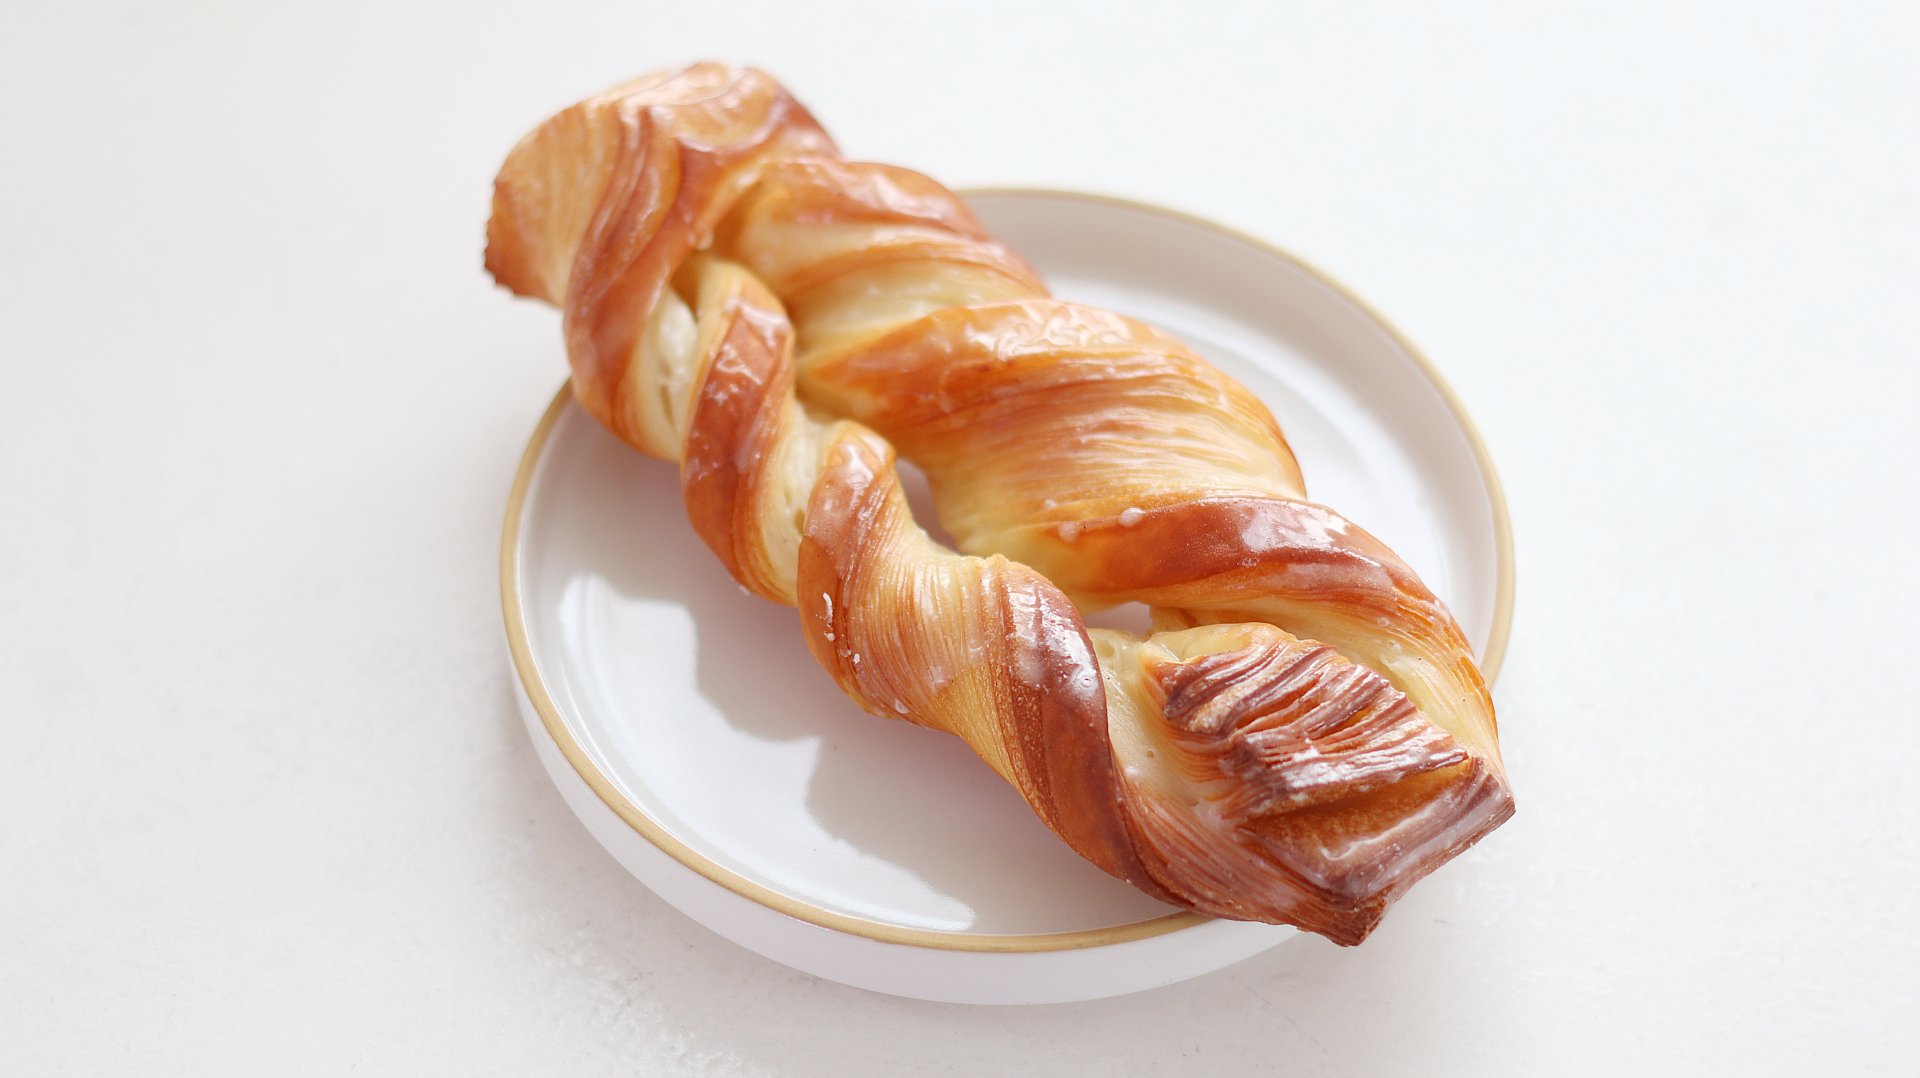
Vanilla Danish Twist
TIER 1
Vanilla Danish Twist
This recipe is all about the dough. We walk through hand lamination step-by-step, so make sure to watch the video before diving in. Once the dough is ready, we use a simple shaping technique to twist the dough, then finish the flakey pastry with a simple vanilla glaze. I think these are the perfect breakfast pastry, so I suggest wrapping them up once baked and leaving them at room temperature, then glazing them the next morning!
8-10
TWISTS
Ingredients
Makes 8-10 Twists
Danish Pastry Détrempe (Dough)
565g Strong White Bread Flour
30g Unsalted Butter, Room Temperature
14g Instant Dry Yeast
230g Whole Milk
65g Whole Eggs
38g Caster Sugar
12g Sea Salt
Buerrage (Butter Block)
250g Unsalted Butter, Room Temperature
25g Plain/All Purpose Flour
Vanilla Icing
400g Icing Sugar
Whole Milk
1 Vanilla Pod
Pinch of Fine Sea Salt
Special equipment
Stand mixer
Rolling pin
Digital thermometer
Ruler
Method
Danish Dough
1. Into the bowl of a stand mixer fitted with a dough hook, add all of the ingredients for the dough. Start with the wet ingredients on the bottom and the dry on top as it makes it easier for everything to incorporate.
2. Knead the mixture on a medium speed, for 6-8 minutes, until the dough feels smooth and elastic, passing the window pane test when you stretch a small piece of the dough. The dough is quite low hydration so initially may look quite dry but should pull together. If it does appear too dry, add up to 20g more milk to help pull it together.
3. Remove the dough from the mixer and briefly knead it on the work surface. Shape it into a rough rectangle, then wrap it in clingfilm, but not too tightly as it will need some room to proof. Place it onto a baking tray and refrigerate overnight. Alternatively if you want to do this whole process in one day, you can chill it for 3 hours.
Buerrage (Butter Block)
1. For the butter block, start by preparing your parchment paper. Take a large sheet, and with a marker, draw a 17.5x20cm square. Flip the paper over so the pen is facing the work surface.
2. Add the butter into the bowl of a stand mixer fitted with a paddle attachment. Add the flour on top, and beat briefly, to combine them and there are no streaks of flour.
3. Scoop the mixture into the centre of the parchment. Wrap the excess parchment around the butter, folding the edges in to match the guides of the neat square you drew. It can help to tape the edges together to stop the parchment paper from moving around or opening up as you roll.
4. Flip it back over and use a rolling pin to roll the butter, pushing it to the edges and creating an even layer of butter across the rectangle of parchment. Place this in the fridge to chill for at least an hour or again, ideally overnight.
Lamination
1. When you are ready to laminate, remove the butter from the fridge, it needs to be 13-14C (55-57F) when you insert a digital thermometer. If it is too cold it will shatter when you start to laminate.
2. Just before it is at temperature, remove the dough from the fridge. Lightly flour it and roll it to just over double the length of the butter, 44cm, but the same width, 17.5cm.
3. The dough will be slightly curved at the top when you roll it out, so I like to trim the dough down, so that it is 40cm in total length. This then gives you a really neat rectangle to fold over your butter.
4. When the butter is at temperature, place it into the centre of the dough and then fold the edges of the dough so they meet in the centre of the butter.
5. Pinch the dough together to form a seam. Using a sharp knife, score the folded edges of the dough.
6. With this seam facing towards you, turn the dough 90 degrees so the seam is now horizontal to your body and give the dough a quick roll, to give it a little bit of width.
7. Turn the dough 90 degrees again so the seam is vertical in line with your body and begin to roll the dough. Working relatively quickly. Apply even pressure and roll the dough into a long even rectangle, flouring very lightly if needed.
8. Don’t focus too much on the length of the rectangle, but more on getting it into an even rectangle that ends up around 5mm thick (0.2”).
9. Once you are happy with the thickness and shape, dust off any excess flour with a brush, and if the ends of the dough have gone a bit wonky, cut them off so you have straight edges on either side.
10. Perform a single fold of the dough, where you take one-third of the dough and fold it up, then take the other third of dough and fold this over the top. This is called a ‘single fold or ‘single turn’.
11. Wrap the dough tightly in cling film, and place it in the freezer for 15 minutes, then into the fridge for 10 minutes.
12. Remove the dough from the fridge, and with the open seam facing you (i.e if you were looking at the dough straight on, you would be able to see where it has been folded over itself), use a sharp knife again, to score the edges of the dough where it is folded.
13. Turn the dough 90 degrees so the open seam is now horizontal to you and give the dough a quick roll, to give it a little bit of width.
14. Turn the dough 90 degrees again so the open seam is facing you again and begin to roll the dough. Roll the dough into a long even rectangle, very very lightly flouring it, just as we did in step 7.
15. Wrap the dough tightly in cling film, and place it in the freezer for 15 minutes, then into the fridge for 10 minutes.
16. Repeat steps 12-14 one more time, completing 3 single folds in total. Chill the dough in the fridge for 1 hour.
17. Lightly flour the chilled dough, and use a sharp knife to score the folded edges of the dough to release the tension.
18. Roll the dough out, so that it is roughly 25cm tall, and 8-10mm thick. Don’t worry about the length.
19. Once you are at the correct thickness, trim the edges of the dough so you are left with a rectangle that is 20cm tall.
20. Then cut the rectangle into 4cm wide strips.
21. Use a sharp knife to cut a slit down the centre of each rectangle.
22. Lift up each piece of dough and take one edge, and fold it over and through the slit to the other side, then feed the opposite edge under and through the slit. Pull both ends gently to tighten, which will form the twist.
23. Line two trays with baking paper and place the twists on, evenly spaced out, 4 per tray.
24. Place the trays into the oven, switched off, and place a small cup of boiling water in the bottom. Change this every 30-45 minutes, proofing the twists until they have puffed up and the layers appear to be separating slightly. It can take 3-4 hours, but don’t worry too much about overproofing them as the dough is resilient.
25. Remove them from the oven and preheat it to 185C/365F fan assisted. Once the oven is hot, load the trays into the oven, and immediately drop the oven temperature to 170C/340F. Bake the danishes for 15-20 minutes, or until they are an even golden brown colour.
26. Once baked, remove them from the oven and carefully lift them onto a wire rack to cool slightly. Keep the oven on.
Vanilla Icing
1. Into a large bowl, add the icing/powdered sugar, salt, beans from a fresh vanilla pod and then slowly start adding milk. Whisk the mixture, adding enough milk until you have a runny, glue-like consistency.
2. Keep the danishes on a wire rack, but place a tray underneath.
3. Pour the glaze over the top of each danish, coating them completely. If you need, scoop up the excess glaze from the tray underneath, and re-use it to glaze any remaining danishes.
4. Place them back into the oven, just for 1-2 minutes, until the glaze goes slightly transparent.
5. Remove them from the oven and allow them to cool for a few minutes then serve.
Note – the process can be quite long, that you end up finishing the danishes quite late which is not the ideal time to eat them (!). What I like to do is to bake the danishes, then wrap the tray tightly once they are cool and leave them at room temperature overnight. The next morning, I heat the oven to 175C/345F and just place them back in for 3-5 minutes, until they feel hot to the touch, then glaze them.
Alternatively you can freeze them once baked, and then just reheat them for longer in the oven (8-15 minutes).
Shop the Equipment

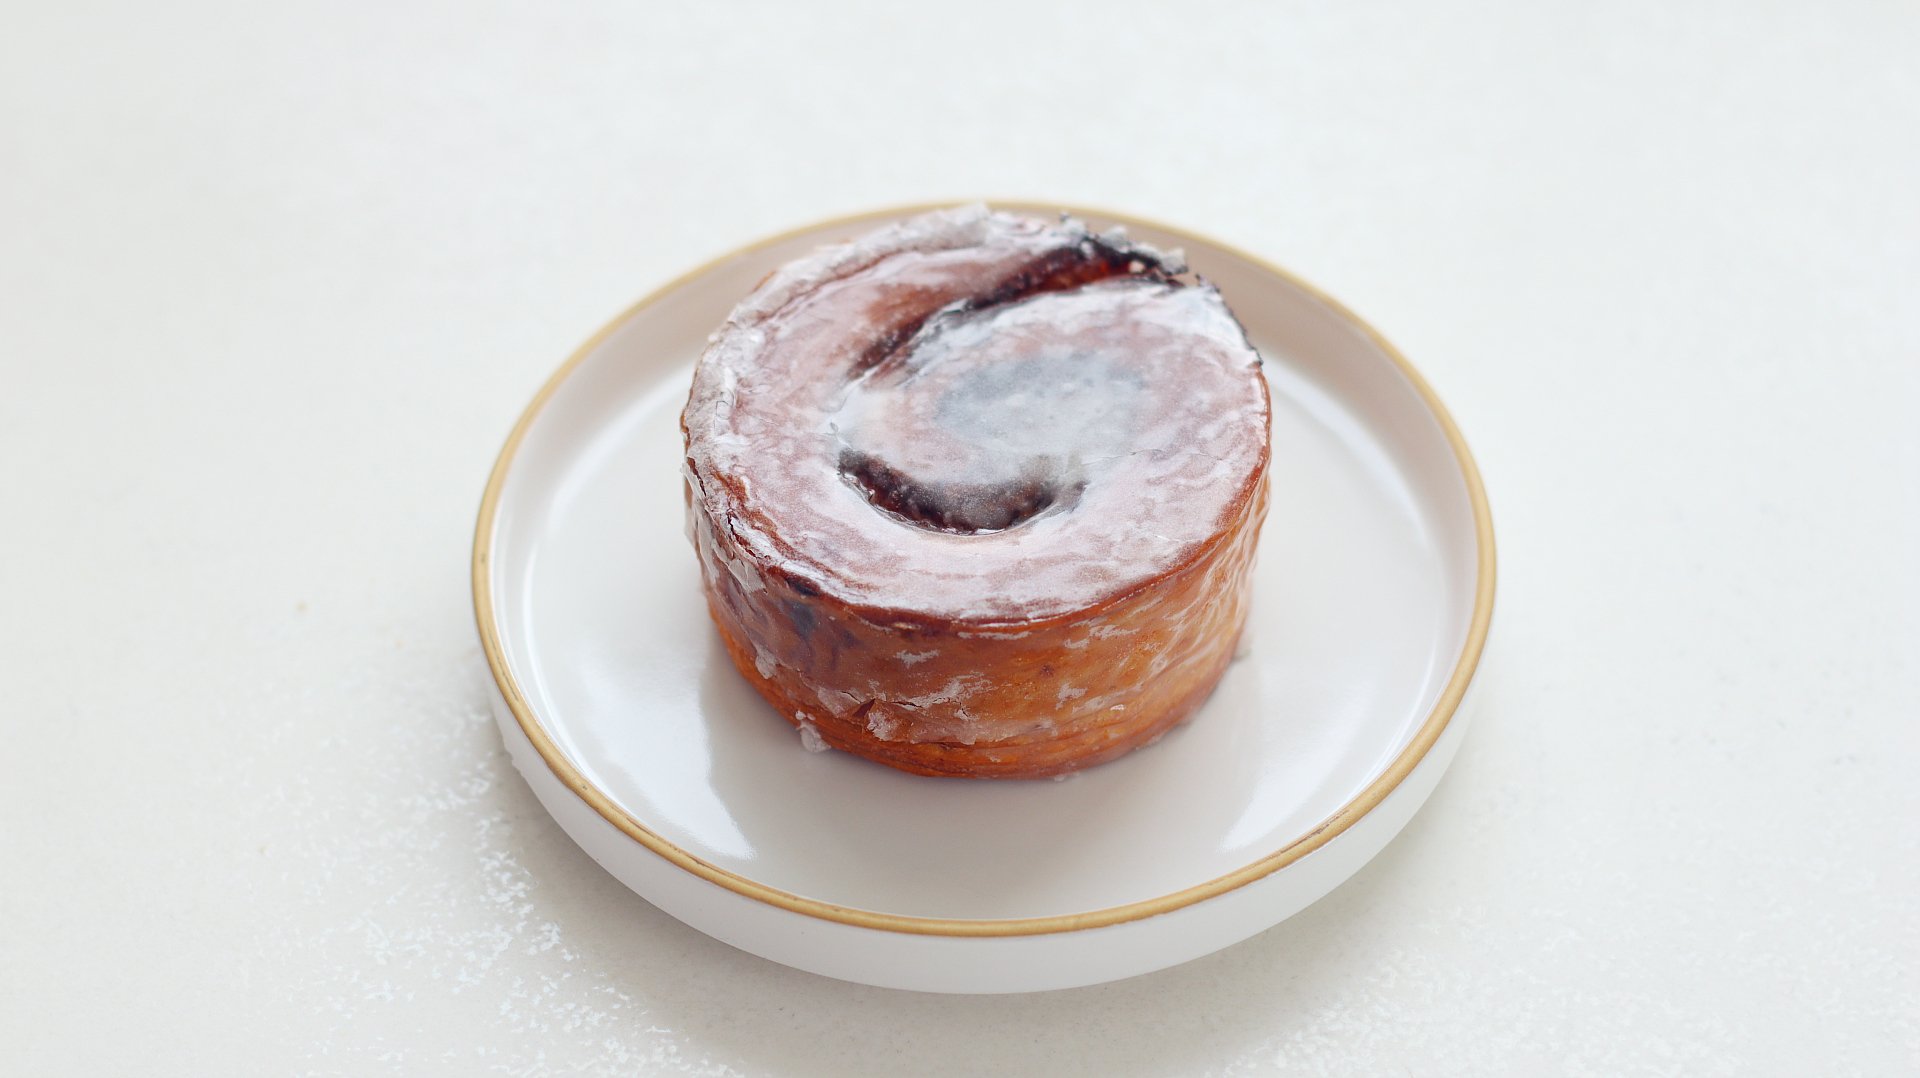
Danish Cinnamon Roll
TIER 2
Danish Cinnamon Roll
In Tier 2 we take the same dough from Tier 1 and fill it with a cinnamon crème pâtissière instead of a traditional cinnamon butter. Then we bake the rolls with a tray on top for the perfect ‘puck’ shape. The cinnamon glaze to finish gives it an extra cinnamon kick and a crackly texture. Make sure to watch the hand lamination technique from the Tier 1 video, as I don’t cover it again in this video.
8-10
ROLLS
Ingredients
Makes 8-10 Rolls
Danish Pastry Détrempe (Dough)
565g Strong White Bread Flour
30g Unsalted Butter, Room Temperature
14g Instant Dry Yeast
230g Whole Milk
55g Whole Eggs
38g Caster Sugar
12g Sea Salt
Buerrage (Butter Block)
250g Unsalted Butter, Room Temperature
25g Plain/All Purpose Flour
Cinnamon Pastry Cream
45g Dark Brown Sugar
10g Ground Cinnamon
70g Egg Yolks
25g Cornflour/Cornstarch
Pinch of Sea Salt
300g Whole Milk
1 Vanilla Pod
25g Unsalted Butter
Cinnamon Icing
400g Icing Sugar
Whole Milk
1 Vanilla Pod
½ Tsp Cinnamon
Pinch of Fine Sea Salt
Special equipment
10 9cmx4cm ring molds
Stand mixer
Thermometer
Rolling pin
Piping bag
Metre ruler
Method
Danish Dough
1. Into the bowl of a stand mixer fitted with a dough hook, add all of the ingredients for the dough. Start with the wet ingredients on the bottom and the dry on top as it makes it easier for everything to incorporate.
2. Knead the mixture on a medium speed, for 6-8 minutes, until the dough feels smooth and elastic, passing the window pane test when you stretch a small piece of the dough. The dough is quite low hydration so initially may look quite dry but should pull together. If it does appear too dry, add up to 20g more milk to help pull it together.
3. Remove the dough from the mixer and briefly knead it on the work surface. Shape it into a rough rectangle, then wrap it in clingfilm, but not too tightly as it will need some room to proof. Place it onto a baking tray and refrigerate overnight. Alternatively if you want to do this whole process in one day, you can chill it for 3 hours.
Buerrage (Butter Block)
1. For the butter block, start by preparing your parchment paper. Take a large sheet, and with a marker, draw a 17.5x20cm square. Flip the paper over so the pen is facing the work surface.
2. Add the butter into the bowl of a stand mixer fitted with a paddle attachment. Add the flour on top, and beat briefly, to combine them and there are no streaks of flour.
3. Scoop the mixture into the centre of the parchment. Wrap the excess parchment around the butter, folding the edges in to match the guides of the neat square you drew. It can help to tape the edges together to stop the parchment paper from moving around or opening up as you roll.
4. Flip it back over and use a rolling pin to roll the butter, pushing it to the edges and creating an even layer of butter across the rectangle of parchment. Place this in the fridge to chill for at least an hour or again, ideally overnight.
Lamination
1. When you are ready to laminate, remove the butter from the fridge, it needs to be 13-14C (55-57F) when you insert a digital thermometer. If it is too cold it will shatter when you start to laminate.
2. Just before it is at temperature, remove the dough from the fridge. Lightly flour it and roll it to just over double the length of the butter, 44cm, but the same width, 17.5cm.
3. The dough will be slightly curved at the top when you roll it out, so I like to trim the dough down, so that it is 40cm in total length. This then gives you a really neat rectangle to fold over your butter.
4. When the butter is at temperature, place it into the centre of the dough and then fold the edges of the dough so they meet in the centre of the butter.
5. Pinch the dough together to form a seam. Using a sharp knife, score the folded edges of the dough.
6. With this seam facing towards you, turn the dough 90 degrees so the seam is now horizontal to your body and give the dough a quick roll, to give it a little bit of width.
7. Turn the dough 90 degrees again so the seam is vertical in line with your body and begin to roll the dough. Working relatively quickly. Apply even pressure and roll the dough into a long even rectangle, flouring very lightly if needed.
8. Don’t focus too much on the length of the rectangle, but more on getting it into an even rectangle that ends up around 5mm thick (0.2”).
9. Once you are happy with the thickness and shape, dust off any excess flour with a brush, and if the ends of the dough have gone a bit wonky, cut them off so you have straight edges on either side.
10. Perform a single fold of the dough, where you take one-third of the dough and fold it up, then take the other third of dough and fold this over the top. This is called a ‘single fold or ‘single turn’.
11. Wrap the dough tightly in cling film, and place it in the freezer for 15 minutes, then into the fridge for 10 minutes.
12. Remove the dough from the fridge, and with the open seam facing you (i.e if you were looking at the dough straight on, you would be able to see where it has been folded over itself), use a sharp knife again, to score the edges of the dough where it is folded.
13. Turn the dough 90 degrees so the open seam is now horizontal to you and give the dough a quick roll, to give it a little bit of width.
14. Turn the dough 90 degrees again so the open seam is facing you again and begin to roll the dough. Roll the dough into a long even rectangle, very very lightly flouring it, just as we did in step 7.
15. Wrap the dough tightly in cling film, and place it in the freezer for 15 minutes, then into the fridge for 10 minutes.
16. Repeat steps 12-14 one more time, completing 3 single folds in total. Chill the dough in the fridge for 1 hour.
Cinnamon Pastry Cream
1. Into a medium bowl add the sugar, salt, cornflour/cornstarch and egg yolks. Whisk together for about 30 seconds, then set this to one side.
2. Meanwhile in a medium saucepan, add the milk and beans scraped from a vanilla pod. Place it over a medium heat and whisk occasionally until it is steaming.
3. Slowly pour the hot milk mixture over the egg yolks and whisk to combine.
4. Pour the mixture back into the pan and cook it over a medium heat, whisking constantly. Once it thickens and begins to bubble, keep cooking it for a further minute.
5. Remove it from the heat and pass it through a sieve into a clean bowl. Add in the butter and whisk to combine. Cover the surface with cling film and refrigerate for at least an hour.
Danish Dough (Continued)
1. Remove the pastry cream from the fridge and whisk it for 1-2 minutes until it is smooth. Add it into a piping bag and set it to one side.
2. Line a baking tray with parchment paper and place 8-10 lightly greased ring molds (9x4cm)
3. Lightly flour the chilled dough, and use a sharp knife to score the folded edges of the dough to release the tension.
4. Roll the dough out, so that it is roughly 27-30cm tall, and 8-10mm thick. Don’t worry about the length.
5. Once you are at the correct thickness, trim the edges of the dough so you are left with a rectangle that is 25cm tall.
6. Then cut the rectangle into 3cm wide strips.
7. Cut quite a large hole in the end of the piping bag, and pipe a thick line of the pastry cream down the entire length of each strip of dough.
8. Roll the dough on itself but not too tightly, then carefully place them into the ring molds.
9. Place the tray into the oven, switched off, and place a small cup of boiling water in the bottom. Change this every 30-45 minutes, proofing the twists until they have puffed up and the layers appear to be separating slightly. It can take 3-4 hours, but don’t worry too much about overproofing them as the dough is resilient. Once it is ready, it should have risen to the edges of the ring molds, with the layers looking like they are separating slightly.
10. Remove them from the oven and pre-heat it to 185C/365F fan assisted.
11. Place a silicon mat or piece of parchment paper on top and then 2-3 heavy trays on top. This will prevent the dough from rising out of the ring molds.
12. Once the oven is hot, load the trays into the oven, and immediately drop the oven temperature to 170C/340F. Bake the danishes for 35-40 minutes. Try to avoid removing the trays on top too soon, so try and look in the oven and see what colour the dough looks like. It should be a deep golden brown colour once they are baked.
13. Remove them from the oven, and remove the ring molds. Flip them over and place them onto a wire rack to cool slightly.
Cinnamon Icing
1. Into a large bowl, add the icing/powdered sugar, salt, beans from a fresh vanilla pod and cinnamon. Slowly start adding milk and whisk the mixture, adding enough milk until you have a runny, glue-like consistency.
2. Keep the danishes on a wire rack, but place a tray underneath.
3. Pour the glaze over the top of each danish, coating them completely. If you need, scoop up the excess glaze from the tray underneath, and re-use it to glaze any remaining danishes.
4. Place them back into the oven, just for 1-2 minutes, until the glaze goes slightly transparent.
5. Remove them from the oven and allow them to cool for a few minutes then serve.
Note – the process can be quite long, that you end up finishing the danishes quite late which is not the ideal time to eat them (!). What I like to do is to bake the danishes, then wrap the tray tightly once they are cool and leave them at room temperature overnight. The next morning, I heat the oven to 175C/345F and just place them back in for 3-5 minutes, until they feel hot to the touch, then glaze them.
Alternatively you can freeze them once baked, and then just reheat them for longer in the oven (8-15 minutes).
Shop the Equipment
Ingredients
140g unsalted butter
185g egg whites
90g ground almonds
185g powdered/icing sugar
90g self-rising/self-raising flour
2g lemon zest
1⁄2 fresh vanilla bean pod or 1 tsp vanilla bean paste
125g blueberries
lightly toasted flaked almonds, for topping
Special equipment
Oval silicone/metal mold pan
Method
1. Preheat the oven to 320°F/160°C.
2. In a small saucepan on the stovetop over low heat, melt the butter. Remove the
saucepan from the heat and allow the butter to cool for 5 minutes.
3. In a medium bowl, whisk the egg whites for 30 seconds or until frothy.
4. Add the ground almonds, powdered/icing sugar and lemon zest. Cut the vanilla bean
lengthways and using the knife to scrape out half of the beans, add these into the
bowl. Whisk until combined.
5. Place a sieve over the medium bowl and sift in the flour. Whisk until the flour has just
been absorbed, about 30 seconds.
6. Add the melted butter and whisk until there are no more streaks of butter.
7. Gently fold the blueberries into the batter.
8. Pour the batter into the cups of an oval silicone/metal mold pan (or the cups of a
cupcake pan/tin) and fill the cups about three-fourths full. Sprinkle a few flaked
almonds over the top of each cup.
9. Place the pan in the oven and bake for 25 or 30 minutes or until the financiers have a
nice golden colour.
10. Remove the pan from the oven and allow the financiers to cool for 5 minutes before
removing them from the pan. Serve while still warm or allow them to cool completely
and then serve later.
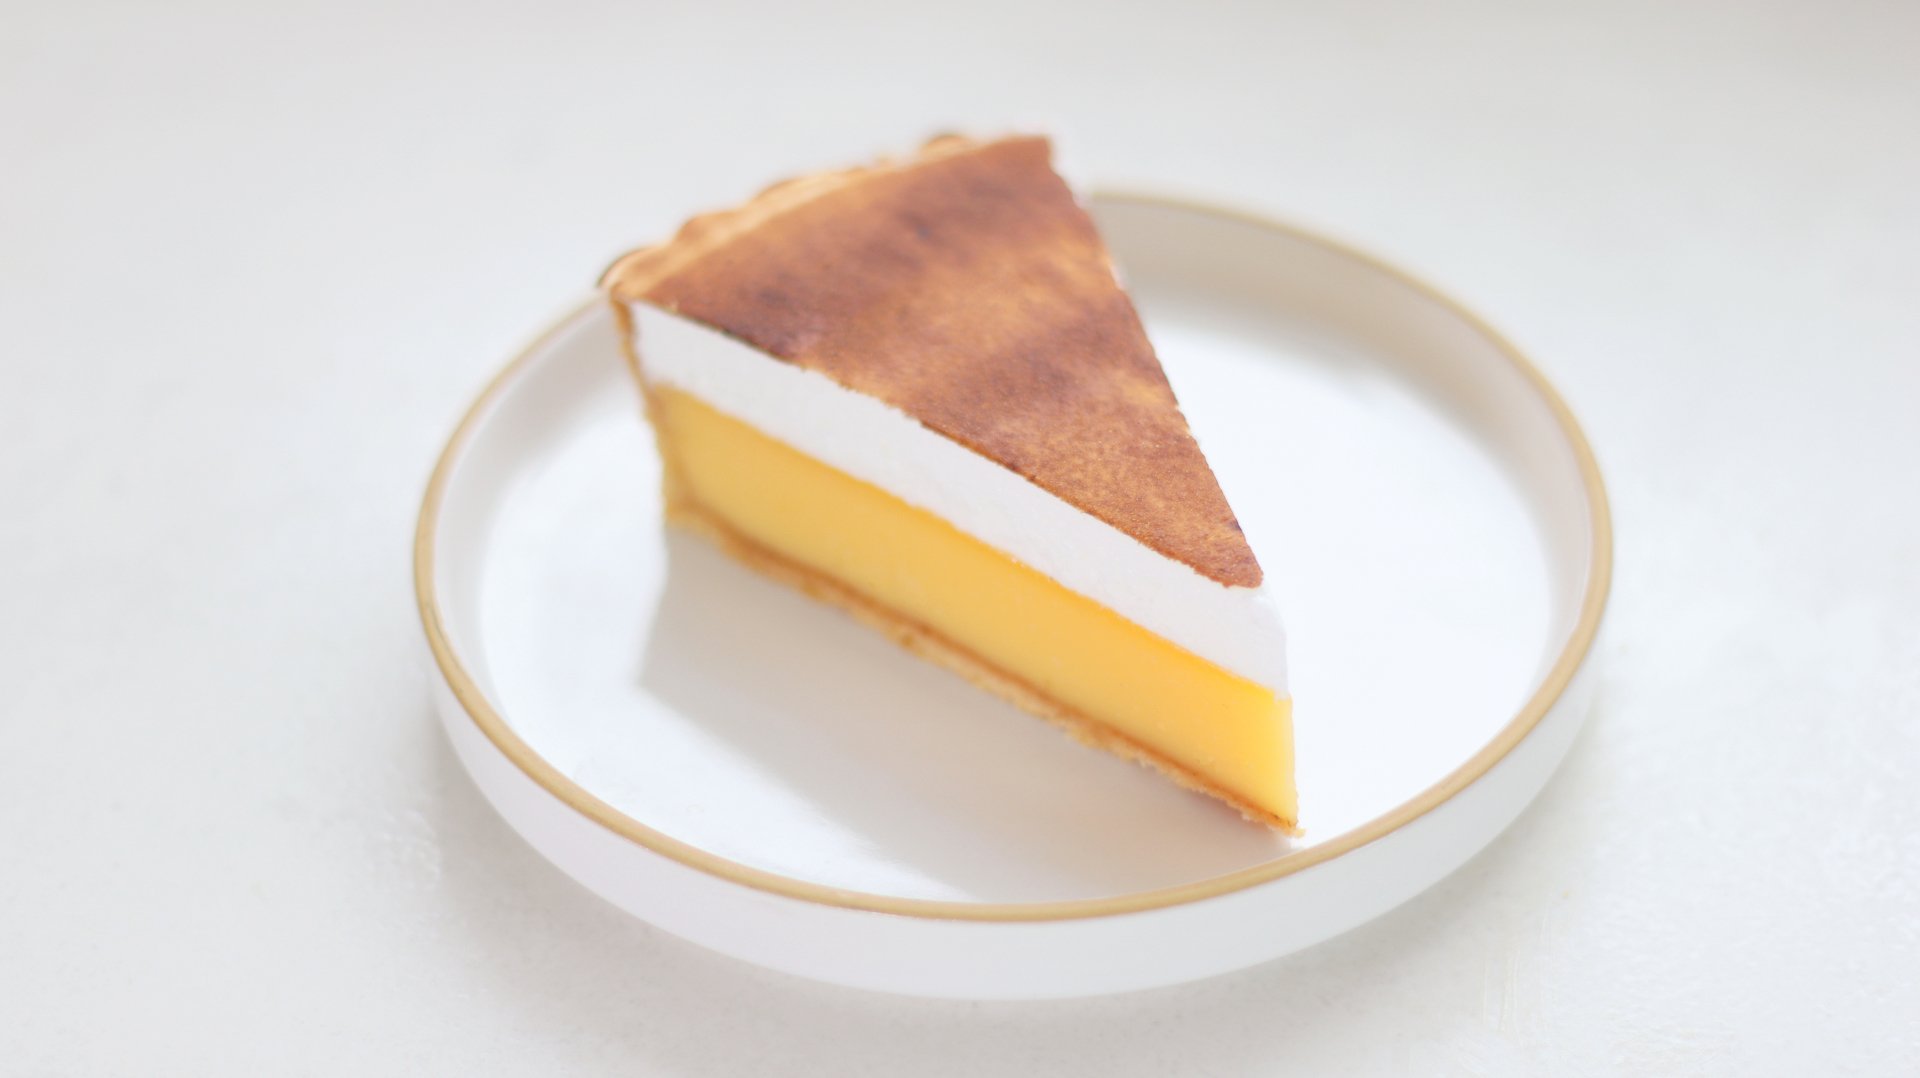
Lemon Meringue Tart
TIER 1
Lemon Meringue Tart
Lemon meringue tart is something I’ve been a bit hesitant to make before – I always thought there was way too much meringue, and it was overly sweet, so it was my mission to be proved wrong! The lemon filling is slightly richer than my Dad’s recipe, with more egg yolks which means it sets slightly firmer. We make a Swiss meringue for the topping, but with less sugar, which we press flat against the filling to create a more modern design.
1
9-INCH TART
Ingredients
Makes 1 9-inch tart
Lemon Sweet Pastry
100g Unsalted Butter, Cold & Cubed
70g Icing/Powdered Sugar, Sifted
Pinch of Fine Sea Salt
Zest ½ Lemon
50g Egg Yolk
200g Plain, All Purpose Flour
Egg Wash
40g Egg Yolk
10g Double/Heavy Cream
Lemon Filling
160g Whole Eggs
120g Egg Yolks
230g Caster/ White Sugar
200g Double/Heavy Cream
6g Lemon Zest
150g Lemon Juice
Swiss Meringue
100g Egg Whites
100g Caster/White Sugar
Special equipment
Stand mixer
9-inch fluted tart ring
Hand blender
Baking beans
Blow torch
Digital thermometer
Method
Lemon Sweet Pastry
1. Into the bowl of a stand mixer, add the butter, icing sugar, salt and lemon zest. With the paddle attachment, beat the mixture for 2-3 minutes, scraping it down a few times in between, until you have a smooth paste.
2. Add in the egg yolks, and beat again, until the mixture is evenly combined, you will need to scrape down the bowl a few times again.
3. Tip in the flour, and use a rubber spatula to scrape the bottom of the bowl to make sure the butter doesn’t get stuck. Scrape the sides, and then mix on a low speed until it pulls together to form a dough.
4. Scoop the dough out onto your work surface, and give it a quick knead just to bring it together. Shape it into a disc and warp it in clingfilm, before refrigerating for an hour or longer.
5. Once it’s chilled, remove it from the fridge and let it soften slightly at room temperature. The dough needs to be cold but flexible. If it is too cold when you roll it, it will crack.
6. Flour the dough and your rolling pin and applying even pressure, roll the dough out into a large, rough circle shape, around 3-5mm thick.
7. Working quickly, carefully lift this into a 23cm fluted tart ring on a baking tray. Use your fingers to press the dough into the side of the tin, then with the excess dough, fold it to create a thick rim around the outside of the tin. We will remove this excess later, but it will help to prevent the dough from shrinking as it bakes.
8. Dock the bottom of the pastry with a fork, and then freeze it for 30 minutes.
9. Preheat the oven to 175C Non-fan assisted (345F or 160C fan-assisted).
Lemon Filling
1. Into a large measuring jug, add the cream, sugar, eggs and egg yolks and blend until smooth.
2. Add in the lemon juice and zest, and blend again to combine, avoiding adding too many air bubbles.
3. Place a sheet of clingfilm on the surface, and refrigerate until needed.
Pastry Continued
1. Once the pastry has chilled, scrunch a large circle of parchment/baking paper up, then press it firmly into the tart. Fill it to the top with baking beans or rice.
2. Place it into the centre of the oven and bake for 25 minutes. Remove the parchment paper and beans, then bake for a further 5-10 minutes until it is a pale golden brown.
3. Whisk together the egg wash ingredients, then brush these all over the tart. Bake for a further 8-15 minutes, or until it is a deep golden colour.
4. As soon as it is out of the oven, use a serrated knife, holding it against the edge of the tin, and carefully trim off the excess pastry. Brush out any crumbs. Lower the oven temperature to 110C Non-fan assisted (230F or 95C fan-assisted).
5. Remove the lemon filling from the fridge and peel off the clingfilm. Scoop off any remaining bubbles with a spoon, then pour the mixture into a medium saucepan.
6. Place the pan onto a medium low heat and stir constantly until it reaches 40C/104F on a digital thermometer.
7. Immediately remove it from the heat and gently pour it through a sieve, back into a tall measuring jug.
8. Place the tart shell, on a tray, into the centre of the oven and pour the lemon filling in. Use a blow torch to pop any remaining bubbles.
9. Bake for around 55 minutes, or until the filling has just set when you gently wobble the tray.
10. Remove it from the oven and allow it to cool for 30 minutes at room temperature, before refrigerating for 1-2 hours.
Swiss Meringue
1. Into the bowl of a stand mixer (or a medium bowl if using an electric hand whisk), add the egg whites and sugar.
2. Place this over a pan of gently simmering water, whisking constantly until it reaches 65C/149F on a digital thermometer.
3. Immediately remove it from the heat, and place it onto a stand mixer fitted with the whisk attachment. Whisk for 5-7 minutes, until you have a medium stiff peak.
4. Remove the lemon tart from the fridge and with it still in the tin, spread the meringue over the top. Then using a large offset spatula, starting at one edge, press it firmly against the rim of the tin and drag it firmly across the tin, to smooth the top. You can do this a few times if needs be.
5. Use a blow torch to caramelise the meringue to an even golden brown colour. Alternatively place it under a hot grill, keeping a very very close eye on it.
6. Remove the tart from the tin and slice it with a hot knife to serve.
Shop the Equipment


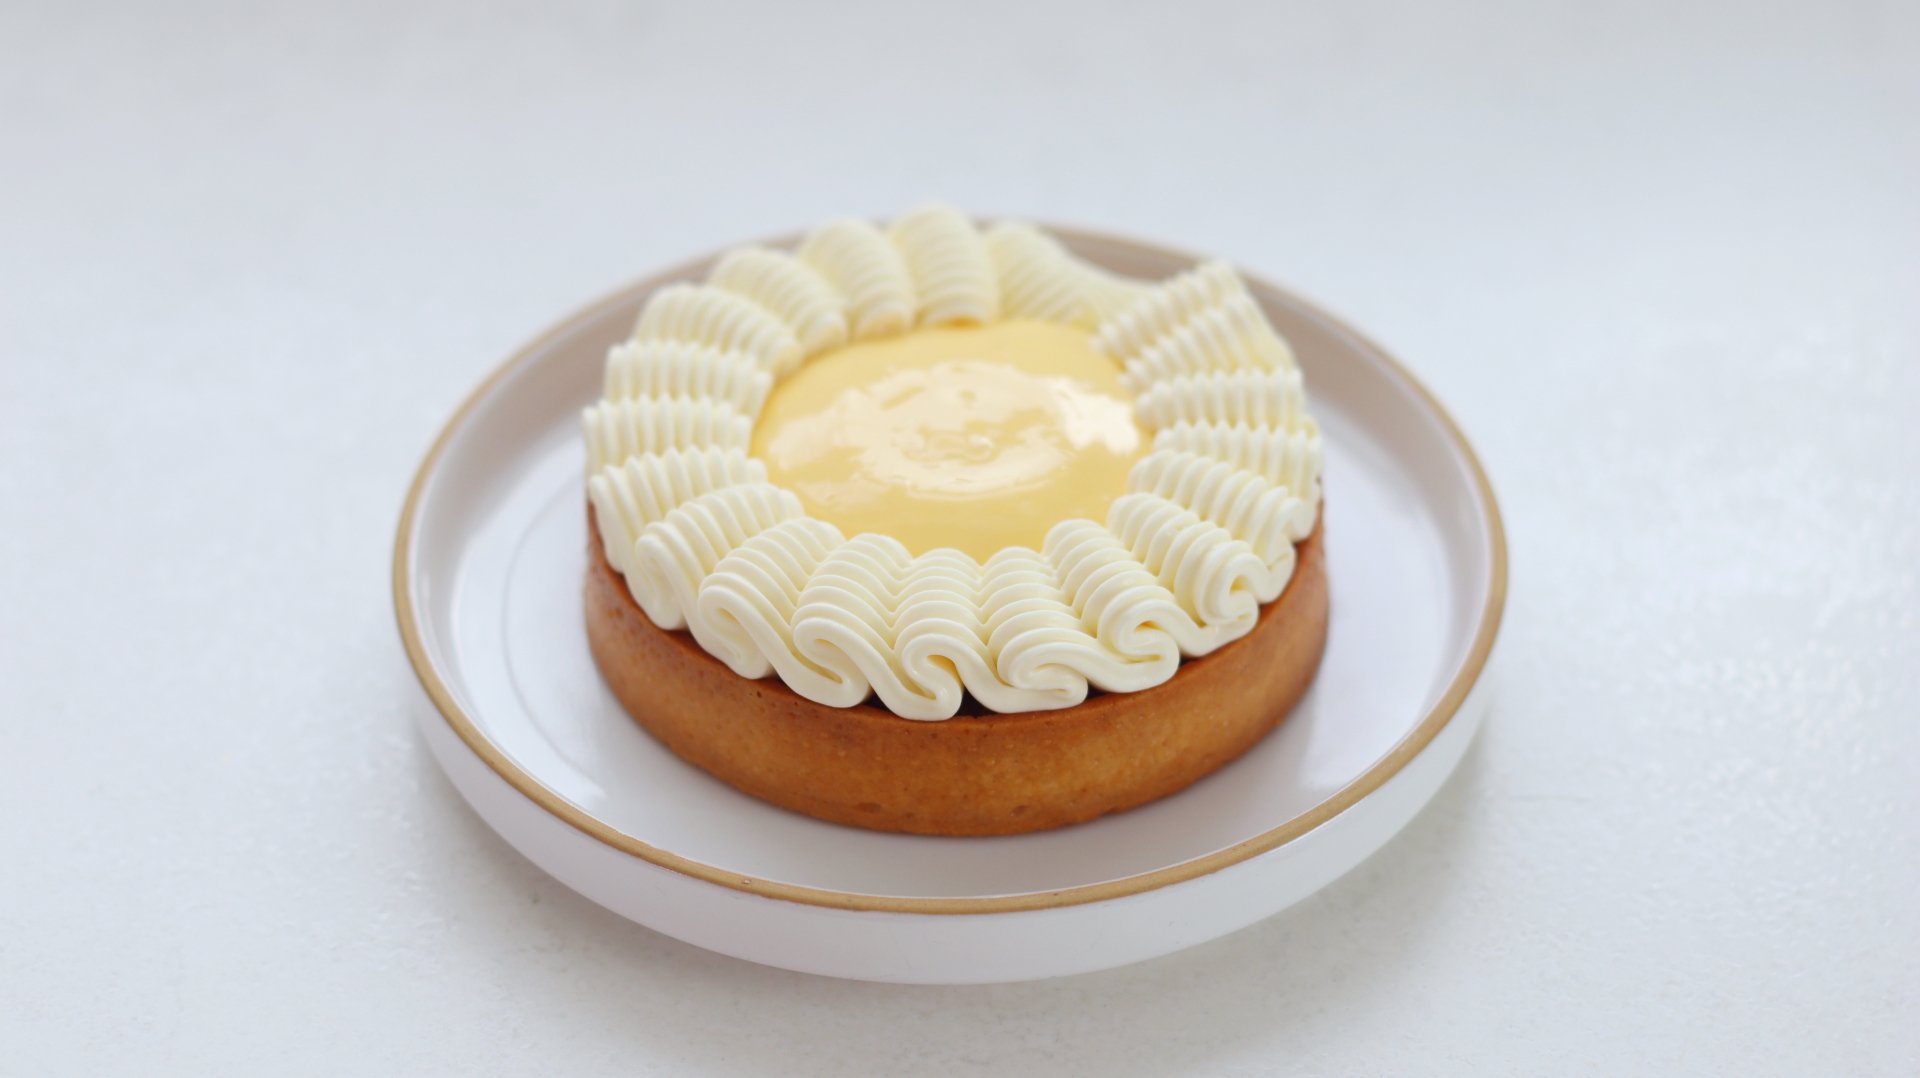
Lemon & White Chocolate Tarts
TIER 2
Lemon & White Chocolate Tart
For Tier 2, we use the same lemon filling as Tier 1, but instead of baking it we cook it like a curd. It sits on top of an almond mirliton, with a secret layer of zingy lemon confit, topped with a stunning white chocolate namelaka which is piped using a basket weave nozzle. Because we cook the lemon filling like a curd, it has a slightly softer texture, more like a cremeux which contrasts all the textures in the tart really well.
4
INDIVIDUAL TARTS
Ingredients
Makes 4 individual tarts
White Chocolate Namelaka
3g Powdered Gelatin (250 Bloom) + 18g Cold Water OR 1 Sheet of Leaf Gelatin
100g Whole Milk
10g Glucose or Honey
185g White Chocolate, Melted
200g Double/Heavy Cream, Cold
Lemon Confit
8g Lemon Zest
130g Lemon Juice
65g Caster/White Sugar
Lemon Sweet Pastry
100g Unsalted Butter, Cold & Cubed
70g Icing/Powdered Sugar, Sifted
Pinch of Fine Sea Salt
Zest ½ Lemon
50g Egg Yolk
200g Plain, All Purpose Flour
Egg Wash
40g Egg Yolk
10g Double/Heavy Cream
Lemon Filling
80g Whole Eggs
60g Egg Yolks
115g Caster/ White Sugar
100g Double/Heavy Cream
3g Lemon Zest
75g Lemon Juice
20g Unsalted Butter, Cold & Cubed (Optional)
Roasted Almond Mirliton
105g Unsalted Butter
85g Roasted Almond Powder
85g Icing/Powdered Sugar
110g Egg Whites
½ Fresh Vanilla Pod
Zest ½ Lemon
Special equipment
Hand blender
Stand mixer
2 silicon mats (optional)
4 4-inch perforated tart rings
Multi-wheel pastry cutter (optional)
Digital thermometer
Piping bags
Basket weave nozzle
Rotating cake stand (optional)
Method
White Chocolate Namelaka
1. Into a small dish, add the powdered gelatin and cold water. Stir them together and allow it to bloom for 10 minutes at room temperature. If using leaf gelatin, soak this in a bowl of cold water.
2. Melt the white chocolate in a bowl over a pan of gently simmering water, and then set this to one side.
3. Meanwhile, add the milk and glucose/honey to a small saucepan. Stir it occasionally over a medium heat, until it is steaming and the glucose has dissolved.
4. Scoop in the bloom gelatin (or squeeze the excess water from the leaf gelatin and drop this in). Stir it together until the gelatin has completely dissolved.
5. Pour the hot milk mixture over the melted white chocolate in three parts, stirring in tight circles in the centre with a rubber spatula, to emulsify the mixture. Initially it will look slightly split but it will pull together.
6. Finally, pour in the cold cream and blend it with a hand blender, until smooth. Cover the surface with cling film and refrigerate overnight or a minimum of 6 hours.
Lemon Confit
1. Add the lemon zest into a small saucepan, and cover with cold water. Bring the mixture to the boil, then immediately pass it through a sieve. Repeat this two more times, to remove the bitterness from the zest.
2. Add the blanched zest, lemon juice and sugar into a saucepan, and note the total weight of the ingredients in the pan, on a digital scale.
3. Place the pan on a medium low heat, and simmer until the total weight of the pan has reduced by around 100g.
4. Pour the mixture into a small dish, covered with clingfilm and refrigerate overnight.
Lemon Sweet Pastry
1. Into the bowl of a stand mixer, add the butter, icing sugar, salt and lemon zest. With the paddle attachment, beat the mixture for 2-3 minutes, scraping it down a few times in between, until you have a smooth paste.
2. Add in the egg yolks, and beat again, until the mixture is evenly combined, you will need to scrape down the bowl a few times again.
3. Tip in the flour, and use a rubber spatula to scrape the bottom of the bowl to make sure the butter doesn’t get stuck. Scrape the sides, and then mix on a low speed until it pulls together to form a dough.
4. Scoop the dough out onto your work surface, and give it a quick knead just to bring it together.
5. Place the dough onto a large silicon mat. Place a second silicon mat on top and roll the mixture into a rough circle, getting it as thin as possible (around 3-5mm). If you don’t have silicon mats you can roll the dough between parchment paper but it will be very difficult as it will slip and slide all over the place!
6. Once you have a rough circle of dough, place it into the freezer for 30m.
7. Once chilled, remove it from the freezer and working quickly, peel the silicon mat off of the dough. Take 2 of the 4” perforated ring molds (very lightly greased with soft butter) and press these into the dough.
8. Lift them up and place them onto a perforated tray lined with a perforated baking mat.
9. Using a multi-wheel pastry cutter (or a ruler and a sharp knife) cut 2 long strips of dough, ensuring the width is slightly more than the height of your tart shells. Take the strip of dough and place it inside the tart ring, using your fingers to carefully press the walls against the base of the pastry. If at any point you feel the pastry is getting too warm, place it in the freezer for 5-10 minutes then carry on. Place the tarts into the freezer for 30 minutes.
10. Take the spare dough and form it back into a dough ball. Repeat steps 5-8 to make two more tart shells.
11. Preheat the oven to 175C/345F Non-fan assisted (160C fan-assisted).
12. Use a knife to trim the excess pastry from the tart rings so it is flush, then place the tarts into the centre of the oven for around 20 minutes, or until they are a light golden brown colour.
13. Remove them from the oven and allow them to cool for 5 minutes before carefully removing the tart rings.
14. Mix the egg wash ingredients together and use a pastry brush to paint this over the entire surface of the tart shells. Place them back into the oven and bake for a further 5-10 minutes, until the tarts are a deep golden brown colour. Set aside to cool.
Lemon Filling
1. Into a medium saucepan, add all of the ingredients for the lemon filling, excluding the butter.
2. Whisk it constantly over a medium heat, until it reaches a temperature of 82-84C (179-183F) on a digital thermometer.
3. Immediately remove it from the heat and pass it through a sieve, into a tall measuring jug.
4. Add in the cold butter and blend until smooth with a hand blender.
5. Pour the mixture onto a baking tray and cover the surface with clingfilm. Refrigerate it for 1-2 hours (or longer) until it is a thicker, more pipeable consistency.
Almond Mirliton
1. Into a small saucepan, add the butter and over a medium heat, until it has melted. Remove it from the heat and allow to cool for 5 minutes.
2. Add the remaining ingredients into a medium bowl and whisk to combine, before pouring in the melted butter and whisking to combine.
3. Cover the surface of the mixture with cling film and refrigerate for 1 hour. Meanwhile, set the oven to 160C/320F non-fan assisted (145C fan-assisted).
4. Once it has cooled, pipe the mixture into the tart shells, filling them up just above ¾ full. If you want you can also sprinkle some toasted flaked almonds on.
5. Place the tarts into the centre of the oven and bake for 20-25 minutes, or until it is a golden colour on top. Allow to cool for 30 minutes at room temperature.
Assembly
1. Remove the lemon confit from the fridge which should now be a thicker, marmalade like consistency.
2. Pipe a few dollops onto the top of the cooled tart, and spread this to the edges with the back of a spoon. It is quite sharp so you don’t need to overload the tart.
3. Remove the white chocolate namelaka from the fridge and add into the bowl of a stand mixer fitted with a whisk attachment. Whisk on a medium speed until the mixture holds a medium stiff peak.
4. Add it into a piping bag fitted with a basket weave nozzle.
5. Place the tart into the centre of a rotating cake stand and holding the piping bag at about a 60 degree angle, apply even pressure, then push the nozzle slightly forward to create an initial ruffle of buttercream, before pulling it back to fold the buttercream over itself. Continue this motion in one direction without stopping so the folds connect smoothly, creating an even, continuous ruffle/weave. Because of the type of nozzle it is a little difficult to join the lines up seamlessly, so you just have to neatly pull the piping bag away to create a tail.
6. Remove the lemon filling from the fridge and add this into a piping bag, pipe it into the centre of the tart, filling it just below the rim of the cream.
7. They are now ready to serve.
Shop the Equipment


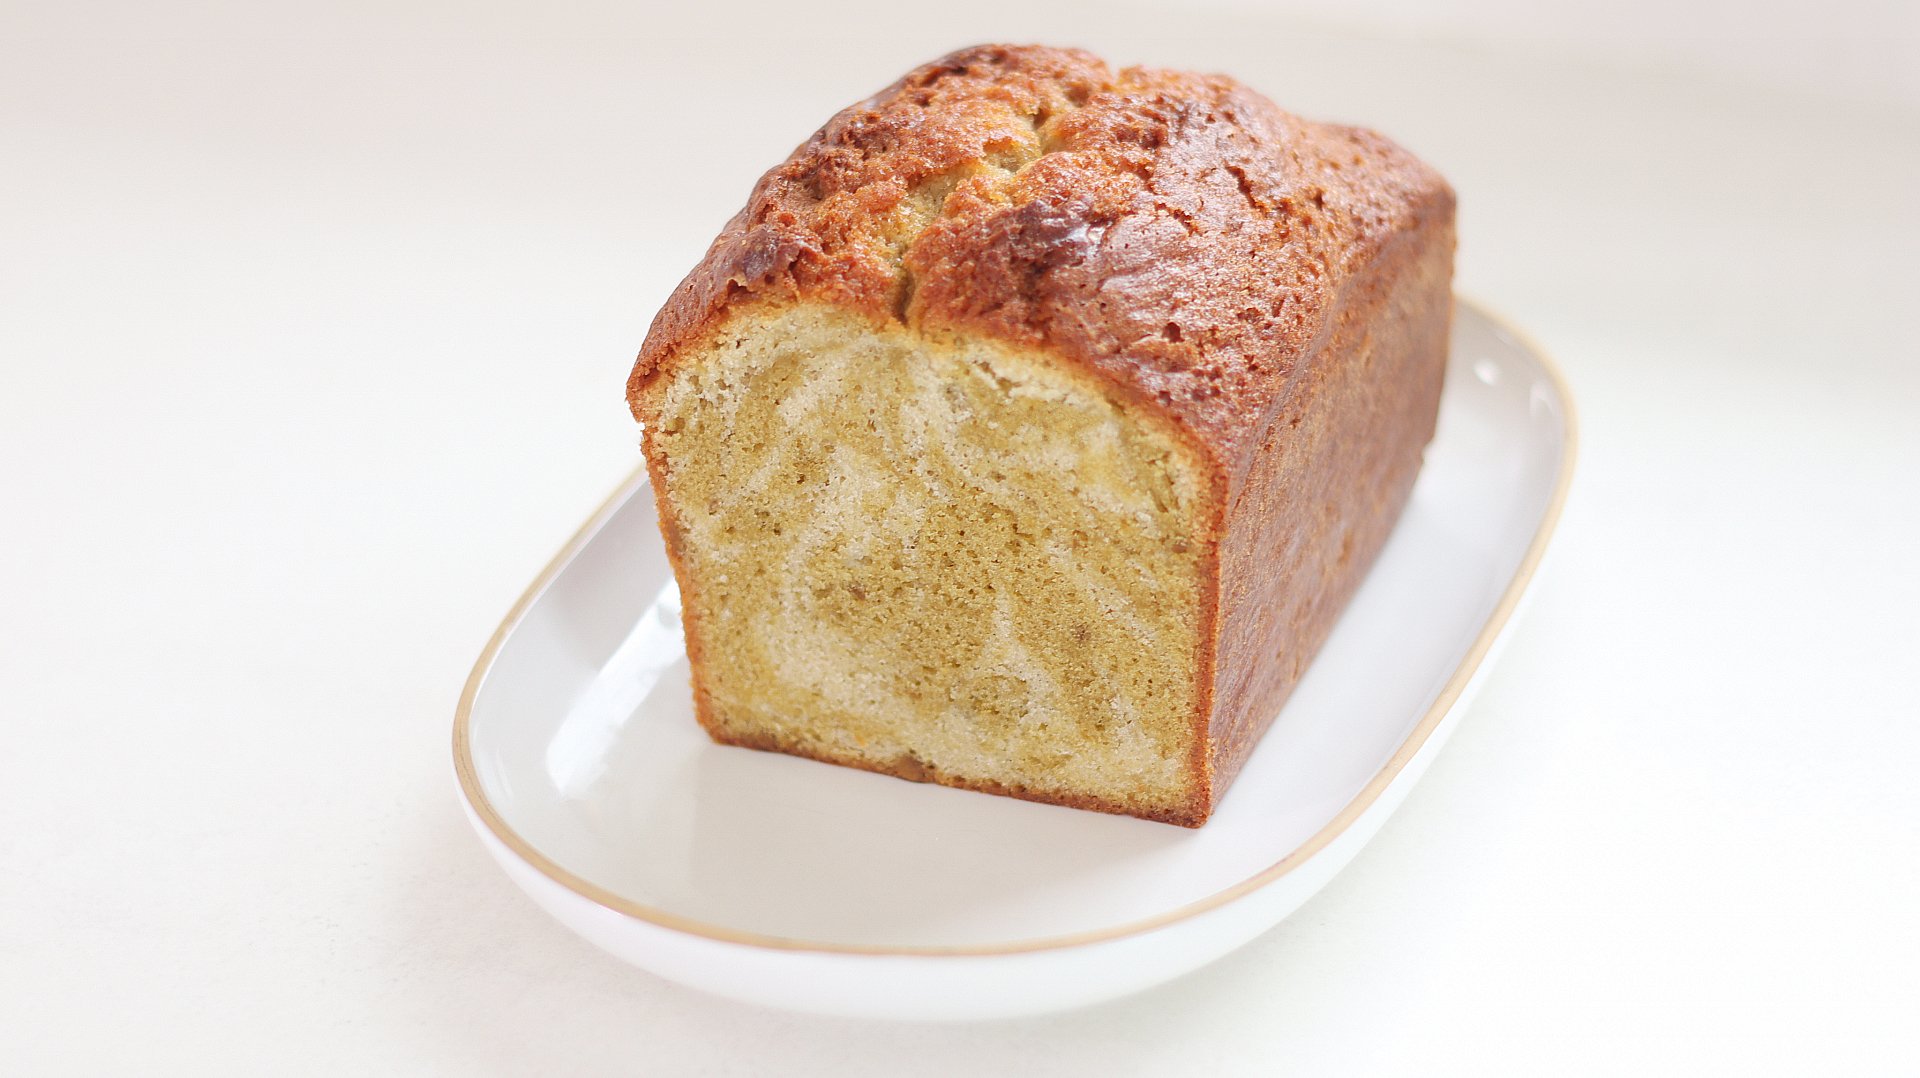
Pistachio Marble Travel Cake
TIER 1
Pistachio Marble Travel Cake
The beauty of this cake lies in the pistachio, a flavour that’s hugely popular right now. Two batters, vanilla and pistachio, are gently swirled together to create a stunning natural green, with the added excitement of discovering what the pattern will be when you slice it! The cake is lovely on its own, but can be elevated with a really simple chocolate glaze too (try this one, with pistachios instead of peanuts!).
1
2lb CAKE
Ingredients
Makes 1 2lb cake
Vanilla Sponge
105g Unsalted Butter, Soft
175g Caster/White Sugar
1 Fresh Vanilla Bean or ½ Tsp Vanilla Bean Paste
130g Whole Eggs
175g Plain/All-Purpose Flour
6.5g Baking Powder
Pinch of Fine Sea Salt
70g Whole Milk
Pistachio Sponge
120g Whole Eggs
145g Caster/White Sugar
65g Double/Heavy Cream
110g Plain/All-Purpose Flour
Pinch of Fine Sea Salt
5g Baking Powder
130g Pure Pistachio Paste
90g Unsalted Butter to make 50g Brown Butter
Soft Butter To Pipe
Special equipment
2lb loaf tin
Stand mixer (optional)
Piping bags
Method
1. Preheat the oven to 165C/330F Non-fan Assisted (150C Fan). Lightly grease a 2lb/900g loaf tin with butter and coat the sides and base with parchment paper. Set to one side.
2. Start by making the brown butter for the pistachio sponge as this will need some time to cool. Add the unsalted butter into a small saucepan and place it onto a medium heat. Cook the mixture until the butter has melted and begins to smell nutty and caramelised. Immediately remove it from the heat and pour it into a bowl to cool.
3. For the vanilla batter, into the bowl of a stand mixer, or a large mixing bowl if you are using an electric hand mixer, add the soft butter, sugar and vanilla. Beat on a medium speed for 1-2 minutes, with the paddle attachment until it is a smoother consistency, scraping down the bowl as needed.
4. Next, add the eggs in 3-4 additions, slowly incorporating them as the mixer is beating. Once you have added all the eggs, scrape the bowl again.
5. Into a bowl, sift together the flour, baking powder and salt, and then tip this in a mix on a low speed until there are no more dry ingredients.
6. Finally, add in the milk and mix just until you have a smooth cake batter.
7. Scrape the mixture out of the bowl and into a piping bag and set this to one side.
8. For the pistachio cake batter, add the eggs and sugar into the bowl of a stand mixer, fitted with a paddle attachment and beat for 2 minutes on a medium speed. Then, pour in the cream and mix to combine.
9. Meanwhile, sift together the flour, salt and baking powder. Tip this into the bowl and mix just until there are no more dry ingredients.
10. Add in the pistachio paste and mix until it is completely combined.
11. Finally, weigh 50g of brown butter that you made earlier and pour this in, mixing until there are no streaks. Add the cake batter into a piping bag.
12. Pipe alternate lines of the pistachio and vanilla cake batter into the tin, filling it up until you have used all of the batter in the cake bags.
13. Take a skewer, and starting at one end of the cake tin, zig zag this through the batter until you get to the other end, and then drag the skewer vertically, through the centre of the cake.
14. Take a small amount of soft butter and add this into a piping bag. Pipe a thin line down the centre of the cake.
15. Place it into the centre of the oven and bake for around 75 minutes, or until a skewer inserted into the centre comes out clean.
16. Once baked, tip it out of the tin onto a wire rack, and immediately wrap it in clingfilm. Refrigerate the cake overnight.
17. The next day, allow the cake to come to room temperature for at least 45 minutes before serving.
Shop the Equipment

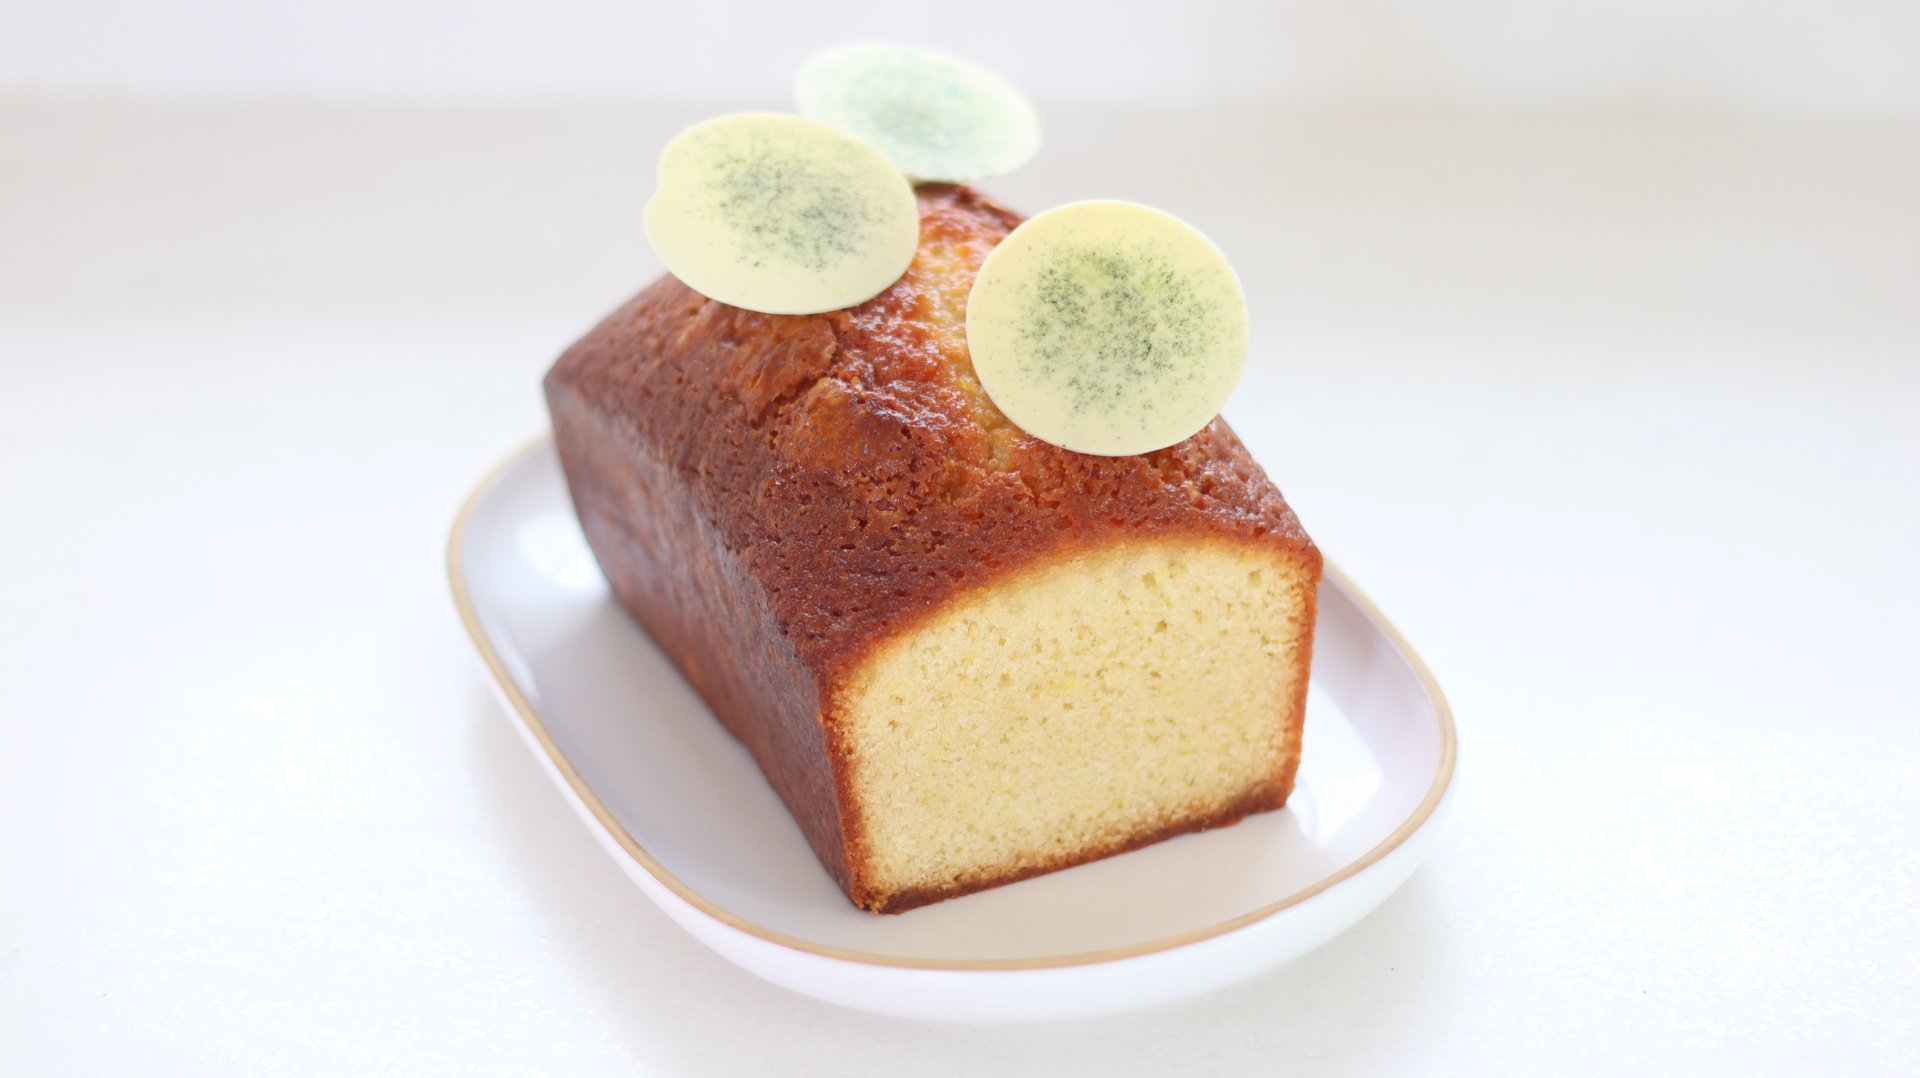
Lemon & Olive Oil Travel Cake
TIER 2
Lemon & Olive Oil Travel Cake
Now I usually just stick to olive oil in my focaccia, but it really works in this cake, adding a subtle fragrance that works so well with the citrus. The cake is so soft and, in my opinion, tastes even better after a few days! The cake batter is simple to pull together, but we’re elevating it with a professional white chocolate decoration that you’d find in most Parisian bakeries. If you’re new to tempering chocolate, check out my video from the archives.
1
2lb CAKE
Ingredients
Makes 1 2lb Cake
Lemon & Olive Oil Sponge
300g Caster Sugar
Zest 3 Lemons (4g)
200g Whole Eggs
140g Double/Heavy Cream
240g Self Raising Flour, Sifted (or 240g Plain/All Purpose Flour with 2 Tsp Baking Powder)
2g Fine Sea Salt
80g Olive Oil (or a neutral oil)
Soft Butter, To Pipe
Lemon Soaking Syrup
60g Lemon Juice
60g Water
120g Caster/White Sugar
White Chocolate Decoration
150g Tempered White Chocolate
Green Food Colour Powder
Lemon Whipped Ganache
350g Double/Heavy Cream
70g White Chocolate, Chopped
3g Powdered Gelatin (250 Bloom) + 18g Cold Water (or 1 Sheet of Leaf Gelatin, any strength)
Zest ½ Lemon
Special equipment
2lb loaf tin
Stand mixer
Piping bags
Large round tip nozzle
Hand blender
Acetate
Method
1. Preheat the oven to 165C/330F Non-fan Assisted (150C Fan). Lightly grease a 2lb/900g loaf tin with butter and coat the sides and base with parchment paper. Set to one side.
2. Into the bowl of a stand mixer, add the sugar and lemon zest. Rub these together for a minute to release the citrus oils.
3. Add the eggs on top and whisk for 2 minutes on a medium speed. Then pour in the cream and mix just to combine.
4. Scrape any lemon zest off the whisk, back into the bowl, then add in the sifted flour & salt on top and whisk on a low speed just until the dry ingredients have been incorporated.
5. Finally, pour in the olive oil and whisk again just until combined and there are no streaks of oil.
6. Pour the batter into the tin, then add some soft butter to a piping bag and pipe a very thin line, lengthways down the centre of the cake.
7. Place it into the centre of the oven and bake for 75-80 minutes, or until a skewer inserted into the centre comes out clean.
8. While the cake is baking, prepare the sugar syrup by placing all of the ingredients into a small saucepan and bring to the boil. Set to one side.
9. Remove the cake from the oven and immediately tip it out of the tin onto a wire rack with a tray underneath.
10. Pour the syrup all over the cake, then immediately wrap it tightly in clingfilm and refrigerate overnight.
11. For the lemon cream, add the powdered gelatin into a small bowl and pour the cold water over the top. If using a gelatin sheet, soak this in a bowl of cold water. Let this sit for 10 minutes.
12. Add the white chocolate into a tall measuring jug and set to one side.
13. Add 250g of the cream to a small saucepan, along with the lemon zest. Place this over a medium heat until it is steaming.
14. Remove it from the heat and pour this over the white chocolate, and scoop the bloomed gelatin on top (or squeeze the water out of the leaf gelatin and add this in). Let this sit for 2 minutes.
15. Blend with a hand blender until smooth. Then pour in the remaining 100g of cold cream and blend again. Transfer the mixture to a bowl, cover the surface with clingfilm and then place it in the refrigerator, ideally overnight.
16. The next day, remove the cake from the fridge and allow it to come to room temperature for an hour.
17. Prepare the tempered white chocolate and add this into a small piping bag. You only need a small amount of white chocolate for the decorations, but if you are tempering the chocolate by hand, it is easier to temper a larger quantity (like 300-400g). With the leftover tempered white chocolate, just pipe it into small discs and then once they are set, add them back into your bag of white chocolate to use again another time!
18. Onto a long strip of acetate, dust a series of very small patches of green food colour powder. Pipe a small dollop of tempered white chocolate on top of each patch of colour powder, about 1” wide.
19. Place a second strip of acetate on top, and then use the back of a cup or something flat and round, and press it gently until the chocolate forms a disc shape.
20. Lift the acetate onto a baking tray and place it into the fridge for 10 minutes. You may need to put another baking tray gently on top just to stop the chocolate from curling up as it sets (but this doesn’t really matter!)
21. Add the lemon whipped ganache into the bowl of a stand mixer (or a large bowl if you are using an electric hand mixer). Whisk on a medium speed until it reaches a medium stiff peak. Add the mixture into a piping bag fitted with a large round tip nozzle.
22. Pipe a few dollops of the cream over the top of the cake, then remove your chocolate discs from the fridge, peeling off the acetate to reveal the discs.
23. Gently press them onto the cream. The cake is now ready to serve. You can serve slices with more of the remaining cream.
Shop the Equipment

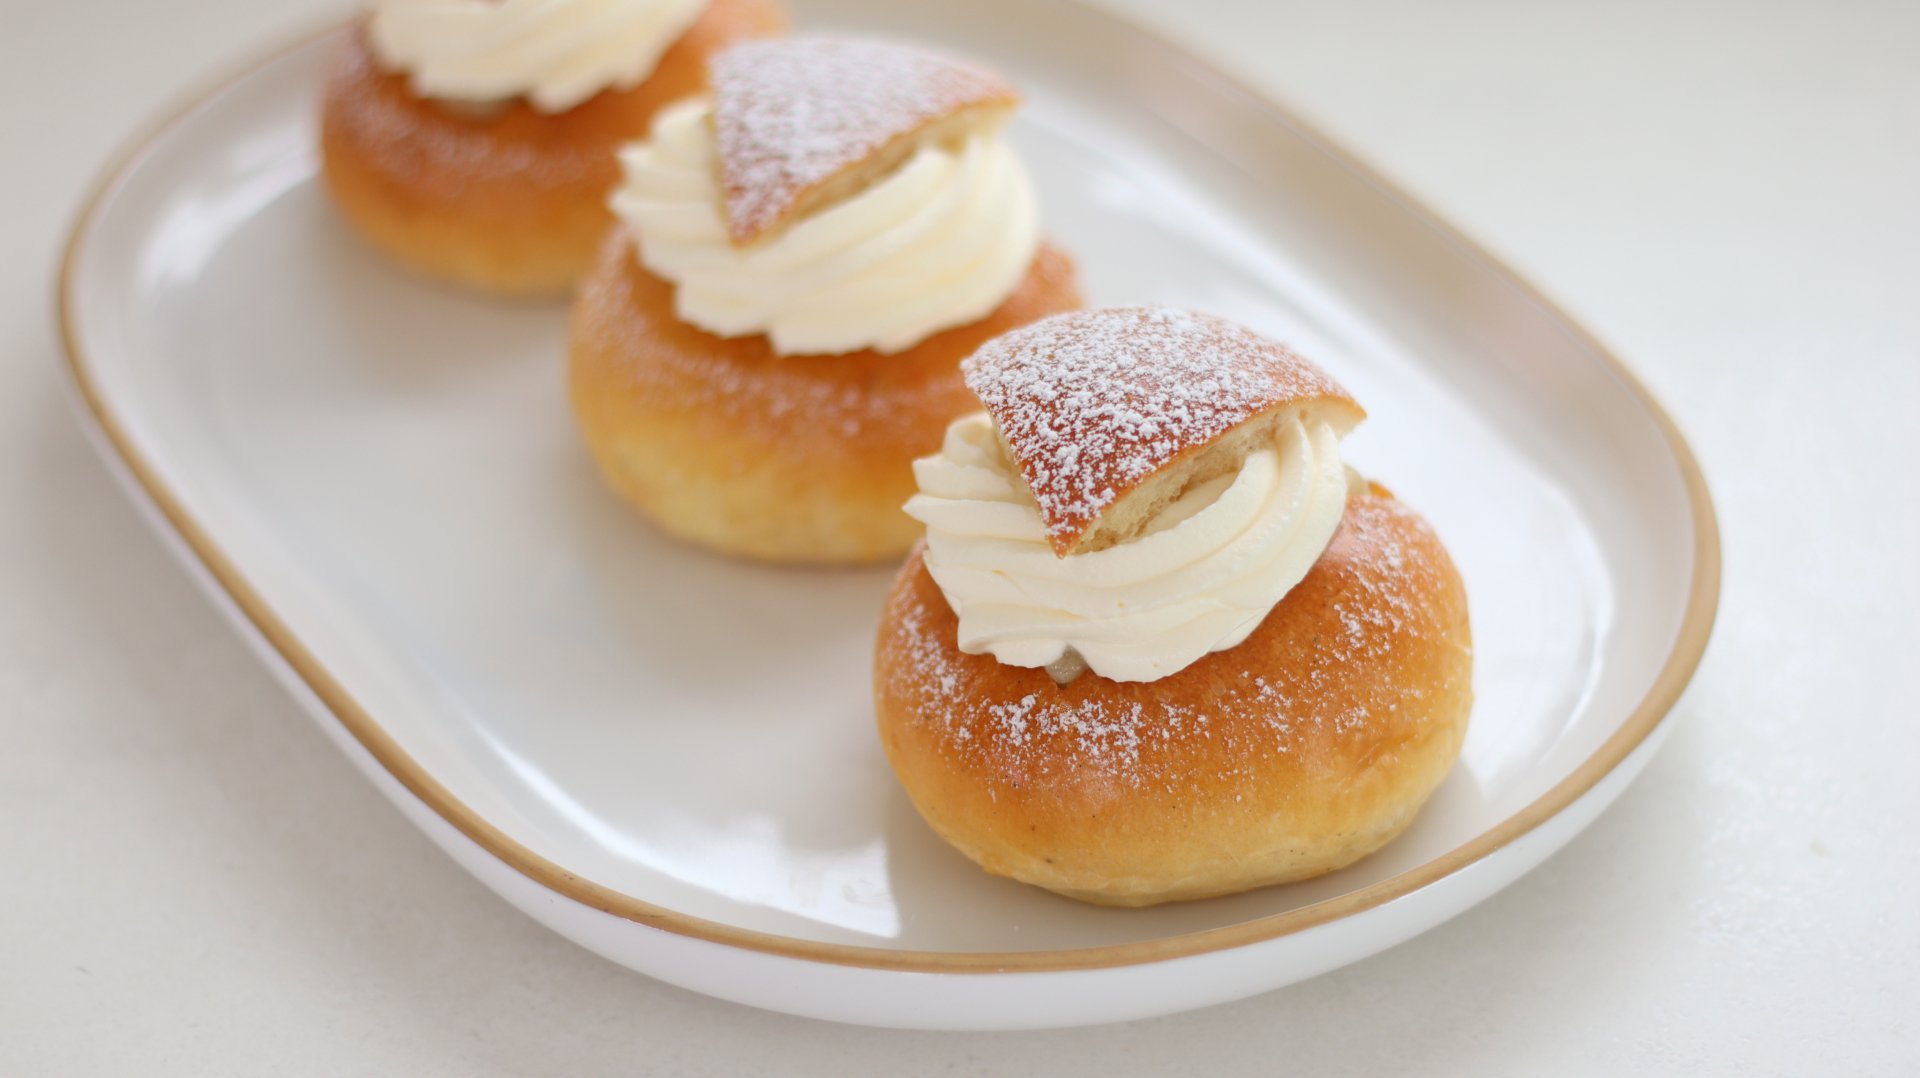
Swedish Semlor Buns
TIER 1
Swedish Semlor Buns
I will admit I’m a bit early to be sharing a semla recipe with you – typically this Swedish treat starts popping up just after Christmas in bakeries. But after a trip to Sweden a few years ago and a bakery tour of eating different Semla, it felt like the perfect month to share my version! It is a soft bun, with an almond filling and topped with a simple mascarpone cream. The bun is spiced with cardamom and vanilla which gives makes it a really fragrant bake. So if you’re a purist, save this one until December, but I won’t tell anyone if you make it early!
12-14
BUNS
Ingredients
Makes 12-14 buns
Tangzhong
80g Whole Milk
20g White Bread Flour
Dough
500g White Bread Flour
9g Fine Sea Salt
12g Fresh Yeast/6g Instant Dry Yeast
255g Whole Milk
50g Double/Heavy Cream
55g Sweetened Condensed Milk
50g Whole Egg
75g Unsalted Butter
7 cardamom pods
½ Fresh Vanilla Pod
Egg Wash
1 Whole Egg
Splash of cream
Almond Filling
400g Almond Paste
40g Ground Almonds
40g Flaked Almonds
3g Ground Cardamom
15g Caster/White Sugar
70g Icing/Powdered Sugar
125g Whole Milk
Mascarpone Cream
600g Double/Heavy Cream
200g Mascarpone
20g Icing/Powdered Sugar
Special equipment
Stand mixer
Digital thermometer
Oil spray (optional)
Piping bags
Star tip nozzle
Method
Tangzhong
1. Into a small saucepan, add the whole milk and bread flour and cook it over a medium heat, whisking until it reaches a thick paste like consistency.
2. Scoop the mixture into a pan and set it aside to cool for 15 minutes.
Dough
1. Take the fresh cardamom pods and crack them open. Pour the seeds into a pestle and mortar and crush them to a fine powder.
2. Into the bowl of a stand mixer, add the cardamom, bread flour, salt and yeast. Split half a vanilla pod lengthwise and scrape the beans into the dry mixture.
3. Add the cooled tangzhong paste and crumble this through with your fingertips. Set the bowl to one side.
4. Add the milk, cream, egg and sweetened condensed milk to a small saucepan. Over a low heat, stir it until it reaches 46-48C/114F-188F and then immediately take it off the heat and pour it over the dry ingredients.
5. Stir the mixture together with a spatula and a plastic dough scraper, until there are no more dry ingredients at the bottom. Cover the bowl with a tea towel and let it rest for 30 minutes.
6. Add in the cold cubed butter and with the dough hook, knead for 5-7 minutes, scraping down the sides if needed, until the dough is smooth and elastic.
7. Remove it from the bowl and shape it into a tight ball on the work surface, before lifting it into a lightly oiled bowl. Cover the bowl with cling film and proof for 1 hour.
8. Remove the proofed dough from the bowl and lift it onto your work surface – no need to flour it.
9. Cut the dough into 75g portions, you should get 12-14.
10. Cup your hand around the dough in a ‘C’ shape and rotate it underneath your fingers and palm, to create a smooth, round ball.
11. Lift each ball onto a baking tray lined with parchment paper or a silicon baking mat. You will fit 6 balls per tray. If you have it, spray the balls with an oil spray and cover them with cling film. If not, cover them loosely with a clingfilm. Proof them for 45 minutes – 1 hour or until doubled in size.
12. Meanwhile, preheat the oven to 175C/345F non-fan assisted (160C fan assisted).
13. Whisk together the egg wash ingredients and use a pastry brush, to cover the whole bun. Place them into the centre oven (you will likely need to swap the trays halfway through baking). Bake them for around 25 minutes or until golden brown all over.
14. Remove them from the oven and lift them off the tray, straight onto a wire cooling rack. Cool for at least 30 minutes.
Almond Filling
1. Add all of the ingredients except the milk into a stand mixer fitted with a paddle attachment and mix on a medium-low speed for 1-2 minutes, until slightly smoother (there will be some chunks of flaked almond).
2. Slowly add the milk until you have a smooth mixture. Add it into a piping bag and set it to one side.
Mascarpone Cream
Note: You’ll want to split this into two batches as the cream isn’t stabilised so if you try and pipe it all in one go, it will go quite grainy by the last few buns.
1. Add all of the ingredients into a stand mixer fitted with a whisk attachment and whisk until you have a medium peak, being very careful not to over whip it.
2. Add the mixture into a piping bag fitted with a star tip nozzle.
Assembly
1. Using a knife, cut a triangle out of the top of each bun and set the lids to one side.
2. Pipe the almond cream into the gap, filling it to the top.
3. Pipe the cream in an anti-clockwise spiral motion on top of 6 of the buns.
4. Place the lid on top, pressing down slightly to press the cream outwards.
5. Finish with a dusting of icing/powdered sugar and serve. Whisk the remaining cream ingredients and repeat the process for the final 6 buns.
Shop the Equipment


Strawberry Custard Buns
TIER 2
Strawberry Custard Buns
A true showstopper, we take the same bun as tier 1 but this time just use vanilla as the flavouring. It’s filled with a strawberry cremeux, vanilla pastry cream and finished with a strawberry gel. The decoration is elegant and refined, definitely worthy of a fancy pastry shop! To finish it, I added some simple white chocolate sticks – if you want to learn about tempering just head to the archives and there is a whole class about it!
12-14
BUNS
Ingredients
Makes 12-14 Buns
Soft Buns
Tangzhong
80g Whole Milk
20g White Bread Flour
Dough
500g White Bread Flour
9g Fine Sea Salt
12g Fresh Yeast/6g Instant Dry Yeast
255g Whole Milk
50g Double/Heavy Cream
55g Sweetened Condensed Milk
50g Whole Egg
75g Unsalted Butter
½ Fresh Vanilla Pod
Strawberry Cremeux
200g Egg Yolks
130g Whole Eggs
100g Sugar
300g Strawberry Puree
200g Unsalted Butter, Soft
5g Powdered Gelatin (250 Bloom) + 30g Water (or 2 sheets of leaf gelatin)
A touch of red food colour (optional)
Pinch of Flakey Salt
Crème Pâtissière
350g Whole Milk
1 Fresh vanilla bean pod
50g Caster/White Sugar
85g Egg Yolks
28g Cornstarch/Cornflour
Pinch of Flakey Sea Salt
30g Unsalted Butter, Cold & Cubed
Strawberry Coulis
5g Powdered Gelatin (250 Bloom) + 30g Cold Water
100g Strawberry Puree
100g Fresh Strawberries
5g Pectin NH
30g Caster/White Sugar
Juice of 1/4 Lemon
Special equipment
Digital thermometer
Hand blender
Stand mixer
Oil spray (optional)
Piping bags
Round tip nozzle
Method
Strawberry Cremeux
1. Into a small dish, add the powdered gelatin and cold water and set it aside to bloom for 10 minutes. If using gelatin leaves, use two sheets (any strength) and soften this in a bowl of cold water.
2. Add the puree, eggs, yolks and sugar into a medium saucepan. Add a touch of red food colour if you wish. Place it over a medium heat and whisk constantly until the mixture has thickened to a custard-like texture. It will be just above 75C on a digital thermometer, but be careful not to scramble it. It has gelatin in it to stabilise it, which will help.
3. Immediately remove it from the heat and pass the mixture through a sieve into a tall measuring jug.
4. Add in the bloomed gelatin (squeeze out the excess water if using a gelatin sheet) and blend this with a hand blender until smooth.
5. Allow the mixture to cool to 35-45C and then add in the soft butter and blend again until smooth. Finally, stir through a pinch of salt.
Soft Buns
Tangzhong
1. Into a small saucepan, add the whole milk and bread flour and cook it over a medium heat, whisking until it reaches a thick paste like consistency.
2. Scoop the mixture into a pan and set it aside to cool for 15 minutes.
Dough
1. Into the bowl of a stand mixer, add the bread flour, salt and yeast. Split half a vanilla pod lengthwise and scrape the beans into the dry mixture.
2. Add the cooled tangzhong paste and crumble this through with your fingertips. Set the bowl to one side.
3. Add the milk, cream, egg and sweetened condensed milk to a small saucepan. Over a low heat, stir it until it reaches 46-48C/114F-188F and then immediately take it off the heat and pour it over the dry ingredients.
4. Stir the mixture together with a spatula and a plastic dough scraper, until there are no more dry ingredients at the bottom. Cover the bowl with a tea towel and let it rest for 30 minutes.
5. Add in the cold cubed butter and with the dough hook, knead for 5-7 minutes, scraping down the sides if needed, until the dough is smooth and elastic.
6. Remove it from the bowl and shape it into a tight ball on the work surface, before lifting it into a lightly oiled bowl. Cover the bowl with cling film and proof for 1 hour.
7. Remove the proofed dough from the bowl and lift it onto your work surface – no need to flour it.
8. Cut the dough into 75g portions, you should get 12-14.
9. Cup your hand around the dough in a ‘C’ shape and rotate it underneath your fingers and palm, to create a smooth, round ball.
10. Lift each ball onto a baking tray lined with parchment paper or a silicon baking mat. You will fit 6 balls per tray. If you have it, spray the balls with an oil spray and cover them with cling film. If not, cover them loosely with a clingfilm. Proof them for 45 minutes – 1 hour or until doubled in size.
11. Meanwhile, preheat the oven to 175C/345F non-fan assisted (160C fan assisted).
12. Whisk together the egg wash ingredients and use a pastry brush, to cover the whole bun. Place them into the centre oven (you will likely need to swap the trays halfway through baking). Bake them for around 25 minutes or until golden brown all over.
13. Remove them from the oven and lift them off the tray, straight onto a wire cooling rack. Cool for at least 30 minutes.
Crème Pâtissière
1. Heat milk and vanilla in a saucepan over a medium heat. Whilst this is heating up, in a separate bowl whisk together the egg yolk, sugar, cornstarch and salt.
2. Once the milk has come to a gentle simmer, slowly pour it over the top of the egg mixture, whisking constantly.
3. Pour the combined mixture back into the saucepan and continue whisking until the mixture starts to thicken. It will take about two minutes to come to a boil. Once it reaches this point, heat and whisk for a further minute to cook out all the cornstarch. You should be left with a thick, pudding-like consistency.
4. Pass the mixture through a sieve into a tall measuring jug. Add in the cold butter and blend with a hand blender until smooth. Pour it into a bowl and set it in the fridge to chill for 2 hours.
Strawberry Gel
1. Into a small bowl, add cold water and the powdered gelatin. Let it soak for 5-10 minutes.
2. Stir together the pectin and sugar in a small bowl and set this to one side.
3. Add the fresh strawberries and strawberry puree to a small saucepan and stir them together over a medium heat until they warm slightly (about 40C/105F). Whisk in the pectin sugar mixture and continue to whisk until it reaches a boil.
4. Remove it from the heat and scoop in the bloomed gelatin before whisking it through, along with the fresh lemon juice.
5. Pour the mixture into a tall jug, cover the surface with clingfilm, and let it set in the fridge for 1-2 hours or overnight.
Assembly
1. Add the chilled strawberry cremeux to a stand mixer fitted with a whisk attachment. Whisk on a medium speed until it holds a medium stiff peak.
2. Split the mixture between two piping bags, one with a large round tip nozzle.
3. Add the cooled strawberry gel into a small blend (or a tall just if using a hand blender) and blend it into a smooth gel. Add this into a piping bag.
4. Remove the crème pâtissière and with a hand whisk, whisk for 1-2 minutes, until it is smooth and there are no lumps. Add this to a piping bag.
5. Take the cooled buns and use an apple corer or a knife to take a portion of dough out of the underside, keeping the base intact so you can put this back on! You need a decent-sized hole in order to fit the filling in so you may need to pull some of the dough out.
6. Take the buns and fill them with the strawberry cremeux, and then the crème pâtissière. Place the base of the bun back on, to seal it.
7. Take the strawberry cremeux with the piping nozzle, and pipe a small dollop on top of each bun. Then, using the back of a warm ¼ tsp measure, scoop a small hole out of the centre, and pipe the strawberry gel inside.
8. Finish with a dusting of icing sugar and some white chocolate decorations if you fancy making them.
9. These are best served and eaten within a few hours.
Shop the Equipment
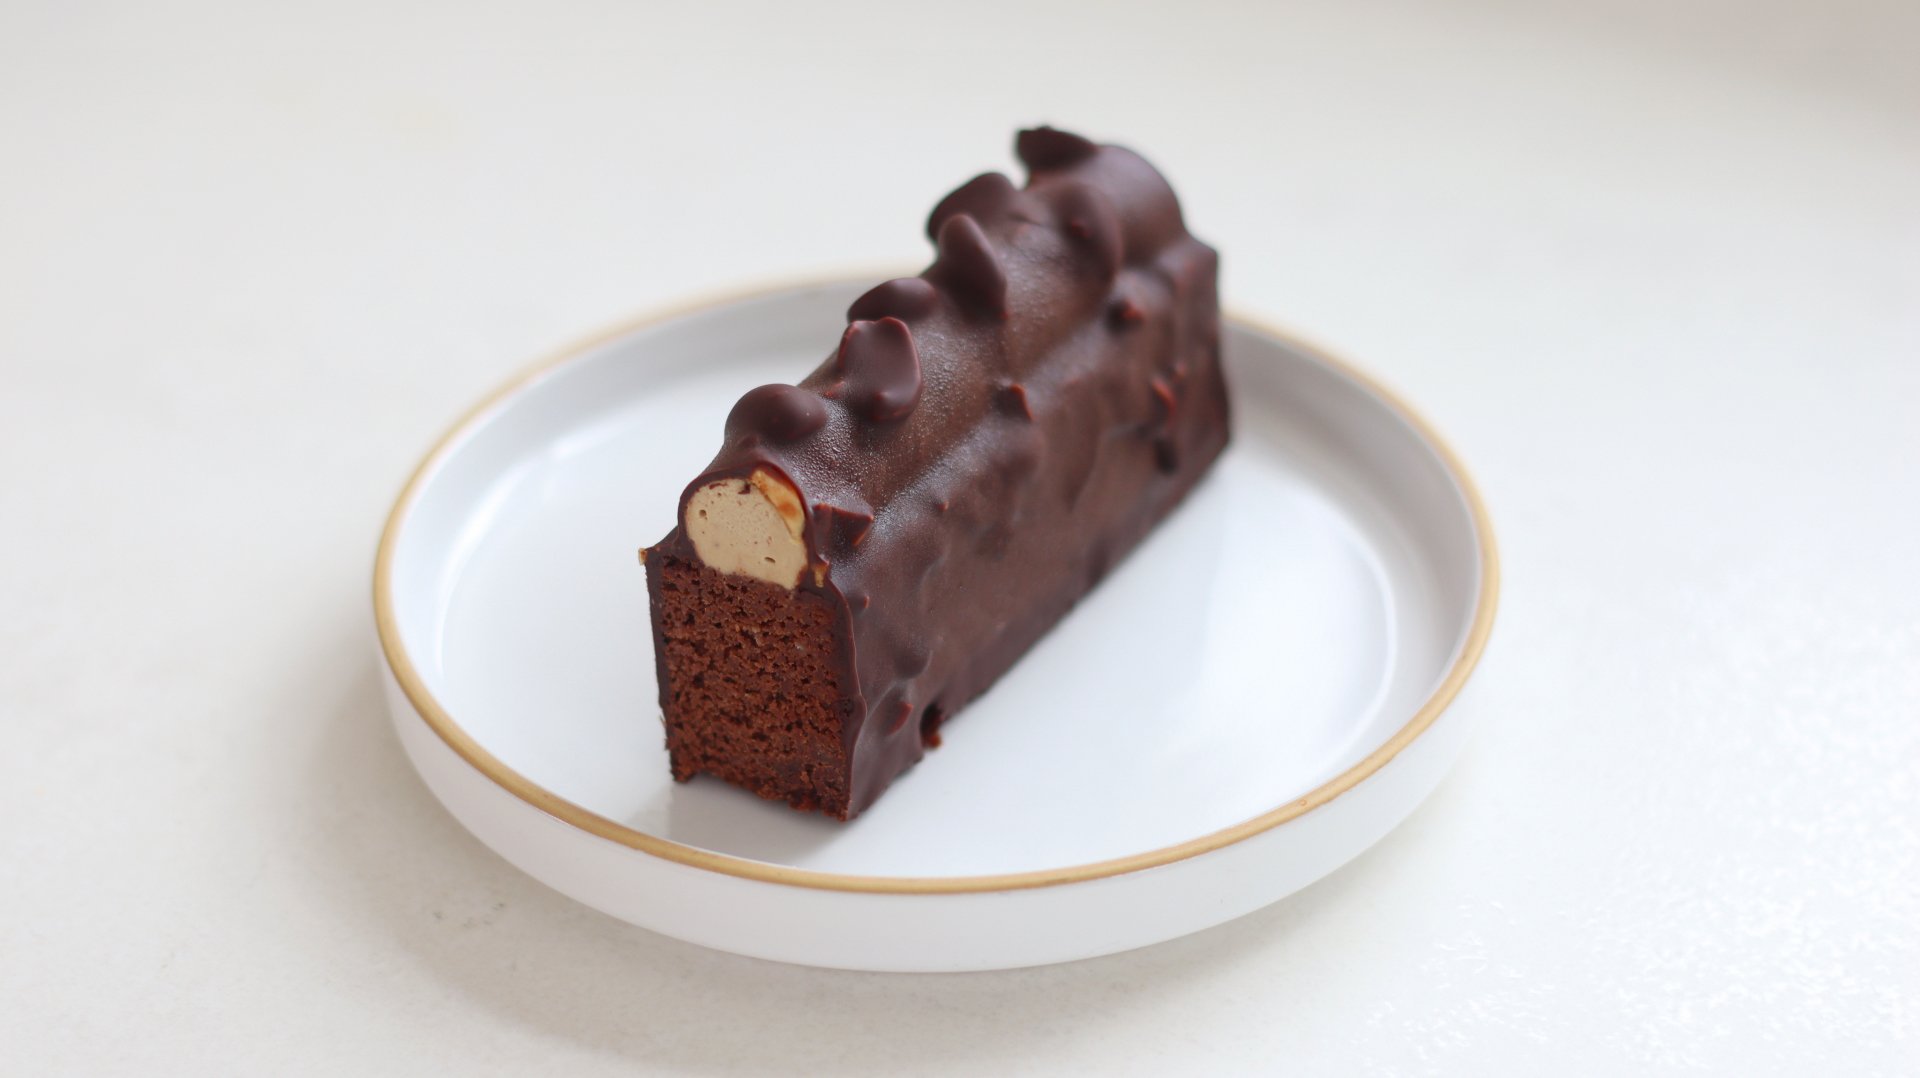
Coffee & Peanut Financier
TIER 1
Coffee & Peanut Financier
I’m a huge fan of “finger” style desserts and the great thing about this recipe is that it builds all the fundamental elements you’ll need to take on tier 2. The financier is almost like a brownie texture with a smooth coffee cremeux and a simple chocolate glaze. Peanut and coffee is a delicious combination but feel free to swap the peanuts with any other nut. The financier also stores really well so you can bake it, wrap it tightly and store it in the fridge for a few days until you need it.
12-14
FINANCIERS
Ingredients
Makes 12-14 Financiers
Coffee Cremeux
5g Powdered Gelatin + 30g Water
400g Double Cream
115g Egg Yolks
60g Sugar
1 Vanilla Pod
75g Espresso
1g Freshly Ground Coffee
Small Pinch of Flaky Salt
Chocolate Peanut Financier
200g Unsalted Butter
560g Dark Chocolate (70%)
160g Plain Flour
200g Icing Sugar
16g Baking Powder
2g Fine Sea Salt
520g Double Cream
400g Egg Whites
160g Ground Peanuts or Almonds
Chopped Peanuts To Garnish
Chocolate Peanut Glaze
300g Dark Chocolate, 70% cocoa solids
30g Neutral Oil
30g Chopped Peanuts
Special equipment
Digital thermometer
Hand blender
13×9” cake tin
Stand mixer
Piping bag
Large round tip nozzle
Method
1. Into a small bowl, add the gelatin and water to a small saucepan and let it bloom for 10 minutes.
2. Into a medium saucepan, add the cream, espresso, coffee grounds and beans from the fresh vanilla pod. Place it over a medium heat until steaming.
3. Meanwhile, whisk together the egg yolks and sugar until combined.
4. Pour the hot cream over the egg mixture, whisking to combine, then add it back into the saucepan. Place it over a medium heat.
5. Cook to 80-82C on a digital thermometer, then immediately pass it through a sieve, on top of a tall measuring jug.
6. Scoop in the bloomed gelatin and blend till smooth with a hand blender. Sprinkle in a pinch of flaky sea salt and stir it through with a spatula. Pour the mixture into a bowl and refrigerate for a minimum of 6 hours.
7. For the financier, preheat the oven to 160C/320F non-fan assisted (145C for fan assisted). Lightly grease a 13×9” cake tin with soft butter. Cut a strip of parchment paper long enough to cover the base of the tin and extend up and over two opposite sides, creating “handles.” Press it into the tin so it sticks to the base and sides. Then cover the other sides with two strips of parchment.
8. Add the chocolate and butter to a medium bowl and melt this over a pan of gently simmering water. Once melted, set it to one side to cool slightly.
9. Meanwhile, sift together the flour, icing sugar, baking powder and salt. Add the ground peanuts on top and whisk to combine.
10. Pour the cream and egg whites on top and whisk by hand just until combined and there are no streaks of dry ingredients.
11. Pour in the melted chocolate mixture and whisk again to combine.
12. Pour the smooth batter into the lined tray and bake in the oven for 70-75 minutes.
13. Remove it from the oven and allow it to cool for 30 minutes before refrigerating for 1 hour.
14. When the financiers have cooled, use the parchment handles to lift it out of the tin and onto a chopping board. Cut it into 12-14 rectangles, or as small/large as you would like to make them.
15. Remove the coffee cremeux from the fridge and add the mixture into a stand mixer fitted with a whisk attachment. Whisk on a medium speed until it has thickened to a medium stiff peak. Add the mixture into a piping bag fitted with a large round tip nozzle.
16. Pipe long lines of the cremeux along the top of the financier, and then use a slightly warm knife to trim off the ends so they are flush with the edge of the financier.
17. Place some chopped peanuts into the top of the cremeux, then place the financiers into the freezer for 3-6 hours or until they are solid.
18. When they are frozen, prepare the glaze. Add the chocolate and oil into a bowl and place it over a pan of simmering water, stirring until it is melted.
19. Remove it from the heat and stir through the chopped peanuts. The glaze needs to be around 45C/113F when you use it. Pour the mixture into a tall but thin rectangular container. Take the temperature and heat it up if needed or allow it to cool further.
20. Remove the financiers from the freezer and place a knife into the bottom. Dip the financier into the glaze until it is completely covered, then lift it up, allowing the excess to drip off before quickly flipping it over and placing it onto a tray.
21. Repeat this with the remaining financiers.
22. The financiers can be left at room temperature for 30 minutes then served, or stored in the fridge until needed.
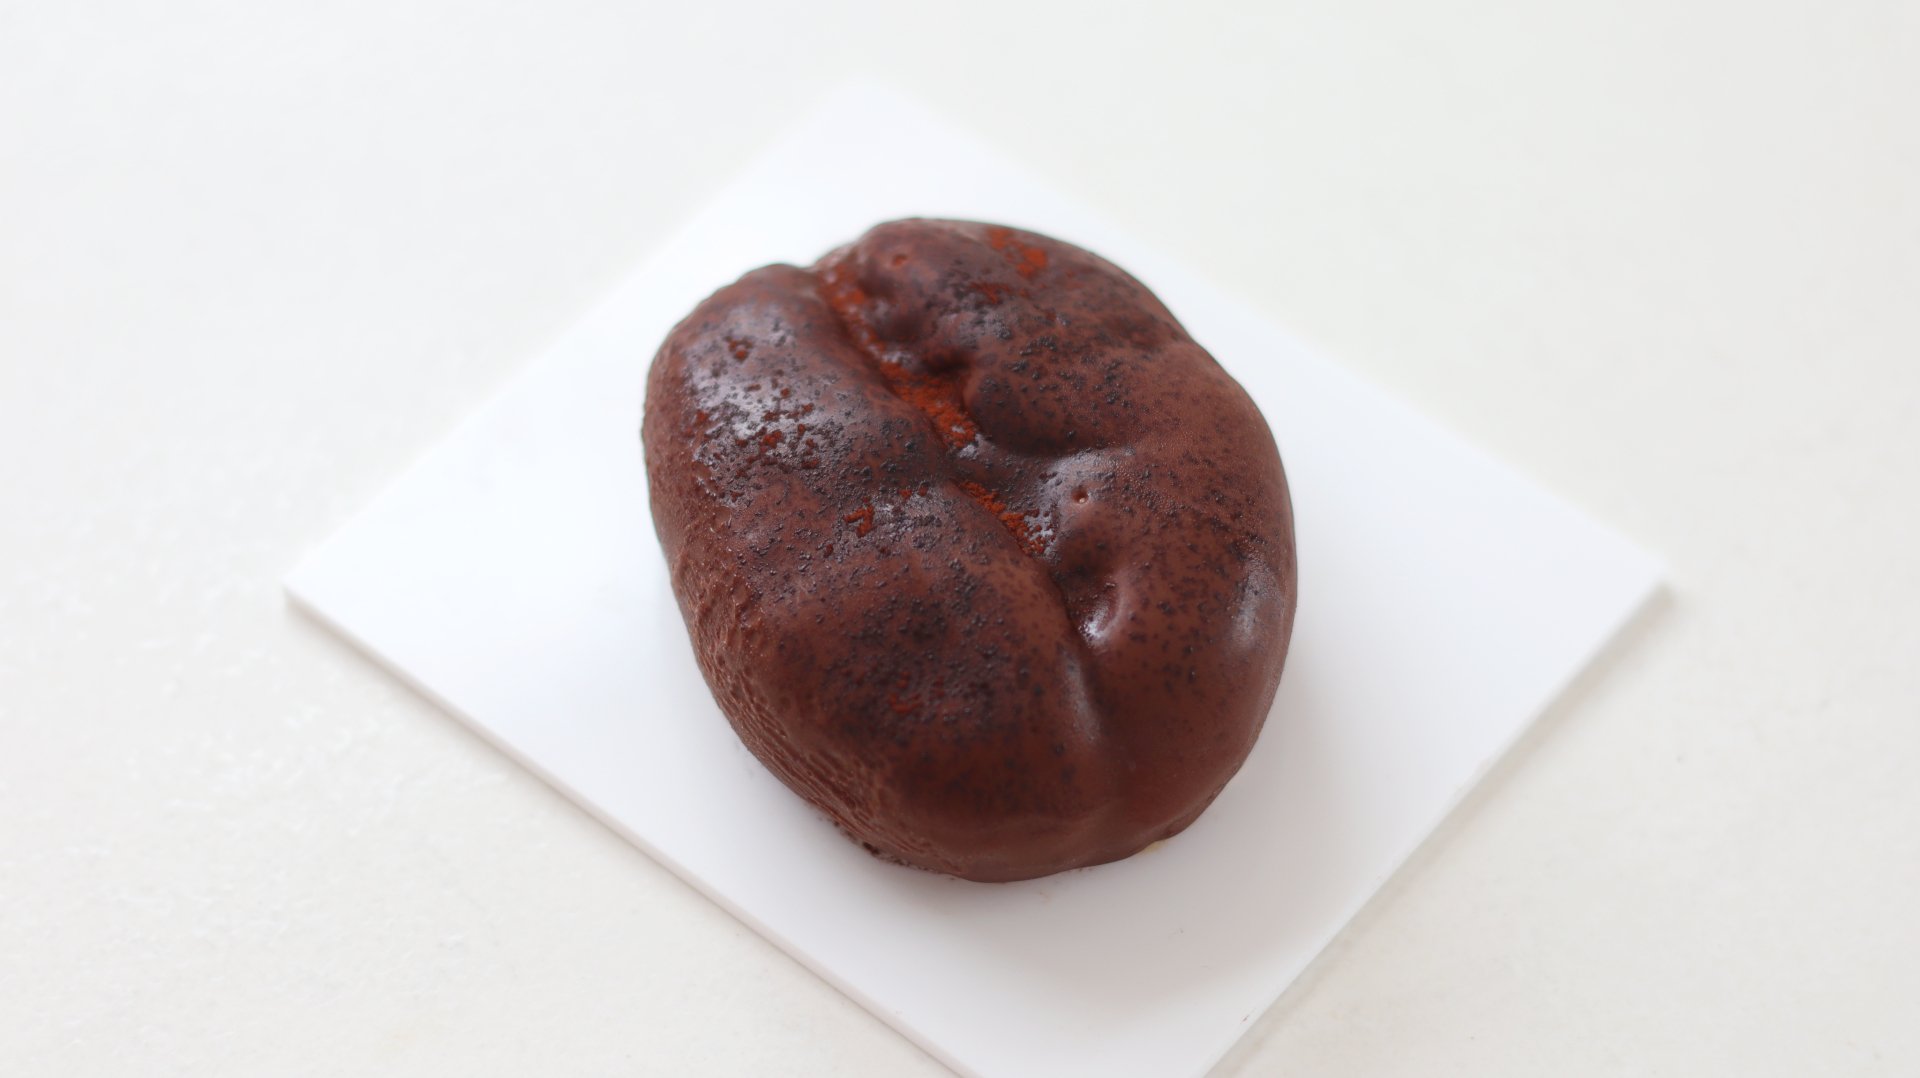
Coffee Bean Petit Gateaux
TIER 2
Coffee Bean Petit Gateaux
The showstopper! This style of dessert was made famous by pastry chef Cedric Grolet but no one ever seems to show you how to actually make them! The recipe has quite a few elements to prepare with a coffee cremeux, chocolate financier, recomposed streusel and a chocolate glaze. I’m a coffee snob, so I would always recommend using the freshest coffee you can get for the best flavour. If you don’t have the fancy coffee bean silicon mold, then feel free to freeze it in any small silicon mold you’ve got.
8-10
COFFEE BEANS
Ingredients
Makes 8-10 Coffee Beans
Coffee Cremeux
5g Powdered Gelatin + 30g Water
400g Double Cream
115g Egg Yolks
60g Sugar
1 Vanilla Pod
75g Espresso
1g Freshly Ground Coffee
Small Pinch of Flaky Salt
Chocolate Financier
130g Double Cream
100g Egg Whites
50g Icing Sugar
40g Ground Almonds
40g Plain Flour
4g Baking Powder
Pinch of Salt
50g Unsalted Butter
140g Dark Chocolate (70% Cocoa Solids)
Coffee Hazelnut Praline
220g Roasted Hazelnuts, Skinned
80g Pecans
12g Whole Coffee Beans
200g Sugar
50g Water
1 Vanilla Pod
Flakey Salt
Streusel
110g Light Brown Sugar
110g Ground Hazelnuts or Almonds
95g Plain/All-Purpose Flour
2g Bicarbonate of Soda
1g Fine Sea Salt
110g Cold Unsalted Butter, Cubed
Recomposed Streusel
215g Streusel
50g Dark Chocolate (70%)
25g Unsalted Butter
70g Coffee Hazelnut Praline
Chocolate Glaze
350g 55% Chocolate
300g Cocoa Butter
30g Neutral Oil
Cocoa Powder to Finish
Special equipment
Digital thermometer
35x25cm baking tray
Food processor
Stand mixer
Piping bag
Coffee bean silicon mold
Method
1. Into a small bowl, add the gelatin and water to a small saucepan and let it bloom for 10 minutes.
2. Into a medium saucepan, add the cream, espresso, coffee grounds and beans from the fresh vanilla pod. Place it over a medium heat until steaming.
3. Meanwhile, whisk together the egg yolks and sugar until combined.
4. Pour the hot cream over the egg mixture, whisking to combine, then add it back into the saucepan. Place it over a medium heat.
5. Cook to 80-82C on a digital thermometer, then immediately pass it through a sieve, on top of a tall measuring jug.
6. Scoop in the bloomed gelatin and blend till smooth with a hand blender. Sprinkle in a pinch of flaky sea salt and stir it through with a spatula. Pour the mixture into a bowl and refrigerate for a minimum of 6 hours.
7. For the financier, preheat the oven to 160C/320F non-fan assisted (145C for fan assisted). Lightly grease a 35x25cm baking tray with soft butter and line it with parchment paper – alternatively use a silicon sponge roll mat. Add the chocolate and butter to a medium bowl and melt this over a pan of gently simmering water. Once melted, set it to one side to cool slightly.
8. Meanwhile, sift together the flour, icing sugar, baking powder and salt. Add the ground almonds on top and whisk to combine.
9. Pour the cream and egg whites on top and whisk by hand just until combined and there are no streaks of dry ingredients.
10. Pour in the melted chocolate mixture and whisk again to combine.
11. Pour the smooth batter into the lined tray and bake in the oven for 15-17 minutes.
12. Remove it from the oven and allow it to cool for 30 minutes before refrigerating for at least 1 hour. You can also freeze this.
13. For the coffee hazelnut praline, into a medium saucepan, add the sugar and water. Place it on a medium heat, and cook the mixture until it reaches 116C/240F on a digital thermometer.
14. Once at temperature, pour in the hazelnuts, pecans, coffee beans and the beans from a fresh vanilla pod. Stir constantly with a spatula. The mixture will initially look quite clumpy, then the sugar will crystallise, but eventually, as you keep stirring, the sugars will caramelise and you should have a deep golden caramel surrounding the nuts. It will take around 3-5 minutes.
15. Immediately remove the pan from the heat, and tip the caramelised nuts onto a baking tray lined with a silicon mat. Sprinkle some sea salt flakes on top and let it set completely at room temperature for 30 minutes.
16. The praline should then be completely cool and solid to the touch. Break it into pieces and add it into a high-powered food processor. Blend for 3-4 minutes, scraping it down every so often, until you have a smooth, nutty paste. Store in an airtight container.
17. Into the bowl of a stand mixer, fitted with the paddle attachment, add all of the ingredients for the streusel.
18. Mix on a low speed until the butter has broken down and the mixture is sandy in texture.
19. Transfer this to a baking tray, lined with a silicon mat and spread it out. Place it into the freezer for 30 minutes. Meanwhile preheat the oven to 175C/345F non-fan assisted.
20. Place the chilled mixture into the oven and bake for 30 minutes. After around 15 minutes it should be slightly golden around the edges. Remove it from the oven and stir it all together with a spatula then place it back in the oven to bake until it is an even golden colour.
21. Once baked, allow it to cool at room temperature for at least 30 minutes.
22. For the recomposed streusel, add the chocolate, butter and praline into a bowl and place this over a pan of simmering water. Stir it together until the chocolate and butter have completely melted. Remove it from the heat.
23. Tip in the cooled streusel and stir to combine. Ensure if there are any large pieces of streusel, that you crush them slightly so they are smaller, before adding them in.
24. Pour the mixture onto a sheet of parchment paper and place a second sheet on top. Use a rolling pin to roll it relatively thin, then place it into the freezer for 30 minutes.
25. To assemble the dessert, remove the coffee cremeux from the fridge and whisk it to a medium peak in a stand mixer – avoid whipping it too stiff. Add the mixture into a piping bag.
26. If your coffee bean silicon mold has a cutter, use this to cut the out inserts from the recomposed streusel and financier. Sandwich them together with a little bit of cremeux. If you don’t have a cutter, then you can use a sharp knife to cut the required shapes that will fit your coffee bean mold. You can also freeze this dessert in any silicon mold you have!
27. Take the coffee bean silicon mold (or any silicon mold) and pipe the cremeux into the mold, filling it up about ¾ of the way. Use a spatula to press the cremeux to the edges, then place the financier/streusel insert into the cremeux. Top up the mold if needed with cremeux and then smooth the top with a palette knife. Repeat this for all of the molds you have. Place the molds onto a tray and freeze them for at least 12 hours.
28. Once frozen, remove them from the molds then place the desserts back in the freezer on a tray lined with a silicon mat for a further hour.
29. For the glaze, add the chocolate, cocoa butter and oil into a medium bowl. Place this over a pan of gently simmering water and stir it until it is completely melted.
30. The glaze needs to be at 45C/113F when you dip the desserts. Pour the mixture into a small, deep container that is just slightly larger than your dessert.
31. Remove one dessert at a time, and place a knife into the base. Dip the dessert into the so that it is covered right to the edge, then lift it up and hold it at a 45 degree angle until the dripping slows. Then lift it upright until it has set.
32. Dip a pastry brush back into the glaze and quickly brush this all around the bean to ‘rough’ it up slightly.
33. Finally, dust a thin layer of cocoa powder on top of the coffee bean then very quickly and carefully blow torch it to darken the cocoa powder slightly. Lift it onto a small serving dish.
34. Repeat this for all the remaining desserts, and then leave them in the fridge for at least an hour or overnight before serving.
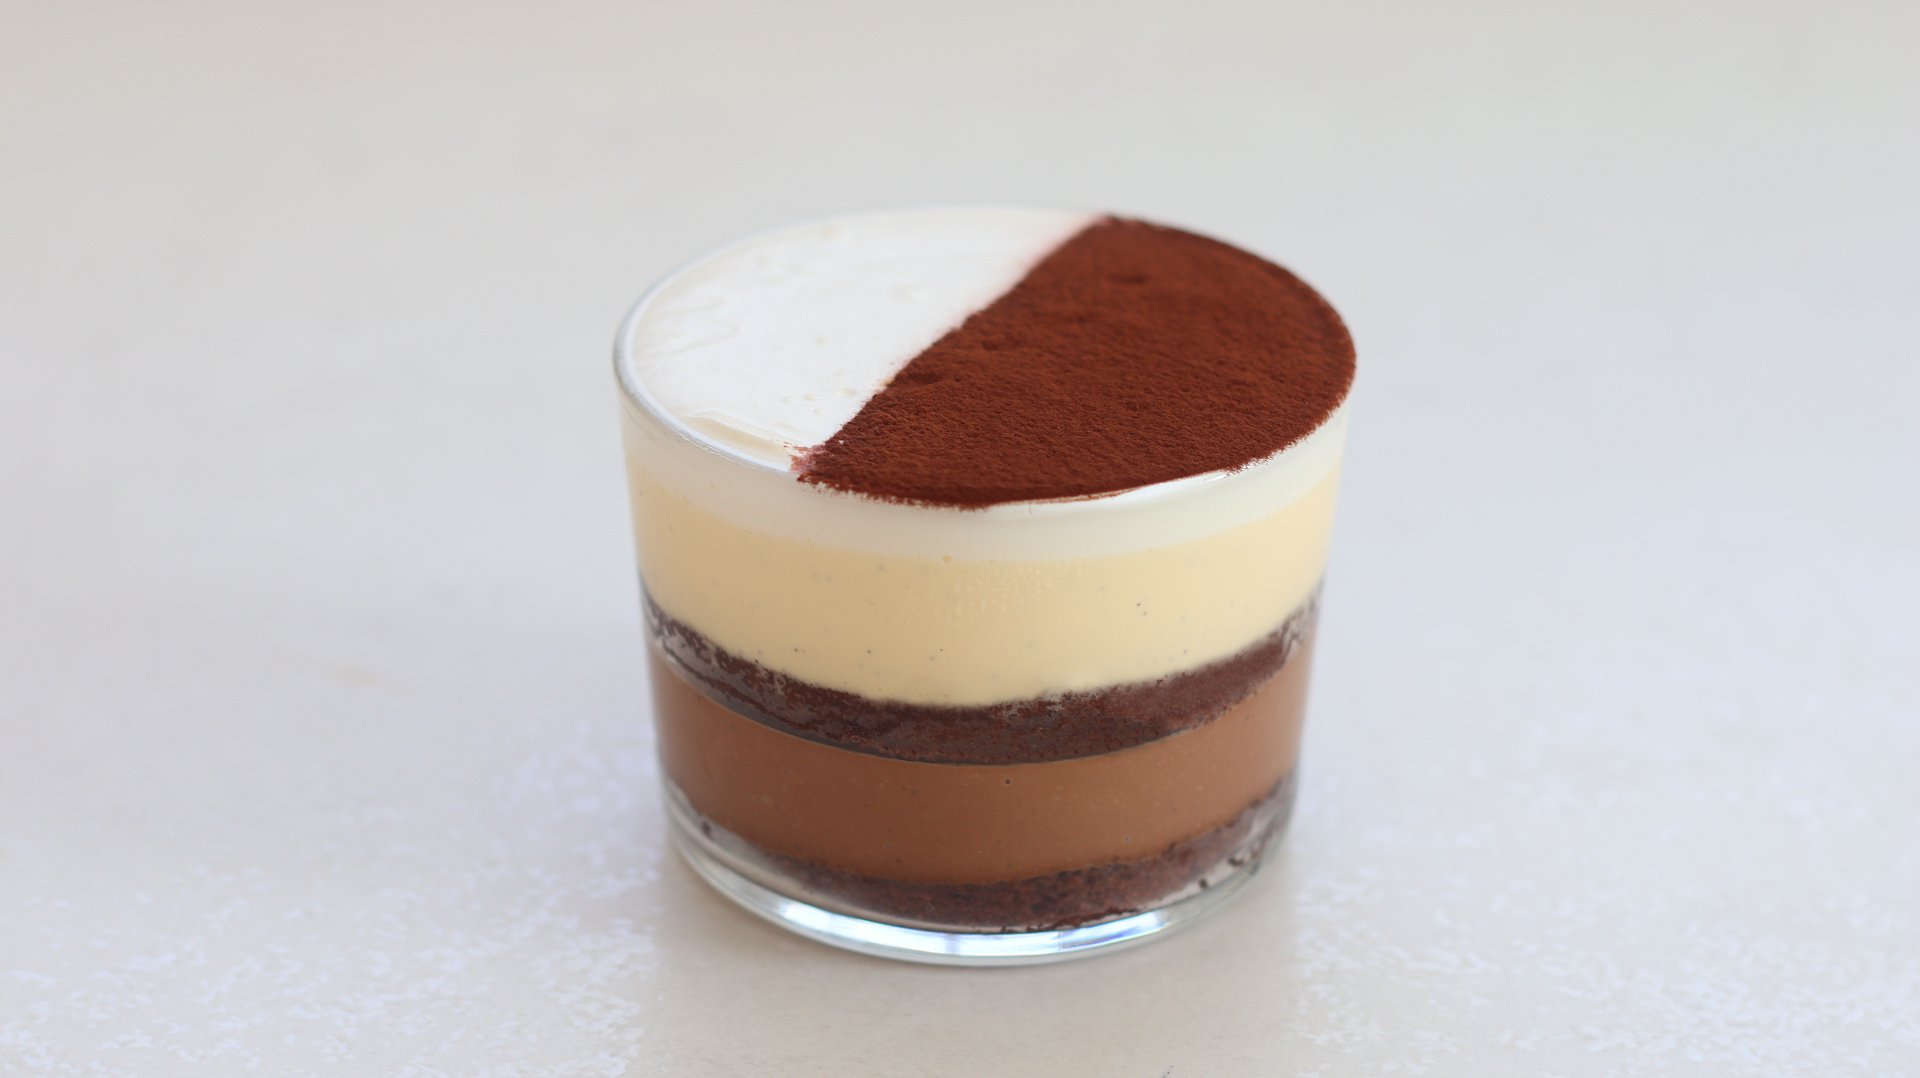
Chocolate Orange Marmalade Trifle
TIER 1
Chocolate Orange Marmalade Trifle
Now this isn’t any ordinary trifle. This has layers of soft chocolate sponge, orange marmalade, vanilla and chocolate custard, then finished with whipped cream. It’s not really traditional, but the texture when you get a spoonful of all the layers is amazing. This can be scaled up to a large trifle, you will just need to increase the quantities.
4
MINI TRIFLES
Ingredients
Makes 4 Mini Trifles
Chocolate Sponge
80g Egg Yolks
75g Caster/White Sugar, Divided
150g Egg Whites
45g Plain/All-Purpose Flour
25g Cocoa Powder
50g Vegetable Oil
35g Whole Milk
Custard Base
350g Double/Heavy Cream
175g Milk
1 Vanilla Pod
160g Egg Yolks
55g Caster/White Sugar
Pinch Flakey Sea Salt
Chocolate Custard
260-285g Custard Base
65g Chocolate, 70% Cocoa Solids
Vanilla Custard
260-285g Custard Base
40g Unsalted Butter, Cold & Cubed
Unsweetened Whipped Cream
200g Double/Heavy Cream
Orange Marmalade To Fill
Cocoa Powder To Decorate
Special equipment
39x27cm baking tray
Electric hand whisk or stand mixer
Digital thermometer
Hand blender
Cookie cutter
Piping bag (optional)
Method
Chocolate Sponge
1. Preheat the oven to 180°C/355°F Non-Fan Assisted.
2. Lightly grease a 39x27cm baking tray. Cut a rectangle of parchment paper so that it fits neatly inside the tray, and press it in.
3. Into a medium bowl, add the egg yolks, and 20g of caster sugar. Whisk the mixture with an electric hand mixer (or in a stand mixer) until it is thicker in volume and pale in colour. About 1-2 minutes. Set this to one side.
4. Into a medium bowl, add the egg whites and using an electric hand whisk (or stand mixer) whisk on a medium-low speed. Once the mixture is frothy, increase the speed to medium and slowly add the remaining 55g of caster sugar, about 1 tablespoon at a time. Whisk until you have a medium-stiff peak to the meringue.
5. Gently fold the first third of meringue into the egg yolk mixture. Once incorporated, add the second third, fold it through and then the final third.
6. Next, sift in the plain flour & cocoa powder, and fold the mixture carefully until there are no more streaks of dry ingredients.
7. Finally, pour in the vegetable oil and whole milk. Use a spatula to fold this in, making sure to scrape the bottom of the bowl.
8. Pour the batter onto the lined tray, and then using a spatula, spread the batter out evenly.
9. Bake the sponge for 12 minutes then allow it to cool for 30 minutes at room temperature.
Custard Base
1. Into a medium saucepan add the cream, milk, egg yolks, sugar and beans scraped from a fresh vanilla pod.
2. Place this over a medium-low heat and whisk constantly until it reaches a temperature of 82C/180F on a digital thermometer.
3. Immediately remove it from the heat and pour it through a sieve into a tall measuring jug.
4. Split the mixture into half in between two measuring jugs, you should get around 260-285g per jug.
5. Add the chopped chocolate into one, butter into another, and then blend each until smooth with a hand blender. Add a pinch of flakey sea salt to each and stir it through with a spoon. Alternatively, if you want the vanilla version to be thicker, try using white chocolate instead of butter.
6. Pour the vanilla custard onto a shallow baking tray and cover the surface directly with cling film. Cover the surface of the chocolate jug with cling film and refrigerate – this will thicken faster than the vanilla version.
Assembly
1. Take the cooled chocolate sponge and flip it out of the tray onto a large silicon mat or piece of parchment paper.
2. Take a few tablespoons of orange marmalade and spread this evenly across the sponge with an offset spatula.
3. Take a cookie cutter that is just slightly bigger than the width of your individual trifle dishes.
4. Place a disc of sponge into the base of each trifle dish.
5. Remove the chilled chocolate custard from the fridge (it needs 15-30 minutes to thicken and cool slightly).
6. Add it into a piping bag if you want, otherwise, pour an even layer across each dish.
7. Place it into the freezer or fridge just until a skin has formed on top and when you poke it with your finger, you feel there is enough of a ‘barrier’ to support the weight of the next layer.
8. Add a second disc of sponge, then remove the chilled vanilla custard from the fridge – this will be a looser consistency.
9. Pour this on top of the sponge, leaving enough room at the top for cream.
10. Place the trifles into the fridge or freezer just until the vanilla mixture has set to create a slight barrier and support the weight of the cream. This can take slightly longer as the mixture is softer.
11. For the whipped cream, simply add the cream to a bowl and whisk with an electric hand whisk until you have a medium stiff peak.
12. Spoon the cream on top of the set vanilla custard, and then level it completely with a slightly warm palette knife.
13. The trifles can now be refrigerated until needed or served immediately. Dust with a light coating of cocoa powder when ready to serve.
Shop the Equipment


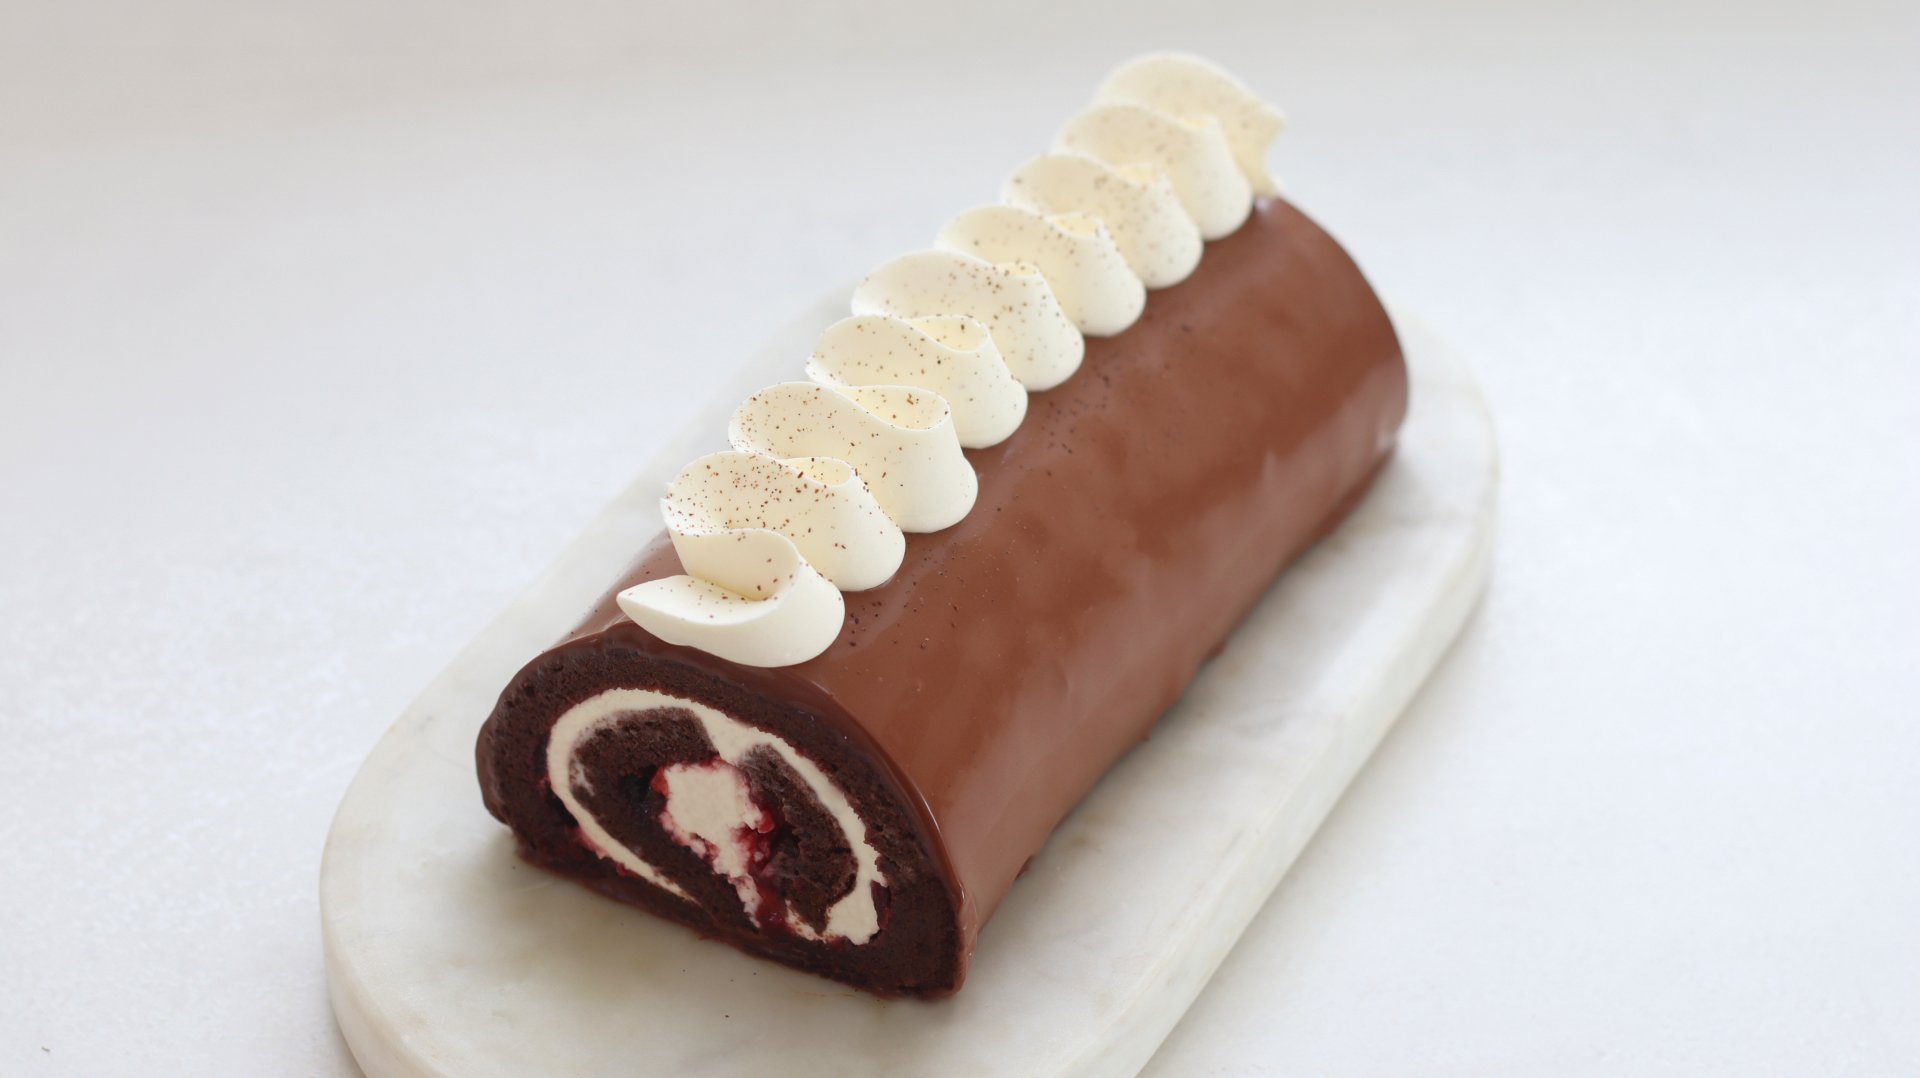
Black Forest Swiss Roll
TIER 2
Black Forest Swiss Roll
Black Forest gâteau is one of my all-time favourites, and the mix of cream, fruit, and chocolate is exactly what a good Swiss roll should be about too! This version layers the chocolate sponge from Tier 1 with cherry jam, mascarpone cream, and finishes with a stunning chocolate glaze. Watch the video to help you master the perfect roll, and you’ll catch the little accident I had along the way 😅.
1
SWISS ROLL CAKE
Ingredients
Makes 1 Swiss Roll Cake
Mascarpone Vanilla Cream
4g Powdered Gelatin, 250 bloom
24g Cold water
400g Double/Heavy Cream, Divided
1 Fresh Vanilla Pod
130g Mascarpone
20g Icing/Powdered Sugar
Chocolate Sponge
80g Egg Yolks
75g Caster/White Sugar, Divided
150g Egg Whites
45g Plain/All-Purpose Flour
25g Cocoa Powder
50g Vegetable Oil
35g Whole Milk
Chocolate Glaze
160g Dark Chocolate, 70% Cocoa Solids, Chopped
370g Double/Heavy Cream
10g Unsalted Butter
10g Glucose or Honey
Cherry Jam To Fill
Special equipment
Hand blender
39x27cm baking tray.
Electric hand whisk
Stand mixer
Piping bag
St Honore nozzle
Method
Mascarpone Vanilla Cream
1. Into a small bowl, add the powdered gelatin and cold water. Stir them together and set to one side for 5 minutes to bloom.
2. Into a tall jug, add the mascarpone and set this to one side.
3. Pour 330g of cream into a small saucepan, along with the sugar and the beans scraped from a fresh vanilla pod.
4. Place this over a medium heat, stirring until the mixture is steaming.
5. Remove it from the heat and pour it over the mascarpone. Scoop in the bloomed gelatin, and blend with a hand blender until smooth.
6. Finally, pour in the remaining 70g of cold cream and blend again. Pour the mixture onto a deep baking tray and cover the surface directly with clingfilm.
7. Refrigerate for a minimum of 3 hours.
Chocolate Sponge
1. Preheat the oven to 180°C/355°F Non-Fan Assisted.
2. Lightly grease a 39x27cm baking tray. Cut a rectangle of parchment paper so that it fits neatly inside the tray, and press it in.
3. Into a medium bowl, add the egg yolks, and 20g of caster sugar. Whisk the mixture with an electric hand mixer (or in a stand mixer) until it is thicker in volume and pale in colour. About 1-2 minutes. Set this to one side.
4. Into a medium bowl, add the egg whites and using an electric hand whisk (or stand mixer) whisk on a medium-low speed. Once the mixture is frothy, increase the speed to medium and slowly add the remaining 55g of caster sugar, about 1 tablespoon at a time. Whisk until you have a medium-stiff peak to the meringue.
5. Gently fold the first third of meringue into the egg yolk mixture. Once incorporated, add the second third, fold it through and then the final third.
6. Next, sift in the plain flour & cocoa powder, and fold the mixture carefully until there are no more streaks of dry ingredients.
7. Finally, pour in the vegetable oil and whole milk. Use a spatula to fold this in, making sure to scrape the bottom of the bowl.
8. Pour the batter onto the lined tray, and then using a spatula, spread the batter out evenly.
9. Bake the sponge for 12 minutes then allow it to cool for 30 minutes at room temperature.
Assembly
1. Once the sponge has cooled, flip it out of the tray and gently peel off the parchment paper. Then carefully flip the sponge over onto a large, clean sheet of parchment paper, so that the smooth top side (the side that wasn’t touching the tray during baking) is facing down.
2. Position the sponge with the long edge facing you. Choose one of the short ends—either the left or right edge—and slice off a thin piece at a 45-degree angle using a serrated knife. This angled cut makes it easier to start the roll neatly and helps it tuck in smoothly. Then, at the opposite end, score three lines, about 1cm/0.4” apart, being very careful not to cut through the sponge.
3. Take a few tablespoons of cherry jam and spread this evenly across the sponge using a palette knife.
4. Then, remove the mascarpone cream from the fridge, and scoop half of it into the bowl of a stand mixer fitted with a whisk attachment. Place the remaining half back in the fridge to use later.
5. Whisk the cream on a medium speed for 2-3 minutes, until you have a medium stiff peak.
6. Use an offset spatula to spread the cream in a very even layer across the sponge, right to the edges.
7. Starting from the short edge that you didn’t cut, begin to roll the sponge tightly using the parchment paper underneath to guide and lift the sponge as you go. Use firm but gentle pressure to keep the roll even and tight. Once fully rolled, wrap the parchment paper around the log. Then, place a flat tool like a bench scraper against the roll, and with your other hand, gently pull the loose end of the parchment paper. This will tighten the log and help create a more defined cylinder shape. Place the Swiss roll onto a tray and refrigerate for 1 hour, then into the freezer for 15 minutes.
Chocolate Glaze
1. Just before you remove the Swiss roll from the freezer, prepare the glaze, as we will use this immediately.
2. Into a tall jug, add the chopped chocolate and set this to one side.
3. Add the cream and glucose (or honey) to a small saucepan. Note – if you are using a cream with a lower fat percentage (35% for example), you will need less cream, around 260g.
4. Place this over a medium-low heat and stir until the mixture is steaming.
5. Immediately remove it from the heat, and pour it over the chocolate, and add the butter on top.
6. Let it sit for 2 minutes, then use a hand blender to blend until smooth. Avoid adding any air bubbles as you blend it.
7. Remove the Swiss roll from the freezer and place a wire rack over a tray to catch any excess glaze. To elevate the Swiss roll and allow the glaze to drip cleanly down the sides, set a few small ring molds under the roll so it sits slightly above the wire rack. This will keep the bottom from sticking and ensure an even coating all around.
8. Take the glaze and slowly pour it evenly all over the Swiss roll.
9. Let the excess drip off and the glaze set for a few minutes before taking a small knife and wiping away any drips that have set on the underside of the cake.
10. Use a large offset spatula to carefully lift the Swiss roll onto your serving plate, then with a sharp knife that has been heated, cut both ends of the Swiss roll to reveal the swirl. Clean up the plate to ensure a nice presentation. Leave this at room temperature for 30 minutes.
11. Take the remaining mascarpone cream and whisk it to a medium stiff peak. Add this into a piping bag fitted with a St Honore nozzle.
12. Pipe a zigzag of cream down the centre and serve.
Shop the Equipment

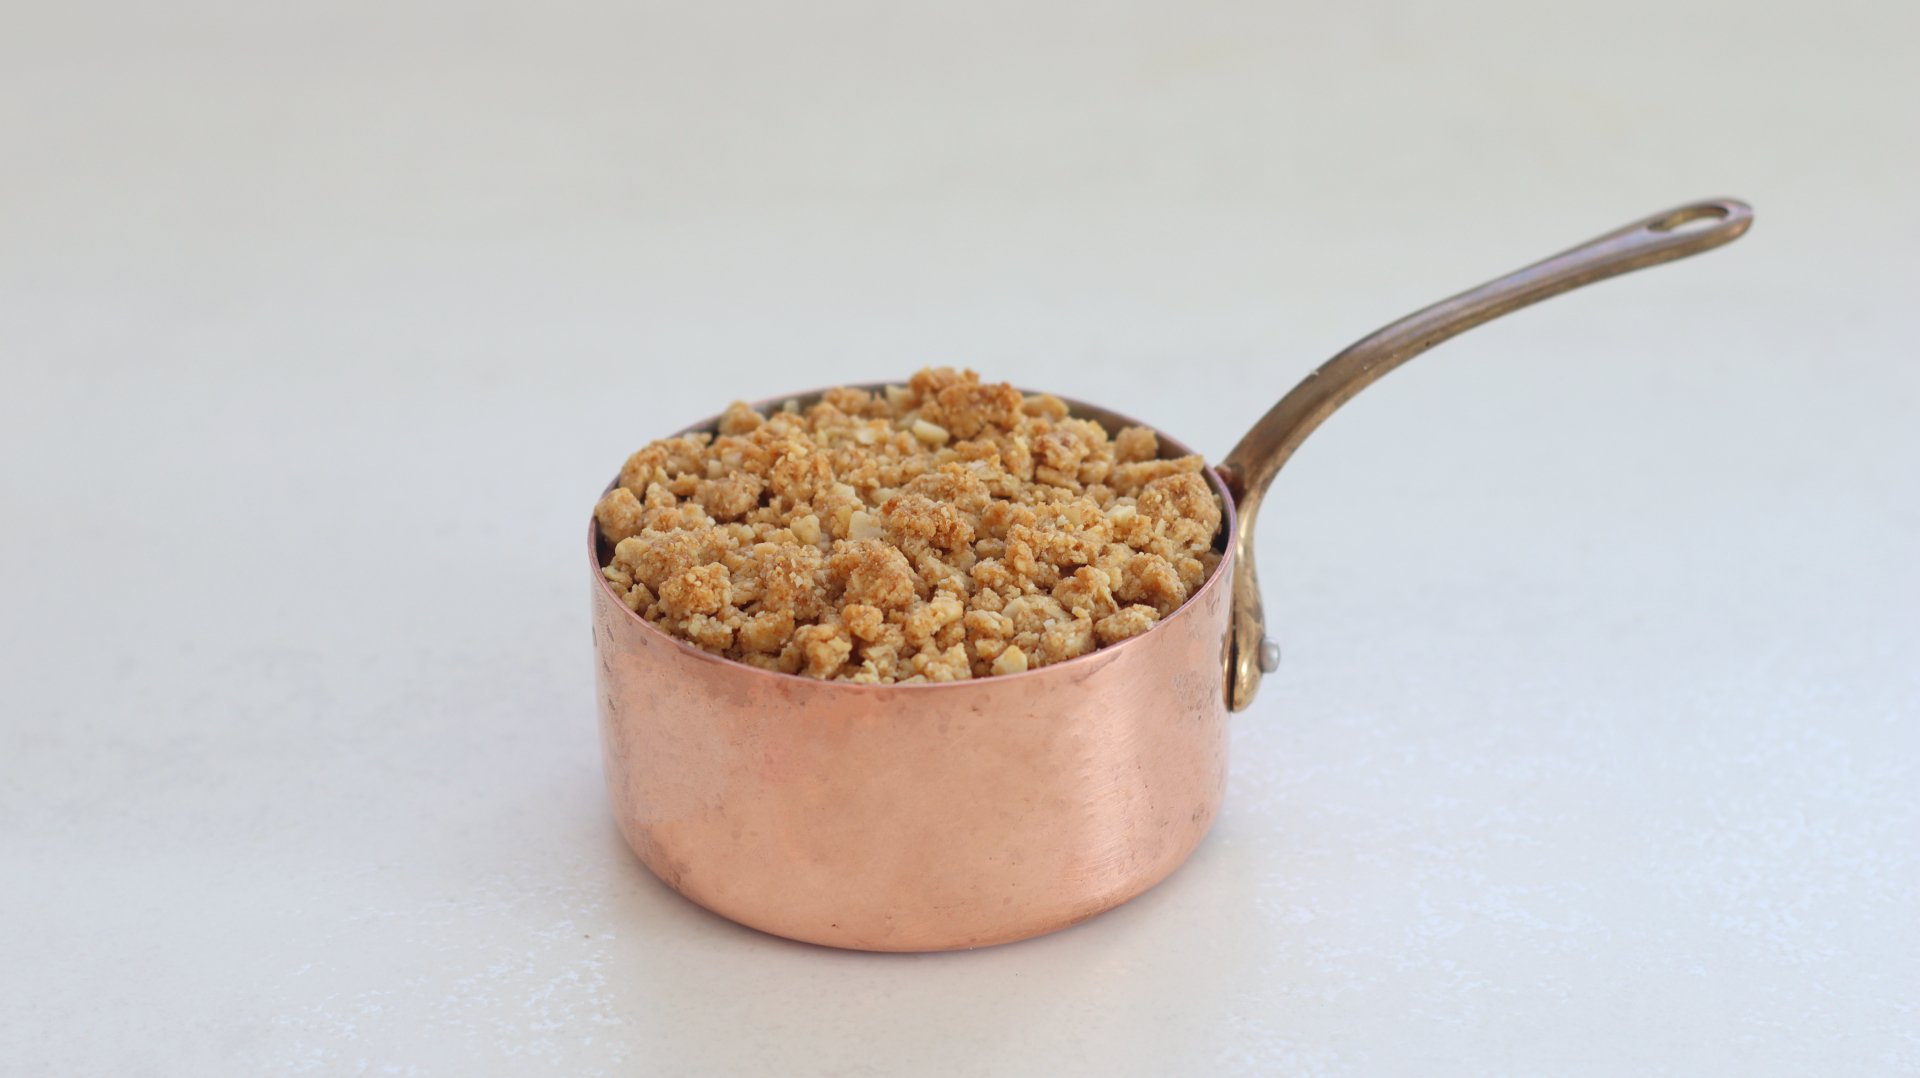
Apple Crumble
TIER 1
Apple Crumble
I like to call this my ‘restaurant crumble’ – not quite your simple butter, flour, sugar mixture as this crumble topping has oats, nuts and muscovado sugar. It’s a bit fancy but I love all the textures. The base of an apple crumble is a great apple filling and this is the fundamental thing we are learning here which we take through to Tier 2. It’s rich with spices and has a lovely soft, almost caramel like sauce wrapping around the apples. Serve with custard (and ice cream!).
4
INDIVIDUAL CRUMBLES
Ingredients
Makes 4 Individual Crumbles
Crumble
125g Plain/All-Purpose Flour
85g Unsalted Butter, Cold & Cubed
15g Oats
30g Whole Hazelnuts, Skinned
60g Ground Almonds
40g Muscovado Sugar
Pinch of Flakey Salt
Apple Filling
35g Unsalted Butter
600g Braeburn Apples (About 12 Apples)
55g Dark Muscovado Sugar
10g Caster/White Sugar
14g Cornstarch/Corn flour
½ Tsp Ground Cinnamon
¼ Tsp Ground Ginger
½ Tsp Vanilla Bean Paste
Freshly Grated Nutmeg
75-100g water (adjust based on desired consistency)
Lemon Juice
Flakey Sea Salt
Special equipment
Food processor
Ramekins
Method
Apple Filling
1. Peel and core the apples, then cut them into cubes – 1x1cm as a guide.
2. Toss them in a bowl with a squeeze of lemon juice once chopped, to prevent them from browning.
3. Into a medium saucepan, add the butter and place it over a medium heat.
4. Stir it until the butter begins to brown slightly and smells nutty.
5. Add in the apples, and stir, cooking over a medium heat for 2 minutes.
6. Add in the sugars, and continue to cook for 5 minutes, to release some of the moisture from the apples.
7. Reduce the heat to medium low, and add in the spices, cook for 30 seconds, then add in the cornflour and cook for a minute.
8. Stir in the water, starting with about half, until you have a sauce that is thick and glossy – the consistency of a runny caramel. If you prefer a crumble with a saucier consistency, then you can add more water.
9. Finally, stir through a pinch of flaky sea salt.
10. Pour the mixture onto a baking tray, and cover the surface with clingfilm. Refrigerate for 1 hour.
Crumble
1. Into a food processor, add all of the ingredients for the crumble.
2. Pulse the mixture until the butter has broken down into pea size pieces.
3. Tip it out onto a large tray and use your hands to squeeze it together until it clumps up.
4. Then rub it between your hands to form a crumble-like mixture. Spread it evenly across your baking tray.
5. Place the tray in the freezer for 30 minutes.
6. Meanwhile, pre-heat the oven to 175C/345F non-fan assisted.
7. Once the crumble has chilled, bake it in the oven for 12 minutes. No need to stir it, just remove it from the oven and let it cool for about 15 minutes. Leave the oven on.
Assembly
1. Remove the chilled apple filling from the fridge.
2. Take 4 ramekins or individual saucepans (I used small copper pots) and fill them up about ¾ of the way with the apple filling.
3. Take the cooled crumble and scoop it on top, filling it to the top of the ramekin.
4. Place the ramekins on a baking tray and bake for around 25-30 minutes, or until the crumble is a deep golden brown colour.
5. Remove them from the oven and serve immediately with ice cream or custard!
Shop the Equipment


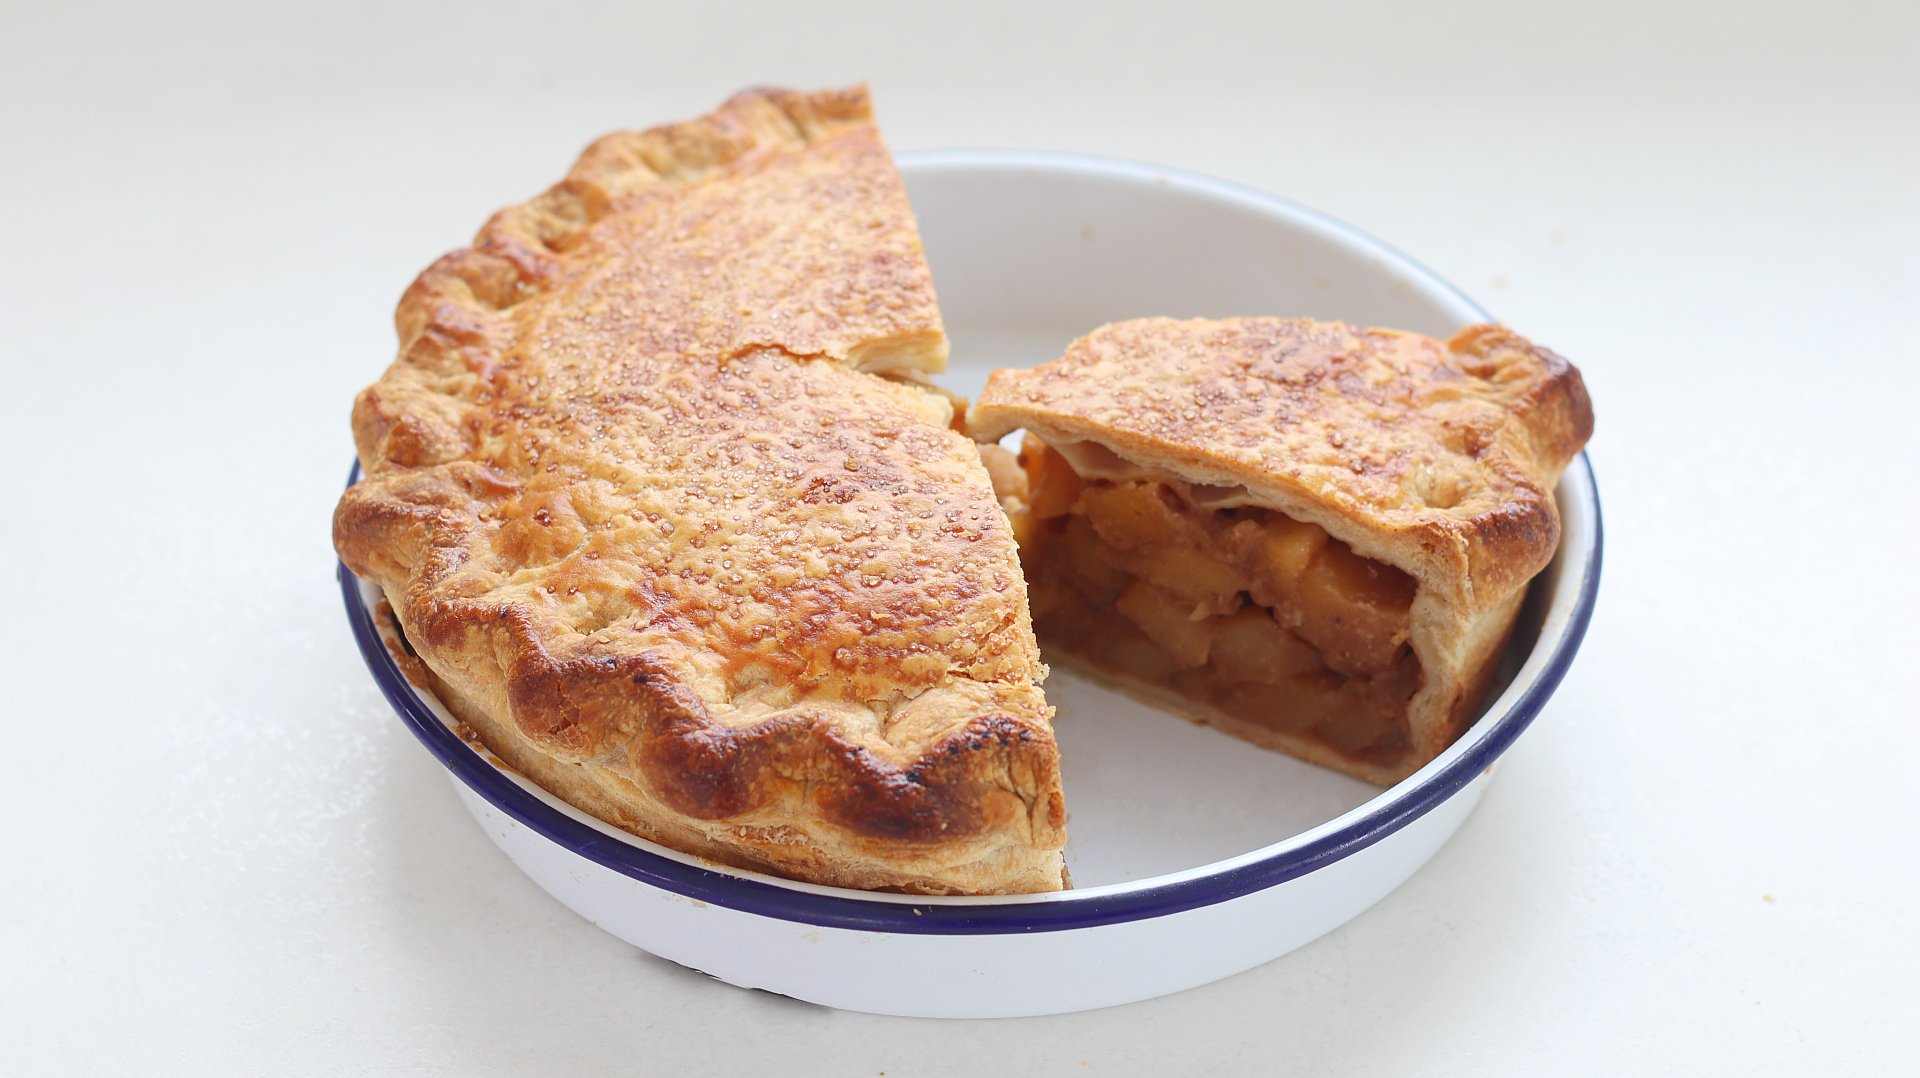
Apple Pie
TIER 2
Apple Pie
A pastry chef once recommended adding cream cheese to a pie dough for extra tenderness and I have to say, I really love this dough! It is slightly technical as we are ‘laminating’ the pie dough to get it extra flakey, but it’s nothing like laminating a croissant so don’t panic! We use the same apple filling as Tier 1 and use it for a classic double crust apple pie. Serve with custard (and ice cream!).
1
9 inch pie
Ingredients
Makes 1 9-inch Pie
Pie Dough
500g Plain/all-Purpose Flour
6g Fine Sea Salt
25g Caster/White Sugar
325g Unsalted Butter, Cold
80g Full-Fat Cream Cheese, Cold
100–150g Ice-cold water
Apple Filling
75g Unsalted Butter
1200g Pink Lady Apples (About 12 Apples)
110g Dark Muscovado Sugar
20g Caster/White Sugar
27g Cornstarch/Corn flour
¾ Tsp Ground Cinnamon
½ Tsp Ground Ginger
1 Tsp Vanilla Bean Paste
Freshly Grated Nutmeg
150–225g water (adjust based on desired consistency)
Lemon Juice
Flakey Sea Salt
To Finish
1 Egg, Whisked
Demerara Sugar
Special equipment
9-inch pie dish
Rolling pin
Method
Pie Dough
1. Add the flour, sugar & salt into a large bowl.
2. Add in the butter (cut into small cubes), and toss it in the flour to coat the pieces.
3. Using your hands, work the butter into the flour, squeezing each piece between your fingers to flatten them.
4. Add in the cream cheese, and stir it through with your hands again to dissolve it into the flour mixture.
5. Now, mix in the ice-cold water, starting with about half, and swirl your hands to mix the water into the dry ingredients. Keep adding water just until there are no more dry ingredients in the bowl. The amount of water you need will depend on the type of flour you use.
6. Lift the dough onto your work surface and pull it together with your hands into a rough square shape.
7. Flour your work surface and the top of the dough, and using a rolling pin, roll it into a long rectangle. The dough might want to stick, so use a bench scraper to get underneath the dough to loosen it.
8. Fold one-third of the dough up, then fold the other third of the dough over the top of this. Wrap the dough in cling film and refrigerate for 30 minutes.
9. Repeat this laminating process two more times, rolling the dough into a rectangle and folding it on itself. Once you have performed the final fold, cut the dough in half, then wrap and chill the dough for at least 1.5 hours, or leave it overnight.
Apple Filling
1. Peel and core the apples, then cut them into cubes – 2x2cm as a guide.
2. Toss them in a bowl with a squeeze of lemon juice once chopped, to prevent them from browning.
3. Into a large saucepan, add the butter and place it over a medium heat.
4. Stir it until the butter begins to brown slightly and smells nutty.
5. Add in the apples, and stir, cooking over a medium heat for 2 minutes.
6. Add in the sugars, and continue to cook for 5 minutes, to release some of the moisture from the apples.
7. Reduce the heat to medium low, and add in the spices, cook for 30 seconds, then add in the cornflour and cook for a minute.
8. Stir in the water, starting with about half, until you have a sauce that is thick and glossy – the consistency of a runny caramel. If you prefer a pie with a saucier consistency, then you can add more water.
9. Finally, stir through a pinch of flaky sea salt.
10. Pour the mixture onto a baking tray, and cover the surface with clingfilm. Refrigerate for 1 hour.
Assembly
1. Remove one half of the pie dough from the fridge, and on a lightly floured surface, roll it out into a rough circle, around 3-5mm thick.
2. Lift it into a 9” pie dish – you should have a 1” overhang of dough over the edge of the tin.
3. Scoop the cooled apple filling into the dough, pressing it down with a spatula to remove any air pockets.
4. Place the pie in the fridge.
5. Remove the second piece of dough from the fridge, and on a lightly floured surface, roll it into a rough circle.
6. Remove the pie from the fridge and apply a light egg wash around the edge.
7. Lift the second piece of dough on top, and using your fingers, firmly crimp the edges to seal the two pieces of dough together.
8. Using scissors, cut the excess dough away, leaving about a ¼” of dough around the edge.
9. Fold this excess dough underneath itself to create a thick rim.
10. Use your thumb and index finger on one hand to gently pinch the edge of the dough. With the index finger of your other hand, press into the pinched section to push the dough outward, creating a fluted edge. Continue this motion, crimping the entire crust of the pie.
11. Place the pie into the fridge for 30 minutes.
12. Meanwhile, pre-heat the oven to 225C/435F non-fan assisted, and place a baking tray on the lower third rack of the oven.
13. Once the pie is chilled, remove it from the fridge and brush an egg wash over the dough.
14. Sprinkle a light dusting of demerara sugar on top, and then use a knife to cut 3 air vents in the centre of the pie.
15. Place it onto the pre-heated tray, and bake for 25 minutes.
16. Then, move the pie up to the middle shelf of the oven and lower the temperature to 180C/355F. Bake for a further 60-70 minutes.
17. The pie will darken quite quickly, so you will most likely need to cover the top of the pie with a sheet of foil for the final 30-45 minutes to prevent it from burning.
18. Once baked, the pie should be a deep golden colour, and the filling should be bubbling up slightly.
19. Remove the pie from the oven and allow it to cool. Let the pie cool for at least 30 minutes before serving. It will still be warm, with a soft, and runny center. But for cleaner slices, allow it to cool completely or even chill it in the fridge—then reheat individual slices as needed.
Shop the Equipment


Sesame Bloomer
TIER 1
Sesame Bloomer
The Tier 1 dough is relatively low hydration so simple to work with – by hand or in your mixer. The great technique here is lightly soaking the dough and then coating it in sesame seeds. It is a technique I use to get perfect coverage of seeds over the loaf, rather than spilling seeds everywhere! This is a slightly softer loaf than Tier 2 so great for sandwiches. Feel free to swap out sesame seeds for poppy seeds too.
1
LOAF
Ingredients
Makes 1 Loaf
12g Fresh Yeast/6g Instant Dry Yeast
12g Fine Salt
400g Strong White Bread Flour
100g Wholemeal Bread flour
325g Tepid Water
15g Sesame Seeds + Extra To Coat
20g Unsalted Butter, Soft
5g White Sugar
Special equipment
Stand mixer
Bread scorer
Digital thermometer (optional)
Method
1. Add all of the ingredients for the dough into the bowl of a stand mixer.
2. Attach the dough hook and knead on a medium speed for around 6-7 minutes until the dough pulls away from the sides of the bowl and appears smooth. It should pass the windowpane test, which is when you stretch a small piece of dough out and it forms a windowpane without tearing.
3. Lift the dough onto your work surface, and perform a few slap and folds with the dough, then use your hands to shape it into a smooth ball shape.
4. Lift the dough into a lightly oiled bowl and cover it with clingfilm – the dough needs to proof for about an hour at room temperature or until doubled in size. This may take longer if your room is cold.
5. Just before it is ready, soak a tea towel and ring out any excess water. Set this next to a baking tray lined with parchment paper.
6. Lightly toast a tray of sesame seeds for about 10 minutes at 180C/355F. They just need to be a light golden brown – not too dark!
7. Lightly flour your work surface, and scoop the dough, smooth side down, onto the flour.
8. Gently flatten the dough with lightly floured hands into a large circle. Stretch the left side out slightly and fold it toward the center. Then stretch the right side and fold it in to overlap the first fold.
9. Reshape the dough into a tidy rectangle. Starting from the top edge, roll the dough tightly towards you, using your thumbs to press the dough firmly inward with each turn to create a taut log.
10. Once fully rolled, pinch the seam closed by using your fingers to stitch it together.
11. Working quickly, tilt the dough side to side on the wet tea towel, then transfer it to the toasted sesame seeds, tilting it to cover the entire loaf.
12. Flip the dough over and place it seam side down onto your baking tray.
13. Cover the dough with a tea towel to proof for about an hour at room temperature. The dough should almost double in size.
14. Meanwhile, preheat the oven to 230C/445F non-fan assisted and place a small tray on the bottom shelf.
15. Once the dough is proofed, take a razor blade and slash the dough. I used multiple diagonal slashes across the top of the dough, but you can slash it any way you prefer.
16. Splash a cup of boiling water onto the preheated tray and immediately place the bread on the middle shelf of the oven.
17. Immediately drop the oven temperature to 190C/375F non-fan assisted and bake for around 50 minutes – the dough should be a golden colour, and a digital thermometer inserted into the centre should reach 90C/195F or just above it.
18. Lift the baked loaf onto a wire rack and cool for at least an hour before slicing.
Shop the Equipment


Multigrain Bloomer
TIER 2
Multigrain Bloomer
In Tier 2 we are looking at the importance of soaking seeds in dough. Seeds suck up a lot of moisture so it’s important to pre-soak them before they go into the dough to ensure they don’t draw out moisture from the bread itself, making it dry. The final loaf is proofed in a banneton basket, and then baked in a cast iron dutch oven which gives a really rustic, bakery style finish. This bread is heartier and is great for toast and eggs!
1
LOAF
Ingredients
Makes 1 Loaf
Poolish
150g Strong White Bread Flour
150g Water
1.5g Fresh Yeast / 0.75g Instant Dry Yeast
Soaker
10g Rolled Oats
5g Poppy Seeds
35g Mixed Seeds (Pumpkin, Linseed, Sunflower)
60g Boiling Water
Dough
120g Wholemeal Flour
230g Strong White Bread Flour
1g Fresh Yeast/0.5g Instant Dry Yeast
12g Salt
15g Unsalted Butter. Room Temperature
120g Water
Special equipment
Stand mixer
500g Wood Pulp Banneton Basket
Bread scorer
Cast Iron Dutch Oven
Digital thermometer (optional)
Method
Poolish
1. Into a small bowl, add the water and yeast. Stir this until the yeast has completely dissolved.
2. Tip in the flour and mix to form a smooth paste. Cover the bowl and leave it at room temperature for 12 hours, by which point it should be very bubbly on top.
Soaker
1. Add all the seeds into a bowl and pour the boiling water over the top. Set it aside at room temperature for 12 hours.
Dough
1. Into the bowl of a stand mixer, add the poolish, soaked seeds, and remaining dough ingredients.
2. Attach the dough hook and knead on a medium speed for around 6-7 minutes until the dough pulls away from the sides of the bowl and appears smooth. It should pass the windowpane test, which is when you stretch a small piece of dough out and it forms a windowpane without tearing.
3. Lift the dough onto your work surface, and perform a few slap and folds with the dough, then use your hands to shape it into a smooth ball shape.
4. Lift the dough into a lightly oiled bowl and cover it with clingfilm – the dough doesn’t have a lot of yeast, so it will need 2.5-3 hours to rise at room temperature, until doubled in size.
5. Once proofed, lightly flour your work surface, and scoop the dough, smooth side down, onto the flour.
6. Gently flatten the dough with lightly floured hands into a large circle. Stretch the left side out slightly and fold it toward the center. Then stretch the right side and fold it in to overlap the first fold.
7. Reshape the dough into a tidy rectangle. Starting from the top edge, roll the dough tightly towards you, using your thumbs to press the dough firmly inward with each turn to create a taut log.
8. Roll the sealed dough lightly in some flour, then lift it into your floured banneton basket. Pinch the seam together when it is in the basket if needed.
9. Lightly flour the top of the dough and cover the basket with a tea towel. Proof for another 2.5-3 hours. It should puff up above the rim of the basket – see the video as a visual cue!
10. 45 minutes before the dough is ready, pre-heat the oven to 230C/445F non-fan assisted, with a cast iron pan (with the lid on) in the centre.
11. When the dough is proofed, carefully flip it out onto a circle of parchment paper, and then use a razor blade to score the dough lengthways.
12. Remove the cast iron pan from the oven and being very careful, lift the dough into the pan. Drop a few small ice cubes at the side of the pan, place the lid back on top, and get it straight into the oven.
13. Bake for 20 minutes, then remove the lid of the cast iron pot and lower the oven temperature to 190C/375F and bake for a further 15 minutes. It should be a golden brown colour, and a digital thermometer inserted into the centre will read 90C/195F or just above.
14. Remove it from the cast iron pan and lift it onto a wire rack to cool completely, at least an hour before slicing it.
Shop the Equipment


Chocolate Orange Tiramisu
TIER 1
Chocolate Orange Tiramisu
I couldn’t make ladyfingers and not use them in a tiramisu! In Tier 1 we keep the technique of a tiramisu very classic – no cream! But I’ve mixed things up with a chocolate orange flavour. You soak your homemade ladyfingers biscuits in espresso, and layer them between orange mascarpone cream and chocolate shavings. This is a great dessert you can make ahead of time.
8-10
SERVINGS
Ingredients
Makes 8-10 Servings
Savoiardi Biscuits
115g Egg Yolks
25g Whole Eggs
40g Caster/White Sugar (A)
100g Plain/All-Purpose Flour (A)
260g Egg Whites
100g Caster/White Sugar (B)
1.5g Fine Salt
35g Plain/All-Purpose Flour (B)
Icing Sugar To Finish
Orange Mascarpone Cream
600g Mascarpone
65g Egg Yolks
50g Caster/White Sugar (A)
Zest 2 Oranges
145g Egg Whites
50g Caster/White Sugar (B)
Coffee Soaking Syrup
150g Freshly Brewed Coffee
15g Kahlua
Dark Chocolate, Grated
Special equipment
10mm round tip nozzle
Piping bag
Stand mixer
Method
Savoiardi Biscuits
1. Pre-heat the oven to 160C/320F non-fan assisted.
2. Take 2 large sheets of baking paper and draw two sets of train track lines on the baking sheets, 90mm/3.5” tall. Flip these upside down (so the ink doesn’t touch the pastry) and place them on a baking sheet.
3. Take a small round tip nozzle (10mm) and add it into a piping bag. The piping nozzle needs to be smaller than you think, as the batter will spread slightly as it is piped.
4. Into a medium bowl, add the egg yolks, whole eggs, and sugar (A). Whisk this to combine, then add the flour (B) and whisk to form a thick paste. Set this to one side.
5. Into the bowl of a stand mixer, add the egg whites (room temperature) along with the salt.
6. With the whisk attachment, whisk on a medium-low speed until it becomes frothy, with small bubbles on top (this will take a few minutes).
7. Slowly add in the sugar (B), about a tablespoon at a time. Once you have added all the sugar, whisk until you have a stiff peak.
8. Take about ⅕ of the meringue mixture and whisk it through the egg yolk mixture. This will be quite stiff, so it needs to be whisked firmly to smooth it out.
9. Add the remaining meringue in 2-3 parts, gently folding it through to ensure you don’t beat out too much air.
10. Once smooth, sift over the remaining flour (B) and fold through until there are no more lumps.
11. Add the mixture into your piping bag and let it rest for a few minutes; this will just make it slightly easier to pipe.
12. Using the guides on your baking tray, pipe individual lines, ensuring they’re not too close together, as they will spread slightly.
13. Once piped, add a good dusting of icing sugar over the top, wait 1-2 minutes, and then repeat.
14. Place them directly into the oven and bake until a deep golden brown colour – be sure not to underbake them. It should take around 30 minutes, but it can depend on how big you’ve piped them and your oven.
15. Remove them from the oven and then allow them to cool at room temperature. If you want to make these ahead of time, you can place them in an airtight container and freeze them for up to 2 months.
Orange Mascarpone Cream
1. Into a medium bowl, add the sugar (A) and zest of 1 orange, then massage this zest into the sugar.
2. Add the egg yolks and whisk by hand for a minute until thickened slightly.
3. Add the mascarpone and remaining orange zest, and whisk again until completely smooth. Set this to one side.
4. Into the bowl of a stand mixer, add the egg whites and whisk on a medium-low speed until frothy.
5. Slowly add the sugar about a tablespoon at a time. Once you’ve added all the sugar keep whisking until it reaches a stiff peak.
6. Take the meringue, and fold it through the egg yolk mixture in three parts until smooth and evenly combined.
Coffee Soaking Syrup
1. Combine the two ingredients in a shallow dish.
Assembly
1. Take the cooled lady fingers and check to see how they fit into your chosen dish. If you need to cut them down to size, use a knife or a microplane to shave them down so that they fit snugly in the dish.
2. Take the lady fingers and soak them one by one, then, lay them into the base of your tiramisu dish.
3. Once the bottom of the dish is covered, take a few large spoonfuls of the mascarpone cream mixture and spread this evenly across the lady fingers with an offset spatula.
4. Using a microplane, grate a fine layer of dark chocolate over the cream (or cocoa powder)
5. Repeat this two more times, finishing with a layer of the mascarpone cream. Use an offset spatula to completely smooth the top so that it is flush with the rim of the dish.
6. Place the tiramisu into the fridge to chill – ideally 4-6 hours, but overnight is absolutely fine too.
7. When ready to serve, remove it from the fridge and grate over one final layer of dark chocolate (or cocoa powder) and serve.
Shop the Equipment


Berry Charlotte Cake
TIER 2
Berry Charlotte Cake
In Tier 2 we take the precision of the ladyfingers to another level, using them to decorate the outside of this berry charlotte cake. When piping them, we want to get them as neat and as even as possible so making the Tier 1 tiramisu is a great place to build your confidence. The charlotte cake has a light berry mousse, with two layers of the lady fingers covered in raspberry jam, and it’s finished with a smooth mascarpone cream. This is frozen overnight and takes a little while to defrost, so keep those timings in mind!
8-10
SERVINGS
Ingredients
Makes 8-10 Servings
Savoiardi Biscuits
115g Egg Yolks
25g Whole Eggs
40g Caster/White Sugar (A)
100g Plain/All-Purpose Flour (A)
260g Egg Whites
100g Caster/White Sugar (B)
1.5g Fine Salt
35g Plain/All-Purpose Flour (B)
Caster/White Sugar To Coat
Berry Bavarois Mousse
6g Gelatin Powder (220-250 Bloom) + 36g Cold Water (or 2 Sheets of Gelatin, soaked)
75g Egg Yolks
30g Caster/White Sugar
50g Whole Milk
300g Double/Heavy Cream (A)
250g Fruit Puree (Raspberry or Strawberry)
400g Double/Heavy Cream (B)
Mascarpone Cream
3g Powdered Gelatin + 18g Cold Water (or 1 Gelatin Sheet, Soaked)
250g Double/Heavy Cream (A)
100g Mascarpone
15g Icing/Powdered Sugar
50g Double/Heavy Cream (B), Cold
To Assemble
Crushed Pistachios
Raspberry/Strawberry Jam
Fresh Strawberries/Raspberries, Sliced
Special equipment
10mm round tip nozzle
Piping bag
Stand mixer
Digital thermometer
Hand blender
7” ring mold
1M star tip nozzle
Method
Savoiardi Biscuits
1. Pre-heat the oven to 160C/320F non-fan assisted.
2. Take 2 large sheets of baking paper and draw two sets of train track lines on the baking paper, each 90mm/3.5” tall. Flip these upside down (so the ink doesn’t touch the pastry) and place them on a baking sheet.
3. Take another baking sheet and draw two 7” circles on baking paper. Flip this upside down.
4. Take a small round tip nozzle (10mm) and put it into a piping bag. The piping nozzle needs to be smaller than you think, as the batter will spread slightly as it is piped.
5. Into a medium bowl, add the egg yolks, whole eggs, and sugar (A). Whisk this to combine, then add the flour (B) and whisk to form a thick paste. Set this to one side.
6. Into the bowl of a stand mixer, add the egg whites (room temperature) along with the salt.
7. With the whisk attachment, whisk on a medium-low speed until it becomes frothy, with small bubbles on top (this will take a few minutes).
8. Slowly add in the sugar (B), about a tablespoon at a time. Once you have added all the sugar, whisk until you have a stiff peak.
9. Take about ⅕ of the meringue mixture and whisk it through the egg yolk mixture. This will be quite stiff, so it needs to be whisked firmly to smooth it out.
10. Add the remaining meringue in 2-3 parts, gently folding it through to ensure you don’t beat out too much air.
11. Once smooth, sift over the remaining flour (B) and fold through until there are no more lumps.
12. Add the mixture into your piping bag and let it rest for a few minutes; this will just make it slightly easier to pipe.
13. Using the guides on your baking tray, pipe two large 7” circles and then individual lines for the lady fingers. You will need 25-30 lady fingers, depending on the size of the ring mold you are using for the mousse. The more you can make, the better! But remember, they need to be baked immediately or the meringue will begin to collapse.
14. Once piped, sprinkle a thin coating of caster/white sugar over the top.
15. Place them directly into the oven and bake until a deep golden brown colour.
Note – as we are baking multiple trays of ladyfingers and sponge discs for the charlotte cake, the placement in the oven affects browning. The top tray will turn golden first because it’s directly exposed to the heat from the top of the oven, while the lower trays are shielded, preventing them from browning properly. We don’t care about the 7” disc brownings, but we need both sets of lady fingers to be golden, so rotate the trays halfway through baking, bringing the lower trays to the top and vice versa. Just do it very very quickly, so we don’t deflate the lady fingers.
16. Bake everything for around 30 minutes, being sure not to underbake the lady fingers especially. They need to be firm to the touch. What I like to do is pop the 7” circles back in the oven just to get them slightly more golden.
17. Remove them from the oven and then allow them to cool at room temperature. Leave the 7” discs out at room temperature but freeze the remaining lady fingers in a sealed tupperware as we won’t need these until the next day.
18. If you want to make these ahead of time, you can place them in an airtight container and freeze them for up to 2 months.
Berry Bavarois Mousse
1. Add the powdered gelatin into a small bowl and pour the cold water over the top. Let it bloom for 5-10 minutes. If using a gelatin sheet, soak this in ice-cold water.
2. Into a medium bowl, add the egg yolks and sugar and whisk briefly to combine.
3. Meanwhile, add the cream and milk to a medium saucepan and heat just until it is steaming.
4. Slowly pour the hot cream over the egg yolk mixture and whisk to combine.
5. Pour it back into the pan and whisk constantly, cooking until it reaches 82C/180F on a digital thermometer, then immediately remove it from the heat. You need to do this quickly or it will begin to scramble.
6. Pour it straight through a sieve into a tall measuring jug.
7. Scoop in the bloomed gelatin powder (or squeeze the water out of the gelatin sheet), and then use a hand blender to blend until smooth.
8. Pour in the fruit puree and blend to combine.
9. Pour this mixture into a tray and cover the surface with cling film. We need this to cool to around 30C/86F on a digital thermometer, so refrigerating it can be the quickest way to chill it.
10. Once at temperature, add the remaining cream to the bowl of a stand mixer and whisk on a medium speed until you have a medium stiff peak.
11. Pour the chilled fruit mixture into a bowl, and then whisk in the whipped cream in 3 parts until you have a smooth mousse.
Assembly Part 1
1. Take the cooled 7” savaordi biscuit discs and, using your 7” ring mold, trim them down to size.
2. Line the inside of the 7” cake ring mold with acetate and place this onto a tray lined with a baking mat.
3. Take a few tablespoons of jam and spread this evenly across each disc, then place one into the base of the ring mold.
4. Take the berry bavarois mousse and fill the ring mold up halfway.
5. Add the second savoiardi disc.
6. Pour the remaining mousse in, filling it to the top of the rind mold. It should settle evenly, but if it needs it, flatten it with a palette knife.
7. Place this into the freezer, ideally overnight, but a minimum of 6 hours.
Mascarpone Cream
1. Add the powdered gelatin into a small bowl and pour the cold water over the top. Let it bloom for 5-10 minutes. If using a gelatin sheet, soak this in ice cold water.
2. Into a medium saucepan, add the cream and heat until it is steaming.
3. Remove it from the heat, and add the bloomed gelatin into a tall measuring jug and pour over the hot cream.
4. Blend to combine, then add the sugar and mascarpone and blend again.
5. Finally, add the remaining cold cream and blend one more time.
6. Cover the surface with clingfilm and refrigerate for 6 hours or overnight.
Note – there is no vanilla in this, but you can absolutely add it, if you want that flavour! Add it to the cream when you are heating it.
Assembly Part 2
1. Remove the frozen berry bavarois from the freezer, and lift it onto your serving dish. Peel off the acetate.
2. Leave it at room temperature for about 30 minutes – 1 hour to soften, this will make it easier to stick the lady fingers on. Alternatively, you can use a heat gun/blow torch to warm the sides and press the lady fingers on.
3. Once the edges have softened slightly, remove the lady fingers from the freezer, and then trim them down slightly so they are all of identical height. You can also use a microplane to lightly shave the edges to get them nice and straight.
4. Press them into the side of the cake – just note that the longer you leave them on the cake, the softer they will become. So if you want them to be a bit more crunchy, then it is best to place them on the cake just as you are serving. But note the cake needs quite some time to defrost!
5. Remove the mascarpone cream from the fridge and add it to a stand mixer fitted with a whisk attachment.
6. Whisk on a medium speed until it holds a medium peak, being careful not to over whip it.
7. Add the mixture into a piping bag fitted with a 1M star tip nozzle.
8. Pipe a spiral border around the edge of the cake.
9. Finish the cake by decorating it with some crushed pistachios and freshly sliced fruit.
10. The cake needs around 3-4 hours in total once removed from the freezer to defrost so just take those timings into consideration before serving.
Shop the Equipment

Boston Cream Pie
TIER 1
Boston Cream Pie
A childhood favourite of mine, a Boston cream pie often comes as a donut, but it’s also fantastic in cake form. It starts with two layers of vanilla sponge, which are filled with a thick layer of smooth vanilla crème pâtissière. The cake is then finished with a thin chocolate glaze.The beauty in the cake lies in how it is layered in the tin, and using acetate really helps to get a smooth, clean finish.
7"
CAKE
Ingredients
Makes 1 7-inch Cake
Vanilla Sponge
245g Caster Sugar
245g All Purpose/Plain or Cake Flour
15g Baking Powder
2g Fine Sea Salt
245g Whole Eggs
100g Vegetable Oil
85g Whole Milk
145g Unsalted Butter
1 Tsp Vanilla Bean Paste
Crème Pâtissiére
500g Whole Milk
1 Fresh Vanilla Pod
75g Caster/White Sugar
120g Egg Yolks
40g Cornstarch
1g Fine Sea Salt
45g Unsalted Butter, Cold & Cubed
Chocolate Glaze
100g Chocolate (55% Cocoa Solids)
50g Unsalted Butter
80g Double/Heavy Cream, Slightly Warm
Special equipment
2 x 7″ springform/removable base cake tins
Acetate
Hand blender (optional)
Stand mixer (optional)
Method
Vanilla Sponge
1. Pre-heat your oven to 180C/355F non-fan assisted.
2. Lightly grease the bottom of two 7” cake tins, and place a circle of parchment on the base. Lightly grease the sides and coat them with flour, tipping out any excess.
3. Place the butter & vanilla into a saucepan and melt it over a low heat. Once it has just melted, set it to one side to cool slightly.
4. In a large bowl, sieve together the dry ingredients – sugar, flour, salt & baking powder. Whisk until they are evenly combined.
5. In a separate jug, whisk together the eggs, oil & milk.
6. Slowly pour the wet ingredients into the dry bowl, whisking to combine until you have a smooth batter with no more streaks of flour.
7. Finally, pour in the melted butter and mix the batter slowly until everything is evenly combined and you have a smooth batter.
8. Pour 500g of batter into each cake tin.
9. Place the cakes in the oven and bake for around 30-35 minutes, at which time the cake should be golden and a skewer should come out clean.
10. Once baked, remove them from the oven and run a knife around the outer edge of the cake tin to ensure it releases. Then carefully flip it onto a wire rack.
11. Let the sponges cool for a few minutes, then flip them onto a sheet of cling film and wrap them, before refrigerating. 3-4 hours will be enough but overnight works great too!
Crème Pâtissiére
1. In a medium saucepan on the stovetop over medium heat, add the milk and the scraped vanilla pod just until it is steaming.
2. In a separate medium bowl, whisk together the sugar, egg yolks, cornstarch, and salt until smooth and thickened.
3. Slowly pour the hot milk mixture over the sugar and eggs mixture, whisking constantly.
4. Pour the mixture back into the saucepan. Whisk constantly over medium heat until it begins to bubble, then cook for 1 minute.
5. Remove the saucepan from the heat and pass the mixture through a sieve placed over a large bowl.
6. Blend (or whisk) in the butter until the mixture is smooth. Cover the surface with cling film and refrigerate for 2-3 hours.
Assembly
1. Once the cakes have chilled, use a serrated knife (or cake leveller) just to trim the top of the cakes off – don’t cut off too much!
2. Take a 7” cake tin with a removable bottom/springform tin/cake ring and line the inside with acetate. Place this onto a tray.
3. Take one of the sponges, and lift it into the tin/ring mold. Ensure the acetate is tight around the cake – if you need to, adjust the acetate and re-tape it so that there are no gaps between the acetate and the cake.
4. Remove the créme pâtissiére from the fridge and add it into a stand mixer (or whisk by hand) and whisk for around 2 minutes until the mixture becomes much smoother in texture. It might initially look slightly lumpy/gelatinous but as you whisk it will smooth itself out.
5. Scoop the créme pâtissiére on top of the sponge and use a spoon to spread it to the edges, creating an even layer.
6. Next, take the second layer of cake and flip it upside down so that the side you cut is now facing down. Lift this on top of the créme pâtissiére and carefully press it in with your hands.
7. To make the chocolate ganache, add the chocolate and butter to a bowl and place this over a pan of gently simmering water. Stir it until it has completely melted.
8. Take some slightly warm cream and pour this in, and then stir with a spatula until smooth.
9. Working quickly, immediately pour the ganache on top of the sponge, and then tilt the tin/ring mold so that it spreads evenly to the edges.
10. Place the entire cake in the fridge for 2-3 hours to set (or overnight) then remove it from the fridge.
11. Lift it out of the tin/ring mold and peel off the acetate. If any of the créme pâtissiére has stuck, simply smooth the edge of the cake with an offset spatula so that it is neat.
12. It is best served, left at room temperature for 30m-1 hours so that the chocolate can soften slightly.
13. To give it a nice finish as you serve it, gently blow torch the chocolate to give it a quick shine!
Shop the Equipment


Raspberry Sachertorte
TIER 2
Raspberry Sacher Torte
This is a new and improved version of my original Sachertorte. It has 2 layers of chocolate financier (which is delicious baked on its own too!), with a layer of raspberry compote in the centre. We then sandwich that in a chocolate mousse which uses a pâte à bombe base. The whole thing is frozen and finished with a shiny chocolate ganache glaze. I’d recommend a good quality hand blender for this glaze, to avoid adding too many air bubbles.
7"
CAKE
Ingredients
Makes 1 7-inch Cake
Chocolate Financier
210g Dark Chocolate (70% Cocoa Solids)
75g Unsalted Butter
75g Icing Sugar
60g Ground Almonds
60g Plain Flour
6g Baking Powder
1g Fine Sea Salt
150g Egg Whites (Room Temperature)
195g Double/Heavy Cream
Raspberry Compote
180g Raspberry Puree
40g Caster/White Sugar
3g Pectin Nh
15g Lemon Juice
Chocolate Mousse
90g Egg Yolks
45g Whole Eggs
70g Caster/White Sugar
200g Dark Chocolate (70% Cocoa Solids)
(a) 150g Cream (35-48% Fat)
(b) 275g Cream (35-48% Fat)
Chocolate Glaze
200g Dark Chocolate (55% Cocoa Solids), Chopped
240g Cream (35-40% Fat) – Ideally we want a cream that is lower in fat here as it will make the glaze more fluid. I used 39% fat.
40g Soft, Unsalted Butter
20g Raspberry Liqueur (Optional)
Special equipment
9×13” baking tray
6.3”x1.7” (16×4.5cm) ring mold
Stand mixer
Digital thermometer
Hand blender
7″ ring mold
Method
Chocolate Financier
1. Take a 9×13” baking tray, and lightly grease the bottom, lining it with a sheet of parchment paper. Pre-heat the oven to 175C/345F Non-fan assisted.
2. Into a small bowl, add the chocolate and butter and place this over a pan of gently simmering water. Stir until it has completely melted and then set it to one side to cool slightly.
3. Into a medium bowl, add the icing sugar, ground almonds, salt, flour, and baking powder. Whisk these together until they are combined.
4. Pour in the egg whites and whisk again until smooth.
5. Pour in the cream and whisk until smooth.
6. Finally, slowly pour in the chocolate mixture while whisking, until you have a thick chocolate batter.
7. Pour the batter into the lined tray and use an offset spatula to spread it out evenly.
8. Bake for 20 minutes in the oven and then remove and allow to cool at room temperature for 30 minutes, before refrigerating for 2-3 hours – chilling it will make it easier to cut without falling apart!
Raspberry Compote
1. If you don’t have raspberry puree, you can simply blend 180g of fresh raspberries and use that.
2. Pour the raspberry puree into a medium saucepan and place it on a medium low heat.
3. Meanwhile, in a small bowl, stir together the sugar and pectin.
4. Once the puree is steaming, whisk in the pectin sugar mixture and keep cooking until it reaches a boil.
5. Remove it from the heat, and whisk in the lemon juice.
6. Pour the mixture into a bowl and cover the surface directly with clingfilm. Refrigerate for 1-2 hours.
Assembly Part 1
1. Once the financier has chilled, use a 6.3”x1.7” (16×4.5cm) ring mold to cut two discs. If you don’t have enough space to cut two full discs, you can cut a second disc, and then cut some scraps and press the cake together slightly. Don’t worry too much if you don’t have a ring mold this exact size, you just want something smaller than the ‘main’ 7” ring mold that we are using later. This is the insert layer that gets sandwiched in between the chocolate mousse.
Note – we will need the spare financier scraps later to decorate the cake so set them to one side. When you have a moment, very briefly blend them to a crumb, then get them onto a tray and into the freezer to use later.
2. Lift one of the discs into the bottom of the 6.3” ring mold, which is on a tray lined with a silicon baking mat.
3, Remove the raspberry puree from the fridge and stir it to loosen it.
4. Pour this into the ring mold and spread it to the edges so that you have an even layer.
5. Place the second chocolate sponge on top and gently sandwich it together.
6. Place the ring into the freezer for 2-3 hours or until frozen.
Chocolate Mousse
1. The key to this mousse is ensuring that the temperatures are correct otherwise, it could split or go grainy.
2. Into a medium bowl, add the chocolate and place this over a pan of gently simmering water. Stir this until melted, then turn off the heat, but keep it on the water so it stays warm & fluid.
3. Then, add the whole eggs, egg yolks and sugar into the bowl of a stand mixer.
4. Place the bowl over a pan of gently simmering water and whisk by hand until it reaches around 60C/140F on a digital thermometer.
5. Immediately remove the bowl from the heat, place it onto a stand mixer and whisk on a medium speed.
6. Meanwhile, add the cream (a) into a small saucepan and place it over a medium heat, stirring until it is steaming.
7. Remove the cream from the heat and pour it over your melted chocolate, then use a hand blender to emulsify them together.
8. At this point we need to check the temperatures of both ingredients. The chocolate/cream needs to be between 40-50C (104-122F) and the egg yolk mixture needs to be between 20-25C (68-77F) when we combine them. This will ensure they combine properly.
9. If you find one is colder than the other, just gently stir it over a pan of very gently simmering water.
10. Once both components are at temperature, gently fold the egg yolk mixture (which will have thickened) into the chocolate in three parts until smooth. Set this bowl to one side.
11. Into the bowl of a stand mixer fitted with the whisk attachment, add the remaining cream (b). Whisk this until it forms medium soft peaks, do not overwhip it.
12. Take the soft cream and fold it into the chocolate base in three parts until you have a smooth mousse.
13. Take a 7” ring mold and tightly wrap the bottom with clingfilm (you can line it with acetate if you want – this will just make it slightly easier to demold). Place it onto a tray lined with a baking mat.
14. Scoop a small portion of the chocolate mousse into the ring mold, then remove the raspberry/chocolate insert from the freezer. Pop it out of the ring mold and press it into the chocolate mousse.
15. Top up the rest of the ring mold with the chocolate mousse, using a palette knife to completely smooth the top. You may have a little extra chocolate mousse – get this into some ramekins and chill it to have a nice dessert later!
16. Place the entire dessert into the freezer for a minimum of 6 hours, until frozen solid.
Chocolate Glaze
1. Once the glaze is ready we are going to pour it immediately over the cake so be prepared with the frozen cake nearby and a rack ready to pour it on. It can help to demold the mousse from the ring mold, then place it back in the freezer so when you are ready to glaze you don’t need to faff around getting it out of the mold.
2. Into a tall jug, add the chopped chocolate.
3. Add the cream into a small saucepan, and gently stir it until it is steaming.
4. Immediately remove it from the heat and pour it over the chopped chocolate.
5. Let it sit for a minute, then use a hand blender to blend it until smooth. Really try to avoid adding any air bubbles here.
6. Add in the soft butter and raspberry liqueur (optional) and blend again until smooth.
7. Remove the frozen mousse from the freezer and place it onto a glass, with a tray and wire rack underneath.
8. Pour the glaze evenly over the entire cake.
9. The glaze will set quickly, so once it has stopped dripping, use a knife to just trim away the drips.
10. Remove the blended-up crumbs from the freezer and press these into the bottom of the cake.
11. Then carefully lift it onto your serving plate. You might damage it slightly lifting it up/moving it, so just patch up any bits with more blended crumb!
12. Let it defrost for 2 hours at room temperature, then serve.
Shop the Equipment


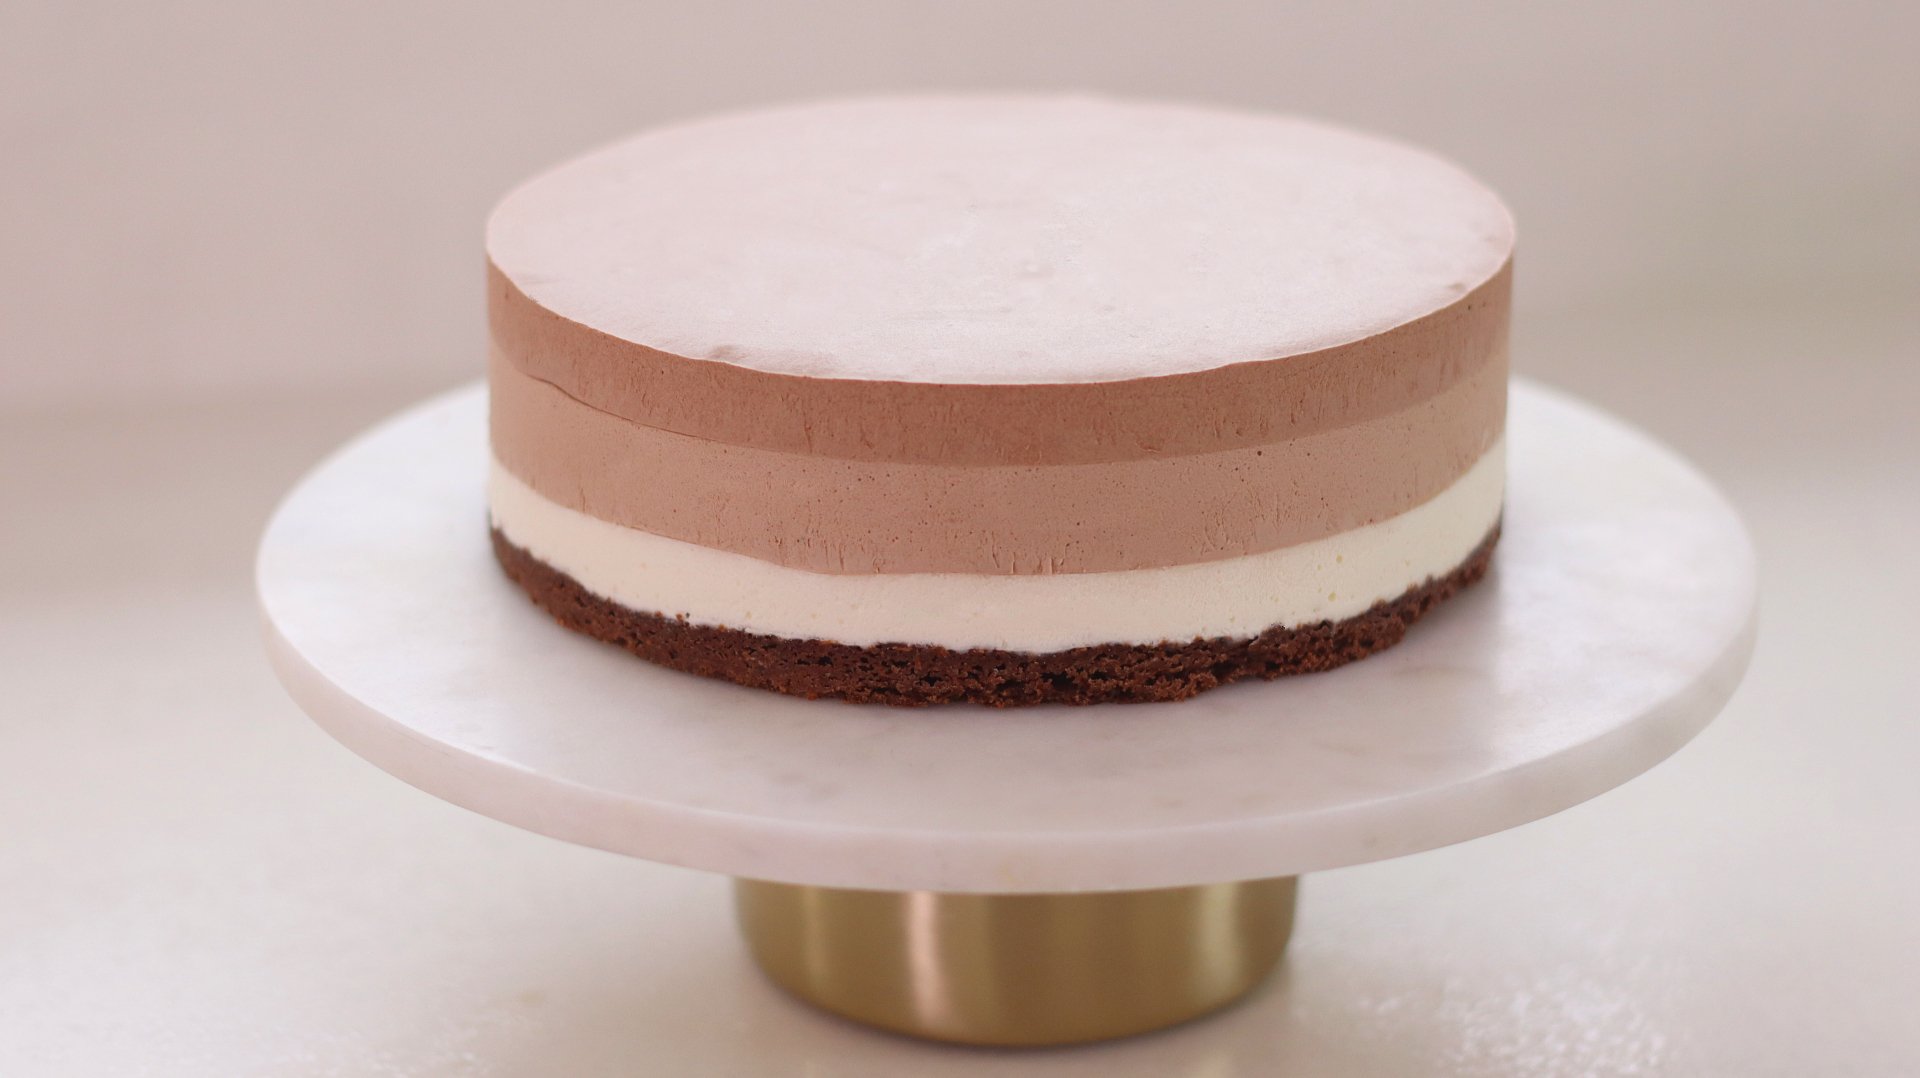
Triple Chocolate Cheesecake
TIER 1
Triple Chocolate Cheesecake
Unlike a traditional dense cheesecake, this one has a light, mousse-like texture (Triple Chocolate… Choussecake?!). The process is simple as we start by making a ganache with cream cheese, then fold in whipped cream to create that incredible texture. Each layer is easy to replicate since the measurements are nearly identical, with just a few small tweaks. The only tricky part is waiting for each layer to set! But once it’s ready to serve, you’re left with a beautiful ombré effect.
1
8" CHEESECAKE
Ingredients
Makes 1 8-inch Cheesecake
Chocolate Cookie Base
120g Oreos
20g-40g Unsalted Butter
Milk Mixture
275g Whole Milk
30g Honey
White Chocolate Layer
75g Milk Mixture (Above)
60g White Chocolate, Chopped
75g Double/Heavy cream
90g Cream Cheese, Full Fat
60g Double/Heavy cream
Milk Chocolate Layer
75g Milk Mixture (Above)
60g Milk Chocolate, Chopped
6g Cocoa Powder
75g Double/Heavy cream
90g Cream Cheese, Full Fat
60g Double/Heavy cream
Dark Chocolate Layer
75g Milk Mixture (Above)
65g Dark Chocolate (70% Cocoa Solids), Chopped
75g Double/Heavy cream
90g Cream Cheese, Full Fat
60g Double/Heavy cream
Special equipment
Food processor
8×2.75” ring mold
Acetate (optional)
Hand blender
Stand mixer
Method
Chocolate Cookie Base
1. Add the Oreos into a food processor and blend to a fine crumb. If you want, you can remove the white filling and just use 120g of Oreo biscuits.
2. Pour these into a medium bowl and set it to one side.
3. Add the butter into a small saucepan and place it on a low heat until melted.
4. Slowly pour about half of the butter mixture into the Oreos and stir to combine. Keep adding butter until the mixture resembles slightly wet sand. Oreos don’t require as much butter to pull together unlike a traditional biscuit base so add it slowly to avoid a very wet biscuit mixture.
5. Take an 8×2.75” ring mold and place a piece of acetate along the inside. Acetate isn’t completely necessary as we are freezing the mousse. If you don’t have acetate you can simply heat the outside of the ring mold with a hair dryer/heat gun when you need to demold it. Acetate just makes this process much easier and you end up with a slightly cleaner finish. Place the ring onto a baking tray.
6. Pour the Oreo mixture into the base of the ring and use the back of a measuring cup or something flat, to smooth the base out so that it is even. Place the tray into the freezer.
Milk Mixture
1. Add the milk and honey into a small saucepan, and place it over a medium-low heat until it is steaming – stirring occasionally. We are going to split this mixture between all three cheesecake bases.
The process for making the layers is identical, so it is easiest to set up three measuring jugs at once, each with the chopped chocolate in, then pour in the weighed milk mixture.
White Chocolate Layer
1. Into a tall jug, add the chopped chocolate, and pour over 75g of the hot milk mixture. The mixture needs to be hot so that the chocolate melts. Let it sit for 2 minutes before blending until smooth.
2. Add in the cream cheese, and the 75g of double/heavy cream. Blend again until smooth and there are no lumps of cream cheese. Cover the surface with clingfilm and refrigerate for 3 hours (or longer if needed).
Milk Chocolate Layer
1. Into a tall jug, add the chopped chocolate, and cocoa powder, and pour over 75g of the hot milk mixture. The mixture needs to be hot so that the chocolate melts. Let it sit for 2 minutes before blending until smooth.
2. Add in the cream cheese, and the 75g of double/heavy cream. Blend again until smooth and there are no lumps of cream cheese. Cover the surface with clingfilm and refrigerate for 3 hours (or longer if needed).
Dark Chocolate Layer
1. Into a tall jug, add the chopped chocolate, and pour over 75g of the hot milk mixture. The mixture needs to be hot so that the chocolate melts. Let it sit for 2 minutes before blending until smooth.
2. Add in the cream cheese, and the 75g of double/heavy cream. Blend again until smooth and there are no lumps of cream cheese. Cover the surface with clingfilm and refrigerate for 3 hours (or longer if needed).
Assembly
The assembly process is slightly tedious, as you have to wait for each layer to set before you can add the next one!
1. Remove the white chocolate layer from the fridge and place it into a medium bowl or the bowl of a stand mixer fitted with a whisk attachment. Whisk on a medium speed, until the mixture thickens and holds a medium peak. Set this to one side.
2. Into a bowl, add the remaining 60g of double/heavy cream and whisk until it holds a medium peak. Note – 60g can actually be quite tough to whisk if you are using an electric stand mixer so it is worth mixing 100g so that the whisk attachment can actually catch it, then just weigh the required 60g of cream.
3. Take the 60g of whipped cream, and fold this through the white chocolate layer, until smooth and combined. The final texture of the mixture should be thick, but still soft and slightly runny. We want a texture where we can pour the mousse into the tin and it will almost settle itself without too much assistance!
4. Remove the chilled chocolate base from the freezer and pour the white chocolate layer in. It should spread to the edges and settle, but if not just use a palette knife or a spoon to gently spread it, so that it is even. You can even give the tray a bit of a tap on the work surface to help it settle. Place the tray into the freezer for 30-60 minutes, or until the white chocolate layer feels firm enough to the touch to support another layer of mousse.
5. Repeat this exact same process with the milk chocolate and dark chocolate layers, freezing the mousse in between the milk and dark chocolate each layer. Note that because these layers have more cocoa solids, they will become thicker more quickly as you whisk them, so be careful not to over-whisk them and let them become too thick.
6. Once you have added the dark chocolate layer, place the entire cheesecake into the freezer. If you need to serve this quickly, 2-3 hours in the freezer will be absolutely fine, but you can also freeze it overnight too.
7. When you are ready to serve, remove the cheesecake from the freezer, and lift it onto your serving dish. Carefully pull off the ring mold and then peel away the acetate, to reveal a smooth cheesecake. The cheesecake now needs 2 hours to defrost before you can eat it (maybe slightly less if you only freeze it for 2-3 hours). Or, you can defrost it for 2 hours then get it straight into the fridge.
8. Just a note that the longer you leave it at room temperature, you will begin to see the base ‘weep’. This is just because the sugar draws moisture from the cheesecake mixture. Nothing has gone wrong, it’s just a natural scientific occurrence of the ingredients of the hygroscopic properties of sugar!
Shop the Equipment


Espresso Burnt Basque Cheesecake
TIER 2
Espresso Burnt Basque Cheesecake
We don’t use coffee often in Bake It Better, but it’s a flavour I absolutely love! A classic burnt Basque cheesecake is usually made without a biscuit base, but here, we’re taking it up a notch with our own homemade chocolate biscuit base. I’ve also included some great techniques to give the cheesecake a more refined finish—less rustic than most recipes! If coffee isn’t your thing, feel free to skip the espresso and coffee beans and swap in fresh vanilla instead!
1
9" CHEESECAKE
Ingredients
Makes 1 9-inch Cheesecake
Chocolate Cookie Base
70g Unsalted Butter, Cubed & Cold
55g Plain/All-Purpose Flour
12g Cocoa Powder
45g Ground Almonds
35g Caster/White Sugar
1g Baking Powder
Pinch of Sea Salt Flakes
Coffee Cheesecake
450g Double/Heavy Cream + extra
45g Coffee Beans, Whole
880g Cream Cheese
265g Caster Sugar
38g Plain Flour
290g Whole Eggs, Whisked Together
25g Freshly Brewed Espresso
Special equipment
9” springform/loose bottom cake tin
Stand mixer
Hand blender
Food processor
Method
Chocolate Cookie Base
1. Take a 9” springform/loose bottom cake tin, and lightly grease the base and sides. Place a circle of parchment along the bottom and a strip around the side.
2. Into the bowl of a stand mixer (or you can do this with your hands), add all of the ingredients.
3. With the paddle attachment, mix on a low speed until it resembles a crumble-like texture and the butter has broken down. If doing this by hand, just rub the mixture between your fingers.
4. Remove the mixture from the bowl and tip it into the base of the cake tin. Use your hands to press it flat into the tin – it will be quite dry/dusty initially, but pressing it down will help form it into a dough. Then use the back of a flat glass to press it firmly down.
5. Place the tin into the freezer, while you pre-heat the oven to 175C/345F Non-fan assisted.
6. Put the tin into the oven and bake the base for 20 minutes. Remove it from the oven and allow it to cool at room temperature for 15 minutes.
7. Once it has cooled, lay a few large sheets of foil underneath the pan – we will need these later!
Coffee Cheesecake
1. Into a medium saucepan, add the cream and whole coffee beans. Place the lid on the pan and place it on a medium heat. Once it comes to a simmer, turn the heat off and allow it to steep for 30 minutes.
2. Pre-heat the oven to 210C/410F fan-assisted.
3. Remove the lid and pour the mixture into a tall jug, then use a hand blender to blend for about 30 seconds.
4. Pour the mixture through a sieve and into a bowl on a scale. You will have lost some weight due to evaporation, so you need to top up the mixture with more fresh double/heavy cream, until it weighs 365g.
5. Into a food processor or blender, add the cream cheese, flour, and sugar. Blend on a low speed for about 2 minutes until the mixture is smooth. We’re trying to avoid adding in too much air so it is important to do this on a low speed. Scrape down the mixture a few times to ensure it incorporates properly.
6. Pour in the eggs and blend until combined on a low speed. Scrape down the food processor when/if needed.
7. Finally, pour in the coffee cream and freshly brewed coffee and blend on low until combined. Scrape down the food processor and blend again.
8. Give the bowl a very firm tap on the work surface to get rid of any excess bubbles, then pour the mixture, through a sieve, straight over the biscuit base.
9. Take two tea towels, and soak them in water. Fold them into a neat rectangle shape and then wrap them around the outside of the tin. Then, take the foil that you laid down, and wrap this up and around the tea towels (to stop them from burning!)
10. Place the tray into the centre of the oven and bake for around 35-40 minutes. The cheesecake should be dark on top, with a very significant wobble when you gently shake the tray. About ¾ of the cheesecake should wobble. If you think the cheesecake is done, but maybe you want it a little darker on top, you can put it under a hot grill just for a minute or two to add some colour. For me, I found 36 minutes was perfect.
11. Remove it from the oven and allow it to cool at room temperature for 1 hour, before refrigerating overnight. It’s important to let it chill overnight to really set the cheesecake.
12. The next day, remove it from the tin, and then use a hot knife to cut slices.
Shop the Equipment


Salted Caramel Cookies
TIER 2
Salted Caramel Cookies
In Tier 2 we step things up by adding a brown sugar streusel and salted caramel to the basic cookie dough recipe. The roasted hazelnuts in the dough add an amazing flavour, and the texture combination of this with the streusel and salted caramel is next level! The salted caramel centre can be swapped out for other fillings too – ganache, lemon cremeux, hazelnut praline etc!
8
COOKIES
Ingredients
Makes 8 Cookies
Hazelnut Sablé
350g Plain/All-Purpose Flour
190g Unsalted Butter, Cold & Cubed
120g Icing/Powdered Sugar
45g Ground Hazelnuts (or Almonds)
1g Fine Sea Salt
65g Whole Eggs
Streusel
60g Cold Unsalted Butter, Cubed
60g Light Brown Sugar
75g Ground Almonds/Hazelnuts
60g Plain/All Purpose Flour
Pinch of Sea Salt
Zest ¼ Lemon
Salted Caramel
175g Double/Heavy Cream
45g Whole Milk
135g Liquid Glucose Syrup, Divided
80g Caster/White Sugar
2g Flakey Sea Salt
60g Unsalted Butter
Special equipment
78mm Tart Ting
50mm Cookie Cutter
Stand mixer
Rolling pin
Silcon mats (optional)
Piping bags (optional)
Method
Salted Caramel
1. In a medium saucepan on the stovetop over medium heat, combine the milk, heavy cream, and 45 grams of corn/glucose syrup. Bring to a gentle simmer, whisking the mixture to ensure the syrup has fully dissolved. Remove the saucepan from the heat but ensure the mixture stays warm.
2. In a medium saucepan on the stovetop over medium heat, combine the superfine/caster sugar and the remaining 45 grams of glucose sugar. Cook until the mixture turns a deep caramel colour, whisking slowly to help disperse the sugar.
3. Once golden, immediately pour in the hot cream mixture, being very careful as it will bubble up violently. Whisk the mixture and cook for 1 minute.
4. Remove the saucepan from the heat and pour the mixture through a sieve and into a large bowl. Let the mixture cool for 2 minutes. Add the sea salt flakes and butter. Blend or whisk until smooth.
5. Pour the mixture into a container and leave at room temperature.
Streusel
1. Into the bowl of a stand mixer, fitted with the paddle attachment, add all of the ingredients.
2. Mix on a low speed until the butter has broken down and the mixture is sandy in texture. This will take a few
3. Transfer this to a baking tray and place it into the freezer while you make the sablé.
Hazelnut Sablé
1. Into the bowl of a stand mixer, fitted with the paddle attachment, add all of the ingredients except the egg.
2. Pour in the whole egg and mix on low speed for 30 seconds, then stop the mixer and use your hands to squeeze the dough together to form a dough.
3. Place the dough in between two silicon mats or pieces of parchment paper, and using a rolling pin, roll it to around 7mm/0.25” thick.
4. Place this in the freezer for 20 minutes.
5. Once chilled, work quickly and use the 78mm tart ring to cut out discs, then cut the middle of the dough out with a 50mm cookie cutter to leave you with donut shape. Place these onto a tray lined with parchment paper, ensuring you keep the tart rings around the outside of the dough. Place these back into the freezer for 15 minutes, meanwhile preheat your oven to 160C/320F Non-fan assisted.
6. Place the dough into the oven and bake for 12 minutes – it should turn a very light golden colour.
7. Once baked, let them cool for a few minutes before pressing the sables out of the tart ring and letting them cool completely.
8. Use the same tart ring and place it back onto the baking tray. Add a few tablespoons of the chilled streusel and press it down with the back of a spoon so you have an even layer.
9. Take the chilled hazelnut sablé and press this on top of the streusel, it should fit snugly into the tart ring. You need to make sure the sablé is touching the streusel. (If you find it won’t touch – when it is baking, it will soften, so after a few minutes you can press it down while it is in the oven).
10. Place the cookies into the oven and bake for around 20 minutes, or until they are a golden colour.
11. Remove them from the oven and allow to cool for a few minutes before pressing them out of the tart rings.
12. Ensure the caramel is a soft, almost runny honey-like texture, and pipe this into the centre of the biscuits. The caramel will be soft and runny if served immediately but will thicken the longer they sit at room temperature.
Shop the Equipment


Chocolate Orange Swirl Cookies
TIER 1
Chocolate Orange Swirl Cookies
These stunning cookies use the same base dough, one flavoured with orange and the other flavoured with cocoa powder. The doughs are laid on top of each other and carefully rolled into a tight log to create the spiral effect. You can get creative and colour one of the doughs, or even make a quick ganache and sandwich the cookies together!
18-20
COOKIES
Ingredients
Makes 18-20 Cookies
Chocolate Dough
170g Plain/All-Purpose Flour
2g Fine Sea Salt
30g Cocoa Powder
80g Icing/Powdered Sugar
30g Ground Almonds
110g Unsalted Butter, Cold & Cubed
40g Whole Eggs
Orange Dough
200g Plain/All-Purpose Flour
2g Fine Sea Salt
80g Icing/Powdered Sugar
30g Ground Almonds
110g Unsalted Butter, Cold & Cubed
Zest 1 Medium Orange
40g Whole Eggs
Egg Wash
1 whole egg, whisked
Special equipment
Stand mixer
Silicon mats (optional)
Rolling pin
Method
Chocolate Cookie Dough
1. Add all of the dry ingredients into the bowl of a stand mixer, along with the cubed butter.
2. Mix on a medium low speed for 2-4 minutes, until the butter has broken down, and the mixture has a breadcrumb/sandy-like texture.
3. Pour in the egg mixture and mix for about 20 seconds, the dough will not pull together however, so remove the bowl from the mixer and squeeze the dough with your hands, until it forms a dough.
4. Place the dough in between two silicon mats or pieces of parchment paper and roll it to about 3-5mm thick – the thinner the better really. You want to roll it as best as possible into a neat rectangle shape as that will reduce the wastage later on.
5. Place the dough into the fridge for a minimum of 3 hours.
Orange Cookie Dough
1. Add all of the dry ingredients into the bowl of a stand mixer, along with the cubed butter.
2. Mix on a medium low speed for 2-4 minutes, until the butter has broken down, and the mixture has a breadcrumb/sandy-like texture.
3. Pour in the egg mixture and mix for about 20 seconds, the dough will not pull together however, so remove the bowl from the mixer and squeeze the dough with your hands, until it forms a dough.
4. Place the dough in between two silicon mats or pieces of parchment paper and roll it to about 3-5mm thick – the thinner the better really. You want to roll it as best as possible into a neat rectangle shape as that will reduce the wastage later on.
5. Place the dough into the fridge for a minimum of 3 hours.
Assembly
1. Once the doughs have chilled remove them from the fridge, and apply a light egg wash to the chocolate dough. Then, lift the orange dough on top, gluing it in place.
2. Leave them at room temperature to soften for just a few minutes – this will make them easier to roll.
3. Once softer, with the chocolate dough on the bottom, carefully roll the dough, lengthways (with the short side of the rectangle of dough facing you), into a tight log. Wrap this in clingfilm and then refrigerate for at least 1 hour
4. Before they are done chilling, preheat the oven to 150C/300F, non-fan assisted.
5. Once chilled, use a very sharp knife to cut the log into discs of equal thickness – about 5mm, then lift the biscuits onto a tray lined with a silicon baking mat.
6. Immediately place the tray into the oven and bake until lightly golden around the edges – about 20-25 minutes. Allow to cool then serve.
Shop the Equipment

Pandoro
TIER 2
Pandoro
In Tier 2 we are really stepping things up with a Pandoro – the iconic 8 pointed star Italian bread. This is a challenging dough that requires a high protein flour to handle the high levels of fat and sugar in the dough. Similarly to the Kugelhopf , this dough is flavoured with lemon and orange zest, with a beautiful enriched yellow crumb once baked. There is a lot of fermentation and proofing in this recipe, so really set aside some time to tackle this!
2
750G LOAVES
Ingredients
Makes 2 750g Loaves
1st Dough
615g Manitoba Flour (or Pannetone Flour)
0.8g Fresh Yeast/0.4g Instant Dry Yeast
340g Whole Eggs
125g Unsalted Butter, Cubed & Slightly Soft
Butter Mixture
150g Unsalted Butter, Soft
105g Caster Sugar
10g Honey
Zest ½ Lemon
Zest 1 Orange
Beans from 1 Vanilla Pod
2nd Dough
170g Manitoba Flour (or Pannetone Flour)
125g Caster/White Sugar
45g Whole Milk
8.5g Fine Sea Salt
85g Egg Yolks
19g Fresh Yeast/9.5g Instant Dry Yeast
Butter Mixture (Above)
Special equipment
Stand mixer
Dough scraper
Pandoro tins
Digital thermometer
Method
1st Dough
Note – this dough needs a long proof so it is best to do it at night so that it can proof overnight, then you’ll be ready to make the 2nd dough the next day.
1. Into a stand mixer, add the eggs and yeast, and whisk to combine.
2. Add in the flour and attach the dough hook. Mix on a medium low speed, until the flour has completely absorbed the wet ingredients. Once it has absorbed them, continue to knead for a minute on a low speed.
3. While mixing on a medium low speed, add the cubed butter a few pieces at a time. Allow the butter to incorporate before adding the next few pieces.
4. As soon as the butter has all been incorporated, continue to knead for 1 minute. We are not looking to develop the dough too much so remove it from the mixer and gently work it on your work surface, shaping it into a rough ball.
5. Lift the dough into a large container or bowl, ideally with measurements on the side so that you can see how much the dough has risen.
6. Cover the bowl tightly and proof at room temperature for 12 hours or until the dough has tripled in volume.
Butter Mixture
1. The next day, add all the ingredients for the butter mixture into a stand mixer, and attach the paddle attachment. Beat on a medium speed until it is smooth and homogenous. Set this to one side at room temperature.
2nd Dough
1. Now that the 1st dough has tripled in size, it is ready to use.
2. Into a small bowl, whisk together the sugar and flour. Add the milk into a small jug too.
3. Into the bowl of a stand mixer, add half of the 1st dough, along with the yeast.
4. Add ¼ of the sugar/flour mixture and mix on a low speed. Drizzle in ¼ of the milk. Knead on a low speed until all the dry ingredients are completely absorbed.
5. Repeat this process, adding the sugar/flour mixture in increments along with the milk. Ensure that all the dry ingredients are incorporated each time.
6. Once you have a homogenous dough, add the remaining half of the first dough and knead on a low speed for a minute.
7. Add in the salt and knead for a minute.
8. With the mixer still on low, alternate adding the egg yolks and butter mixture (above) in about 4 additions per ingredient. You need to ensure that the egg yolks are completely incorporated before adding the butter, and the butter is incorporated before adding the next part of egg yolks. Be patient here, waiting about 45 seconds in between each addition.
9. Once these have been incorporated and there are no streaks of egg yolks or butter, increase the speed to medium, and knead for around 10 minutes or until the dough is completely smooth and passes the windowpane test (where you stretch a small piece of dough between your fingers and it creates a windowpane without tearing).
10. Lift the dough out of the mixer, shape it into a tight ball, and lift it into a lightly oiled bowl. Allow it to proof at room temperature for 30 minutes.
11. After 30 minutes, using a dough scraper, split the dough into two equal 750g portions (you might have a little extra dough).
12. Use a dough scrape to shape each piece of dough into a tight ball.
13. Ensure your 750g Pandoro tins are lightly buttered and floured, and carefully lift the dough balls into the tins, smooth side down (so the smooth, top side of the dough should be against the bottom of the tin).
14. Loosely cover the top of the tins with clingfilm, and proof them for 4-6 hours at room temperature or until the dough has risen to just below the lip of the tin.
15. Before they are ready, pre-heat the oven to 170C/340F Non-Fan Assisted.
16. When the dough has proofed, place the tins into the oven, and bake for 50-60 minutes. The dough needs to register a temperature of at least 95C/203F on a digital thermometer. After about 25 minutes of baking, cover the top with a sheet of foil to stop it from darkening too much.
17. Once at temperature, remove the tins from the oven and allow the Pandoro to cool for 30 minutes in the tin, before flipping them onto a wire rack to cool completely.
18. Dust with icing sugar to serve.
Shop the Equipment


Kugelhopf
TIER 1
Kugelhopf
This bread has ties to Germany, Austria and France and is a popular bread served around the holidays. Think of it like giant hot cross bun in a bundt tin! The dough is a soft, buttery brioche flavoured with soaked raisins that have been steeped in orange, lemon and vanilla. When the cake is finished it is soaked in melted butter and then coated in sugar. I have to say, this is one of the most delicious recipes I’ve made ALL year! I’ve used a Kugelhopf tin, but the dough can also be made in a classic bundt tin.
2
400G LOAVES
Ingredients
Makes 2 400g Loaves
Soaked Raisins
100g Sultanas
20g Sugar
150g Water
Peels of 1/2 Lemon
Peels of 1 Medium Orange
Brioche Dough
425g Strong White Bread Flour (13-14% Protein)
10g Salt
50g Sugar
17g Fresh Yeast or 8.5g Instant Dry Yeast
190g Eggs
65g Whole Milk
Zest of 1 Lemon
Zest of 1 Orange
210g Unsalted Butter, Slightly Cold & Cubed
To Finish
Melted Butter
Caster/White Sugar
Special equipment
Stand mixer
Dough scraper
Kugelhopf tin/Bundt tin
Digital thermometer
Method
Soaked Raisins
1. Into a small saucepan, add all the ingredients for the soaked raisins. Bring it to a boil and then pour the mixture into a tupperware. Cover and refrigerate for a minimum of 6 hours, ideally overnight.
Brioche Dough
1. For the brioche dough, add all the ingredients, except the butter, to the bowl of a stand mixer fitted with the dough hook.
2. Mix for 10 minutes on a medium speed, scraping down the sides of the bowl occasionally.
3. After 10 minutes, add the butter slowly, a few cubes at a time. It helps to squeeze the cold butter in between your fingers gently just before you add it into the mixer.
4. Once all the butter has been added, continue to mix the dough until it is pulling away from the sides of the mixer and the dough passes the windowpane test.
5. Right at the end, drain the soaked raisins and briefly mix these in. We don’t want to knead them for too long or it will discolour the dough.
6. Scoop the dough out of the bowl, and shape it into a round ball using a dough scraper before lifting it into a lightly oiled bowl.
7. Allow the dough to proof for 2 hours at room temperature. It should double in size.
8. While it is proofing, lightly butter your Kugelhopf tin and coat the inside with flour, before tipping out the excess.
9. Once the dough has proofed, remove it from the bowl, knocking out the air.
10. Cut it into two equal 400g pieces of dough.
11. Carefully shape each piece into a ball, then with one of the dough balls, use your fingers to press a hole in the middle, creating a donut shape.
12. Confidently lift it into the greased tin and cover the tin with cling film.
13. With the other piece of dough, simply shape it into a ball and place it back into the bowl. Cover the surface of the dough and the bowl with cling film. Place both the tin and the bowl in the fridge overnight.
14. The next day, leave the tin at room temperature and proof for 2-3 hours, while leaving the other dough in the fridge.
15. Before baking, preheat the oven to 170C/355F Non-Fan Assisted.
16. Once proofed, the dough should have doubled, to just below the top edge of the tin. Bake the dough for around 35 minutes, it should be a golden colour and register 95C/203F when a digital thermometer is inserted in the middle.
17. Allow it to cool in the tin for 5 minutes, then flip it out and use a pastry brush to cover the entire dough in melted butter, before rolling in sugar.
18. Allow to cool before serving.
19. You can now remove the second dough from the fridge, and re-use the tin. Shape it into a donut again by piercing a hole in the centre and lift it into a the lightly greased tin.
20. Cover the tin with a tea towel and allow it to rise again until doubled – about 2-3 hours at room temperature. Bake as per step 16/17.
Shop the Equipment


Gâteaux Basque
TIER 2
Gâteaux Basque
Using the same idea of working with a high fat, high butter dough, in Tier 2 we work with a pastry that is very similar to a Sablé Breton. The dough is rolled, almost like a deep dish cookie pie, and filled with cherry jam and pastry cream. It’s traditionally finished by decorating it with the stripes of a fork and baked until golden. Most recipes say to cool it completely, but I really prefer it slightly warm as I think it has a much better texture!
1TART (SERVES 8-10)
Ingredients
Makes 8-10 Servings
For the Pastry
125g Egg Yolks
250g Caster/White Sugar
1g Salt
375g Plain/All-Purpose Flour
2.5g Baking Powder
20g Ground Almonds/Almond Flour
2g Lemon Zest
250g Unsalted Butter, Very Soft & Cubed
Egg Wash
1 Egg Yolk
For the Pastry Cream
500g Whole Milk
1 Fresh Vanilla Pod
70g Caster/White Sugar
120g Egg Yolks
40g Cornstarch/Cornflour
Pinch of Fine Sea Salt
45g Unsalted Butter, Cold & Cubed
Black Cherry Jam To Fill (or your favourite jam)
Special equipment
20 x 3.2 cm Tart Ring
Stand Mixer
Silicon Baking Mat
Rolling Pin
Method
Pastry
1. Sift the dry ingredients together in a bowl and set this to one side.
2. Into the bowl of a stand mixer fitted with a whisk attachment, add the egg yolks, sugar, lemon zest and salt. Whisk on a medium speed for 2 minutes until the mixture is thick and light in colour.
3. Add in the sifted dry ingredients, along with the soft butter (in small cubes). Mix with a paddle attachment just until it pulls together into a smooth dough. This won’t take long.
4. Turn the dough out onto a lightly floured work surface and knead it briefly until smooth, then shape it into 2 equal discs and wrap it in clingfilm. Refrigerate the dough for 1 hour.
Vanilla Pastry Cream
1. In a medium saucepan on the stovetop over medium heat, add the milk and the scraped vanilla pod just until it is steaming.
2. In a separate medium bowl, whisk together the sugar, egg yolks, cornstarch, and salt until smooth and thickened.
3. Slowly pour the hot milk mixture over the sugar and eggs mixture, whisking constantly.
4. Pour the mixture back into the saucepan. Whisk constantly over medium heat until it begins to bubble, then cook for 1 minute.
5. Remove the saucepan from the heat and pass the mixture through a sieve placed over a large bowl.
6. Whisk in the butter until the mixture is smooth. Pour the mixture onto a baking tray, spread it out and cover the surface directly with clingfilm. Spreading it thin will help it to chill faster.
Assembly
1. Line a baking tray with a silicon mat, and lightly butter the inside of your tart ring. Place this into the centre.
2. Once the pastry discs have chilled, remove one from the fridge. Briefly massage the dough in your hand to soften it slightly. Place it onto a lightly floured work surface.
3. Roll the dough out into a rough circle, until it is around 5mm/0.19” thick. Cut a disc around 23cm/9” and quickly but carefully lift the disc into your tart ring.
4. Lightly flour your fingers and gently press the dough into all edges of the tart ring. There should be a slight overhang of dough over the edge of the tart ring. Use a sharp knife to trim off the excess so that the dough is now flush with the edge of the ring. Refrigerate the dough for 30 minutes.
5. Once the dough is chilled, remove it from the fridge and spread 3-4 tbsp of your desired jam over the bottom of the pastry so that you have a thin, even layer.
6. Remove the pastry cream from the fridge and add it into a bowl. Whisk it by hand until it is smooth and homogenous
7. Pour the pastry cream directly into the tart shell and use the back of a spoon to spread this out evenly across the tart. Place this back in the fridge briefly.
8. Remove the second disc of pastry from the fridge and again use your hands to lightly massage it so that it softens slightly.
9. Place this onto a lightly floured surface and roll it out into a rough disc, until it is around 5mm/0.19” thick.
10. Remove the tart ring from the fridge and lift the circle of dough directly on top. Then use a rolling pin to roll over the top of the pastry, pressing it against the edges of the tin, to very neatly trim off the excess pastry. Refrigerate it for 1-2 hours.
11. Just before it is chilled. Preheat the oven to 160C/320F fan assisted, or 175C/345F non-fan assisted.
12. Whisk an egg yolk, then brush this evenly over the top of the pastry using a pastry brush.
13. Using a fork, trace 4 sets of parallel lines with a fork, then turn the mould 1/4 turn and trace 4 more sets of parallel lines perpendicular to the first sets of lines. This will result in a diamond-shaped crosshatch pattern. Prick a few small holes in the pastry too, to help any steam escape as it bakes.
14. Place the tart directly into the oven, and bake for 40 minutes, then lower the heat to 150C/300F Fan assisted (165/330F Non-fan assisted) and bake for a further 15-20 minutes or until a deep golden colour.
15. Remove from the oven and allow to cool. I prefer to eat it slightly warm, so I allow it to cool for around 75-90 minutes but it can also be eaten once it has completely cooled to room temperature too.
Shop the Equipment

Sablé Viennois
TIER 1
Sablé Viennois
In Tier 1 we tackle a simple Sablé biscuit, and learn the foundations of a Sablé dough. A spin on the recipe I share in my book, the biscuits are elevated by piping the dough into a zigzag pattern! Although the piping can be a little bit tricky, it’s worth the effort as it holds its shape really well, resulting in a stunning biscuit. To finish, I’ve dipped mine in a little dark chocolate, but you can get creative here with the toppings.
12-14COOKIES
Ingredients
Makes 12-14 Biscuits
140g Unsalted Butter, Soft
80g Icing/Powdered Sugar
2g Fine Sea Salt
20g Egg White
120g Plain Flour
40g White Bread Flour
20g Cornflour (Cornstarch)
Chocolate Variation:
140g Unsalted Butter, Soft
80g Icing/Powdered Sugar
2g Fine Sea Salt
20g Egg White
115g Plain Flour
30g Bread Flour
20g Cornflour (Cornstarch)
15g Cocoa Powder
To decorate:
200g Dark Chocolate (50-60% Cocoa Solids), Melted
Special equipment
Basket Weave Piping Nozzle
Stand Mixer
Piping Bags
Silicon Baking Mat
Method
1. Into the bowl of a stand mixer fitted with a paddle attachment (or a large bowl), add the soft butter, sugar and salt.
2. Beat this on a medium-low speed for 2 minutes until lighter and fluffier in consistency. If doing this by hand, simply use a rubber spatula to beat the ingredients together.
3. Add in the egg white and beat again to combine. The egg white, won’t fully incorporate so don’t worry if the butter is slightly lumpy/separated.
4. Finally, sift in the flours & cornflour. Mix this until the dough is soft and slightly sticky. We need the dough to be quite soft otherwise it will be very difficult to pipe. Add this mixture into a piping bag fitted with a basket weave piping nozzle (or any other nozzle you prefer!). Massage the dough in the bag to soften it further.
Note: If you want to make chocolate cookies, simply follow the same steps, but add the cocoa powder in with the flours.
5. If you want to be accurate, draw a stencil on some parchment paper, with pairs of lines, about an inch apart, and place this under your silicone mat.
6. With firm pressure, pipe tight zig zags, roughly 3-4” long. Then, use a bench scraper or sharp knife, neaten the top and bottoms of the biscuits by trimming off the shaggy ends.
7. Place the tray of cookies into the freezer, while you preheat your oven to 175C/350F Non-Fan Assisted.
8. After the cookies have chilled for 20 minutes, place the tray into the middle shelf of the oven and bake the cookies for 15 minutes or until lightly golden around the edges.
9. Remove them from the oven and allow them to cool on the tray for 5 minutes.
10. To decorate, melt some dark chocolate, and dip the edges of the biscuits before placing them carefully on a silicon mat. Let the chocolate set before serving.
Shop the Equipment


Raspberry Jam Frangipane Tart
TIER 2
Raspberry Jam Frangipane Tart
In this recipe we take our homemade raspberry jam from tier 1 and spread it on a Páte Brisée pastry case. Then we fill it with an almond frangipane and delicately decorate it with a pattern of flaked almonds. I usually fill my desserts with almond cream instead of frangipane, but the addition of pastry cream really improves the texture and adds even more flavour to the dessert.
1
9-INCH TART
Ingredients
Makes 1 9-inch Tart
Pâte Brisée
200g Plain/All-Purpose Flour
100g Unsalted Butter, Cold & Cubed
50g Cold Water
3g Sea Salt
Pastry Cream
250g Whole Milk
½ Fresh Vanilla Bean Pod
35g Caster/White sugar
60g Egg Yolks
20g Cornstarch/Cornflour
2g Fine Sea Salt
20g Cold Unsalted Butter
Frangipane
165g Unsalted Butter, Room Temperature
165g Caster/White Sugar
Zest ½ Lemon
130g Whole Egg, Lightly Whisked Together
165g Ground Almonds/Almond Flour
2g Sea Salt
85g Pastry Cream, Cooled
To Fill & Finish
Raspberry Jam (Tier 1)
Flaked Almonds
Fresh Raspberries
Icing/Powdered Sugar
Special equipment
Stand mixer
Silicon mats
9-inch fluted tart ring
Baking beans
Piping bag
Method
Pâte Brisée
1. Into the bowl of a stand mixer, add the butter, flour and salt. Mix on a low speed until the butter has completely broken down into fine crumbs and there are no large chunks of butter.
2. Slowly drizzle in the cold water and mix for a few seconds until it pulls together into a dough.
3. Gently knead the dough into a disc on your work surface and wrap it in clingfilm, then refrigerate for 30 minutes.
4. After 30 minutes, place it in between two silicon mats (or two sheets of parchment paper), and roll the dough into a rough disc that is around 3-5mm thick.
5. Refrigerate the pastry again for 1 hour and preheat the oven to 180C/355F Non-fan Assisted. This is a good point to prepare your pastry cream.
6. Peel the silicon mats/parchment paper off the pastry and ensure the dough is cold but flexible. If it is too cold it will break so just leave it for a few minutes to soften slightly if needed.
7. Lift the pastry into a 22.5cm fluted tart ring and use your hands to gently press it into the edges. Work quickly, being careful not to tear the pastry.
8. Use a knife to trim the excess pastry off and place the tart shell back into the fridge to chill for 15 minutes.
9. Scrunch up a piece of baking paper and press this into the chilled tart shell. Fill the tart shell with baking beans or rice and then place it on a tray and straight into the oven to bake.
10. Bake the tart for 30 minutes, then remove the baking beans, and continue to bake for a further 10-15 minutes, or until the pastry is an even golden brown colour.
11. Remove it from the oven and allow it to cool for 30 minutes.
Pastry Cream
1. In a medium saucepan on the stovetop over medium heat, add the milk and the scraped vanilla pod just until it is steaming.
2. In a separate medium bowl, whisk together the sugar, egg yolks, cornstarch, and salt until smooth and thickened.
3. Slowly pour the hot milk mixture over the sugar and eggs mixture, whisking constantly.
4. Pour the mixture back into the saucepan. Whisk constantly over medium heat until it begins to bubble, then cook for 1 minute.
5. Remove the saucepan from the heat and pass the mixture through a sieve placed over a large bowl.
6. Whisk in the butter until the mixture is smooth. Cover the bowl with cling film and refrigerate it for an hour.
Frangipane
1. Into a stand mixer, add the soft butter, salt, lemon zest and sugar. Beat for 2-3 minutes on a medium-low speed until slightly thicker and paler in texture.
2. Slowly drizzle in the eggs and beat for a further minute.
3. Finally, add in the ground almonds/almond flour and scoop in the required amount of cooled pastry cream. Beat until smooth.
4. Add the mixture into a piping bag.
Assembly & Baking
1. Lower the oven temperature to 175C/345F Non-Fan Assisted.
2. Take the raspberry jam and spread a few tablespoons across the bottom of the cooled pastry. Make sure it is nice and even.
3. Next, pipe the frangipane evenly into the tart shell. Use a palette knife if needed to smooth it out.
4. Slice your fresh raspberries in half and press them gently into the frangipane.
5. Next, take your time, and evenly place the flaked almonds around the entire tart in a nice circular pattern. This is optional, you can simply sprinkle them on!
6. Place it into the oven and bake for 25-30 minutes or until it is an even golden colour all over.
7. Remove it from the oven, and at this point this filling will still be slightly soft, so let it cool for an hour at room temperature before serving.
Shop the Equipment

Raspberry & Strawberry Jam
TIER 1
Raspberry & Strawberry Jam
In these recipes we learn the basics of making jams. I walk you through the recipe for raspberry and strawberry jam. The techniques are very similar but I’ll take you through each step, and discuss crucially, the jam setting point, which is a really important temperature to hit to make sure your jam sets! I’ve also included a bonus recipe in the PDF – my dad’s homemade marmalade (thanks Dad!). This was something I grew up eating, so I hope you guys love it as much as me!
4
JAM JARS
Ingredients
Makes 4 Jam Jars
Raspberry Jam
500g Fresh Raspberries
50g Honey
300g Caster/White Sugar
3g Pectin NH + 50g Caster/White Sugar
5g Lemon Juice
Strawberry Jam
750g Fresh Strawberries
450g Caster/White Sugar
225g Water
4.5g Pectin NH + 70g Caster/White Sugar
8g Lemon Juice
BONUS RECIPE
Seville Orange Marmalade (makes 8 jars)
1kg Seville Oranges
Juices of 2 Lemons
2500g Water
2000g Caster/White Sugar
Special equipment
4 x 100g jam jars, sterilised
Digital thermometer
Pectin
Method
Before starting your jam-making, you want to make sure you have cleaned, dried and sterilised your jam jars. Simply wash them in soapy water, dry them, then place them into the oven for 10 minutes at 140C.
Raspberry Jam
1. Into a small bowl, add the pectin and sugar (50g) mixture. Stir the mixture together and set this to one side.
2. Add the fresh raspberries, honey, and remaining sugar into a medium saucepan. Place the pan onto a medium heat and stir it together.
3. Keep cooking the mixture until it reaches 80C on a digital thermometer, and stir in the sugar/pectin mixture.
4. Continue to cook the mixture until it reaches 104C – this can take a little while, between 5-10 minutes so keep a close eye on the thermometer, stirring it pretty continuously.
5. 104C is an important temperature as this is the setting temperature for jams. The closer it gets to this temperature, the thicker and darker the jam will become, and the bubbles will become heavier.
6. As you are cooking it, use a spoon to skim off any foam/impurities that rise to the top.
7. Remove it from the heat, stir in the lemon juice and then distribute it between your jam jars. You should get 2 jars.
8. Leave them to cool to room temperature before refrigerating.
Strawberry Jam
1. Into a small bowl, add the pectin and sugar (70g) mixture. Stir the mixture together and set this to one side.
2. Hull the fresh strawberries and slice them in half. If the strawberries are smaller, then you can leave them whole.
3. Add the sugar and water into a saucepan, and cook it until it reaches 120C.
4. Once at temperature, immediately tip in the strawberries, stir them through the sugar mixture, then add the pectin sugar mixture.
5. Continue to cook the mixture until it reaches 104C – this can take a little while, between 5-10 minutes so keep a close eye on the thermometer, stirring it pretty continuously. 104C is an important temperature as this is the setting temperature for jams. The closer it gets to this temperature, the thicker and darker the jam will become, and the bubbles will become heavier.
5. As you are cooking it, use a spoon to skim off any foam/impurities that rise to the top.
6. Remove it from the heat, stir in the lemon juice and then distribute it between your jam jars. You should get 2 jars (or maybe slightly more)
7. Allow them to cool to room temperature before refrigerating/storing.
Seville Orange Marmalade (My Dad’s Recipe)
1. Wash the Seville oranges if they are dirty.
2. Cut the oranges in half and juice them. Pour the juice into a medium saucepan.
3. Scoop out the flesh from the inside of the oranges and place these into a muslin cloth.
4. Take the remaining peels of the oranges, and cut them into thin strips (or thicker strips if you prefer slightly chunkier strips in your marmelade). Add these to the pan.
5. Add the juice of the lemons into the pan, and place the juiced lemons into the muslin cloth too. Tie thie up so the orange flesh and lemons are secured.
6. Place the muslin into the saucepan, along with the water.
7. Bring the mixture to a boil, and then lower it to a simmer, and continue to cook the mixture until the orange peels are very soft. Anywhere from 1-2 hours!
8. Remove the muslin and squeeze out the juices from it, into the pan.
9. Add in the sugar and boil the mixture, cooking it until it reaches the jam-setting point of 104C.
10. Once it has reached the setting point, remove it from the heat for 15 minutes, and during this time a lot of froth/impurities will rise. Skim these off. The resting time will also help to distribute the orange peels.
11. Scoop the marmalade into your sterilised jam jars (it will make 7-8 jars!). Allow them to cool to room temperature and then place the lids on and refrigerate/store.
Shop the Equipment


Chausson Aux Pommes
TIER 1
Chausson Aux Pommes
Ok these are essentially apple turnovers, but I felt the name didn’t do them justice and it sounds much more fancy in French! In this recipe I take you through how to make rough puff pastry in detail, so make sure you watch the video to master those folds! Then we cut it into a classic turnover shape and fill it with a sweet apple compote. It’s the perfect buttery, fruity, flakey dessert!
4-6
TURNOVERS
Ingredients
Makes 4-6 Turnovers
Rough Puff Pastry
500g Plain/All-Purpose Flour
10g Fine Sea Salt
240g Ice Cold Water
10g White Vinegar
400g Unsalted Butter, Very Cold & Cubed
Apple Compote
500g Apples (Braeburn/Pink Lady/Golden Delicious – about 5-6 large apples)
60g Dark Brown Sugar
25g Unsalted Butter
1 Vanilla Bean/1 Tsp Vanilla Bean Paste
Pinch of Sea Salt Flakes
Bowl of ice water with the juice of 1 lemon
Egg Wash
25g Egg Whites
60g Egg Yolks
15g Double/Heavy Cream
Glaze
60g Water
60g Caster/White Sugar
Or
65g Water
125g Sugar
30g Liquid Glucose
Special equipment
Stand mixer
Rolling pin
Hand blender
Digital calipers (optional)
Oval template (see PDF)
Fluted pastry wheel
Method
Rough Puff Pastry
1. Pour the flour into the bowl of a stand mixer along with the salt.
2. Pour in the cold water and vinegar.
3. Tip the cubed butter into the centre, then with the paddle attachment, mix on a low speed, just until the dry bits of flour have been absorbed. This should only take 15-20 seconds. The lumps of butter will still be there!
4. Scoop the mixture out of the bowl onto a lightly floured work surface. Using a rolling pin, roll the dough into a long rectangle. You need to work quickly here especially if it is a warm day as the butter will start to soften too much.
5. Once you’ve rolled it out, you might need to use a lightly floured bench scraper to loosen it from the work surface.
6. Perform a single turn, by folding one-third of the dough up on itself, and then folding the remaining third of dough over the top as seen in the PDF.
7. Wrap the dough in cling film and chill it. If it is a warm day, I prefer to do 10 minutes in the freezer then 15 minutes in the fridge. But on a ‘normal day’, 20 minutes in the fridge will be enough.
8. Unwrap the dough and with the open seam facing you, turn the dough 90 degrees so it is now adjacent to you. Roll the dough slightly to give it a little bit of width, then rotate it 90 degrees again so the open seam is facing you again. Roll the dough into a long rectangle again, flouring as needed to ensure it doesn’t stick.
9. Use a bench scraper to get underneath the dough if it feels like it is sticking, then perform a double turn, by folding ¼ of the dough up on itself, then the remaining ¾ of the dough to meet. Fold the dough in half, then wrap in cling film to chill again.
10. Repeat steps 9&10, 2 more times (performing two more double turns) and chill the dough.
11. Unwrap the dough again, and roll it out, performing one final single turn (as seen in step 7). In total you will have done 1x single turn, 3x double turn, 1 x single turn. Refrigerate the dough for 2 hours (or overnight).
Apple Compote
1. Peel and core the apples, then dice them into small cubes (‘brunoise’ as they would say in French!). As you are chopping them, add them to the bowl of cold water with the lemon juice to prevent them from oxidising.
2. Once chopped, drain them and add them into a medium saucepan. Cook them over a medium heat until the juices start to come out of the apples – about 3 minutes. Strain them to remove the excess liquid, then add in the light brown sugar, butter and vanilla.
3. Continue to cook them, stirring frequently, until you have a golden caramelised mixture, this should take about 6-10 minutes. Once cooked, stir through the sea salt flakes.
4. Add the mixture into a jug and blend until you have a thick compote texture.
5. Add this mixture into a bowl and set it to one side in the fridge to cool completely.
Assembly
1. To create the classic chausson aux pommes shape, we need a fluted oval shape which is then folded in half. You can buy special cutters for this but they are expensive, so I created a little hack so that we can do it at home!
2. At the bottom of the PDF there is an oval template you can print off (ideally on some thick card). This will give you an oval that is 6.7”x4.8”.
3. Print this off and then to get the fluted edge, we use a fluted pastry wheel and cut around the template while it is on top of the puff pastry. If you do not have a fluted cutter don’t worry you can just cut around it with a knife. But this template will give you the perfect size!
4. Remove the chilled puff pastry from the fridge and place it onto a floured work surface. Note – it can be easier to work with the pastry in two batches so that it doesn’t get too warm, in this case, just cut the chilled dough in half, and reserve one in the fridge while you roll the other. For the following steps I will assume you are working with a half batch and you just need to repeat the steps to make the remaining pastries.
5. With the open seam facing you, turn the dough 90 degrees so it is now adjacent to you. Roll the dough slightly to give it a bit of width – it needs to be around around 7.5” tall so that it is taller than the oval template.
6. Rotate it 90 degrees again so the open seam is facing you again. Roll the dough into a long rectangle, flouring as needed to ensure it doesn’t stick.
7. Don’t worry about the length of the rectangle, we are more concerned about the thickness – it needs to be around 0.2”/5mm thick. If it is too thick, when it bakes, it will puff up too much! If the dough feels too soft at this point, get it straight into the freezer for 10 minutes to firm up a little. It is much easier to work with when it is cold.
8. Assuming you are working with a half batch of the dough, use the oval template to cut out 2-3 ovals (the number you get will depend on how efficiently you were rolling it and how thick it is!)
9. Lift the fluted ovals onto a tray lined with a silicon mat, and place them in the fridge for 15 minutes.
10. At any point during the process, if you find the dough is getting too warm, place it back into the freezer for 5/10 minutes to chill it down then carry on.
11. Prepare the egg wash by whisking together all the ingredients until you have a homogenous mixture.
12. To ensure you get the same amount of filling, I like to decant my chilled compote into little dishes, each weighing 50g. Then I can just scoop it straight into the pastry knowing I’ve got the correct amount.
13. Remove the chilled pastry from the fridge and, working quickly, scoop 50g of compote into the centre. Refer to the drawing below, we want to make sure we keep the compote away from the edges so it doesn’t leak out later so use your fingers to keep it nice and centred.
14. Brush an egg wash around the edge of the pastry surrounding the compote and fold the bottom half of the pastry over. Use your fingers to seal the dough together, being careful not to warm the dough too much with your hands and ‘smoosh’ it.
15. Use a knife to poke 4 holes in the back of the pastry and then flip it over so this side is now touching the baking tray lined with a silicon mat. Brush the top of the pastry with an egg wash then refrigerate it for 20 minutes. At this point, preheat your oven to 175C/345F non-fan assisted.
16. Remove the pastry from the fridge and apply a second egg wash, then using a sharp knife, lightly score a decorative pattern into the pastry, I just do a series of vertical lines!
17. Place the pastries straight into the oven on the middle shelf and bake for around 45-50 minutes. The apple compote is already cooked so all we are looking for is a nice golden puff pastry.
18. About 10 minutes before you can prepare the glaze so that it is still slightly warm. Add the sugar and water into a saucepan, and simply bring it to a boil. Continue to cook it until it has thickened slightly but is still runny. Slightly looser than the consistency of honey.
19. I’ve given you two options for the glaze, the second one is just slightly shinier from the addition of glucose but is prepared with the exact same method! Just boil the ingredients together.
20. Once the pastries are baked, lift them onto a wire rack and brush them lightly with the glaze. They can be eaten warm or served once cooled, but they are best eaten the same day so that the pastry is as fresh as possible.
Shop the Equipment


Latticed Pistachio Mille-Feuille
TIER 2
Latticed Pistachio Mille-Feuille
You guys know I love a Mille Feuille, and this filling combination has to be my favourite yet. It’s the same rough puff pastry recipe as Tier 1 (I don’t cover this again in the video for Tier 2), but we walk through how to bake it into the perfect Mille Feuille shape. Then we make a raspberry cremeux and a pistachio cremeux to fill it with, alongside a tangy raspberry coulis. The lattice top is optional, but creates a real show stopping design!
1
LARGE MILLE FEUILLE
Ingredients
Makes 1 Large Mille-Feuille
Rough Puff Pastry
250g Plain/All-Purpose Flour
5g Fine Sea Salt
120g Ice Cold Water
5g White Vinegar
200g Unsalted Butter, Very Cold & Cubed
Basic Cremeux
400g Double Cream
115g Egg Yolks
60g Caster Sugar
5g Powdered Gelatin (200-250 Bloom) + 30g Cold Water
Pistachio Cremeux
240g Basic Cremeux
40g Pistachio Paste
Raspberry Cremeux
240g Basic Cremeux
100g Raspberry Puree
Raspberry Coulis
2g Powdered Gelatin (200-250 Bloom)
12g Cold Water
105g Raspberry Puree
105g Frozen Raspberries
5g Pectin NH
20g Caster Sugar
Icing Sugar To Decorate
Special equipment
Stand mixer
Rolling pin
Digital thermometer
Hand blender
Digital calipers (optional)
Lattice pie cutter
Silicon mats
Baking trays
Piping bags
Method
Rough Puff Pastry
1. Pour the flour into the bowl of a stand mixer along with the salt.
2. Pour in the cold water and vinegar.
3. Tip the cubed butter into the centre, then with the paddle attachment, mix on a low speed, just until the dry bits of flour have been absorbed. This should only take 15-20 seconds. The lumps of butter will still be there!
4. Scoop the mixture out of the bowl onto a lightly floured work surface. Using a rolling pin, roll the dough into a long rectangle. You need to work quickly here especially if it is a warm day as the butter will start to soften too much.
5. Once you’ve rolled it out, you might need to use a lightly floured bench scraper to loosen it from the work surface.
6. Perform a single turn, by folding one-third of the dough up on itself, and then folding the remaining third of dough over the top as seen in the PDF.
7. Wrap the dough in cling film and chill it. If it is a warm day, I prefer to do 10 minutes in the freezer then 15 minutes in the fridge. But on a ‘normal day’, 20 minutes in the fridge will be enough.
8. Unwrap the dough and with the open seam facing you, turn the dough 90 degrees so it is now adjacent to you. Roll the dough slightly to give it a little bit of width, then rotate it 90 degrees again so the open seam is facing you again. Roll the dough into a long rectangle again, flouring as needed to ensure it doesn’t stick.
9. Use a bench scraper to get underneath the dough if it feels like it is sticking, then perform a double turn, by folding ¼ of the dough up on itself, then the remaining ¾ of the dough to meet. Fold the dough in half, then wrap in cling film to chill again.
10. Repeat steps 9&10, 2 more times (performing two more double turns) and chill the dough.
11. Unwrap the dough again, and roll it out, performing one final single turn (as seen in step 7). In total you will have done 1x single turn, 3x double turn, 1 x single turn. Refrigerate the dough for 2 hours (or overnight).
Basic Cremeux/Pistachio Cremeux/Raspberry Cremeux
1. Add the pistachio paste and raspberry puree into two separate bowls and set these to one side.
*Note – Pistachio Paste is quite expensive so you can make it yourself. Just toast shelled pistachios in the oven for about 15 minutes at 170C/340F and then process them in а food processor. You will need to do this with about 300g of Pistachios or it won’t be enough for the blades of your food processor to pick up. It will take some time to blend them and you need a high powered food processor!
2. Add the powdered gelatin into a small dish and pour over the cold water. Allow this to bloom for 10 minutes. Once bloomed, scoop this into a large bowl with a sieve placed over the top.
3. Into a medium bowl, add the egg yolks and sugar. Whisk briefly to combine.
4. Add a splash of the cream just to prevent any lumps and whisk to combine.
5. Pour the entire mixture into a medium saucepan along with the cream. Place the pan on a medium heat and whisk constantly, The mixture needs to reach 80-82C. As you continue to cook it, you will see it thicken in the pan, just be really careful not to scramble the eggs.
6. Once at temperature, immediately remove it from the heat and pour it through the sieve over the gelatin. Some of the egg might have caught on the bottom of the pan but don’t panic!
7. Use a hand blender to blend the mixture to ensure the gelatin has completely incorporated.
8. The mixture should weigh around 480-500g so we’re going to split this equally between the two bowls.
9. Pour around 240g of the mixture over the pistachio paste and blend it with a hand blender to completely emulsify it. Cover the surface with cling film and refrigerate overnight (minimum of 6 hours)
10. For the raspberry, let the basic cremeux cool to around 40C/104F before pouring it over the puree. Blend with a hand blender to completely emulsify it. Cover the surface with cling film and refrigerate overnight (minimum of 6 hours)
Raspberry Coulis
1. Add the powdered gelatin into a small dish and pour over the cold water. Allow this to bloom for 10 minutes.
2. Meanwhile, whisk together the sugar and pectin and set this to one side.
3. Add the frozen raspberries (they can be fresh too) and raspberry puree to a small saucepan.
4. Cook them down until they reach around 40C/104F on a digital thermometer, then add in the sugar/pectin mixture. Continue to cook the mixture until it reaches a boil.
5. Remove the pan from the heat, scoop in the bloomed gelatin and stir it to dissolve it into the raspberry mixture.
6. Pour this into a bowl and cover the surface with clingfilm. Refrigerate for a minimum of 1-2 hours.
Assembly
1. Remove the chilled puff pastry from the fridge and place it onto a floured work surface.
2. With the open seam facing you, turn the dough 90 degrees so it is now adjacent to you. Roll the dough slightly to give it a little bit of width, then rotate it 90 degrees again so the open seam is facing you again. Roll the dough into a rectangle, flouring as needed to ensure it doesn’t stick.
3. We are going to bake this on a baking tray, so we just need to ensure the rectangle we roll isn’t bigger than the tray. We are more concerned about the thickness. It needs to be around 7.5” tall and 0.2”/5mm thick.
4. Once you are at that thickness, you can use a pastry wheel or a knife, to trim the rectangle of pastry down so it fits perfectly on your tray.
5. Lift the dough onto a silicon mat and refrigerate it for 20 minutes.
6. Once chilled, cutting vertically, cut off ⅓ of the rectangle, leaving the remaining ⅔ intact.
7. Work quickly here so the dough stays cold (if not, chill it again. This part will be a disaster if the dough is too warm!), use a lattice pastry wheel cutter or a lattice cutter and cut the ⅓ of dough to create the lattice design.
8. Get both the latticed strip of dough, and the other strip of dough into the fridge for another 20 minutes while you pre-heat the oven to 175C/345F non-fan assisted.
9. Once it has chilled. Remove it from the fridge and place a second silicon mat on top, along with another tray and some extra weight! We need to weigh the top tray down as much as possible to stop the pastry from puffing up. I like to use more baking trays!
10. Place the tray of pastry into the oven on the middle shelf and bake it for 60 minutes.
11. After 60 minutes remove all the trays on top, and the pastry should be a light golden colour (if not place the trays back on and bake it for a little longer)
12. Place it back into the oven, uncovered, and bake until it is golden brown.
13. Remove it from the oven and increase the oven temperature to 220C/430F.
14. Dust the puff pastry liberally with icing/powdered sugar and then place it back in the oven, closer to the top shelf this time.
15. Keep a very close eye on it and bake it until the sugar has caramelised and the pastry is a deep, shiny golden colour. Be really careful not to burn it. It can take anywhere from 2-5 minutes.
16. You will find the lattice probably caramelises quicker than the other piece of pastry so you can remove this early.
17. Get both onto a wire cooling rack to cool for 15 minutes.
18. Using a serrated knife trim down the latticed piece of pastry into a neat rectangle. Then cut the other piece of pastry into two, and then trim each of those pieces down so they match the exact size of the lattice pastry.
Final Assembly
1. Add the chilled raspberry coulis into a tall jug, and with a hand blender, blend it to a smooth mixture. Add this into a piping bag and set it to one side.
2. Whisk both the raspberry and pistachio cremeux using a stand mixer until they are thick and hold a stiff peak. The pistachio cremeux will whisk up thicker than the raspberry cremeux, so don’t worry if the raspberry is slightly softer.
3. Add these into separate piping bags fitted with large round tip piping nozzles.
4. Pipe three lines of the pistachio cremeux onto the base of the plain, non latticed pieces of puff pastry. There should be one line on each outer edge and one in the centre. It’s important the pistachio is on the outside to provide support, as the raspberry cremeux would be too soft to support the weight of the layers.
5. Pipe the raspberry cremeux into the gaps and then pipe 2 lines of raspberry coulis on top.
6. Dust icing sugar diagonally across the top of the latticed pastry, using a flat object to cover one side of the pastry.
7. Carefully stack and assemble the mille-feuille, finishing the latticed piece on top. It is now ready to serve. If you need to serve it later, ensure you keep it refrigerated so the cremeux doesn’t soften too much at room temperature.
Shop the Equipment


Raspberry Soufflé Tartlets
TIER 2
Raspberry Soufflé Tartlets
In Tier 2 we make a Bake It Better first – raspberry pastry! I tested this a few times and am really happy with the result. We fill this with a raspberry soufflé and garnish with fresh raspberries. It’s actually the pastry element of this recipe that makes this the Tier 2 recipe – the beauty of adding soufflé to a tart is there’s no pressure on the rise! So once you’ve mastered the pastry, it’s plain sailing!
4
INDIVIDUAL TARTS
Ingredients
Makes 4 Individual Tartlets
Raspberry Pastry
75g Unsalted Butter, Cold & Cubed (small cubes)
50g Icing Sugar
4g Powdered Raspberry Powder
38g Egg Yolks
150g Plain/AP Flour
Red Food Colouring Powder/Gel
Egg Wash
20g Egg Yolk
5g Double/Heavy Cream
Red Food Colouring Powder/Gel
Raspberry Soufflé
– Raspberry Base
120g Raspberry Puree
10g Cornstarch
Pinch of Sugar
– Meringue Base
75g Raspberry Base
80g Egg Whites
50g Caster Sugar
Fresh Raspberries To Fill + Garnish
Special equipment
Stand mixer
Silicone mats
4x 7.5cm x 2cm perforated tart rings
Multi-wheel pastry cutter OR a ruler
Digital thermometer
Piping bags
Method
Raspberry Pastry
1. Into the bowl of a stand mixer, add the cold cubed butter and then sift over the raspberry powder, icing sugar and red food powder. With the paddle attachment, beat on a medium low speed for 2 minutes or until the butter is smooth. As the butter is cold you will need to scrape down the bowl a few times to ensure it is completely incorporated.
2. Add in the egg yolks and beat again for around 30 seconds, scraping down the bowl again to ensure it’s all incorporated.
3. Finally, sift in the flour, scrape the bottom of the bowl just to loosen the butter stuck on the bottom, and then mix again on a low speed until it pulls together to form a dough, about 20-30 seconds.
4. Scoop the dough out and place it onto a large silicone mat and place a second silicone mat on top. Roll the dough out with a rolling pin until it is around 3-5mm thick, don’t worry too much about the shape.
5. Place the entire sheet of pastry into the freezer for 30 minutes.
6. While the dough is chilling, take the perforated tart ring and very lightly grease the inside with soft butter. This helps to prevent the dough from sticking to the ring.
7. Remove the chilled dough from the freezer and, working quickly, peel the top silicone mat off of the dough. Press the 4 tart rings firmly into the dough, lift them up, and transfer them to a perforated tray lined with a perforated baking mat. The dough should be cold enough that it attaches to the ring as you lift it up. Place the tray in the fridge while you cut the walls.
8. With the remaining dough, use a ruler and a sharp knife to cut 4 strips of dough each measuring 9.6 x 0.9 inches (24.4 x 2.3cm). These measurements seem quite precise, but this will ensure the dough fits perfectly into the tart rings with no excess overlapping. If they feel too warm to lift up, place them back in the freezer for 5 minutes just so they can cool back down slightly.
9. Remove the baking tray with the tart bases from the fridge and remove one strip of dough for the walls.
10. Working quickly, take the strip of dough and place it inside the tart ring. Use your fingers to gently press together this strip of dough, against the base of the tart. The idea is to slightly push down the wall of dough so that it meets the dough on the base of the tart shell and there are no gaps. If at any point you feel the dough is too warm or is tearing, place everything back in the freezer for 10 minutes then carry on.
11. Repeat this with the remaining tarts, again, chilling the dough if needed. At this point, squeeze together the remaining scraps of dough, and repeat the process, rolling the dough and chilling it, so that you can create the final 2 tart shells.
12. Once you have lined all the tart shells, avoid trying to move them in case the dough tears. Chill the entire tray in the freezer for 15 minutes and pre-heat your oven to 175C/350F.
13. Remove the shells from the freezer and holding a knife perpendicular to the tart shell, trim off the excess pastry hanging over the tart ring so that the pastry is flush.
14. Place the tart shells in the oven, and bake for 15 minutes. While they bake, add the egg wash ingredients to a small ramekin and blend it to combine – I prefer to use a hand blender as it fully emulsifies the colouring into the egg mixture.
15. Remove the tarts from the oven and allow them to cool for 5 minutes. At this point, the pastry should have retracted slightly from the ring mould, and you should be able to lift it off easily.
16. Lift the shells up and using a pastry brush, apply an even egg wash all over the tart. Lower the oven temperature to 140C/285F and place them back on the tray and into the oven for a further 5 minutes. Remove from the oven to cool.
Raspberry Soufflé
– Raspberry Base
1. Into a medium bowl, whisk together the sugar and cornstarch.
2. Add the puree into a medium saucepan and heat it until it reaches around 40C. Once hot, sift in the cornstarch mixture and whisk together. Continue to cook until the mixture thickens and starts to bubble. Once bubbling, cook for a further minute.
3. Immediately pass the mixture through a sieve into a bowl and cover the surface with cling film. Chill for 30 minutes in the fridge.
– Meringue Base
1. Fill a pan with a shallow amount of water and place it over a medium heat. Meanwhile, add the egg whites and sugar into a medium bowl and place this over the water once it is simmering.
2. Whisk constantly until it reaches 60-65C (140-150F) on a digital thermometer.
3. Immediately remove it from the heat and place it on a stand mixer fitted with a whisk attachment.
4. Whisk on a medium speed for 6-7 minutes until you have a stiff meringue.
5. While it is whisking, remove the raspberry base from the fridge, whisk it, then weigh 75g and add this into a medium bowl.
6. When the meringue is done, fold it in thirds into the raspberry base until you have a homogenous mixture.
Assembly
1. Add the raspberry soufflé mixture into a piping bag and snip the end off.
2. Take the cooled tart shells, and place a few torn up raspberries into the base.
3. Pipe the soufflé mixture into the tart shells, filling them right to the top, and then use a palette knife to level them so they are completely flush with the top of the tart.
4. Place the tarts back onto your baking tray, and place the perforated tart rings around the pastry again. This will just help to provide a little structure and prevent the pastry from cracking as the soufflé expands.
5. Place the tarts into the oven and bake them for 7 minutes. They should rise just slightly.
6. Once they are baked, these can be served warm or alternatively served chilled (place the tarts into the fridge for 1 hour)
7. To garnish, add some freshly sliced raspberries.
Shop the Equipment


Chocolate and Raspberry Soufflé
TIER 1
Chocolate and Raspberry Soufflé
I’ve cheated a bit in Tier 1 and used the chocolate soufflé recipe from my book, because you honestly can’t beat it! But I tried adding a frozen raspberry insert in the middle, which oozes out once baked, and it really takes the dessert to the next level from both a flavour and a wow factor perspective. Make sure you use good quality chocolate with 50-60% cocoa solids to ensure the right consistency.
4-5
SOUFFLÉS
Ingredients
Makes 4-5 Souffles
Raspberry Insert
50g Raspberry Jam
50g Fresh Raspberries
Splash of Water
Chocolate Soufflé
– Beurre Manie
50g Unsalted Butter, Softened
50g Plain Flour
Pinch of sea salt
– Chocolate Base
270g Whole Milk
50g Granulated/Caster Sugar
200g Chopped Dark Chocolate, 50-60% Cocoa Solids
110g Egg Yolks
French Meringue
180g Egg Whites
70g Granulated/Caster Sugar
Special equipment
3.8cm x 1.9cm silicone half-sphere mould (15 hole) OR a small silicone ice cube tray
Stand mixer
Piping bags
Ramekins
Method
Raspberry Insert
1. Into a medium saucepan, add the fresh raspberries, raspberry jam and just a little splash of water (3 tsp roughly).
2. Place it over a medium low heat, and stir it together until the raspberries have broken down, and it is bubbling and has thickened just slightly.
3. Into a silicone half sphere mould, or a silicone ice cube tray, pour the raspberry mixture in, spread it out so it is even, and then freeze for 3 hours or until it is solid.
Chocolate Soufflé
– Beurre Manie
1. Into a small bowl, add the butter, flour and salt and use a spatula to form it into a paste. Sometimes it is actually easier just to use your hands and mix it together as the quantities are so small.
2. Set this bowl to one side.
– Chocolate Base
1. Into a medium saucepan, add the milk and sugar. Place it over a medium heat and stir occasionally until the sugar has dissolved and the mixture is steaming.
2. Remove it from the heat and add in the beurre manie from above. Whisk this through until it has dissolved, then place the pan back on the heat and whisk constantly until the mixture has thickened and holds a slightly more elastic consistency.
3. Remove it from the heat and whisk in the chocolate until the chocolate has completely dissolved. Don’t worry if it looks slightly greasy or split here. Scoop this mixture into a medium bowl.
4. Add the egg yolks on top and immediately whisk this (to make sure the eggs don’t cook from the heat), until you have a smooth, glossy mixture.
5. Cover the surface with cling film and let it rest for 30 minutes.
French Meringue & Assembly
1. Preheat the oven to 160C/320F Fan Assisted.
2. Lightly grease the ramekins with soft butter, using an upwards stroking motion.
3. Tip in a few tablespoons of sugar and swirl this around, tipping out the excess. Place these on a tray and set to one side.
4. Meanwhile, add the egg whites into the bowl of a stand mixer fitted with a whisk attachment and whisk on a medium low speed until the mixture is frothy and thick bubbles have formed.
5. With the speed on medium, slowly add in the sugar a tablespoon at a time, waiting about 15 seconds in between each addition.
6. Once you’ve added all the sugar, keep whisking until you have a stiff meringue.
7. Fold the meringue in thirds, into the chocolate base, until you have a homogenous mixture with no streaks of meringue.
8. Remove your frozen raspberry inserts from the freezer.
9. Add the soufflé mixture into a piping bag, and pipe the mixture into the ramekins, filling them about 3⁄4 of the way. Then press your raspberry into the middle and cover it up, filling the ramekin to the top with the remaining soufflé mixture.
10. Use a palette knife to smooth the top and create a flush edge, then quickly run your thumb around the outside of the soufflé to create a rim.
11. Place them into the oven immediately and bake for 18 minutes.
12. Remove them from the oven and serve immediately. They should be well risen!
Shop the Equipment


Lemon Meringue 'Longboys'
TIER 2
Lemon Meringue ‘Longboys’
In TIer 2 we make the same dough as Tier 1, we just add a touch of lemon zest to give them a bit of extra flavour. Then, inspired by Longboys Doughnuts in the UK, we use an oblong mould to create a different shape, coat them in lemon sugar, then top them with a lemon crème pâtissière, Italian meringue and candied lemon peel. Don’t fancy lemon? Try the chocolate crème pâtissière and crumble from my eclair recipe!
8
'LONGBOYS'
Ingredients
Makes 8-9 ‘Longboys’
Donut Dough
550g Strong White Bread Flour
125g Whole Milk
7g Instant Yeast
200g Whole Eggs
12g Fine Sea Salt
125g Unsalted Butter, Cold + Small Cubes
75g Caster/Granulated Sugar
20g Powdered Milk (Full Fat)
10g Vanilla Extract
Zest 1 Lemon
Lemon Crème Pâtissière
300g Double/Heavy Cream
200g Whole Milk
1 Fresh Vanilla Pod
85g Caster sugar
100g Egg Yolks
40g Cornstarch/Cornflour
Zest of 2 Lemons
Candied Lemon Peel
Zest of 1 Unwaxed Lemon
50g Caster Sugar
50g Water
Lemon Sugar
150g Caster/Granulated Sugar
Zest 1 Lemon
Italian Meringue
110g Egg Whites
70g Water
300g Caster Sugar
3 Litres of Vegetable Oil For Frying
Special equipment
Stand mixer
Oil spray (optional)
Oblong cookie cutter (I used a 14.5cm x 3.5cm cutter)
Deep fat fryer
Digital thermometer
Piping bags
St Honore nozzle
Method
Donut Dough
1. Into the bowl of a stand mixer, add the wet ingredients, followed by the dry. Attach the dough hook and mix it on a medium speed for 10 minutes, scraping down the bowl every 3-4 minutes.
2. After 10 minutes, turn the mixer off and let the dough rest for 5 minutes. This will relax the gluten and make the next part of the mixing easier!
3. Turn the mixer back on, and knead for a further 10-12 minutes. The dough should start to come away from the sides of the bowl but there will still be a few bits stuck to the side.
4. Remove it from the mixer and lift the dough onto your work surface. Give it a quick knead and shape it into a nice tight ball. The dough should feel smooth and pass the windowpane test when you stretch a small piece of the dough.
5. Lift it into a lightly oiled bowl, then lightly spray the top of the dough with an oil spray and cover the surface directly with cling film. Cover the bowl with a sheet of cling film too and refrigerate the dough overnight (12-18 hours). This will make it much easier to work with.
6. Before you are ready to work with the dough, prep a baking tray by cutting 8 rectangles of parchment paper and lightly oiling them before placing them on the tray. This will make it easier to transfer the donuts to the fryer.
7. The next day remove the chilled dough from the fridge. Very lightly flour your work surface and lift the dough on. Lightly flour the top of the dough and a rolling pin, and roll the dough out, the shape doesn’t matter, but you want it to be around 12-15mm thick (0.5”). Ensure there is a little flour underneath the dough once you’ve finished rolling otherwise when you go to remove the cut donuts they will stick to the table.
8. Take the oblong cookie cutter and dip it in a bowl of flour to make sure it doesn’t stick to the dough. Press the cookie cutter into the dough to cut the shapes, and lift them onto the sheets of parchment you cut earlier.
9. Very lightly oil the top of the donuts with an oil spray, and then cover the entire tray with a sheet of cling film and allow the donuts to rise for 2-3 hours at room temperature. In warmer weather, 2 hours should be fine, but when it is colder it will be closer to 3 hours. The donuts should look puffier and will have increased in volume when they are done.
Lemon Crème Pâtissière
1. It is best to make this ahead of rolling out your donuts so that it has enough time to chill.
2. Add the sugar into a bowl along with the lemon zest and briefly rub them together to release some of those citrus oils.
3. Add the egg yolks and cornflour and whisk the mixture together until it is thick, then set it to one side.
4. In the meantime, scrape the beans from the fresh vanilla pod and add these into a medium saucepan along with the milk & cream.
5. Place the pan over a medium heat and stir occasionally until the mixture is steaming.
6. Once hot, slowly pour the mixture over the egg yolks, and whisk until they are combined. It is important to do this slowly to avoid scrambling the eggs.
7. Add the entire mixture back into the pan and place it on a medium heat.
8. Whisk continuously until the mixture thickens and begins to bubble. Once it bubbles, cook for a further minute, then remove it from the heat and pass it through a sieve into another bowl. At this point it’s likely your mixture will have split a little, so just add a splash of water (2 tsp) and blend with a hand blender and it will pull it back together.
9. Place a sheet of cling film directly on the surface and refrigerate until ready to use (3-4 hours).
Candied Lemon Peel
1. Use a vegetable peeler to peel the lemon into strips.
2. With a sharp knife, cut the peel lengthways to create thin strips.
3. Into a small saucepan, add the lemon strips, sugar and water. Place it over a medium low heat and gently simmer for around 10 minutes. The strips of lemon should appear slightly translucent and the liquid should thicken.
4. Use some tongs to remove them from the pan and place them on a baking sheet lined with parchment and allow to dry completely. About half an hour.
Lemon Sugar
1. Add the sugar into a bowl along with the lemon zest and briefly rub them together to release some of those citrus oils.
2. Set the bowl to one side.
Frying
1. When the donuts are close to being proofed, add the oil to your deep fat fryer (or a large pan) and heat it to 170C/340F. A deep-fat fryer is ideal here as it is able to regulate the temperature at a much more consistent level vs frying in a pan.
2. When the donuts are ready, drop 1 into the oil, and slowly peel off the sheet of parchment paper.
3. Fry for 90 seconds, flip, fry for 60 seconds, flip, fry for 15 seconds, flip, fry for 15 seconds. Nb. Due to the shape of these donuts they’re likely to flip over by themselves in the oil, so I’d recommend holding them in place lightly with some tongs so you can ensure an even bake on each side. I’ve also increased the fry time just slightly from the video as I found slightly longer was better!
4. Remove your donut and place it on a wire rack, allowing any excess oil to drip off. After a minute, and while the donuts are still warm, toss the donut in the bowl of lemon sugar then place back on your wire rack.
5. Repeat with the remaining donuts.
Italian Meringue
1. Into a small saucepan, add the water, then pour the sugar on top. Place it over a medium heat
2. Meanwhile, add the egg whites into a stand mixer fitted with a whisk attachment. Whisk it on a medium low speed.
3. Once the water and sugar mixture has started to boil, cook it until it reaches a temperature of 118C/244F on a digital thermometer. By this point, the egg whites should be bubbly and frothy.
4. Immediately remove the sugar syrup from the heat, increase the stand mixer speed to medium high, and slowly drizzle the sugar syrup in, aiming to pour it in between the whisk and the bowl. Just make sure not to pour it on the whisk or it will splatter everywhere.
5. Continue to whisk for 6-7 minutes, or until the bowl is cool to the touch and stiff peaks form on the meringue.
6. Add the meringue to a piping bag fitted with a St. Honore nozzle.
Assembly
1. Remove your lemon crème pâtissière from the fridge and whisk it for 15-20 seconds to loosen it a little. Add it to a piping bag.
2. Take a donut and cut it lengthways down the middle. Pipe in some lemon creme patissiere until it reaches the top of the donut, then smooth it with a palette knife. Repeat with the rest of the donuts.
3. Next, take your meringue and in a zig zag motion, pipe it down the middle of your donut. Then, using a blow torch, lightly torch the top of your meringue until it’s slightly brown. Repeat with the rest of the donuts.
4. Garnish with your candied lemon peel.
Shop the Equipment


Vanilla Glazed Donuts
TIER 1
Vanilla Glazed Donuts
In Tier 1 we start with a classic glazed donut. I walk you through my (new) favourite donut dough, how to create the iconic donut shape, and how to fry your donuts to perfection. Then we smother them in an insane vanilla glaze for that classic Krispy Kreme finish. The end result is the lightest, fluffiest donuts – it’s a struggle just to eat one!
6-7
DONUTS
Ingredients
Makes 6-7 Donuts
Donut Dough
550g Strong White Bread Flour
125g Whole Milk
7g Instant Dry Yeast
200g Whole Eggs
12g Fine Sea Salt
125g Unsalted Butter, Cold + Small Cubes
75g Caster/Granulated Sugar
20g Powdered Milk (Full Fat)
10g Vanilla Extract
Vanilla Glaze
500g Icing/Powdered Sugar
20g Glucose (or Golden Syrup)
80g Whole Milk
25g Water
15g Double/Heavy Cream
1 Tsp Vanilla Bean Paste or 1 Fresh Vanilla Pods
Zest ¼ Lemon
Pinch of Fine Sea Salt
3 Litres of Vegetable Oil For Frying
Special equipment
Stand mixer
Oil spray (optional)
80mm cookie cutter
30mm cookie cutter
Piping bag
Deep fat fryer (optional but recommended)
Method
Donut Dough
1. Into the bowl of a stand mixer, add the wet ingredients, followed by the dry. Attach the dough hook and mix it on a medium speed for 10 minutes, scraping down the bowl every 3-4 minutes.
2. After 10 minutes, turn the mixer off and let the dough rest for 5 minutes. This will relax the gluten and make the next part of the mixing easier!
3. Turn the mixer back on, and knead for a further 10-12 minutes. The dough should start to come away from the sides of the bowl, but there will still be a little bit stuck to the edges.
4. Remove it from the mixer and lift the dough onto your work surface. Give it a quick knead and shape it into a nice tight ball. The dough should feel smooth and pass the windowpane test when you stretch a small piece of the dough.
5. Lift it into a lightly oiled bowl, then lightly spray the top of the dough with an oil spray and cover the surface directly with cling film. Cover the bowl with a sheet of cling film too and refrigerate the dough overnight (12-18 hours). This will make it much easier to work with.
6. Before you are ready to work with the dough, prep a baking tray by cutting 6-7 squares of parchment paper and lightly oiling them before placing them on the tray. This will make it easier to transfer the donuts to the fryer.
7. The next day remove the chilled dough from the fridge. Very lightly flour your work surface and lift the dough on. Lightly flour the top of the dough and a rolling pin, and roll the dough out, the shape doesn’t matter, but you want it to be around 12-15mm thick (0.5”).
8. Take an 80mm cookie cutter and dip it in a bowl of flour to make sure it doesn’t stick to the dough. Press the cookie cutter into the dough. Then take your 30mm cookie cutter, dip it into the bowl of flour and press this into the centre of your donut to create a hole. Lift your donut onto a sheet of parchment paper, then repeat with the remaining dough.
9. Very lightly oil the top of the donuts with an oil spray, and then cover the entire tray with a sheet of cling film and allow the donuts to rise for 2-3 hours at room temperature. In warmer weather, 2 hours should be fine, but when it is colder it will be closer to 3 hours. The donuts should look puffier and will have increased in volume when they are done.
Vanilla Glaze
1. Into the bowl of a stand mixer, sift in the icing sugar then add the remaining ingredients, starting with 80g of milk.
2. Beat the ingredients together with the paddle attachment. You want the consistency to resemble a runny glue, so add more milk if needed. Once you have the desired consistency, beat for a further 30 seconds on a medium-low speed, ensuring all the ingredients are combined.
3. Pour this into a piping bag, tie the end (so that the glaze doesn’t dry out) and set this to one side while you fry the donuts.
Frying
1. When the donuts are close to being proofed, add the oil to your deep fat fryer (or a large pan) and heat it to 170C/340F. A deep-fat fryer is ideal here as it is able to regulate the temperature at a much more consistent level vs frying in a pan.
2. When the donuts are ready, drop 1 at a time into the oil, and slowly peel off the sheet of parchment paper.
3. Fry for 90 seconds, flip, fry for 60 seconds, flip, fry for 15 seconds, flip, fry for 15 seconds.
4. Remove your donut and place it on a wire rack, allowing any excess oil to drip off. After a minute, coat the donut in your vanilla glaze. Repeat with the remaining donuts.
5. Best served the same day (I can’t not eat mine immediately!)
Shop the Equipment